

一、
JPA,全称Java Persistence API,用于对象持久化的API,定义一套接口,来规范众多的ORM框架,所以它是在ORM框架之上的应用。
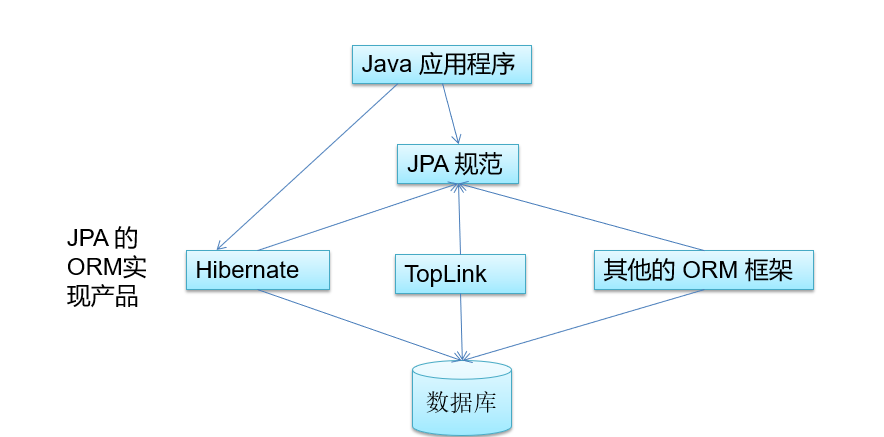
下面主要讲JPA在Hibernate基础上的应用。
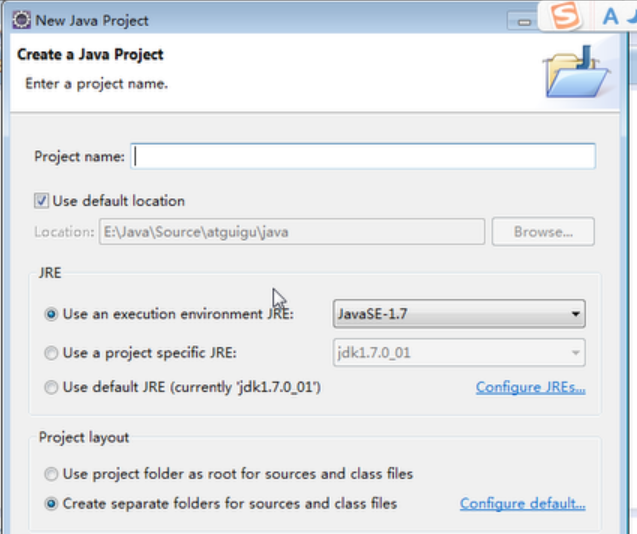
在Eclipse中创建一个纯净的JPA项目流程:

添加Hibernate包,Jpa包,Mysql驱动包。
在该项目中添加下面的三个模块,即完成了项目的基本构成。
1,配置 persistence.xml, 在这个文件中配置持久化单元需要指定跟哪个数据库进行交互;
需要指定 JPA 使用哪个持久化的框架以及配置该框架的基本属性
2,创建实体类, 使用注解的方式来描述实体类跟数据库表之间的映射关系.启动时以更新的方式生产表结构。
3,通过 EntityManagerFactory (对应 Hibernate 中的 SessionFactory),创建 EntityManager (对应 Hibernate 中的Session);
进而通过使用EntityManager 完成数据增加、删除、修改和查询操作,还可以通过EntityManager,获取Query或NativeQuery,通过Query或NativeQuery进行JPQL操作。
举例程序使用JPA操作
public static void main(String[] args) {
//1. 创建 EntitymanagerFactory
String persistenceUnitName = "jpa-1";
Map<String, Object> properites = new HashMap<String, Object>();
properites.put("hibernate.show_sql", true);
EntityManagerFactory entityManagerFactory =
//Persistence.createEntityManagerFactory(persistenceUnitName);
Persistence.createEntityManagerFactory(persistenceUnitName, properites);
//2. 创建 EntityManager. 类似于 Hibernate 的 SessionFactory
EntityManager entityManager = entityManagerFactory.createEntityManager();
//3. 开启事务
EntityTransaction transaction = entityManager.getTransaction();
transaction.begin();
//4. 进行持久化操作
Customer customer = new Customer();
customer.setAge(12);
customer.setEmail("tom@atguigu.com");
customer.setLastName("Tom");
customer.setBirth(new Date());
customer.setCreatedTime(new Date());
entityManager.persist(customer);
//5. 提交事务
transaction.commit();
//6. 关闭 EntityManager
entityManager.close();
//7. 关闭 EntityManagerFactory
entityManagerFactory.close();
}
二、
Spring整合JPA
Spring整合jpa,主要是通过Spring的IOC管理jpa的EntityManagerFactory,通过Spring的AOP让jpa用上spring的声明式事务,即用上spring的两大特性IOC和AOP。
下面演示创建用上Spring的JPA项目
1)创建一个普通的java project
2)依次添加 Spring包,Mysql驱动包,C3p0的包,Hibernate包,Jpa包
3)配置spring的配置文件
<!-- 1. 配置数据源 -->
<context:property-placeholder location="classpath:db.properties"/>
<bean id="dataSource"
class="com.mchange.v2.c3p0.ComboPooledDataSource">
<property name="user" value="${jdbc.user}"></property>
<property name="password" value="${jdbc.password}"></property>
<property name="driverClass" value="${jdbc.driverClass}"></property>
<property name="jdbcUrl" value="${jdbc.jdbcUrl}"></property>
<!-- 配置其他属性 -->
</bean>
<!--以下是JPA的配置-->
<!-- 2. 配置 JPA 的 EntityManagerFactory -->
<bean id="entityManagerFactory"
class="org.springframework.orm.jpa.LocalContainerEntityManagerFactoryBean">
<property name="dataSource" ref="dataSource"></property>
<property name="jpaVendorAdapter">
<bean class="org.springframework.orm.jpa.vendor.HibernateJpaVendorAdapter"></bean>
</property>
<!-- 配置实体类所在的包。将实体类和数据库中的表关联起来,启动时以更新的方式生成表结构 -->
<property name="packagesToScan" value="com.zxp.springdata"></property>
<property name="jpaProperties">
<props>
<!-- 生成的数据表的列的映射策略 -->
<prop key="hibernate.ejb.naming_strategy">org.hibernate.cfg.ImprovedNamingStrategy</prop>
<!-- hibernate 基本属性 -->
<prop key="hibernate.dialect">org.hibernate.dialect.MySQL5InnoDBDialect</prop>
<prop key="hibernate.show_sql">true</prop>
<prop key="hibernate.format_sql">true</prop>
<!--启动时以更新的方式生成表结构-->
<prop key="hibernate.hbm2ddl.auto">update</prop>
</props>
</property>
</bean>
<!-- 3. 配置事务管理器 -->
<bean id="transactionManager"
class="org.springframework.orm.jpa.JpaTransactionManager">
<property name="entityManagerFactory" ref="entityManagerFactory"></property>
</bean>
<!-- 4. 配置支持注解的事务 -->
<tx:annotation-driven transaction-manager="transactionManager"/>
到此,spring和jpa已经整合到一块了。其实以上的这些整合步骤,和下面的springdata搭建配置差不多。
Spring中获取entityManager的方法
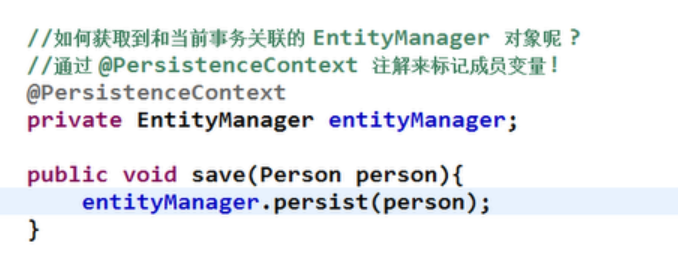
用上springd的声明式事务

三、
SpringData
下面演示创建用上SpringData JPA项目
1)创建一个普通的java project
2)依次添加 Spring包,Mysql驱动包,C3p0的包,Hibernate包,Jpa包,SpringData包
3)配置spring的配置文件
<!-- 1. 配置数据源 -->
<context:property-placeholder location="classpath:db.properties"/>
<bean id="dataSource"
class="com.mchange.v2.c3p0.ComboPooledDataSource">
<property name="user" value="${jdbc.user}"></property>
<property name="password" value="${jdbc.password}"></property>
<property name="driverClass" value="${jdbc.driverClass}"></property>
<property name="jdbcUrl" value="${jdbc.jdbcUrl}"></property>
<!-- 配置其他属性 -->
</bean>
<!--以下是JPA的配置-->
<!-- 2. 配置 JPA 的 EntityManagerFactory -->
<bean id="entityManagerFactory"
class="org.springframework.orm.jpa.LocalContainerEntityManagerFactoryBean">
<property name="dataSource" ref="dataSource"></property>
<property name="jpaVendorAdapter">
<bean class="org.springframework.orm.jpa.vendor.HibernateJpaVendorAdapter"></bean>
</property>
<!-- 配置实体类所在的包。将实体类和数据库中的表关联起来,启动时以更新的方式生成表结构 -->
<property name="packagesToScan" value="com.zxp.springdata"></property>
<property name="jpaProperties">
<props>
<!-- 生成的数据表的列的映射策略 -->
<prop key="hibernate.ejb.naming_strategy">org.hibernate.cfg.ImprovedNamingStrategy</prop>
<!-- hibernate 基本属性 -->
<prop key="hibernate.dialect">org.hibernate.dialect.MySQL5InnoDBDialect</prop>
<prop key="hibernate.show_sql">true</prop>
<prop key="hibernate.format_sql">true</prop>
<!--启动时以更新的方式生成表结构-->
<prop key="hibernate.hbm2ddl.auto">update</prop>
</props>
</property>
</bean>
<!-- 3. 配置事务管理器 -->
<bean id="transactionManager"
class="org.springframework.orm.jpa.JpaTransactionManager">
<property name="entityManagerFactory" ref="entityManagerFactory"></property>
</bean>
<!-- 4. 配置支持注解的事务 -->
<tx:annotation-driven transaction-manager="transactionManager"/>
<!--以下是SpringData的配置-->
<!-- 5. 配置 SpringData -->
<!-- 加入 jpa 的命名空间 -->
<!-- base-package: 扫描 Repository Bean 所在的 package,将Repository加入IOC容器 -->
<jpa:repositories base-package="com.atguigu.springdata" entity-manager-factory-ref="entityManagerFactory"></jpa:repositories>
SpringData的主要特点是:
用户定义自己持久层的接口,该接口必须继承Repository及子接口。
在定义持久层接口中,定义调用方法如下:
1. 可以根据规范的关键字定义方法,如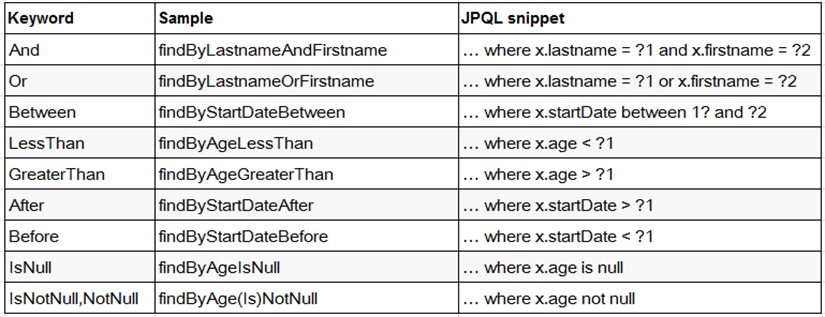
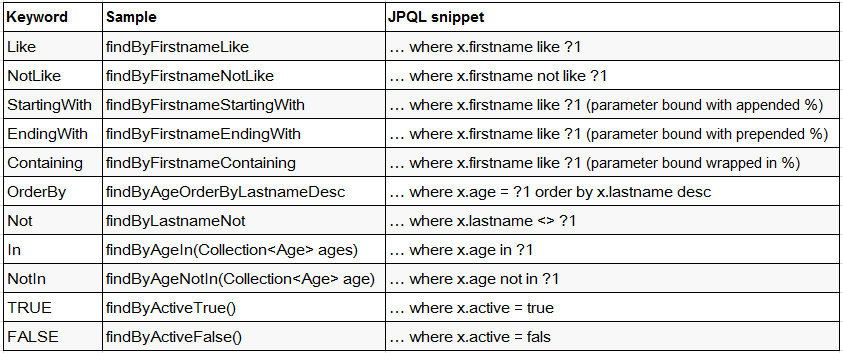
Person getByLastName(String lastName);
2. 可以使用@Query注解执行JPQL语句
@Query("select p from Person p where p.lastName like %:name%")
List<Person> selectPersons(@Param("name") String name);
3. 还可以使用自定义的SQL语句
@Query(value="SELECT p.id,p.email,p.last_name ,d.address from spring_person p JOIN address d on p.id=d.person_id",nativeQuery=true)
List<PersonWeb> SelectPersonsByNativeQuery();
四、
SpringMVC、Spring、SpringData、JPA整合,即SSSP
所用到的jar包 Spring包,Mysql驱动包,C3p0的包,Hibernate包,Jpa包,SpringData包,SpringMvc包。
这个整合,就是创建一个Dynamic Web Project项目,加入上面三的Jar包,再加入Springmvc的包,然后在Spring配置文件中配置上面三的配置,在springmvc的配置配置扫描Controller的包,视图解析器等即完成了。本质就是SpringMVC整合SpingData。
其实SpringMVC整合SpingData,SpringMVC整合Hibernate,SpringMVC整合MyBatis都是一样的配置方式,一个套路。
扩展
spring整合Hibernate:
主要是通过Spring的IOC管理Hibernate的SessionFactory,通过Spring的AOP让Hibernate用上spring的声明式事务,即用上spring的两大特性IOC和AOP。
<?xml version="1.0" encoding="UTF-8"?>
<beans xmlns="http://www.springframework.org/schema/beans"
xmlns:xsi="http://www.w3.org/2001/XMLSchema-instance"
xmlns:context="http://www.springframework.org/schema/context"
xmlns:tx="http://www.springframework.org/schema/tx"
xmlns:aop="http://www.springframework.org/schema/aop"
xsi:schemaLocation="http://www.springframework.org/schema/aop http://www.springframework.org/schema/aop/spring-aop-4.0.xsd
http://www.springframework.org/schema/beans http://www.springframework.org/schema/beans/spring-beans.xsd
http://www.springframework.org/schema/tx http://www.springframework.org/schema/tx/spring-tx-4.0.xsd
http://www.springframework.org/schema/context http://www.springframework.org/schema/context/spring-context-4.0.xsd">
<!-- 配置自动扫描的包 -->
<context:component-scan base-package="com.zxp.test.hibernate"></context:component-scan>
<!-- 配置数据源 -->
<!-- 导入资源文件 -->
<context:property-placeholder location="classpath:db.properties"/>
<bean id="dataSource" class="com.mchange.v2.c3p0.ComboPooledDataSource">
<property name="user" value="${jdbc.user}"></property>
<property name="password" value="${jdbc.password}"></property>
<property name="driverClass" value="${jdbc.driverClass}"></property>
<property name="jdbcUrl" value="${jdbc.jdbcUrl}"></property>
<property name="initialPoolSize" value="${jdbc.initPoolSize}"></property>
<property name="maxPoolSize" value="${jdbc.maxPoolSize}"></property>
</bean>
<!-- 配置 Hibernate 的 SessionFactory 实例: 通过 Spring 提供的 LocalSessionFactoryBean 进行配置 -->
<bean id="sessionFactory" class="org.springframework.orm.hibernate4.LocalSessionFactoryBean">
<!-- 配置数据源属性 -->
<property name="dataSource" ref="dataSource"></property>
<!-- 配置 hibernate 配置文件的位置及名称 -->
<!--
<property name="configLocation" value="classpath:hibernate.cfg.xml"></property>
-->
<!-- 使用 hibernateProperties 属相来配置 Hibernate 原生的属性 -->
<property name="hibernateProperties">
<props>
<prop key="hibernate.dialect">org.hibernate.dialect.MySQL5InnoDBDialect</prop>
<prop key="hibernate.show_sql">true</prop>
<prop key="hibernate.format_sql">true</prop>
<prop key="hibernate.hbm2ddl.auto">update</prop>
</props>
</property>
<!-- 配置 hibernate 映射文件的位置及名称, 可以使用通配符 -->
<property name="mappingLocations"
value="classpath:com/zxp/test/hibernate/entities/*.hbm.xml"></property>
</bean>
<!-- 配置 Spring 的声明式事务 -->
<!-- 1. 配置事务管理器 -->
<bean id="transactionManager" class="org.springframework.orm.hibernate4.HibernateTransactionManager">
<property name="sessionFactory" ref="sessionFactory"></property>
</bean>
<!-- 2. 配置事务属性, 需要事务管理器 -->
<tx:advice id="txAdvice" transaction-manager="transactionManager">
<tx:attributes>
<tx:method name="get*" read-only="true"/>
<tx:method name="purchase" propagation="REQUIRES_NEW"/>
<tx:method name="*"/>
</tx:attributes>
</tx:advice>
<!-- 3. 配置事务切点, 并把切点和事务属性关联起来 -->
<aop:config>
<aop:pointcut expression="execution(* com.zxp.test.hibernate.service.*.*(..))"
id="txPointcut"/>
<aop:advisor advice-ref="txAdvice" pointcut-ref="txPointcut"/>
</aop:config>
</beans>
后台使用sessionFactory获取Session
@Autowired
private SessionFactory sessionFactory;
//获取和当前线程绑定的 Session.
private Session getSession(){
return sessionFactory.getCurrentSession();
}
@Override
public int findBookPriceByIsbn(String isbn) {
String hql = "SELECT b.price FROM Book b WHERE b.isbn = ?";
Query query = getSession().createQuery(hql).setString(0, isbn);
return (Integer)query.uniqueResult();
}
==================================================================================================================
spring整合MyBatis
<!-- Spring的配置文件,这里主要配置和业务逻辑有关的 -->
<!--=================== 数据源,事务控制,xxx ================-->
<context:property-placeholder location="classpath:dbconfig.properties" />
<bean id="pooledDataSource" class="com.mchange.v2.c3p0.ComboPooledDataSource">
<property name="jdbcUrl" value="${jdbc.jdbcUrl}"></property>
<property name="driverClass" value="${jdbc.driverClass}"></property>
<property name="user" value="${jdbc.user}"></property>
<property name="password" value="${jdbc.password}"></property>
</bean>
<!--================== 配置和MyBatis的整合=============== -->
<!-- 配置 mybatis的 SessionFactory 实例 -->
<bean id="sqlSessionFactory" class="org.mybatis.spring.SqlSessionFactoryBean">
<!-- 指定mybatis全局配置文件的位置 -->
<property name="configLocation" value="classpath:mybatis-config.xml"></property>
<property name="dataSource" ref="pooledDataSource"></property>
<!-- 指定mybatis,mapper文件的位置 -->
<property name="mapperLocations" value="classpath:mapper/*.xml"></property>
</bean>
<!-- 配置扫描器,将mybatis接口的实现加入到ioc容器中 -->
<bean class="org.mybatis.spring.mapper.MapperScannerConfigurer">
<property name="sqlSessionFactoryBeanName" value="sqlSessionFactory" />
<!--扫描所有dao接口的实现,加入到ioc容器中 -->
<property name="basePackage" value="com.zxp.test.dao"></property>
</bean>
<!-- ===============事务控制的配置 ================-->
<bean id="transactionManager" class="org.springframework.jdbc.datasource.DataSourceTransactionManager">
<!--控制住数据源 -->
<property name="dataSource" ref="pooledDataSource"></property>
</bean>
<!--配置事务增强,事务如何切入 -->
<tx:advice id="txAdvice" transaction-manager="transactionManager">
<tx:attributes>
<!-- 所有方法都是事务方法 -->
<tx:method name="*"/>
<!--以get开始的所有方法 -->
<tx:method name="get*" read-only="true"/>
</tx:attributes>
</tx:advice>
<!--开启基于注解的事务,使用xml配置形式的事务(必要主要的都是使用配置式) -->
<aop:config>
<!-- 切入点表达式 -->
<aop:pointcut expression="execution(* com.zxp.test.service..*(..))" id="txPoint"/>
<!-- 配置事务增强 -->
<aop:advisor advice-ref="txAdvice" pointcut-ref="txPoint"/>
</aop:config>
==================================================================================================================
spring 用jdbcTemplate 访问数据库
<!-- 配置 C3P0 数据源 -->
<bean id="dataSource"
class="com.mchange.v2.c3p0.ComboPooledDataSource">
<property name="user" value="${jdbc.user}"></property>
<property name="password" value="${jdbc.password}"></property>
<property name="jdbcUrl" value="${jdbc.jdbcUrl}"></property>
<property name="driverClass" value="${jdbc.driverClass}"></property>
<property name="initialPoolSize" value="${jdbc.initPoolSize}"></property>
<property name="maxPoolSize" value="${jdbc.maxPoolSize}"></property>
</bean>
<!-- 配置 Spirng 的 JdbcTemplate -->
<bean id="jdbcTemplate" class="org.springframework.jdbc.core.JdbcTemplate">
<property name="dataSource" ref="dataSource"></property>
</bean>
<!-- 配置事务 -->
<!-- 1. 配置事务管理器 -->
<bean id="transactionManager" class="org.springframework.jdbc.datasource.DataSourceTransactionManager">
<property name="dataSource" ref="dataSource"></property>
</bean>
<!-- 2. 配置事务属性 -->
<tx:advice id="txAdvice" transaction-manager="transactionManager">
<tx:attributes>
<!-- 根据方法名指定事务的属性 -->
<tx:method name="purchase" propagation="REQUIRES_NEW"/>
<tx:method name="get*" read-only="true"/>
<tx:method name="find*" read-only="true"/>
<tx:method name="*"/>
</tx:attributes>
</tx:advice>
<!-- 3. 配置事务切入点, 以及把事务切入点和事务属性关联起来 -->
<aop:config>
<aop:pointcut expression="execution(* com.atguigu.spring.tx.xml.service.*.*(..))" id="txPointCut"/>
<aop:advisor advice-ref="txAdvice" pointcut-ref="txPointCut"/>
</aop:config>
或者把2,3步骤去掉,改为下面的<!-- 启用事务注解 -->
<tx:annotation-driven transaction-manager="transactionManager"/>
注解方式事务后台代码举例
@Service("bookShopService")
public class BookShopServiceImpl implements BookShopService {
@Autowired
private BookShopDao bookShopDao;
//添加事务注解
//1.使用 propagation 指定事务的传播行为, 即当前的事务方法被另外一个事务方法调用时
//如何使用事务, 默认取值为 REQUIRED, 即使用调用方法的事务
//REQUIRES_NEW: 事务自己的事务, 调用的事务方法的事务被挂起.
//2.使用 isolation 指定事务的隔离级别, 最常用的取值为 READ_COMMITTED
//3.默认情况下 Spring 的声明式事务对所有的运行时异常进行回滚. 也可以通过对应的
//属性进行设置. 通常情况下去默认值即可.
//4.使用 readOnly 指定事务是否为只读. 表示这个事务只读取数据但不更新数据,
//这样可以帮助数据库引擎优化事务. 若真的事一个只读取数据库值的方法, 应设置 readOnly=true
//5.使用 timeout 指定强制回滚之前事务可以占用的时间.
@Transactional(propagation=Propagation.REQUIRES_NEW,
isolation=Isolation.READ_COMMITTED,
readOnly=false,
noRollbackFor={UserAccountException.class},
timeout=3)
@Override
public void purchase(String username, String isbn) {
try {
Thread.sleep(5000);
} catch (InterruptedException e) {}
//1. 获取书的单价
int price = bookShopDao.findBookPriceByIsbn(isbn);
//2. 更新数的库存
bookShopDao.updateBookStock(isbn);
//3. 更新用户余额
bookShopDao.updateUserAccount(username, price);
}
}
-----------------------------------------------------
@Repository("bookShopDao")
public class BookShopDaoImpl implements BookShopDao {
@Autowired
private JdbcTemplate jdbcTemplate;
@Override
public int findBookPriceByIsbn(String isbn) {
String sql = "SELECT price FROM book WHERE isbn = ?";
return jdbcTemplate.queryForObject(sql, Integer.class, isbn);
}
@Override
public void updateBookStock(String isbn) {
//检查书的库存是否足够, 若不够, 则抛出异常
String sql2 = "SELECT stock FROM book_stock WHERE isbn = ?";
int stock = jdbcTemplate.queryForObject(sql2, Integer.class, isbn);
if(stock == 0){
throw new BookStockException("库存不足!");
}
String sql = "UPDATE book_stock SET stock = stock -1 WHERE isbn = ?";
jdbcTemplate.update(sql, isbn);
}
@Override
public void updateUserAccount(String username, int price) {
//验证余额是否足够, 若不足, 则抛出异常
String sql2 = "SELECT balance FROM account WHERE username = ?";
int balance = jdbcTemplate.queryForObject(sql2, Integer.class, username);
if(balance < price){
throw new UserAccountException("余额不足!");
}
String sql = "UPDATE account SET balance = balance - ? WHERE username = ?";
jdbcTemplate.update(sql, price, username);
}
}
==================================================================================================================
spring配置AOP的两种方式
基于配置文件的方式
<?xml version="1.0" encoding="UTF-8"?>
<beans xmlns="http://www.springframework.org/schema/beans"
xmlns:xsi="http://www.w3.org/2001/XMLSchema-instance"
xmlns:aop="http://www.springframework.org/schema/aop"
xsi:schemaLocation="http://www.springframework.org/schema/beans http://www.springframework.org/schema/beans/spring-beans.xsd
http://www.springframework.org/schema/aop http://www.springframework.org/schema/aop/spring-aop-4.0.xsd">
<!-- 配置 bean -->
<bean id="arithmeticCalculator"
class="com.zxp.test.aop.xml.ArithmeticCalculatorImpl"></bean>
<!-- 配置切面的 bean. -->
<bean id="loggingAspect"
class="com.zxp.test.aop.xml.LoggingAspect"></bean>
<!-- 配置切面的 bean. -->
<bean id="vlidationAspect"
class="com.zxp.test.aop.xml.VlidationAspect"></bean>
<!-- 配置 AOP -->
<aop:config>
<!-- 配置切点表达式 -->
<aop:pointcut expression="execution(* com.zxp.test.aop.xml.ArithmeticCalculator.*(int, int))"
id="pointcut"/>
<!-- 配置切面及通知 -->
<aop:aspect ref="loggingAspect" order="2">
<aop:before method="beforeMethod" pointcut-ref="pointcut"/>
<aop:after method="afterMethod" pointcut-ref="pointcut"/>
<aop:after-throwing method="afterThrowing" pointcut-ref="pointcut" throwing="e"/>
<aop:after-returning method="afterReturning" pointcut-ref="pointcut" returning="result"/>
<!--
<aop:around method="aroundMethod" pointcut-ref="pointcut"/>
-->
</aop:aspect>
<aop:aspect ref="vlidationAspect" order="1">
<aop:before method="validateArgs" pointcut-ref="pointcut"/>
</aop:aspect>
</aop:config>
</beans>
基于注解的方式
<?xml version="1.0" encoding="UTF-8"?>
<beans xmlns="http://www.springframework.org/schema/beans"
xmlns:xsi="http://www.w3.org/2001/XMLSchema-instance"
xmlns:context="http://www.springframework.org/schema/context"
xmlns:aop="http://www.springframework.org/schema/aop"
xsi:schemaLocation="http://www.springframework.org/schema/aop http://www.springframework.org/schema/aop/spring-aop-4.0.xsd
http://www.springframework.org/schema/beans http://www.springframework.org/schema/beans/spring-beans.xsd
http://www.springframework.org/schema/context http://www.springframework.org/schema/context/spring-context-4.0.xsd">
<!-- 配置自动扫描的包 -->
<context:component-scan base-package="com.zxp.test.aop"></context:component-scan>
<!-- 配置自动为匹配 aspectJ 注解的 Java 类生成代理对象 -->
<aop:aspectj-autoproxy></aop:aspectj-autoproxy>
</beans>
后台切面及切点,每个方法为通知,ArithmeticCalculator为目标对象
@Aspect //声明该类为切面
@Order(2) //可以使用 @Order 注解指定切面的优先级, 值越小优先级越高
@Component
public class LoggingAspect {
@Before("execution(public int com.zxp.test.aop.ArithmeticCalculator.*(..))") //切点表达式
public void beforeMethod(JoinPoint joinPoint){ //通知
String methodName = joinPoint.getSignature().getName();
Object [] args = joinPoint.getArgs();
System.out.println("The method " + methodName + " begins with " + Arrays.asList(args));
}
/**
* 在方法执行之后执行的代码. 无论该方法是否出现异常
*/
@After("execution(public int com.zxp.test.aop.ArithmeticCalculator.*(..))") //切点表达式
public void afterMethod(JoinPoint joinPoint){ //通知
String methodName = joinPoint.getSignature().getName();
System.out.println("The method " + methodName + " ends");
}
}
