

Flutter环境配置(window10环境)最完善版本
> 搞搞flutter,首先是环境配置,此前提是已经安装Android studio和对应的Android SDK。废话不多说,看具体步骤:
# 配置依赖环境
1. `java`环境配置自行百度,
2. `Python`环境配置自行百度
3. `node`环境自行百度
[外链图片转存失败,源站可能有防盗链机制,建议将图片保存下来直接上传(img-kBo3AuV5-1604457219364)(https://oss.wangmiaozero.cn//images/media/flutter3.png)]
# SDK下载
`https://flutter.dev/docs/get-started/install/windows`
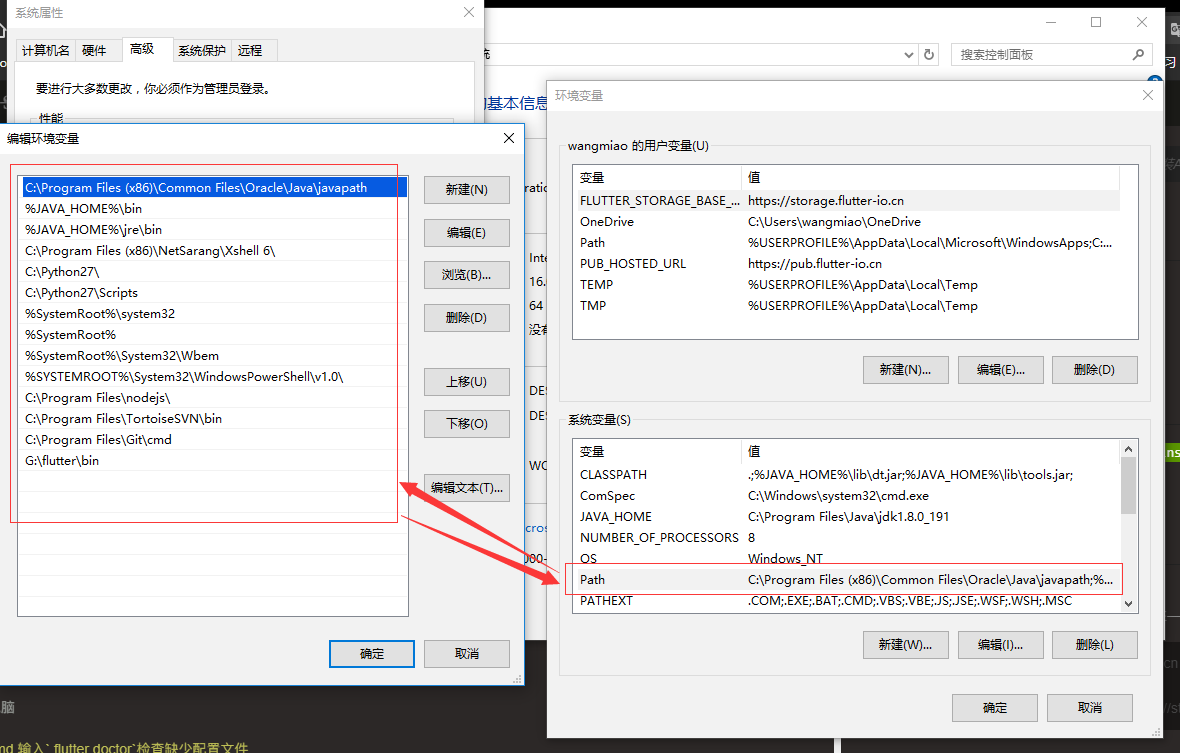
1. 解压文件 复制`C:\flutter\bin`
2. 去系统环境变量path中配置
3. 我是放到了`G:\flutter\bin`
---
`必须配置以下`
配置国内镜像。桌面找到 此电脑-->右击选择属性-->高级系统设置-->环境变量-->找到用户变量-->点击新建
```
PUB_HOSTED_URL=https://pub.flutter-io.cn
FLUTTER_STORAGE_BASE_URL=https://storage.flutter-io.cn
```
# 重启电脑
1. 打开cmd 输入` flutter doctor`检查缺少配置文件
2. 继续配置SDK
配置到用户环境变量中`(这个可以不配置)`
```
ANDROID_HOME=D:\AndroidSDK //该sdk地址是你安装Android studio的时候配置的sdk的地址
```
`必须配置以下`
> 出现感叹号! Some Android licenses not accepted. To resolve this, run: flutter doctor --android-licenses按照他说的 输入 `flutter doctor --android-licenses`,一路y下去即可。
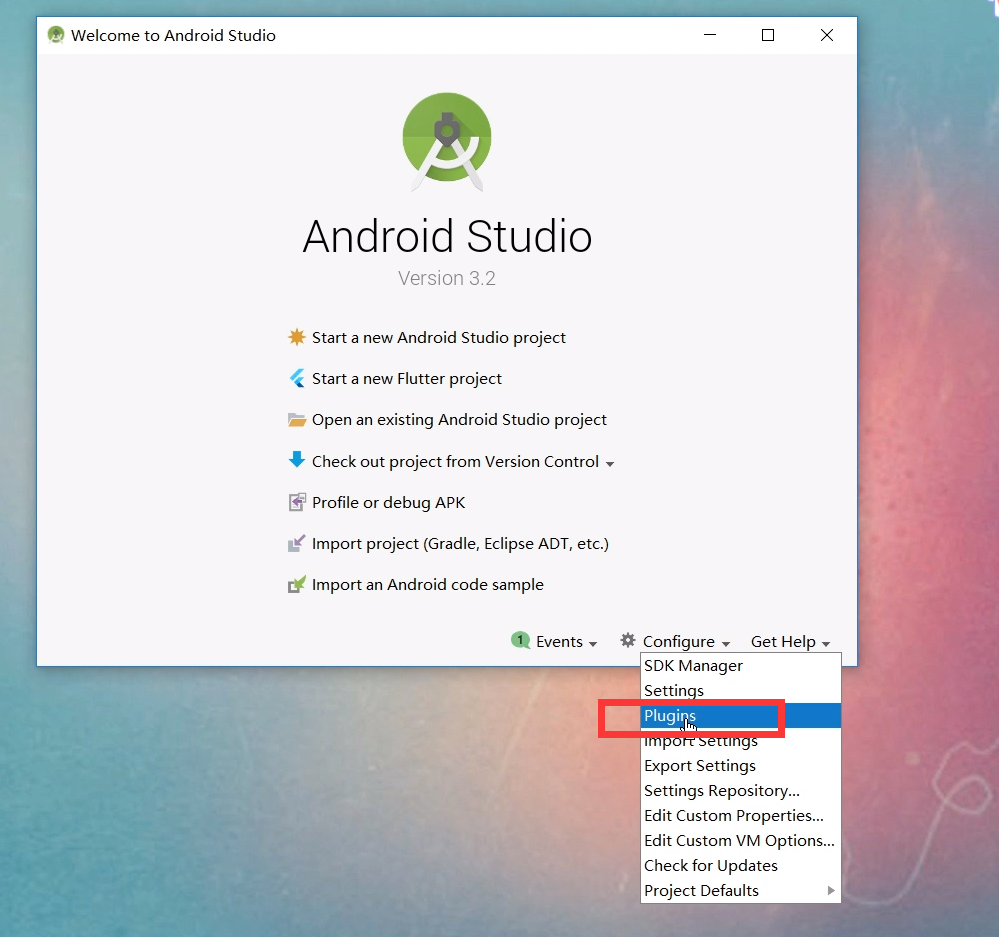
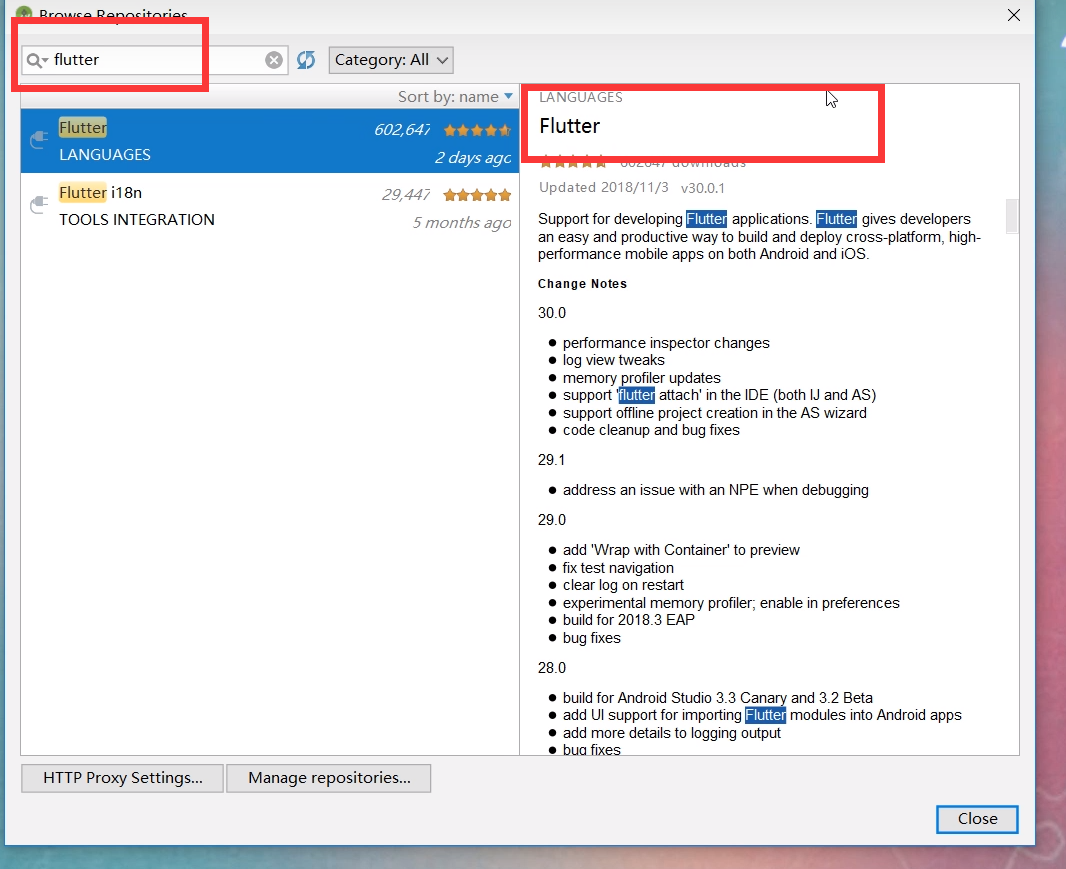
3. `Android studio`里面要安装`flutter`插件
4. 安装完,重启电脑即可
> 错误信息:Flutter extension not installed; install from
> 去vscode把flutter插件安装了,就好了
> 警告信息:Connected device
5. 没有安装虚拟机
# 坑一
+ 当你输入`flutter doctor`检查环境全部绿了,打上勾了,除了虚拟机哪个警告问题时
+ 然后你这个地方卡住一天,两天.或者一个星期.甚至想放弃不想学习了.抱怨当初就应该学习react-native
+ 其实问题也很简单,你点击右边的`install`下载`SDK`时他走的国外地址,你只能慢慢等待.可能会失败一个星期左右.请慢慢等待,不要放弃
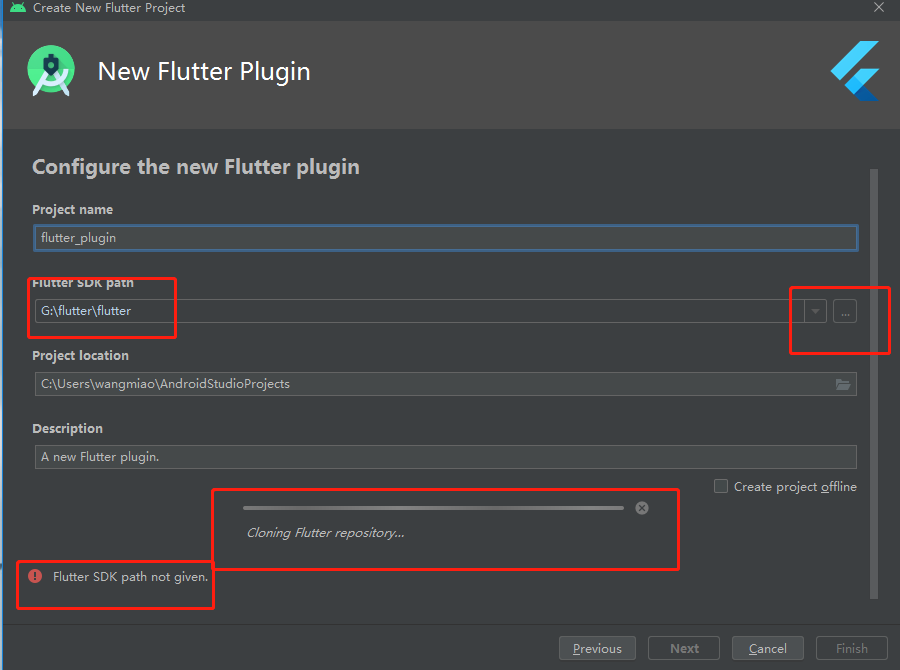
+ 上面安装到了`G:\flutter\bin`那么你的`SDK`就放到`G:\flutter\flutter`
+ 建议你下载到`G:\flutter\flutter`目录中
# 坑二
+ 依然卡住,可能是你的`SDK`没有下载好,或者你网速不行.一般这个地方几秒就好了
# Android studio新建Flutter项目
1. 打开Andorid Studio ,会出现下面的界面,我们选择第二项,新建Flutter项目。
(如果你第一次新建项目,可能会有些慢,这个可能跟技术胖700元的电脑有关,土豪请无视这句话。)
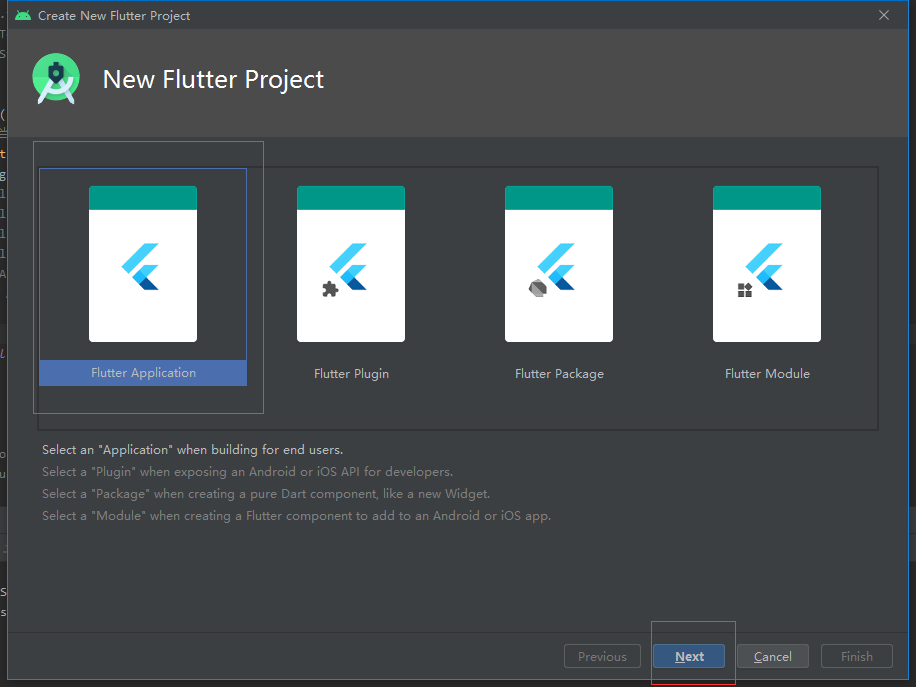
打开第二个窗口后,选择第一个选项Flutter Application(flutter应用)。
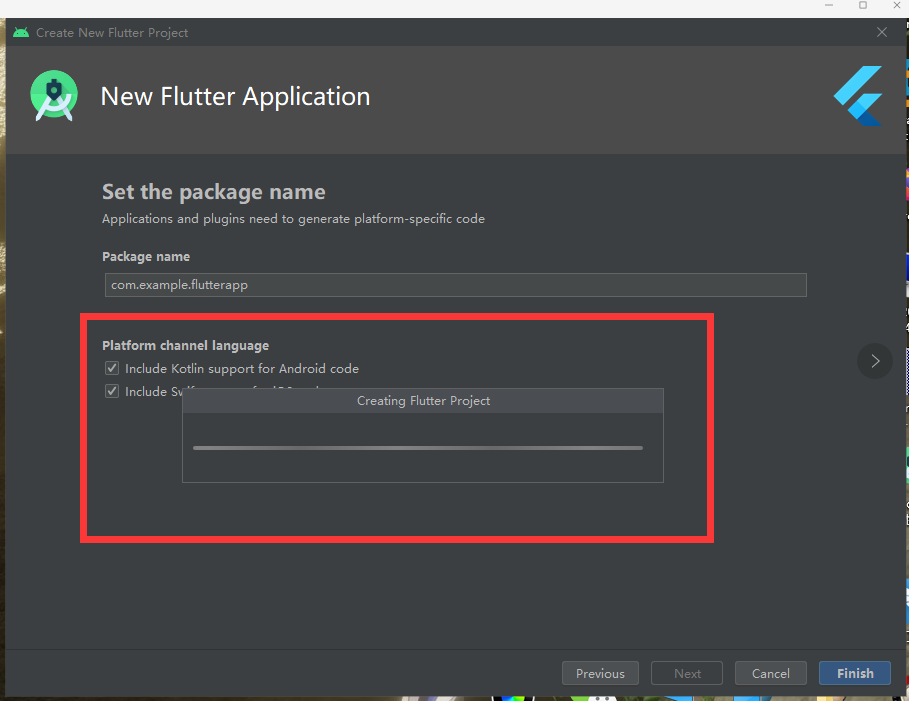
这步完成后,系统就会自动为我们创建一个Flutter项目(新建项目的过程也是很慢的,它要去谷歌下载gradle,这个东西很容下载失败,如果失败,可以多反复试几次)。
# 安装AVD虚拟机
1. 现在需要一个虚拟机来运行我们的程序,可以点击`Android Studio`中的上方菜单`tool -AVD Manager`选项。
2. 出现新建菜单,选择`Create Virtual Device.....`如果你一个虚拟机也没建过,这个选项在对话框的中间
3. 选择虚拟机类型,这个你随意选就好,我选择的是`Nexus 5x`。(如果你屏幕小,就选择一个小屏幕的虚拟机)
4. 选择系统,这里尽量选择最新的,我选择了`Android 9.0`系统,选择好后,又是一个漫长的等待过程。
5. 安装好后,点击开始按钮,运行虚拟机了(第一次运行,需要安装系统,会慢一些),运行起来后
# Flutter项目启动
> 虚拟机运行以后,可以点击`debug`按钮,让Flutter程序跑起来。如果你幸运的话,你的Flutter程序经过编译后,就会跑起来了。(这种幸运的机会很小,总会碰到一些小错误,我在这里介绍两个常见的错误)。
# 坑三
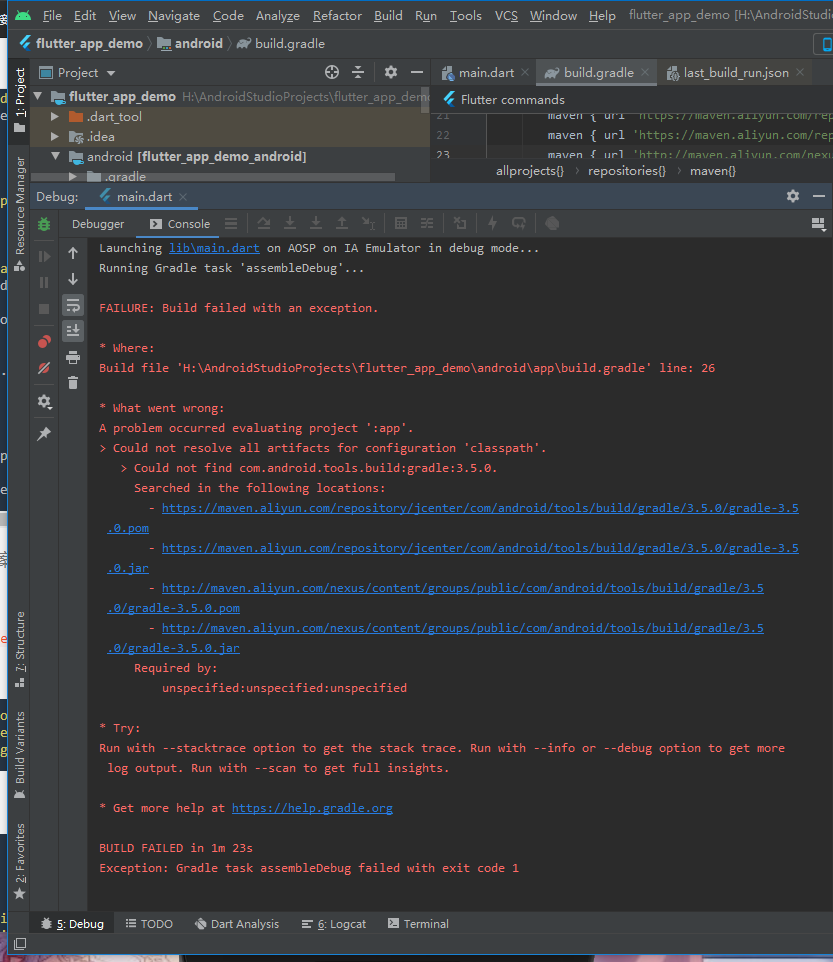
在Debug项目的时候,应该最常见的错误就是类似下面这样的错误了。
```
Launching lib/main.dart on Android SDK built for x86 in debug mode...
Initializing gradle...
Resolving dependencies...
* Error running Gradle:
ProcessException: Process "/Users/rabbit/develop/android/flutter_app/android/gradlew" exited abnormally:
Project evaluation failed including an error in afterEvaluate {}. Run with --stacktrace for details of the afterEvaluate {} error.
FAILURE: Build failed with an exception.
* Where:
Build file '/Users/rabbit/develop/android/flutter_app/android/app/build.gradle' line: 25
* What went wrong:
A problem occurred evaluating project ':app'.
> Could not resolve all files for configuration 'classpath'.
> Could not find lint-gradle-api.jar (com.android.tools.lint:lint-gradle-api:26.1.2).
Searched in the following locations:
https://jcenter.bintray.com/com/android/tools/lint/lint-gradle-api/26.1.2/lint-gradle-api-26.1.2.jar
* Try:
Run with --stacktrace option to get the stack trace. Run with --info or --debug option to get more log output. Run with --scan to get full insights.
* Get more help at https://help.gradle.org
BUILD FAILED in 0s
Command: /Users/rabbit/develop/android/flutter_app/android/gradlew app:properties
Finished with error: Please review your Gradle project setup in the android/ folder.
```
这个问题的产生的原因,还是中国特有的问题,解决方案是改位阿里的链接(1.0已经修复了这个问题,不用再重新设置了)。
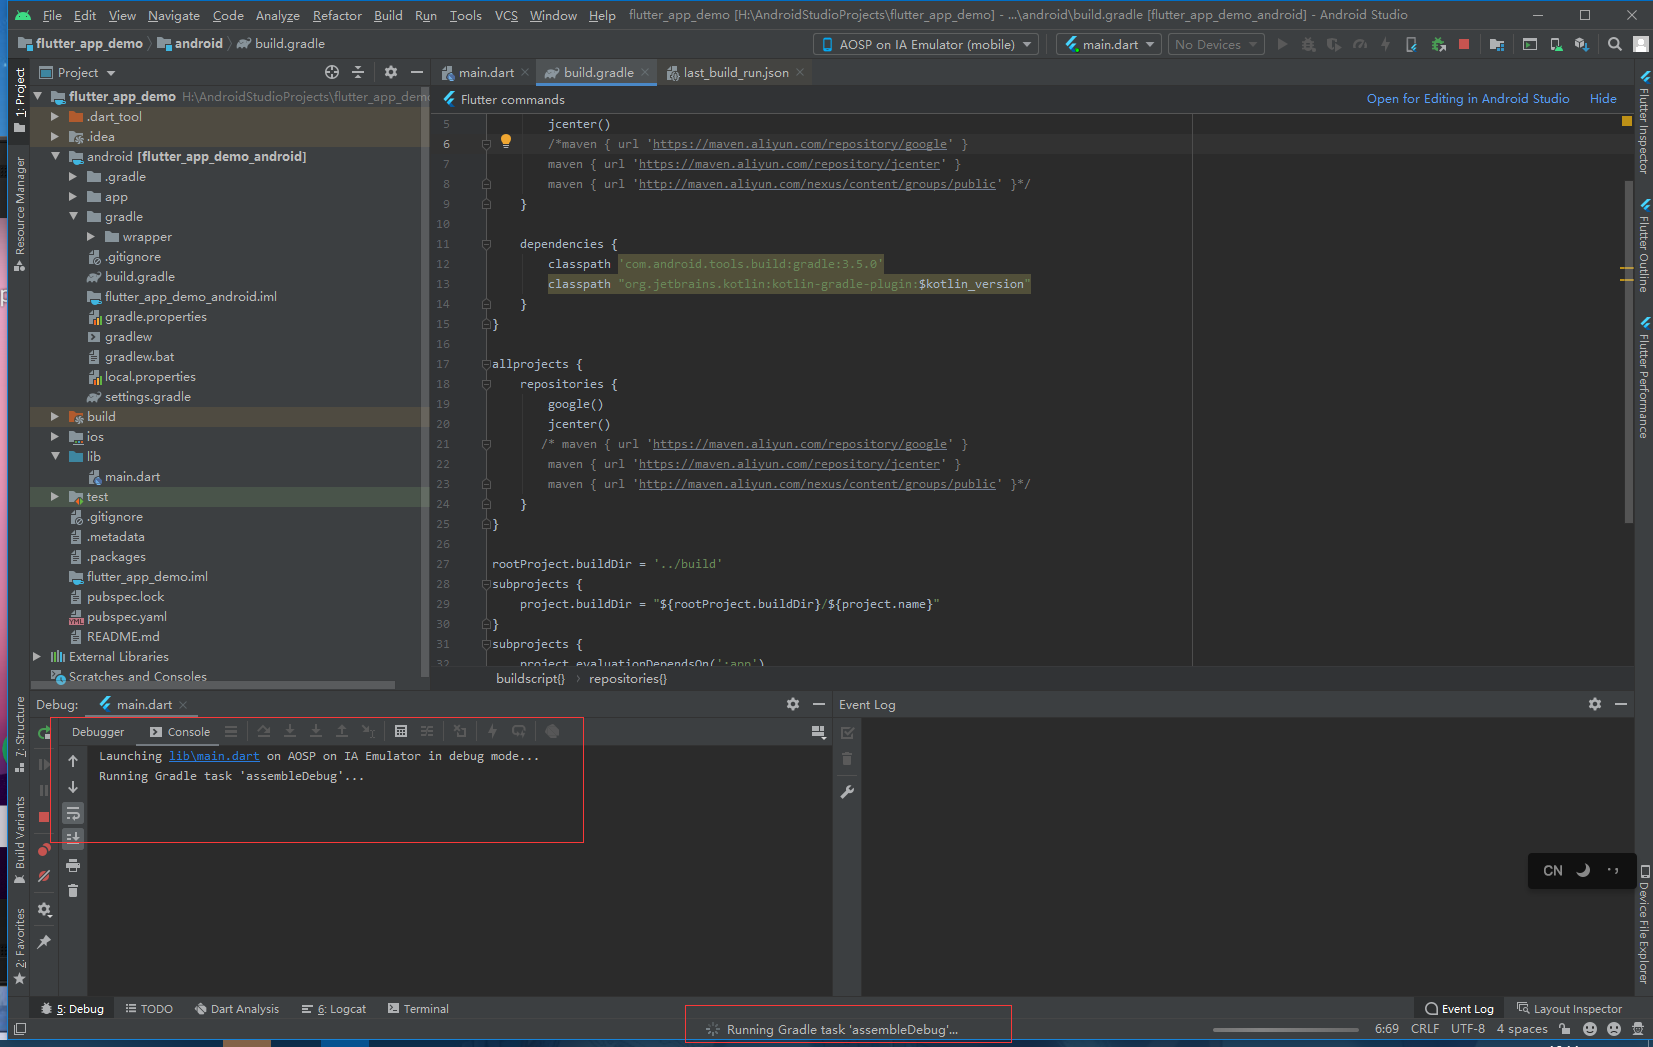
第一步:修改掉项目下的`android`目录下的`build.gradle`文件,把`google()` 和` jcenter()`这两行去掉。改为阿里的链接。
```
maven { url 'https://maven.aliyun.com/repository/google' }
maven { url 'https://maven.aliyun.com/repository/jcenter' }
maven { url 'http://maven.aliyun.com/nexus/content/groups/public' }
```
如下:
```
buildscript {
repositories {
// google()
// jcenter()
maven { url 'https://maven.aliyun.com/repository/google' }
maven { url 'https://maven.aliyun.com/repository/jcenter' }
maven { url 'http://maven.aliyun.com/nexus/content/groups/public'}
}
dependencies {
classpath 'com.android.tools.build:gradle:3.1.2'
}
}
allprojects {
repositories {
// google()
// jcenter()
maven { url 'https://maven.aliyun.com/repository/google' }
maven { url 'https://maven.aliyun.com/repository/jcenter' }
maven { url 'http://maven.aliyun.com/nexus/content/groups/public' }
}
}
rootProject.buildDir = '../build'
subprojects {
project.buildDir = "${rootProject.buildDir}/${project.name}"
}
subprojects {
project.evaluationDependsOn(':app')
}
task clean(type: Delete) {
delete rootProject.buildDir
}
```
注意是有两个部分进行了修改,不要只修改一处。
第二步:修改Flutter SDK包下的flutter.gradle文件,这个目录要根据你的SDK存放的位置有所变化。比如我放在了G盘Flutter目录下,那路径就是这个。
```
G:\flutter\flutter\packages\flutter_tools\gradle
```
打开文件进行修改,修改代码如下(其实也是换成阿里的路径就可以了)。
```
buildscript {
repositories {
//jcenter()
// maven {
// url 'https://dl.google.com/dl/android/maven2'
// }
maven{
url 'https://maven.aliyun.com/repository/jcenter'
}
maven{
url 'http://maven.aliyun.com/nexus/content/groups/public'
}
}
dependencies {
classpath 'com.android.tools.build:gradle:3.1.2'
}
}
```
然后再重新Debug一下,就基本可以启动起来。
# 第一个HelloWorld整体代码
先快速写一个最简单的结构体,这个界面只包含两部分,头部订单的蓝色`bar`条和屏幕中间区域的内容。(请看下面代码)
这段代码写在根目录`\lib\main.dart`文件中,这就是`Flutter`主文件。
```
import 'package:flutter/material.dart';
void main() {
runApp(MyApp());
}
class MyApp extends StatelessWidget {
// This widget is the root of your application.
@override
Widget build(BuildContext context) {
return MaterialApp(
title: 'Flutter Demo',
home:Scaffold(
appBar: AppBar(
title:Text('Flutter Demo 学习')
),
body: Center(
/* child: Text('Hello World,你好,flutter,222222222222222222222222222222222Hello World,你好,flutter',
textAlign: TextAlign.center,// 文字居中
// textAlign: TextAlign.left,// 文字左
// textAlign: TextAlign.right,// 文字右
// textAlign: TextAlign.start,// 文字开始
//textAlign: TextAlign.end,// 文字结束
maxLines: 1,// 最多显示多少行
overflow: TextOverflow.ellipsis,// 显示三个点点
// overflow: TextOverflow.fade,// 从上到下的一个渐变效果
style: TextStyle(
fontSize: 25,
color: Color.fromARGB(255, 255, 125, 125),
decoration: TextDecoration.underline,// 加入下划线
// decorationStyle: TextDecorationStyle.solid,// 加入下滑线样式,实线,虚线等等
),
),*/
child: Container(
// Container相当于div
child: new Text('hello flutter',style: TextStyle(fontSize: 20),),
alignment: Alignment.center,// alignment 子元素对齐
//alignment: Alignment.bottomCenter,// 底部居中对齐
// alignment: Alignment.bottomLeft,// 底部左边对齐
// alignment: Alignment.bottomRight,// 底部右边对齐
// alignment: Alignment.topCenter,// 顶部居中对齐
// alignment: Alignment.topLeft,// 顶部左边对齐
// alignment: Alignment.topRight,// 顶部右边对齐
width: 500.0,
height: 400.0,
color: Colors.lightBlue,// 设置背景颜色
),
),
)
/* theme: ThemeData(
primarySwatch: Colors.blue,
visualDensity: VisualDensity.adaptivePlatformDensity,
),*/
// home: MyHomePage(title: 'Flutter Demo 学习'),
);
}
}
class MyHomePage extends StatefulWidget {
MyHomePage({Key key, this.title}) : super(key: key);
// This widget is the home page of your application. It is stateful, meaning
// that it has a State object (defined below) that contains fields that affect
// how it looks.
// This class is the configuration for the state. It holds the values (in this
// case the title) provided by the parent (in this case the App widget) and
// used by the build method of the State. Fields in a Widget subclass are
// always marked "final".
final String title;
@override
_MyHomePageState createState() => _MyHomePageState();
}
class _MyHomePageState extends State<MyHomePage> {
int _counter = 0;
void _incrementCounter() {
setState(() {
// This call to setState tells the Flutter framework that something has
// changed in this State, which causes it to rerun the build method below
// so that the display can reflect the updated values. If we changed
// _counter without calling setState(), then the build method would not be
// called again, and so nothing would appear to happen.
_counter++;
});
}
@override
Widget build(BuildContext context) {
// This method is rerun every time setState is called, for instance as done
// by the _incrementCounter method above.
//
// The Flutter framework has been optimized to make rerunning build methods
// fast, so that you can just rebuild anything that needs updating rather
// than having to individually change instances of widgets.
return Scaffold(
appBar: AppBar(
// Here we take the value from the MyHomePage object that was created by
// the App.build method, and use it to set our appbar title.
title: Text(widget.title),
),
body: Center(
// Center is a layout widget. It takes a single child and positions it
// in the middle of the parent.
child: Column(
// Column is also a layout widget. It takes a list of children and
// arranges them vertically. By default, it sizes itself to fit its
// children horizontally, and tries to be as tall as its parent.
//
// Invoke "debug painting" (press "p" in the console, choose the
// "Toggle Debug Paint" action from the Flutter Inspector in Android
// Studio, or the "Toggle Debug Paint" command in Visual Studio Code)
// to see the wireframe for each widget.
//
// Column has various properties to control how it sizes itself and
// how it positions its children. Here we use mainAxisAlignment to
// center the children vertically; the main axis here is the vertical
// axis because Columns are vertical (the cross axis would be
// horizontal).
mainAxisAlignment: MainAxisAlignment.center,
children: <Widget>[
Text(
'You have pushed the button this many times:',
),
Text(
'$_counter',
style: Theme.of(context).textTheme.headline4,
),
],
),
),
floatingActionButton: FloatingActionButton(
onPressed: _incrementCounter,
tooltip: 'Increment',
child: Icon(Icons.add),
), // This trailing comma makes auto-formatting nicer for build methods.
);
}
}
```
[Flutter环境配置(MAC OS环境)](https://www.wangmiaozero.cn/detailed?id=108 "Flutter环境配置(MAC OS环境)")
[Flutter环境配置(window10环境)](https://www.wangmiaozero.cn/detailed?id=101 "Flutter环境配置(window10环境)")

 浙公网安备 33010602011771号