https://www.cnblogs.com/Thenext/p/15907248.html
还有个 SynEditStudio V5.8 fix 2 完整版,只支持Delphi7,不支持 Delphi10.3https://www.2ccc.com/article.asp?articleid=4952
通过网盘分享的文件:bootini_SynEditstudio_V5.8.2.rar
链接: https://pan.baidu.com/s/1dwmJVUem-0ZT1YADKaoojA 提取码: 7fbv
通过网盘分享的文件:synMemoSQL_V40.rar
链接: https://pan.baidu.com/s/1rBThEYwl2IGCkoXqaP9r1A 提取码: 9q6j
通过网盘分享的文件:SynEdit for VCL v2023.08 D12.rar
链接: https://pan.baidu.com/s/1ZUsi1bjJZIpxjsXVh87_4A 提取码: ntg4
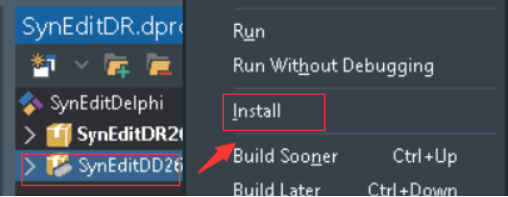
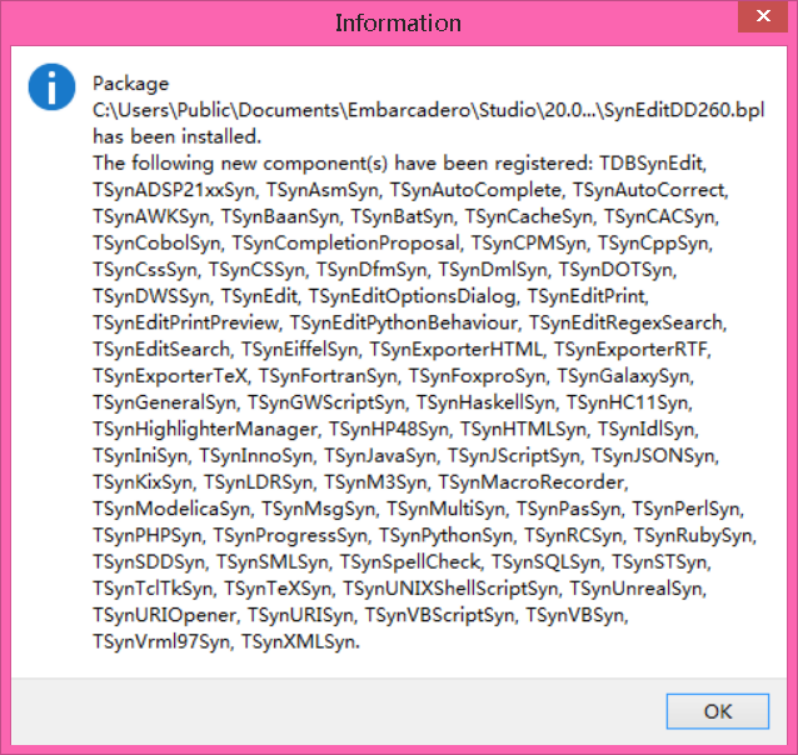
-1】安装
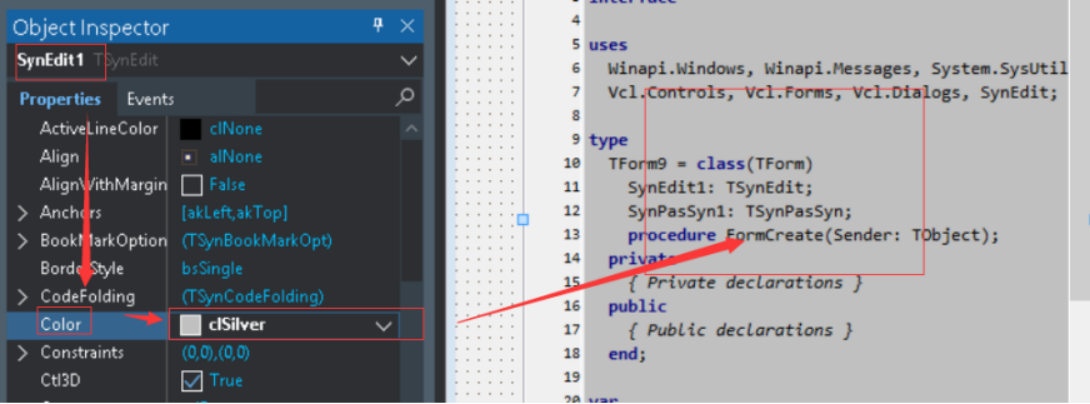
00】设置背景色,设置SynEdit1的Color即可
01】左侧显示行号
02】单个语法高亮
03】自定义关键字的颜色,还有其他 语法的颜色
04】块 折叠 显示,要在 Gutter.Visible设为True。默认为True
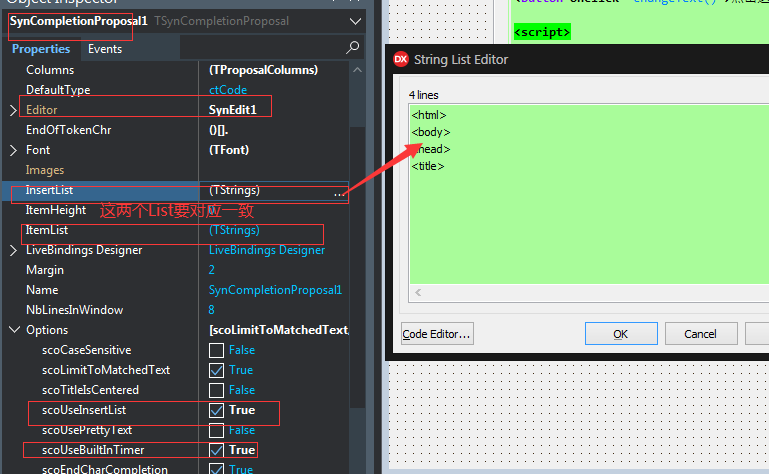
05】点号,下拉列表,插入 选择 输入SynCompletionProposal1
06】导出为HTML格式,RTF,Tex类似
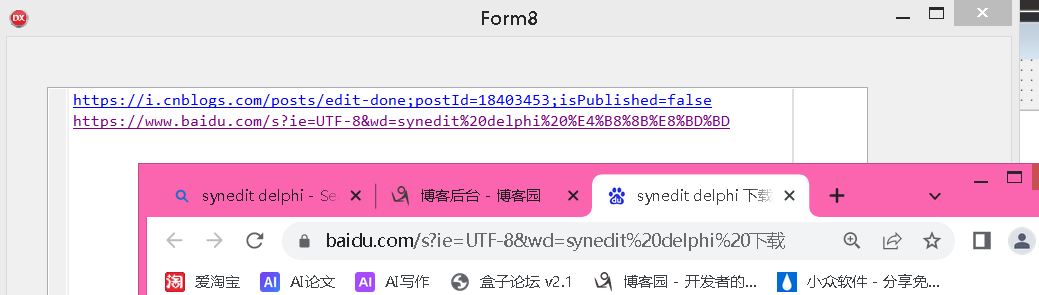
07】SynURiSyn1的Ctrl+鼠标左键 打开 超链接
08】查找与替换,最好直接用其Demo开始,因为涉及到好多关联
09】 显示多个语法高亮
C:\SynEdit for VCL v2023.08 D12\Source
C:\SynEdit for VCL v2023.08 D12\Source\Highlighters
目录添加到
Library

找到
C:\Users\Administrator\Documents\Tencent Files\16130162\FileRecv\SynEdit for VCL v2023.08 D12\Packages\Rio\Delphi
目录下
SynEditDelphi.groupproj


右键,Complie All
右键,Install
将其Gutter\ShowLineNumbers设为True即可。
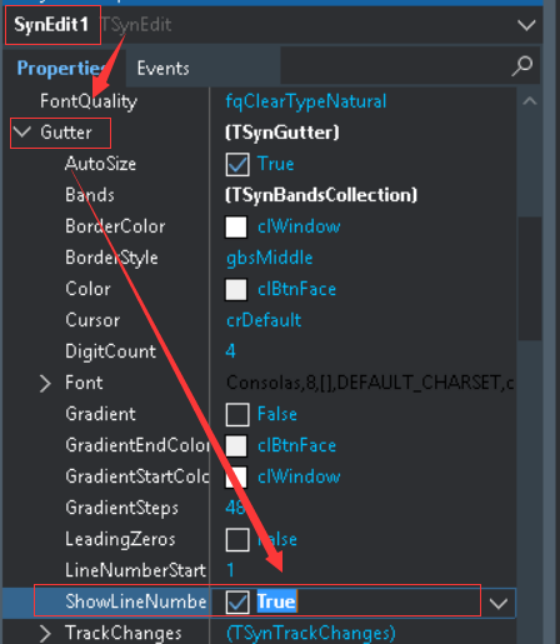
其中LeadinZeros表示在前面补0

拖一个TSynPasSyn,其他语法类似
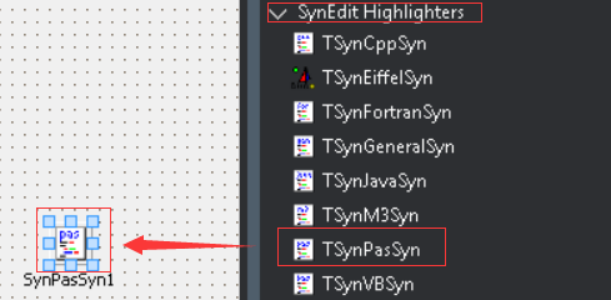
将SynEdit1的Highlighter设置为SynPasSyn1


类似地,数字类型的颜色

取消注释的斜体

SynSQLSyn1.CommentAttri.Foreground := clGreen;               //注释
SynSQLSyn1.DelimitedIdentifierAttri.Foreground :=clBlue;     //标识符
SynSQLSyn1.FunctionAttri.Foreground :=clFuchsia;             //函数
SynSQLSyn1.KeyAttri.Foreground := clBlue;                   //SQL关键字
SynSQLSyn1.StringAttri.Foreground:= clRed;                  //字符串
04]块 折叠 显示,要在 Gutter.Visible设为True。默认为True。并不是所有的语法都支持 代码折叠,SynSQLSyn1就不支持,但synPASsyn1支持
还要在FormCreate事件里 设置
procedure TForm9.FormCreate(Sender: TObject);
begin
   SynEdit1.UseCodeFolding:=TRUE;
end;

还不如我写的 稳定 delphi中Memo1点号下拉ListBox1选择完成文本填充
最小设置:

1scoUseInsertList设为true 表明使用 插入 列表SynCompletionProposal1.InsertList
2scoUseBuiltInTimer表明用TimerInterval延时弹出
3两个要成对
SynCompletionProposal1.InsertList.Add('Create');// 实际插入 文本
SynCompletionProposal1.ItemList.Add('\column{}\style{+B}constructor\style{-B} Create(AOwner: TCustomSynEdit)');//对应的显示的提示信息

增强功能
如果
scoUsePrettyText设为true,则可以在显示时 加粗显示


SynCompletionProposal1.InsertList.Add('Create');
SynCompletionProposal1.ItemList.Add('\column{}\style{+B}constructor\style{-B} Create(AOwner: TCustomSynEdit)');

SynCompletionProposal1.InsertList.Add('Distroy');
SynCompletionProposal1.ItemList .Add('destructor \column{}\style{+B}Distroy\style{-B}(AOwner: TCustomSynEdit)');
TSynCompletionProposal
- Introduction
- Painting and Formatting
Introduction
Painting and Formatting
I. Introduction
In this section I want to describe the new format mechanism, column painting and how existing applications must be modified to work with the new painting method.
II. Format Commands
The old binary format commands are exchanged for escape sequences. This was necessary because several Delphi function don't like low ASCII characters in strings. (Especially #0s)
The new format commands all start with a backslash followed by a command identifier and a parameter. Parameters are enclosed by { and }. This is similar to the syntax of TeX. If you want to use a single backslash without starting a command, just type two backslashes.
Example
A formatted string like
\color{clNavy}\style{+I}\\\\This\style{~I}\color{0} is a\style{+B}\color{$0000FF} Test
which was represented fomerly by
#1#0#0#128#3'I'\\This'#3'i'#1#0#0#0' is a '#3'B'#1#255#0#0' Test'
would produce this output:

All commands
|
Command Identifier |
Description |
Parameter |
|
color |
Changes the font color |
Either a Delphi color identifier or a hexadecimal color value. (Pascal style) (In fact anything that the Delphi function StringToColor can parse) |
|
style |
Changes the font style |
Either a "+", a "-" or a "~" followed by either "B", "I", "S" or "U" (for bold, italic, strike-out and underline). "+"/"-" switches the style on/off, while "~" toggles the specified font style. |
|
column |
Marks the end of the current column |
No parameters for this command. |
|
image |
Inserts an image from the image list provided by the ImageList property |
Index of the image you want to insert. |
|
hspace |
Inserts an empty margin. Only useful in combination with the \image{} command. |
Width of the margin in pixels. |
III. Column Painting
I've completly reworked column painting. The old TSynCompletionProposal had some rudimentary implicit column painting functionality. (Which could be controlled by the BiggestWord property)
The new method supports any number of columns. The \column{} command moves the cursor to the beginning of the next column, just like the old #9-command did. \column{} does no longer toggle the bold font style. As a replacement there is a default font style for every column.
Example
A formatted string...
function \column{}Length(S: string): \column{}Integer;
...with these column definitions:
- Column: (BiggestWord = "CONSTRUCTOR", FontStyle = [fsBold])
- Column: (BiggestWord = "VERYLONGDELPHIFUNCTION", FontStyle = [fsItalic, fsUnderline])
- Column: (BiggestWord = "INTEGER", FontStyle = [fsBold, fsItalic])
...looks like:

IV. Converting
To convert a current application using the new TSynCompletionProposal would require these steps:
- Convert the current format strings to the new ones.
- Create one single column with its BiggestWord-property set to your old BiggestWord property.
- Wherever you expected from a #9 to change the font style you have to insert one \style{} command.
设置好SynExporterHTML1的Highlighter

  SynExporterHTML1.ExportAll(SynEdit1.Lines);
  SynExporterHTML1.SaveToFile('test.html');

07】SynURiSyn1的Ctrl+鼠标左键 打开 超链接

08】查找与替换,最好直接用其Demo开始,因为涉及到好多关联

只需添加这三个文件/窗口
\Demos\SearchReplaceDemo


09】 显示多个语法高亮,在写HTML代码的时候把CSS层叠样式也写在HTML文件里面,
仅SynHTMLSyn1
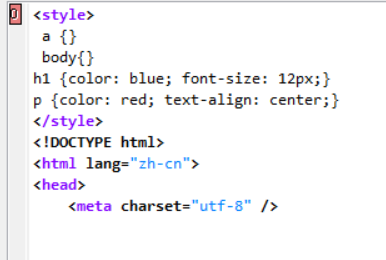
SynHTMLSyn1+SynCssSyn1

1】先添加SynEdit或者SynMemo,然后依次添加SynMultiSyn,SynHTMLSyn1和SynCssSyn1(注意和SynCsSyn区分,SynCsSyn是C#的高亮);
2】SynEdit1的Highlighter设置为SynMultiSyn1。
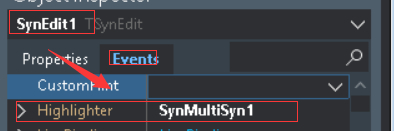
3】SynMultiSyn1的DefaultHighlighter设置为SynHTMLSyn1,然后找到Schemes属性然后单击“...”,再单击“Add”。


第一个CaseSensitive设为False的时候
<style></style>不区分大小写

类似地,还可以添加JavaScipt语法

//这是PHP代码
procedure TMainForm.FormCreate(Sender: TObject);
begin
  SynMultiSyn1.DefaultHighlighter := SynHTMLSyn1;
  // php
  with TgmScheme(SynMultiSyn1.Schemes.Add) do
  begin
       Collection := TCollection(SynMultiSyn1.Schemes);
       StartExpr := '<\?';
       EndExpr := '\?>';
       Highlighter := SynPHPSyn1;
  end;
  SynEdit1.Highlighter := SynMultiSyn1;
end;
可以引用 05】下拉列表,插入 选择 输入SynCompletionProposal1,实现<html>标签输入,下拉选择:

procedure TForm10.FormCreate(Sender: TObject);
begin
SynCompletionProposal1.InsertList.Add('<html>');
SynCompletionProposal1.ItemList.Add('<html>');
SynCompletionProposal1.InsertList.Add('<body>');
SynCompletionProposal1.ItemList.Add('<body>');
SynCompletionProposal1.InsertList.Add('<head>');
SynCompletionProposal1.ItemList.Add('<head>');
SynCompletionProposal1.InsertList.Add('<title>');
SynCompletionProposal1.ItemList.Add('<title>');
end;
等价于

在设计界面中把WordWrap改为True即可。如果不想显示换行标记的话,把WordWrapGlyph的Visible改为False。

自动换行不影响CaretX和CaretY的值。
重要:自动换行的效率不高,打开内容较多(70KB以上)的文本文件就需要等很长时间。
此外,WordWrap和WordWrapGlyph.Visible可以通过代码实现。
其实,只有上面的一些是远远不够的,要实现一些高级的功能,就需要代码实现了。
下面就是通过代码实现的几个实用功能:
打开与保存
打开和保存文件的方法和Memo是一样的,使用Lines.LoadFromFile和Lines.SaveToFile就可以。只不过在Delphi 2009以后的版本保存文件的默认编码为Unicode。使用Lines.LoadFromFile可以打开ANSI和Unicode编码的文本文件,但打开UTF-8编码的文本文件会乱码。如果想支持多种编码的文本文件,自己去写一个过程吧。
在不同的SynHighlighter和SynCompletionProposal之间切换
设置SynEdit或者SynMemo的Highlighter属性即可,另外,SynMultiSyn的用法和SynXXXSyn是一样的。如果不使用任何一个:
属性窗口:Highlighter留空;
编辑代码:使用nil。
示例:
SynMemo1.Highlighter := SynCppSyn1; //使用C++的高亮
SynMemo1.Highlighter := nil; //不使用任何高亮
SynCompletionProposal和SynHighlighter的用法不同,SynCompletionProposal需要修改其Editor属性,如果不需要的情况下,修改Editor属性为nil即可。
示例:
SynCompletionProposal1.Editor := SynMemo1; //使用这个SynCompletionProposal在SynMemo1上
SynCompletionProposal1.Editor := nil; //不使用这个SynCompletionProposal在任何SynEdit或者SynMemo中
光标位置
在编写“记事本”的时候,最头痛的也就是光标位置了。但现在,有了SynEdit之后,就不用担心这个问题了。SynEdit或SynMemo有两个变量:CaretX和CaretY。在OnStatusChange把这两个变量的值显示出来,就知道光标的位置了。在窗体添加一个StatusBar,然后添加至少一个面板(Panel),最后在OnStatusChange中编写代码,搞定。
procedure TForm1.SynMemo1StatusChange(Sender: TObject;
Changes: TSynStatusChanges);
begin
StatusBar1.Panels[1].Text := IntToStr(SynMemo1.CaretX) + ': ' + IntToStr(SynMemo1.CaretY);
end;
输入
SynEdit或SynMemo的ReadOnly属性和Memo相同,当ReadOnly为True的时候,是不可以编辑文字的,也不能通过拖拽更改内容,而且不能剪切和粘贴。而VB在只读(Locked)状态下仍然可以剪切和粘贴。
用法:SynMemo1.ReadOnly := True;
SynEdit和SynMemo没有右键菜单,用起来没有Memo方便,所以我们就得自己使用一个PopupMenu了。
Modified属性也很重要,当内容修改的时候Modified自动变为True,也可以手动修改Modified属性为False。

 浙公网安备 33010602011771号