如何实现一个 Virtual DOM 及源码分析
2017-09-13 22:18 龙恩0707 阅读(1733) 评论(1) 编辑 收藏 举报如何实现一个 Virtual DOM 及源码分析
Virtual DOM算法
web页面有一个对应的DOM树,在传统开发页面时,每次页面需要被更新时,都需要手动操作DOM来进行更新,但是我们知道DOM操作对性能来说是非常不友好的,会影响页面的重排,从而影响页面的性能。因此在React和VUE2.0+引入了虚拟DOM的概念,他们的原理是:把真实的DOM树转换成javascript对象树,也就是虚拟DOM,每次数据需要被更新的时候,它会生成一个新的虚拟DOM,并且和上次生成的虚拟DOM进行对比,对发生变化的数据做批量更新。---(因为操作JS对象会更快,更简单,比操作DOM来说)。
我们知道web页面是由一个个HTML元素嵌套组合而成的,当我们使用javascript来描述这些元素的时候,这些元素可以简单的被表示成纯粹的JSON对象。
比如如下HTML代码:
<div id="container" class="container">
   <ul id="list">
     <li class="item">111</li>
     <li class="item">222</li>
     <li class="item">333</li>
   </ul>
   <button class="btn btn-blue"><em>提交</em></button>
</div>
上面是真实的DOM树结构,我们可以使用javascript中的json对象来表示的话,变成如下:
var element = {
      tagName: 'div',
      props: {   // DOM的属性
        id: 'container',
        class: 'container'
      },
      children: [
        {
          tagName: 'ul',
          props: {
            id: 'list'
          },
          children: [
            {tagName: 'li', props: {class: 'item'}, children: ['111']},
            {tagName: 'li', props: {class: 'item'}, children: ['222']},
            {tagName: 'li', props: {class: 'item'}, children: ['333']}
          ]
        },
        {
          tagName: 'button',
          props: {
            class: 'btn btn-blue'
          },
          children: [
            {
              tagName: 'em',
              children: ['提交']
            }
          ]
        }
      ]
   };
因此我们可以使用javascript对象表示DOM的信息和结构,当状态变更的时候,重新渲染这个javascript对象的结构,然后可以使用新渲染的对象树去和旧的树去对比,记录两颗树的差异,两颗树的差异就是我们需要对页面真正的DOM操作,然后把他们应用到真正的DOM树上,页面就得到更新。视图的整个结构确实全渲染了,但是最后操作DOM的时候,只变更不同的地方。
因此我们可以总结一下 Virtual DOM算法:
1. 用javascript对象结构来表示DOM树的结构,然后用这个树构建一个真正的DOM树,插入到文档中。
2. 当状态变更的时候,重新构造一颗新的对象树,然后使用新的对象树与旧的对象树进行对比,记录两颗树的差异。
3. 把记录下来的差异用到步骤1所构建的真正的DOM树上。视图就更新了。
算法实现:
2-1 使用javascript对象模拟DOM树。
使用javascript来表示一个DOM节点,有如上JSON的数据,我们只需要记录它的节点类型,属性和子节点即可。
element.js 代码如下:
function Element(tagName, props, children) {
  this.tagName = tagName;
  this.props = props;
  this.children = children;
}
Element.prototype.render = function() {
  var el = document.createElement(this.tagName);
  var props = this.props;
  // 遍历子节点,依次设置子节点的属性
  for (var propName in props) {
    var propValue = props[propName];
    el.setAttribute(propName, propValue);
  }
  // 保存子节点
  var childrens = this.children || [];
  // 遍历子节点,使用递归的方式 渲染
  childrens.forEach(function(child) {
    var childEl = (child instanceof Element) ? child.render() // 如果子节点也是虚拟DOM,递归构建DOM节点
      : document.createTextNode(child);    // 如果是字符串的话,只构建文本节点
    el.appendChild(childEl);
  });
  return el;
};
module.exports = function(tagName, props, children) {
  return new Element(tagName, props, children);
}
入口index.js代码如下:
var el = require('./element');

var element = el('div', {id: 'container', class: 'container'}, [
  el('ul', {id: 'list'},[
    el('li', {class: 'item'}, ['111']),
    el('li', {class: 'item'}, ['222']),
    el('li', {class: 'item'}, ['333']),
  ]),
  el('button', {class: 'btn btn-blue'}, [
    el('em', {class: ''}, ['提交'])
  ])
]);

var elemRoot = element.render();
document.body.appendChild(elemRoot);
打开页面即可看到效果。
2-2 比较两颗虚拟DOM树的差异及差异的地方进行dom操作
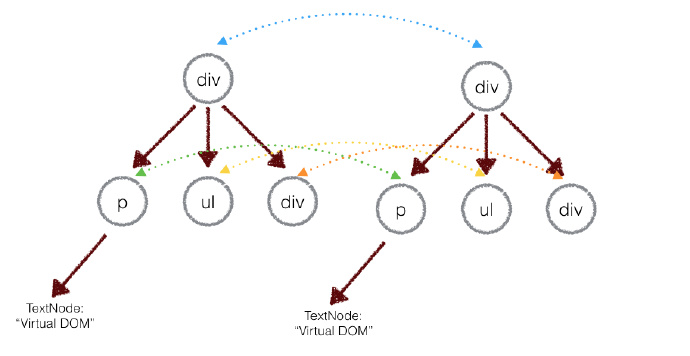
上面的div只会和同一层级的div对比,第二层级的只会和第二层级的对比,这样的算法的复杂度可以达到O(n).
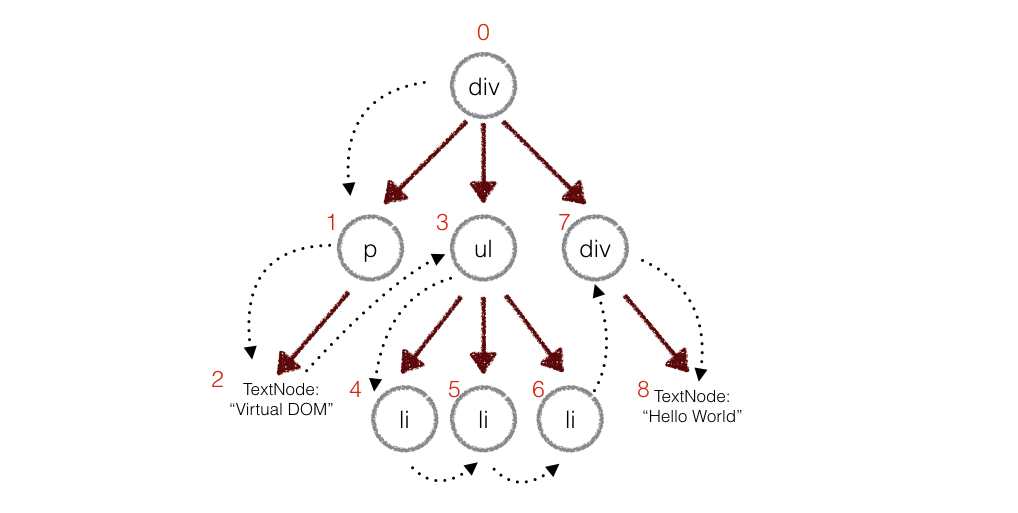
但是在实际代码中,会对新旧两颗树进行一个深度优先的遍历,因此每个节点都会有一个标记。如下图所示:
在遍历的过程中,每次遍历到一个节点就把该节点和新的树进行对比,如果有差异的话就记录到一个对象里面。
现在我们来看下我的目录下 有哪些文件;然后分别对每个文件代码进行解读,看看做了哪些事情,旧的虚拟dom和新的虚拟dom是如何比较的,且是如何更新页面的 如下目录:
目录结构如下:
vdom  ---- 工程名
|   | ---- index.html  html页面
|   | ---- element.js  实例化元素组成json数据 且 提供render方法 渲染页面
|   | ---- util.js     提供一些公用的方法
|   | ---- diff.js     比较新旧节点数据 如果有差异保存到一个对象里面去
|   | ---- patch.js    对当前差异的节点数据 进行DOM操作
|   | ---- index.js    页面代码初始化调用
首先是 index.js文件 页面渲染完成后 变成如下html结构
<div id="container">
  <h1 style="color: red;">simple virtal dom</h1>
  <p>the count is :1</p>
  <ul>
    <li>Item #0</li>
  </ul>
</div>
假如发生改变后,变成如下结构
<div id="container">
  <h1 style="color: blue;">simple virtal dom</h1>
  <p>the count is :2</p>
  <ul>
    <li>Item #0</li>
    <li>Item #1</li>
  </ul>
</div>
可以看到 新旧节点页面数据的改变,h1标签从属性 颜色从红色 变为蓝色,p标签的文本发生改变,ul新增了一项元素li。
基本的原理是:先渲染出页面数据出来,生成第一个模板页面,然后使用定时器会生成一个新的页面数据出来,对新旧两颗树进行一个深度优先的遍历,因此每个节点都会有一个标记。
然后调用diff方法对比对象新旧节点遍历进行对比,找出两者的不同的地方存入到一个对象里面去,最后通过patch.js找出对象不同的地方,分别进行dom操作。
index.js代码如下:
var el = require('./element');
var diff = require('./diff');
var patch = require('./patch');

var count = 0;
function renderTree() {
  count++;
  var items = [];
  var color = (count % 2 === 0) ? 'blue' : 'red';
  for (var i = 0; i < count; i++) {
    items.push(el('li', ['Item #' + i]));
  }
  return el('div', {'id': 'container'}, [
    el('h1', {style: 'color: ' + color}, ['simple virtal dom']),
    el('p', ['the count is :' + count]),
    el('ul', items)
  ]);
}

var tree = renderTree()
var root = tree.render()
document.body.appendChild(root)
setInterval(function () {
  var newTree = renderTree()
  var patches = diff(tree, newTree)
  console.log(patches)
  patch(root, patches)
  tree = newTree
}, 1000);
执行 var tree = renderTree()方法后,会调用element.js,
1. 依次遍历子节点(从内到外调用)依次为 li, h1, p, ul, li和h1和p有一个文本子节点,因此遍历完成后,count就等于1,
但是遍历ul的时候,因为有一个子节点li,因此 count += 1; 所以调用完成后,ul的count等于2. 因此会对每个element属性添加count属性。对于最外层的container容器就是对每个子节点的依次增加,h1子节点默认为1,循环完成后 +1;因此变为2, p节点默认为1,循环完成后 +1,因此也变为2,ul为2,循环完成后 +1,因此变为3,因此container节点的count=2+2+3 = 7;
element.js部分代码如下:
function Element(tagName, props, children) {
  if (!(this instanceof Element)) {
    // 判断子节点 children 是否为 undefined
    if (!utils.isArray(children) && children !== null) {
      children = utils.slice(arguments, 2).filter(utils.truthy);
    }
    return new Element(tagName, props, children);
  }
  // 如果没有属性的话,第二个参数是一个数组,说明第二个参数传的是子节点
  if (utils.isArray(props)) {
    children = props;
    props = {};
  }
  this.tagName = tagName;
  this.props = props || {};
  this.children = children || [];
  // 保存key键 如果有属性 保存key,否则返回undefined
  this.key = props ? props.key : void 0;
  var count = 0;

  utils.each(this.children, function(child, i) {
    // 如果是元素的实列的话
    if (child instanceof Element) {
      count += child.count;
    } else {
      // 如果是文本节点的话,直接赋值
      children[i] = '' + child;
    }
    count++;
  });
  this.count = count;
}
oldTree数据最终变成如下:
var oldTree = {
  tagName: 'div',
  key: undefined,
  count: 7,
  props: {id: 'container'},
  children: [
    {
      tagName: 'h1',
      key: undefined
      count: 1
      props: {style: 'colod: red'},
      children: ['simple virtal dom']
    },
    {
      tagName: 'p',
      key: undefined
      count: 1
      props: {},
      children: ['the count is :1']
    },
    {
      tagName: 'ul',
      key: undefined
      count: 2
      props: {},
      children: [
        {
          tagName: 'li',
          key: undefined,
          count: 1,
          props: {},
          children: ['Item #0']
        }
      ]
    },
  ]
};
定时器 执行 var newTree = renderTree()后,调用方法步骤还是和第一步一样:
2. 依次遍历子节点(从内到外调用)依次为 li, h1, p, ul, li和h1和p有一个文本子节点,因此遍历完成后,count就等于1,因为有2个子元素li,count都为1,因此ul每次遍历依次在原来的基础上加1,因此遍历完成第一个li时候,ul中的count为2,当遍历完成第二个li的时候,ul的count就为4了。因此ul中的count为4. 对于最外层的container容器就是对每个子元素依次增加。
所以 container节点的count = 2 + 2 + 5 = 9;
newTree数据最终变成如下数据:
var newTree = {
  tagName: 'div',
  key: undefined,
  count: 9,
  props: {id: 'container'},
  children: [
    {
      tagName: 'h1',
      key: undefined
      count: 1
      props: {style: 'colod: red'},
      children: ['simple virtal dom']
    },
    {
      tagName: 'p',
      key: undefined
      count: 1
      props: {},
      children: ['the count is :1']
    },
    {
      tagName: 'ul',
      key: undefined
      count: 4
      props: {},
      children: [
        {
          tagName: 'li',
          key: undefined,
          count: 1,
          props: {},
          children: ['Item #0']
        },
        {
          tagName: 'li',
          key: undefined,
          count: 1,
          props: {},
          children: ['Item #1']
        }
      ]
    },
  ]
}
var patches = diff(oldTree, newTree);
调用diff方法可以比较新旧两棵树节点的数据,把两颗树的不同节点找出来。(注意,查看diff对比数据的方法,找到不同的节点,可以查看这篇文章diff算法)如下调用代码:
function diff (oldTree, newTree) {
  var index = 0;
  var patches = {};
  deepWalk(oldTree, newTree, index, patches);
  return patches;
}
执行deepWalk如下代码:
function deepWalk(oldNode, newNode, index, patches) {
  var currentPatch = [];
  // 节点被删除掉
  if (newNode === null) {
    // 真正的DOM节点时,将删除执行重新排序,所以不需要做任何事
  } else if(utils.isString(oldNode) && utils.isString(newNode)) {
    // 替换文本节点
    if (newNode !== oldNode) {
      currentPatch.push({type: patch.TEXT, content: newNode});
    }
  } else if(oldNode.tagName === newNode.tagName && oldNode.key === newNode.key) {
    // 相同的节点,但是新旧节点的属性不同的情况下 比较属性
    // diff props
    var propsPatches = diffProps(oldNode, newNode);
    if (propsPatches) {
      currentPatch.push({type: patch.PROPS, props: propsPatches});
    }
    // 不同的子节点
    if (!isIgnoreChildren(newNode)) {
      diffChildren(
        oldNode.children,
        newNode.children,
        index,
        patches,
        currentPatch
      )
    }
  } else {
    // 不同的节点,那么新节点替换旧节点
    currentPatch.push({type: patch.REPLACE, node: newNode});
  }
  if (currentPatch.length) {
    patches[index] = currentPatch;
  }
}
1. 判断新节点是否为null,如果为null,说明节点被删除掉。
2. 判断新旧节点是否为字符串,如果为字符串说明是文本节点,并且新旧两个文本节点不同的话,存入数组里面去,如下代码:
currentPatch.push({type: patch.TEXT, content: newNode});
patch.TEXT 为 patch.js里面的 TEXT = 3;content属性为新节点。
3. 如果新旧tagName相同的话,并且新旧节点的key相同的话,继续比较新旧节点的属性,如下代码:
var propsPatches = diffProps(oldNode, newNode);
diffProps方法的代码如下:
function diffProps(oldNode, newNode) {
      var count = 0;
      var oldProps = oldNode.props;
      var newProps = newNode.props;
      var key,
        value;
      var propsPatches = {};
      // 找出不同的属性值
      for (key in oldProps) {
        value = oldProps[key];
        if (newProps[key] !== value) {
          count++;
          propsPatches[key] = newProps[key];
        }
      }
      // 找出新增属性
      for (key in newProps) {
        value = newProps[key];
        if (!oldProps.hasOwnProperty(key)) {
          count++;
          propsPatches[key] = newProps[key];
        }
      }
      // 如果所有的属性都是相同的话
      if (count === 0) {
        return null;
      }
      return propsPatches;
   }
diffProps代码解析如下:
for (key in oldProps) {
   value = oldProps[key];
   if (newProps[key] !== value) {
      count++;
      propsPatches[key] = newProps[key];
   }
}
如上代码是 判断旧节点的属性值是否在新节点中找到,如果找不到的话,count++; 把新节点的属性值赋值给 propsPatches 存储起来。
for (key in newProps) {
   value = newProps[key];
   if (!oldProps.hasOwnProperty(key)) {
      count++;
      propsPatches[key] = newProps[key];
   }
}
如上代码是 判断新节点的属性是否能在旧节点中找到,如果找不到的话,count++; 把新节点的属性值赋值给 propsPatches 存储起来。
if (count === 0) {
   return null;
}
return propsPatches;
最后如果count 等于0的话,说明所有属性都是相同的话,所以不需要做任何变化。否则的话,返回新增的属性。
如果有 propsPatches 的话,执行如下代码:
if (propsPatches) {
   currentPatch.push({type: patch.PROPS, props: propsPatches});
}
因此currentPatch数组里面也有对应的更新的属性,props就是需要更新的属性对象。
继续代码:
// 不同的子节点
if (!isIgnoreChildren(newNode)) {
   diffChildren(
     oldNode.children,
     newNode.children,
     index,
     patches,
     currentPatch
   )
}
function isIgnoreChildren(node) {
  return (node.props && node.props.hasOwnProperty('ignore'));
}
如上代码判断子节点是否相同,diffChildren代码如下:
function diffChildren(oldChildren, newChildren, index, patches, currentPatch) {
    var diffs = listDiff(oldChildren, newChildren, 'key');
    newChildren = diffs.children;

    if (diffs.moves.length) {
      var recorderPatch = {type: patch.REORDER, moves: diffs.moves};
      currentPatch.push(recorderPatch);
    }

    var leftNode = null;
    var currentNodeIndex = index;
    utils.each(oldChildren, function(child, i) {
      var newChild = newChildren[i];
      currentNodeIndex = (leftNode && leftNode.count) ? currentNodeIndex + leftNode.count + 1 : currentNodeIndex + 1;
      // 递归
      deepWalk(child, newChild, currentNodeIndex, patches);
      leftNode = child;
    });
  }
如上代码:var diffs = listDiff(oldChildren, newChildren, 'key'); 新旧节点按照key来比较,目前key为undefined,所以diffs 为如下:
diffs = {
    moves: [],
    children: [
      {
        tagName: 'h1',
        key: undefined
        count: 1
        props: {style: 'colod: blue'},
        children: ['simple virtal dom']
      },
      {
        tagName: 'p',
        key: undefined
        count: 1
        props: {},
        children: ['the count is :2']
      },
      {
        tagName: 'ul',
        key: undefined
        count: 4
        props: {},
        children: [
          {
            tagName: 'li',
            key: undefined,
            count: 1,
            props: {},
            children: ['Item #0']
          },
          {
            tagName: 'li',
            key: undefined,
            count: 1,
            props: {},
            children: ['Item #1']
          }
        ]
      }
    ]
  };
newChildren = diffs.children;
oldChildren数据如下:
oldChildren = [
    {
      tagName: 'h1',
      key: undefined
      count: 1
      props: {style: 'colod: red'},
      children: ['simple virtal dom']
    },
    {
      tagName: 'p',
      key: undefined
      count: 1
      props: {},
      children: ['the count is :1']
    },
    {
      tagName: 'ul',
      key: undefined
      count: 2
      props: {},
      children: [
        {
          tagName: 'li',
          key: undefined,
          count: 1,
          props: {},
          children: ['Item #0']
        }
      ]
    }
  ];
接着就是遍历 oldChildren, 第一次遍历时 leftNode 为null,因此 currentNodeIndex = currentNodeIndex + 1 = 0 + 1 = 1; 不是第一次遍历,那么leftNode都为上一次遍历的子节点,因此不是第一次遍历的话,那么 currentNodeIndex = currentNodeIndex + leftNode.count + 1;
然后递归调用 deepWalk(child, newChild, currentNodeIndex, patches); 方法,接着把child赋值给leftNode,leftNode = child;
所以一直递归遍历,最终把不相同的节点 会存储到 currentPatch 数组内。最后执行
if (currentPatch.length) {
   patches[index] = currentPatch;
}
把对应的currentPatch 存储到 patches对象内中的对应项,最后就返回 patches对象。
4. 返回到index.js 代码内,把两颗不相同的树节点的提取出来后,需要调用patch.js方法传进;把不相同的节点应用到真正的DOM上.
不相同的节点 patches数据如下:
patches = {
    1: [{type: 2, props: {style: 'color: blue'}}],
    4: [{type: 3, content: 'the count is :2'}],
    5: [
          {
              type: 1,
              moves: [
                { index: 1,
                   item: {
                      tagName: 'li',
                      props: {},
                      count: 1,
                      key: undefined,
                      children: ['Item #1']
                    }
                }
              ]
           }
        ]
    }
如下代码调用:
patch(root, patches);
执行patch方法,代码如下:
function patch(node, patches) {
  var walker = {index: 0};
  deepWalk(node, walker, patches);
}
deepWalk 代码如下:
function deepWalk(node, walker, patches) {
   var currentPatches = patches[walker.index];
      // node.childNodes 返回指定元素的子元素集合,包括HTML节点,所有属性,文本节点。
   var len = node.childNodes ? node.childNodes.length : 0;
   for (var i = 0; i < len; i++) {
      var child = node.childNodes[i];
      walker.index++;
      // 深度复制 递归遍历
      deepWalk(child, walker, patches);
   }
   if (currentPatches) {
      applyPatches(node, currentPatches);
   }
}
1. 首次调用patch的方法,root就是container的节点,因此调用deepWalk方法,因此 var currentPatches = patches[0] = undefined,
var len = node.childNodes ? node.childNodes.length : 0; 因此 len = 3; 很明显该子节点的长度为3,因为子节点有 h1, p, 和ul元素;
2. 然后进行for循环,获取该父节点的子节点,因此第一个子节点为 h1 元素,walker.index++; 因此walker.index = 1; 再进行递归 deepWalk(child, walker, patches); 此时子节点为h1, walker.index为1, 因此获取 currentPatches = patches[1]; 获取值,再获取 h1的子节点的长度,len = 1; 然后再for循环,获取child为文本节点,此时 walker.index++; 所以此时walker.index 为2, 在调用deepwalk方法递归,因此再继续获取 currentPatches = patches[2]; 值为undefined,再获取len = 0; 因为文本节点么有子节点,所以for循环跳出,所以判断currentPatches是否有值,因为此时 currentPatches 为undefined,所以递归结束,再返回到 h1元素上来,所以currentPatches = patches[1]; 所以有值,所以调用 applyPatches()方法来更新dom元素。
3. 继续循环 i, 此时i = 1; 获取子节点 child = p元素,walker.index++,此时walker.index = 3, 继续调用 deepWalk方法,获取 var currentPatches = patches[walker.index] = patches[3]的值,var len = 1; 因为p元素下有一个子节点(文本节点),再进for循环,此时 walker.index++; 因此walker.index = 4; child此时为文本节点,在调用 deepwalk方法的时候,再获取var currentPatches = patches[walker.index] = patches[4]; 再执行len 代码的时候 len = 0;因此跳出for循环,判断 currentPatches是否有值,有值的话,更新对应的DOM元素。
4. 继续循环i = 2; 获取子节点 child = ul元素,walker.index++; 此时walker.index = 5; 在调用deepWalk方法递归,因此再获取 var currentPatches = patches[walker.index] = patches[5]; 然后len = 1, 因为ul元素下有一个li元素,在继续for循环遍历,获取子节点li,此时walker.index++; walker.index = 6; 再递归调用deepwalk方法,再获取var currentPatches = patches[walker.index] = patches[6]; len = 1; 因为li的元素下有一个文本节点,再进行for循环,此时child为文本节点,walker.index++;此时walker.index = 7; 再执行 deepwalk方法,再获取 var currentPatches = patches[walker.index] = patches[7]; 这时候 len = 0了,因此跳出for循环,判断 当前的currentPatches是否有值,没有,就跳出,然后再返回ul元素,获取该自己li的时候,walker.index 等于5,因此var currentPatches = patches[walker.index] = patches[5]; 然后判断 currentPatches是否有值,有值就进行更新DOM元素。
最后就是 applyPatches 方法更新dom元素了,如下代码:
function applyPatches(node, currentPatches) {
  utils.each(currentPatches, function(currentPatch) {
    switch (currentPatch.type) {
      case REPLACE:
        var newNode = (typeof currentPatch.node === 'string')
          ? document.createTextNode(currentPatch.node)
          : currentPatch.node.render();
        node.parentNode.replaceChild(newNode, node);
        break;
      case REORDER:
        reorderChildren(node, currentPatch.moves);
        break;
      case PROPS:
        setProps(node, currentPatch.props);
        break;
      case TEXT:
        if(node.textContent) {
          node.textContent = currentPatch.content;
        } else {
          // ie bug
          node.nodeValue = currentPatch.content;
        }
        break;
      default:
        throw new Error('Unknow patch type' + currentPatch.type);
    }
  });
}
判断类型,替换对应的属性和节点。
最后就是对子节点进行排序的操作,代码如下:
// 对子节点进行排序
function reorderChildren(node, moves) {
  var staticNodeList = utils.toArray(node.childNodes);
  var maps = {};
  utils.each(staticNodeList, function(node) {
    // 如果是元素节点
    if (node.nodeType === 1) {
      var key = node.getAttribute('key');
      if (key) {
        maps[key] = node;
      }
    }
  })
  utils.each(moves, function(move) {
    var index = move.index;
    if (move.type === 0) {
      // remove Item
      if (staticNodeList[index] === node.childNodes[index]) {
        node.removeChild(node.childNodes[index]);
      }
      staticNodeList.splice(index, 1);
    } else if(move.type === 1) {
      // insert item
      var insertNode = maps[move.item.key]
        ? maps[move.item.key].cloneNode(true)
        : (typeof move.item === 'object') ? move.item.render() : document.createTextNode(move.item);
      staticNodeList.splice(index, 0, insertNode);
      node.insertBefore(insertNode, node.childNodes[index] || null);
    }
  });
}
遍历moves,判断moves.type 是等于0还是等于1,等于0的话是删除操作,等于1的话是新增操作。比如现在moves值变成如下:
moves = {
  index: 1,
  type: 1,
  item: {
    tagName: 'li',
    key: undefined,
    props: {},
    count: 1,
    children: ['#Item 1']
  }
};
node节点 就是 'ul'元素,var staticNodeList = utils.toArray(node.childNodes); 把ul的旧子节点li转成Array形式,由于没有属性key,所以直接跳到下面遍历代码来,遍历moves,获取某一项的索引index,判断move.type 等于0 还是等于1, 目前等于1,是新增一项,但是没有key,因此调用move.item.render(); 渲染完后,对staticNodeList数组里面的旧节点的li项从第二项开始插入节点li,然后执行node.insertBefore(insertNode, node.childNodes[index] || null); node就是ul父节点,insertNode节点插入到 node.childNodes[1]的前面。因此把在第二项的前面插入第一项。
查看github上源码


【推荐】国内首个AI IDE,深度理解中文开发场景,立即下载体验Trae
【推荐】编程新体验,更懂你的AI,立即体验豆包MarsCode编程助手
【推荐】抖音旗下AI助手豆包,你的智能百科全书,全免费不限次数
【推荐】轻量又高性能的 SSH 工具 IShell:AI 加持,快人一步
· go语言实现终端里的倒计时
· 如何编写易于单元测试的代码
· 10年+ .NET Coder 心语,封装的思维:从隐藏、稳定开始理解其本质意义
· .NET Core 中如何实现缓存的预热?
· 从 HTTP 原因短语缺失研究 HTTP/2 和 HTTP/3 的设计差异
· 周边上新:园子的第一款马克杯温暖上架
· 分享 3 个 .NET 开源的文件压缩处理库,助力快速实现文件压缩解压功能!
· Ollama——大语言模型本地部署的极速利器
· DeepSeek如何颠覆传统软件测试?测试工程师会被淘汰吗?
· 使用C#创建一个MCP客户端
2014-09-13 SVN使用教程总结