Spring4整合mybatis(初级版本)
本文主要讲述,利用Spring4整合mybatis3以此来简化mybatis的对象创建工作
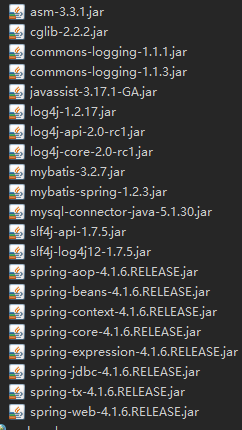
一、所有的引用

除了mybatis-spring包其他的包都可以在spring4或者mybatis3中找到,mybatis-spring自己网上可以在下载
二、创建pojo包下的类
package com.hpu.pojo;

import java.io.PrintWriter;

public class People {
	private int Id;
	private String name;
	private int age;
    private String pwd;
	public String getPwd() {
		return pwd;
	}

	public void setPwd(String pwd) {
		this.pwd = pwd;
	}

	public int getId() {
		return Id;
	}

	public void setId(int id) {
		Id = id;
	}

	public String getName() {
		return name;
	}

	public void setName(String name) {
		this.name = name;
	}

	public int getAge() {
		return age;
	}

	public void setAge(int age) {
		this.age = age;
	}

	public People(int id, String name, int age) {
		super();
		Id = id;
		this.name = name;
		this.age = age;
	}

	public People() {
		super();
		// TODO Auto-generated constructor stub
	}

	@Override
	public String toString() {
		return "People [Id=" + Id + ", name=" + name + ", age=" + age + ", pwd=" + pwd + "]";
	}


}
三、创建mapper接口或者xml
package com.hpu.mapper;

import org.apache.ibatis.annotations.Select;

import com.hpu.pojo.People;

public interface PeopleMapper {
	@Select("select * from people where name=#{name} and pwd=#{pwd}")
   People selByUserPwd(People people);
}
上面以接口+注解的方式
四、创建service接口及其实现类
1、接口
package com.hpu.service;
import com.hpu.pojo.People;
public interface PeopleService {

    /**
     * 用户登录检查
     * @param people
     * @return 一个用户类
     */
    People login(People people );
}
2、实现类
package com.hpu.service.impl;

import com.hpu.mapper.PeopleMapper;
import com.hpu.pojo.People;
import com.hpu.service.PeopleService;

public class PeopleServiceImpl implements PeopleService {
    private PeopleMapper peopleMapper;
	public PeopleMapper getPeopleMapper() {
		return peopleMapper;
	}
	public void setPeopleMapper(PeopleMapper peopleMapper) {
		this.peopleMapper = peopleMapper;
	}
	@Override
	public People login(People people) {
		// TODO Auto-generated method stub
		return peopleMapper.selByUserPwd(people);
	}

}
五、创建application.xml
<?xml version="1.0" encoding="UTF-8"?>
<beans xmlns="http://www.springframework.org/schema/beans"
    xmlns:xsi="http://www.w3.org/2001/XMLSchema-instance"
    xsi:schemaLocation="http://www.springframework.org/schema/beans
        http://www.springframework.org/schema/beans/spring-beans.xsd">
        <!--第一步   获取数据源- -->
        <bean id="dataSource" class="org.springframework.jdbc.datasource.DriverManagerDataSource">
          <property name="driverClassName" value="com.mysql.jdbc.Driver"></property>
          <property name="url" value="jdbc:mysql://localhost:3306/testjdbc"></property>
          <property name="username" value="root"></property>
           <property name="password" value="mysql"></property>
        </bean>
        <!--第二步 spring帮助创建sqlSession -->
        <bean id="factory" class="org.mybatis.spring.SqlSessionFactoryBean">
         <property name="dataSource" ref="dataSource"></property>
        </bean>
        <!--第三步  扫描器,扫描接口,并创建接口对象 -->
        <bean class="org.mybatis.spring.mapper.MapperScannerConfigurer">
          <property name="basePackage" value="com.hpu.mapper"></property>
          <property name="sqlSessionFactory" ref="factory"></property>
        </bean>
        <bean id="peopleService" class="com.hpu.service.impl.PeopleServiceImpl">
          <property name="peopleMapper" ref="peopleMapper"></property>
        </bean>
</beans>
六、配置监听器(在web.xml中配置)
    <!-- 当tomcat加载web.xml,把spring的配置文件存放到applicationContext中 -->
  <!-- 设置spring路径配置 -->
  <context-param>
       <param-name>contextConfigLocation</param-name>
       <param-value>classpath:applicationContext.xml</param-value>
  </context-param>
  <listener>
      <listener-class>org.springframework.web.context.ContextLoaderListener</listener-class>
  </listener>
七、servlet接口调用示例
package com.hpu.servlet;

import java.io.IOException;

import javax.security.auth.message.callback.PrivateKeyCallback.Request;
import javax.servlet.ServletException;
import javax.servlet.annotation.WebServlet;
import javax.servlet.http.HttpServlet;
import javax.servlet.http.HttpServletRequest;
import javax.servlet.http.HttpServletResponse;
import javax.servlet.http.HttpSession;

import org.springframework.context.ApplicationContext;
import org.springframework.web.context.WebApplicationContext;
import org.springframework.web.context.support.WebApplicationContextUtils;

import com.hpu.pojo.People;
import com.hpu.service.PeopleService;
import com.hpu.service.impl.PeopleServiceImpl;

@WebServlet("/LoginServlet")
public class LoginServlet extends HttpServlet {
	private PeopleService peopleService;
	@Override
	public void init() throws ServletException {
     ApplicationContext ac=WebApplicationContextUtils.getRequiredWebApplicationContext(getServletContext());
     peopleService=ac.getBean("peopleService",PeopleServiceImpl.class);
	}
	@Override
	protected void service(HttpServletRequest req, HttpServletResponse resp) throws ServletException, IOException {
        req.setCharacterEncoding("utf-8");
		String name=req.getParameter("username");
		String pwd=req.getParameter("pwd");
		String code=req.getParameter("validCode");
		HttpSession session = req.getSession();
		String codeSession = session.getAttribute("code").toString();
	    if (code.equals(codeSession)) {
	    	People people=new People();
	    	people.setId(1);
	    	people.setName(name);
	    	people.setPwd(pwd);
	    	people.setAge(18);
			People loginPeople = peopleService.login(people);
			System.out.println(loginPeople);
			if (loginPeople!=null) {
				resp.sendRedirect("main.jsp");
			}
			else{

		       req.setAttribute("error", "用户名密码错误");
		       req.getRequestDispatcher("index.jsp").forward(req, resp);
			}
		} else {
			req.setAttribute("error", "验证码错误");
           req.getRequestDispatcher("index.jsp").forward(req, resp);
		}
	}
}


 浙公网安备 33010602011771号