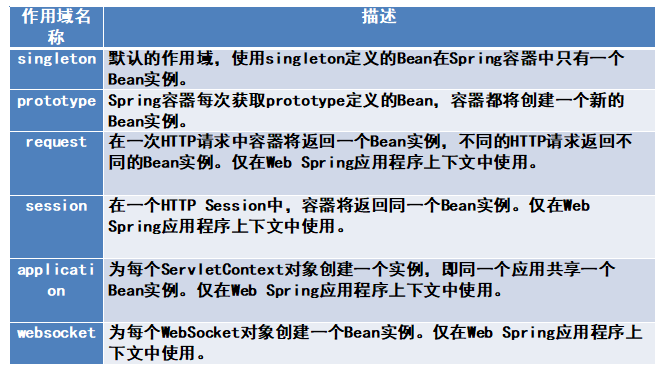
在Spring中,不仅可以完成Bean的实例化,还可以为Bean指定作用域。在Spring中为Bean的实例定义了如表所示的作用域,通过@Scope注解来实现。

演示Bean的作用域,具体步骤如下。

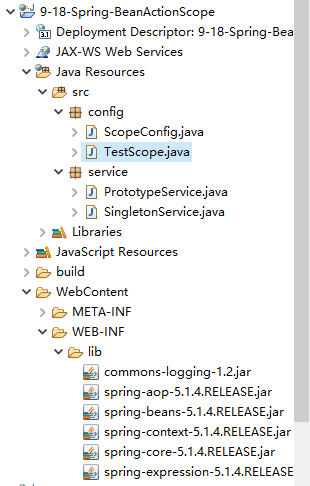
    1.使用Eclipse创建Web应用并导入JAR包

    2.编写不同作用域的Bean

    3.创建配置类

    4.创建测试类

    5.运行测试类
package service;

import org.springframework.stereotype.Service;

@Service//默认为singleton相当于@Scope("singleton")
public class SingletonService {

}
package service;

import org.springframework.context.annotation.Scope;
import org.springframework.stereotype.Service;

@Service
@Scope("prototype")
public class PrototypeService {

}
package config;

import org.springframework.context.annotation.ComponentScan;
import org.springframework.context.annotation.Configuration;

@Configuration
@ComponentScan("service")
public class ScopeConfig {

}
package config;

import org.springframework.context.annotation.AnnotationConfigApplicationContext;

import service.PrototypeService;
import service.SingletonService;

public class TestScope {
    public static void main(String[] args) {
        // 初始化Spring容器ApplicationContext
        AnnotationConfigApplicationContext appCon = new AnnotationConfigApplicationContext(ScopeConfig.class);
        SingletonService ss1 = appCon.getBean(SingletonService.class);
        SingletonService ss2 = appCon.getBean(SingletonService.class);
        System.out.println(ss1);
        System.out.println(ss2);
        PrototypeService ps1 = appCon.getBean(PrototypeService.class);
        PrototypeService ps2 = appCon.getBean(PrototypeService.class);
        System.out.println(ps1);
        System.out.println(ps2);
        appCon.close();
    }
}


