
nginx(多方式访问, 日志配置, 模块)
概要
-
访问web服务器的方式
-
Nginx的配置文件中的日志配置
-
Nginx 模块
-
访问控制模块
-
ngx_http_access_module
-
允许或拒绝某些ip访问
-
ngx_http_auth_basic_module
-
需登陆才能访问
-
ngx_http_autoindex_module
-
开启目录索引效果
-
状态监控模块
-
ngx_http_stub_status_module
-
连接数/请求数控制模块
详细
1 访问web服务器的方式
1.1 多域名的方式(常用)
-修改配置文件
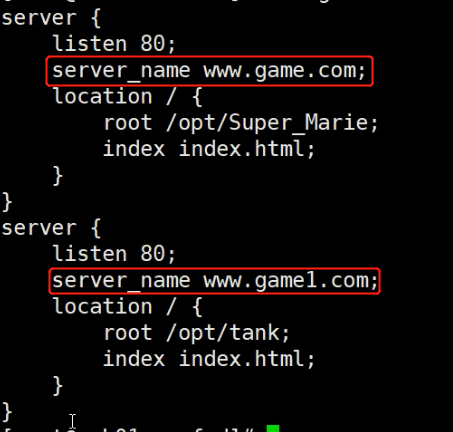
代码
server {
listen 80;
server_name www.game.com;
location / {
root /opt/Super_Marie;
index index.html;
}
}
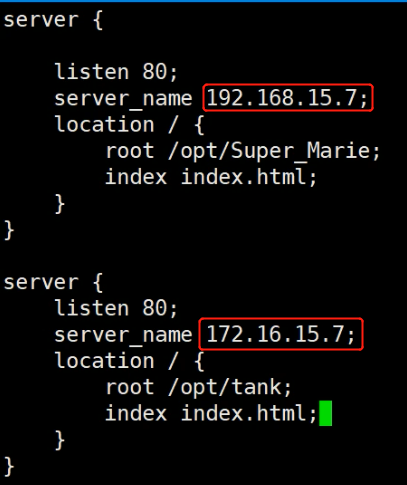
1.2 多IP的方式
-修改配置文件
1.3 多端口的方式
-修改配置文件
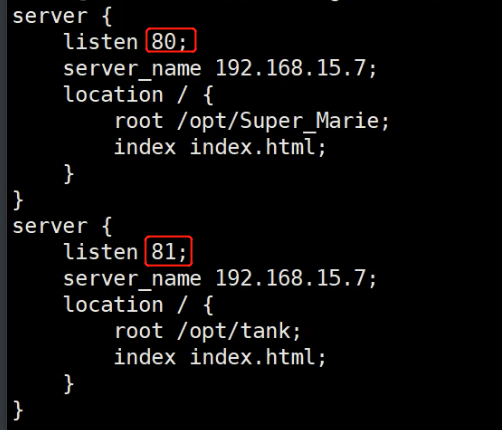
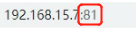
81端口访问,浏览器输入以下访问
2 Nginx的配置文件中的日志配置
cat /etc/nginx/nginx.conf
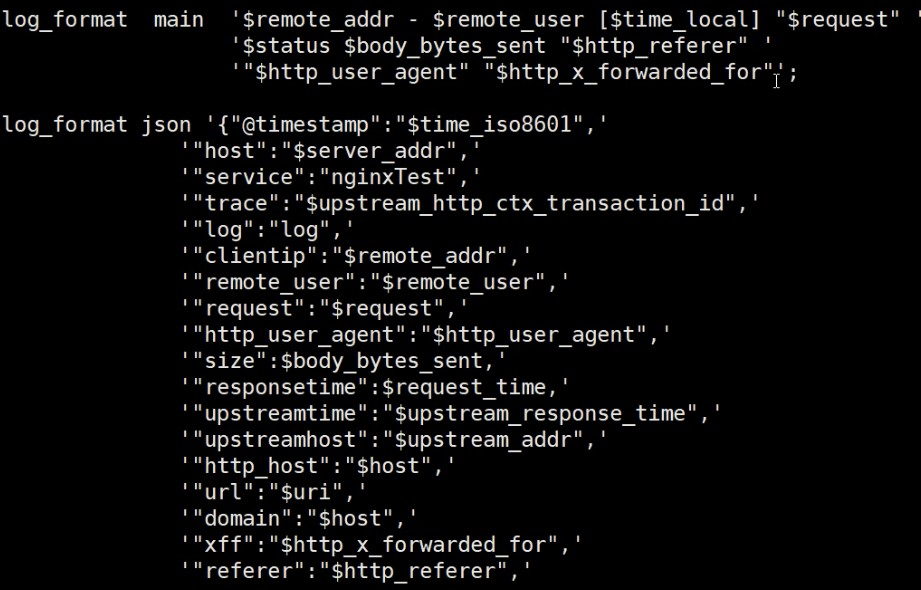
详细
-
$remote_addr(重要)
-
客户端ip(上一次访问的)
-
$remote_user
-
客户端用户名
-
$time_local
-
时间
-
$request
-
具体请求信息 如GET(访问类型) 及路径 及长/段连接
-
status
-
状态 如304 404
-
$body_bytes_sent
-
访问文件大小
-
$http_referer
-
访问的域名
-
$http_user_agent
-
客户端操作系统(iphone Android )
-
$http_x_forwarded_for (重要)
-
真实的客户端IP(在反向代理中配置生效)???
日志可用于
-
网站排错
其他
网站状态码是500的比例
- http请求返回500状态码,整体原因是:服务器内部错误
演示

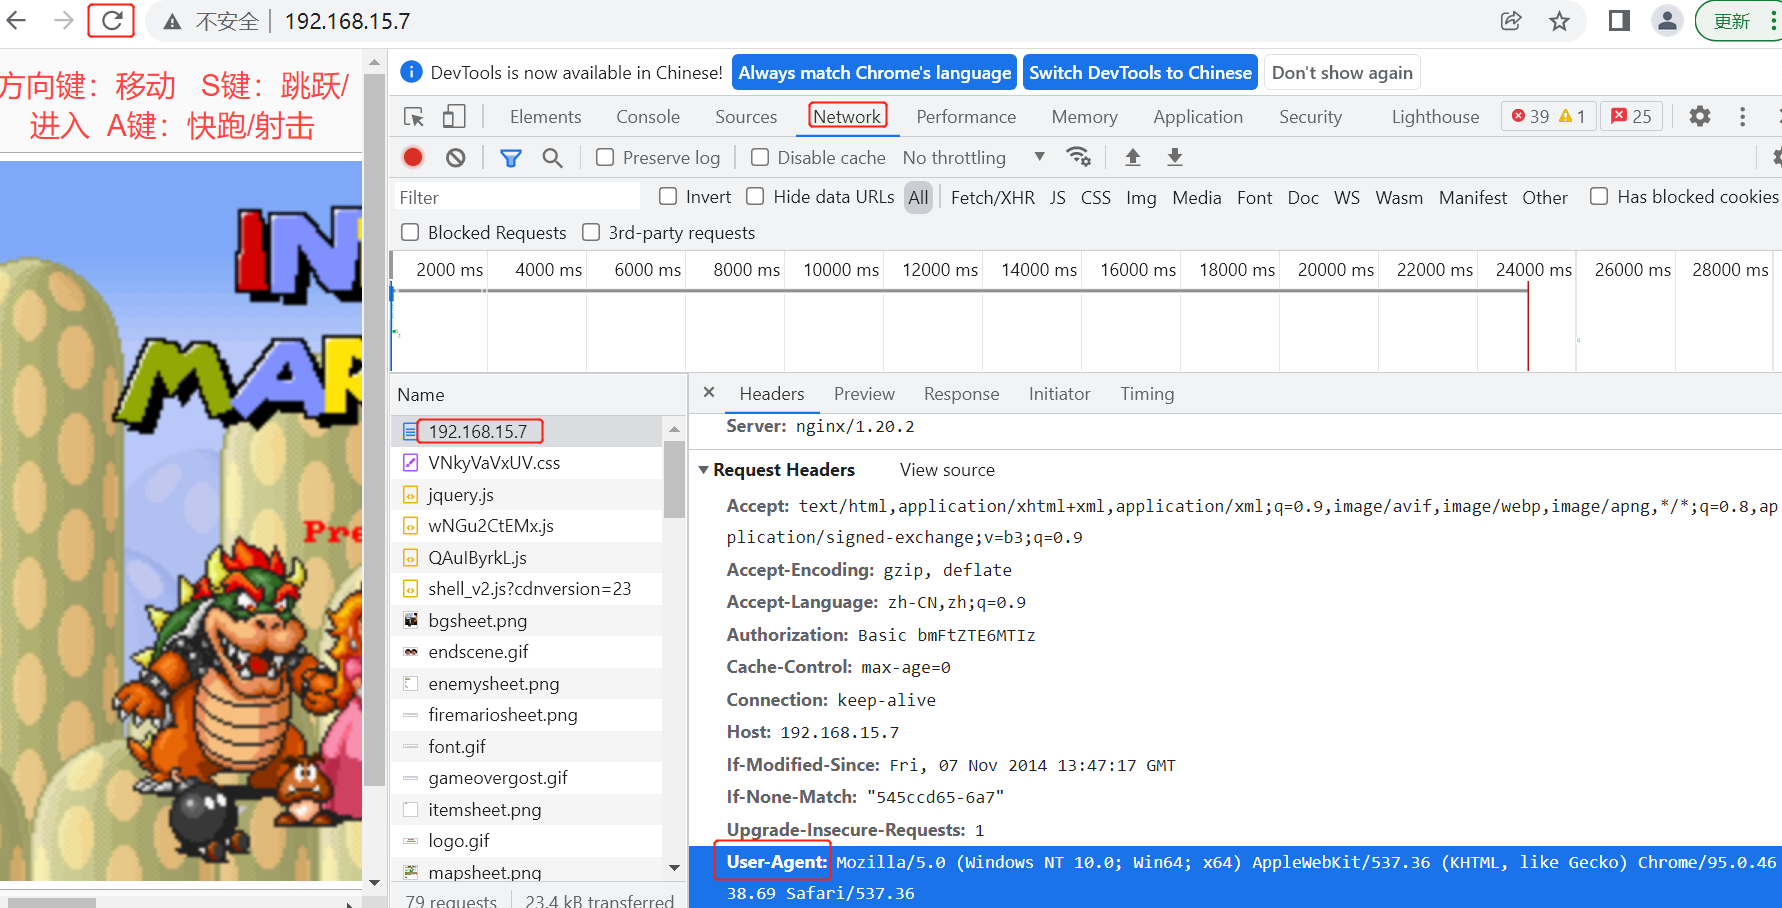
$http_user_agent
windows NT 代表PC端
3 Nginx 模块
前言
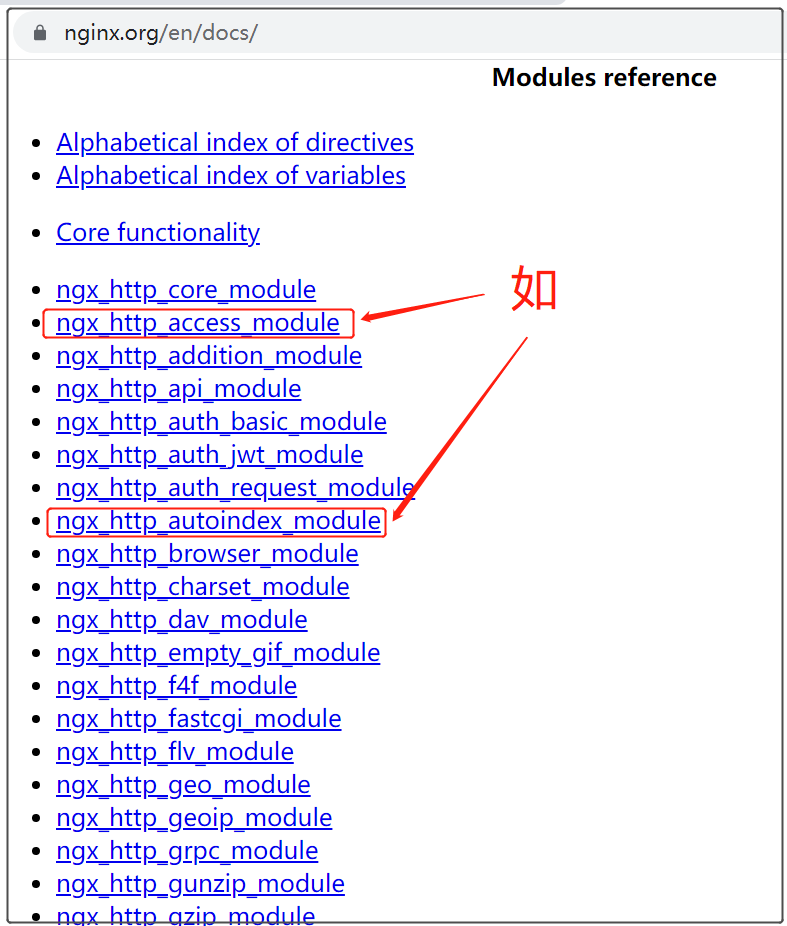
怎么找模块及其用法介绍
1) 找模块
Nginx官网https://nginx.org/ -> documentation -> 往下拉找见 "Modules reference "
2) 模块用法介绍1
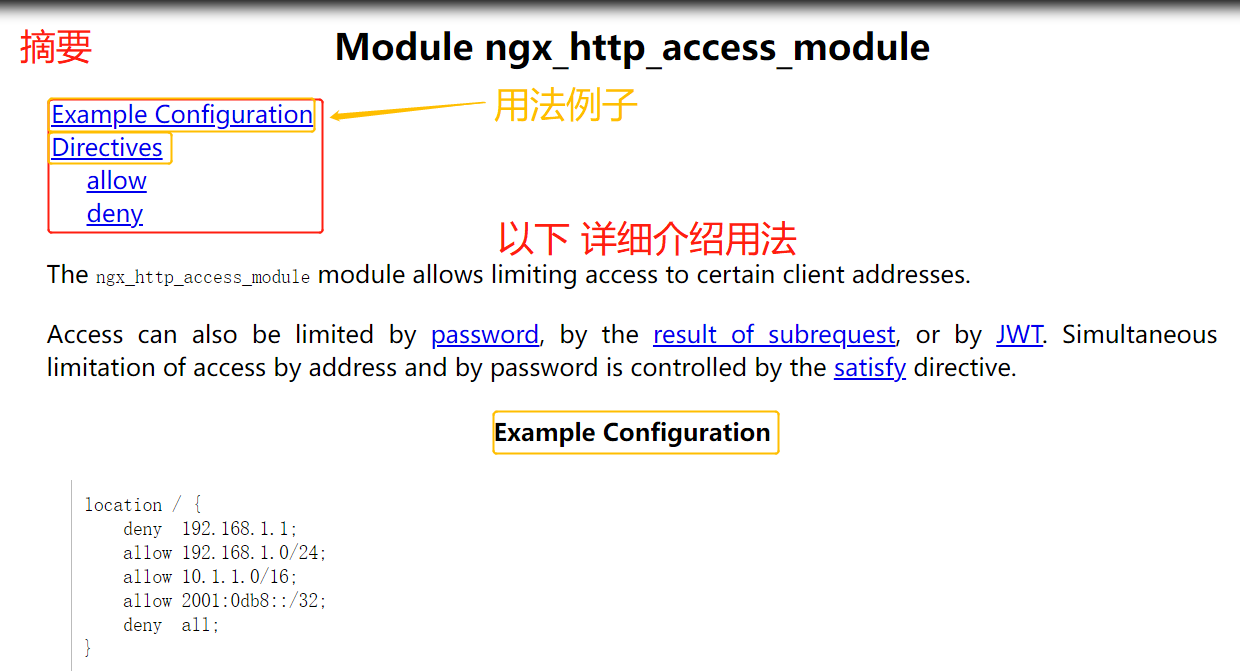
2) 模块用法介绍2
注意:

以下几个模块用法介绍
3.1 --- 访问控制模块
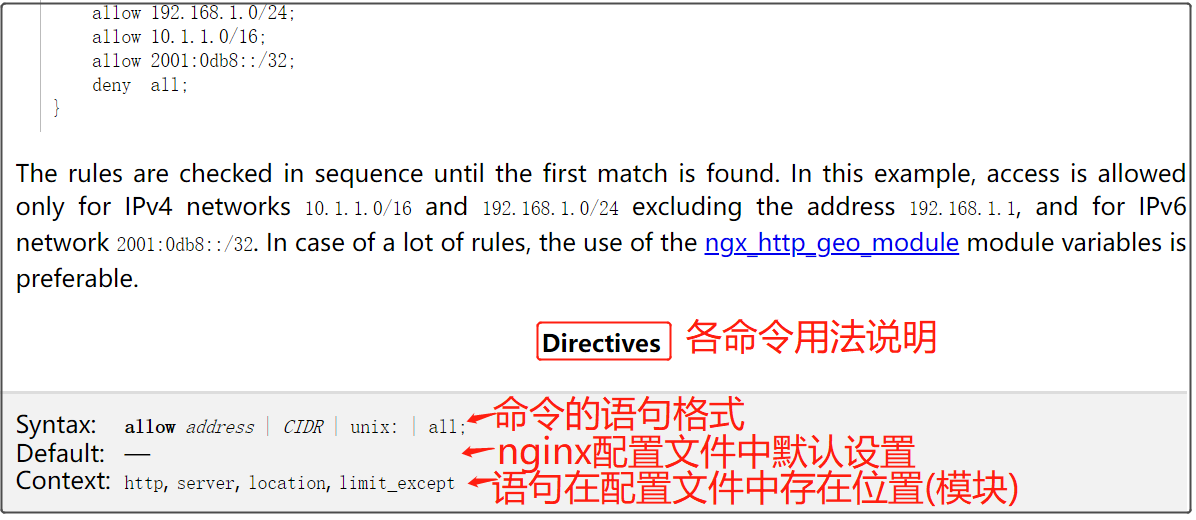
3.1.1 ->"限制某些客户端的ip访问"模块 ngx_http_access_module
1 先查看是否有该模块
结果显示 已默认加载,停止 对应
-
--without-http_access_module

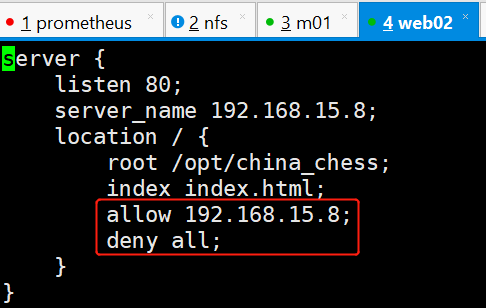
2 修改配置文件
例1
1.1修改配置文件
1.2 测试配置文件格式是否正确 nginx -t
出现test is successful,表示配置文件格式没问题
nginx: the configuration file /etc/nginx/nginx.conf syntax is ok
nginx: configuration file /etc/nginx/nginx.conf test is successful
1.3 systemctl stop nginx (关闭nginx 实际测试下来需这样才能生效)
1.4 systemctl start nginx
1.5 测试
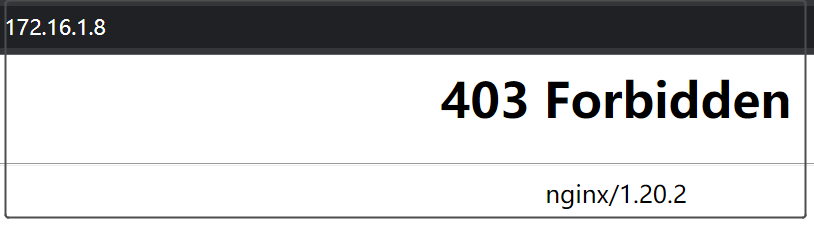
-
403 报错
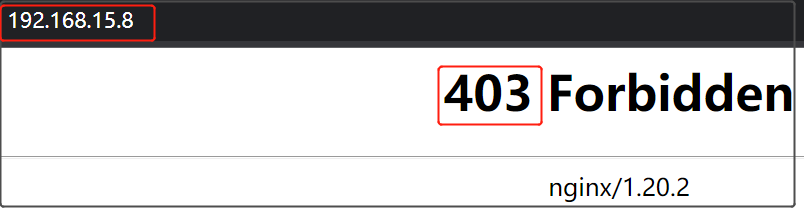
1.6 查看日志
cat /var/log/nginx/access.log
-
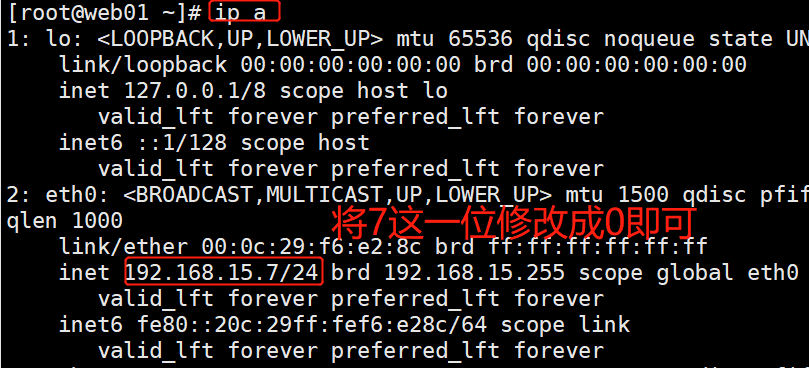
发现访问的机器ip是192.168.15.1 ,与设定只允许192.168.15.7访问

1.7 修改成windows ip
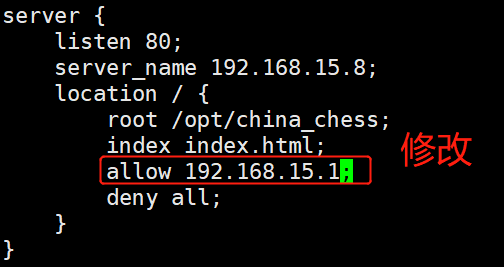
1.8 systemctl start nginx
1.9 清下浏览器缓存
1.9 输入ip测试(用无痕浏览模式测试减少缓存影响)
-
结果成功
例2 允许某个网段访问
2.1 在某局域网的任意一台机器上查ip
2.2 修改配置文件
2.3 测试配置文件格式是否正确 nginx -t
出现test is successful,表示配置文件格式没问题
nginx: the configuration file /etc/nginx/nginx.conf syntax is ok
nginx: configuration file /etc/nginx/nginx.conf test is successful
2.4 systemctl restart nginx
2.5 清下浏览器缓存 (为防治之前登陆成功的缓存造成影响)
2.6 输入ip测试(用无痕浏览模式测试减少缓存影响)
允许的规则可以访问

拒绝的规则不能访问
在web01上操作(以上配置文件都是在web02中修改) 不理解以下
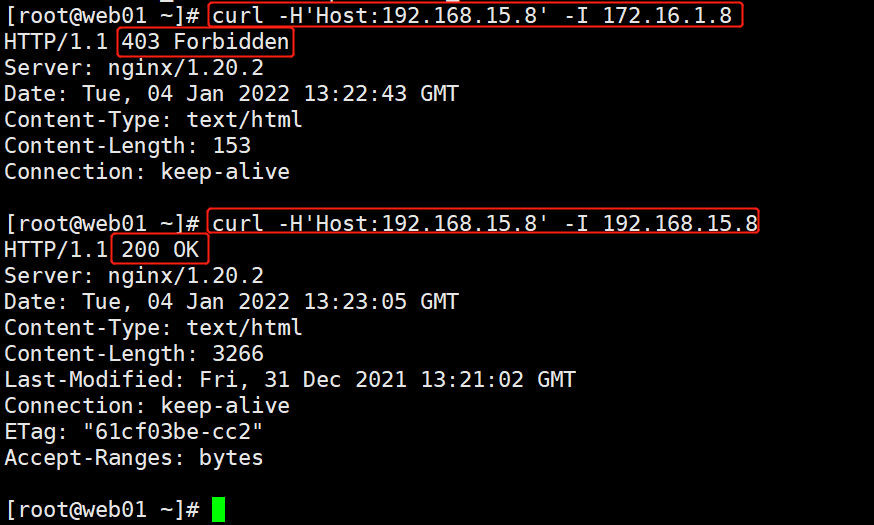
curl -I 打印response头信息
-
curl -I http://www.baidu.com
例3:只允许通过VPN来访问
-
理解:
-
allow VPN所在主机的ip;
-
deny all;
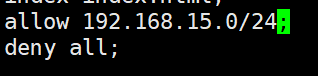
配置文件内增加以下内容,其他步骤参考例2
allow 172.16.1.81;
deny all;
3.1.2 ->登陆验证模块 ngx_http_auth_basic_module
1 首先
查看模块是否存在
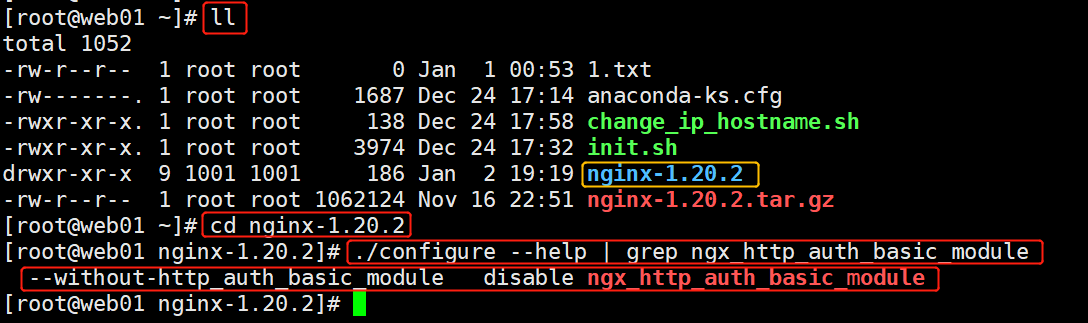
1.1 切换到存放nginx代码包(或叫解压包)目录
1.2 查看模块是否存在
-
./configure --help | grep ngx_http_auth_basic_module
说明:
默认情况下nginx已经安装了ngx_http_auth_basic_module模块,如果不需要这个模块,可以加上 --without-http_auth_basic_module
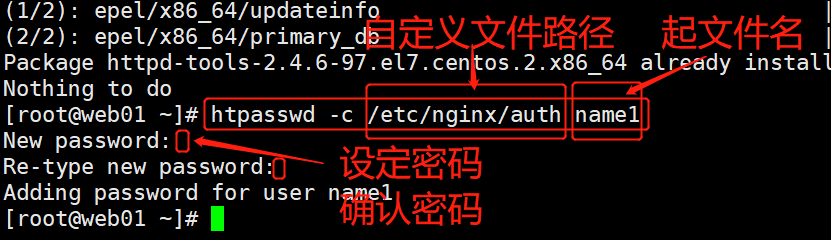
2 安装httpd-tools
[root@web01 ~]# yum install httpd-tools -y
3 生成包含"用户名和密码"文件
[root@web01 ~]# htpasswd -c /etc/nginx/auth chenyang
New password:
Re-type new password:
Adding password for user chenyang
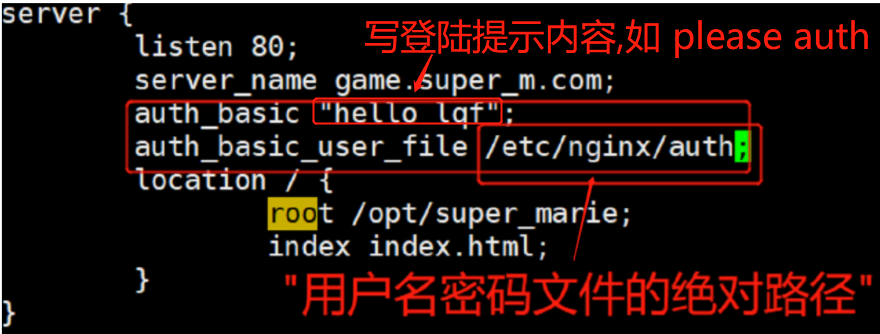
4 将相关内容加入Nginx配置文件
[root@web01 ~]# vim /etc/nginx/conf.d/game4.conf
auth_basic "Welcome To Login";
auth_basic_user_file /etc/nginx/auth;
5 测试配置文件
[root@web01 ~]# nginx -t
出现test is successful,表示配置文件格式没问题
nginx: the configuration file /etc/nginx/nginx.conf syntax is ok
nginx: configuration file /etc/nginx/nginx.conf test is successful
6 重启Nginx
[root@web01 ~]# systemctl restart nginx
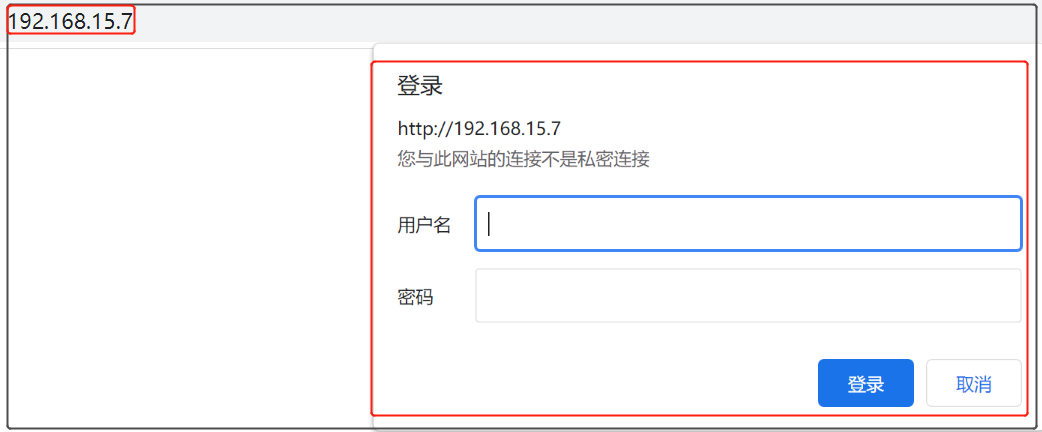
7 浏览器输入ip或域名测试(即配置文件中server_name后跟的内容)
需要用户名和密码才能登陆,测试成功
3.1.3 ->自动显示"目录"模块 ngx_http_autoindex_module
1 先查看是否有该模块
结果显示 已默认加载,停止 对应
-
--without-http_autoindex_module

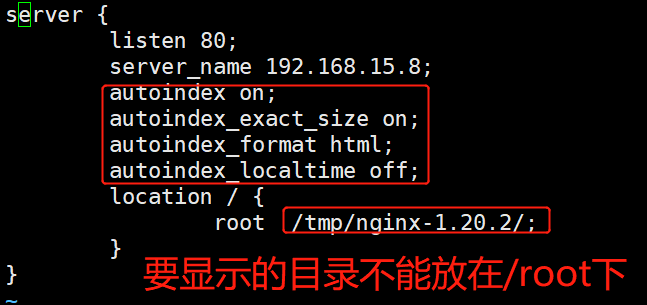
2 增加对应内容在配置文件中,如
-
vim /etc/nginx/conf.d/game_autoindex.conf
3 测试配置文件
[root@web01 ~]# nginx -t
出现test is successful,表示配置文件格式没问题
nginx: the configuration file /etc/nginx/nginx.conf syntax is ok
nginx: configuration file /etc/nginx/nginx.conf test is successful
4 重启Nginx
[root@web01 ~]# systemctl restart nginx
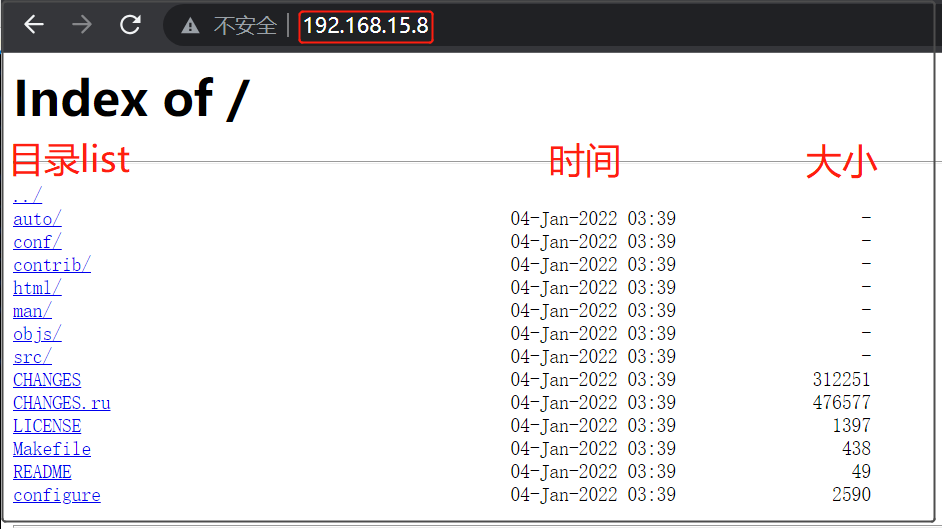
5 浏览器输入ip测试(配置文件中server_name 后是ip)
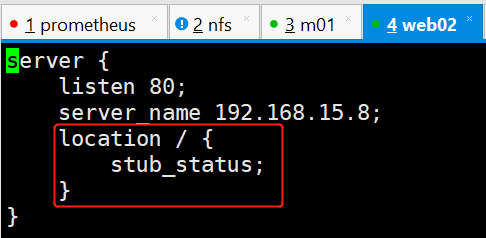
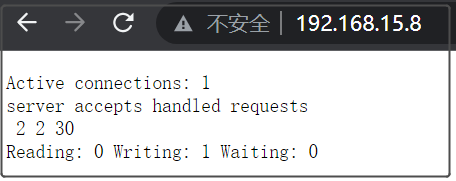
3.2 状态监控模块-> ngx_http_stub_status_module
(监控项少,了解即可,后边有专门的监控模块)
1 修改配置文件
2 nginx -t
出现test is successful,表示配置文件格式没问题
nginx: the configuration file /etc/nginx/nginx.conf syntax is ok
nginx: configuration file /etc/nginx/nginx.conf test is successful
3 systemctl restart nginx
4 测试
3.3 连接数/请求数控制模块(再看视频,做笔记)
3.3-1 控制Nginx连接数
1、安装ab测试命令
yum install httpd-tools -y
2、ab 参数
-n : 总共需要访问多少次
-c : 每次访问多少个
[root@web01 conf.d]# cat game5.conf
# limit_req_zone $remote_addr zone=one:10m rate=1r/s;
limit_conn_zone $remote_addr zone=addr:10m;
server {
listen 80;
server_name 192.168.15.7;
# limit_req zone=one burst=5;
limit_conn addr 1;
location / {
root /opt/Super_Marie;
index index.html;
}
}
3.3-2 控制Nginx请求数
1、连接池
limit_req_zone $remote_addr zone=one:10m rate=1r/s;
声明连接池 变量 名称 连接池的大小 速率
2、限制数
案例:要求每秒只能有一个访问
[root@web01 conf.d]# cat game5.conf
limit_req_zone $remote_addr zone=one:10m rate=1r/s;
server {
listen 80;
server_name 192.168.15.7;
limit_req zone=one burst=5;
location / {
root /opt/Super_Marie;
index index.html;
}
}
---补充
1查找nginx错误
1.1 输入systemctl status nginx.service -l 查看错误
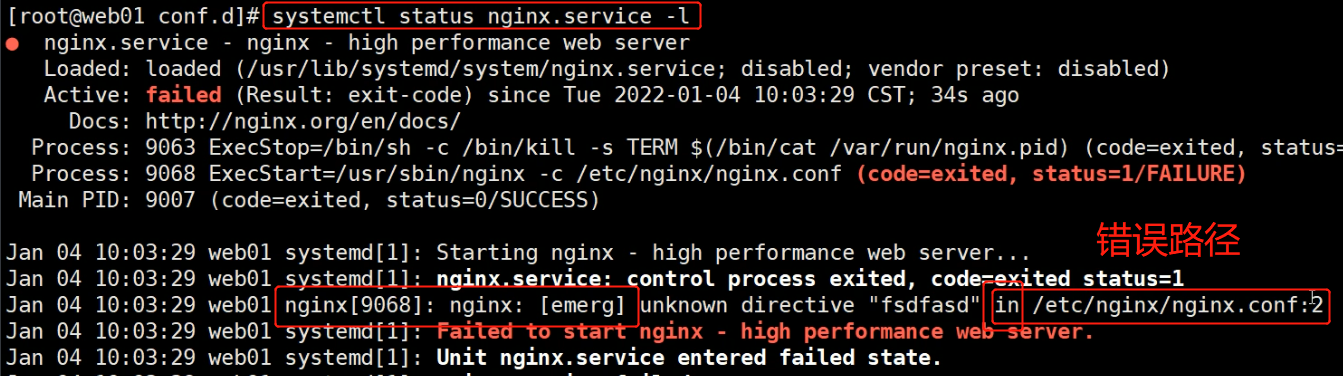
1.2 查看nginx 错误日志
-
cat /var/log/nginx/error.log
2 HTTP访问分为:
-
POST 创建数据
-
DELETE 删除数据
-
PUT 修改数据
-
GET 查看数据

 浙公网安备 33010602011771号