『笔记』KITTI
『笔记』KITTI
KITTI devkit_object包
浏览devkit_object.zip内容
This file describes the KITTI 2D object detection and orientation estimation benchmark, the 3D object detection benchmark and the bird's eye view benchmark. The benchmarks consist of 7481 training images (and point clouds) and 7518 test images (and point clouds) for each task. Despite the fact that we have labeled 8 different classes, only the classes 'Car' and 'Pedestrian' are evaluated in our benchmark, as only for those classes enough instances for a comprehensive evaluation have been labeled
The labeling process has been performed in two steps: First we hired a set of annotators, to label 3D bounding boxe tracklets in point clouds. Since for a pedestrian tracklet, a single 3D bounding box tracklet (dimensions have been fixed) often fits badly, we additionally labeled the left/right boundaries of each object by making use of Mechanical Turk. We also collected labels of the object's occlusion state, and computed the object's truncation via back-projecting a car/pedestrian model into the image plane
数据格式
folders:
- image_02/ contains the left color camera images (.png)
- label_02/ contains the left color camera label files (plain text files)
- calib/ contains the calibration for all four cameras (plain text files)
标签信息:label_2
The label files contain the following information, which can be read and written using the matlab tools (readLabels.m, writeLabels.m) provided within this devkit. All values (numerical or strings) are separated via spaces, each row corresponds to one object. The 15 columns represent:
-
type(1 value): describes the type of object: 'Car', 'Van', 'Truck', 'Pedestrian', 'Person_sitting', 'Cyclist', 'Tram', 'Misc' or 'DontCare’ -
Here, 'DontCare' labels denote regions in which objects have not been labeled, for example because they have been too far away from the laser scanner. To prevent such objects from being counted as false positives our evaluation script will ignore objects detected in don't care regions of the test set. You can use the don't care labels in the training set to avoid that your object detector is harvesting hard negatives from those areas, in case you consider non-object regions from the training images as negative examples
-
truncated(1 value): float from 0 (non-truncated) to 1 (truncated), where truncated refers to the object leaving image boundaries. 代表物体是否被截断,truncated即离开了图像边界 -
occluded(1 value): integer (0,1,2,3) indicating occlusion state: 0 = fully visible, 1 = partly occluded 2 = largely occluded, 3 = unknown -
alpha(1 value): observation angle of object, ranging [-pi..pi]- Note:相机坐标系下,以相机原点为中心,相机原点到物体中心的连线为半径,将物体绕相机y轴旋转至相机z轴,此时物体方向与相机x轴的夹角。 KITTI数据集--参数_cuichuanchen3307的博客-CSDN博客_kitti
r_y + pi/2 - theta = alpha + pi/2(即图中紫色的角是相等的)
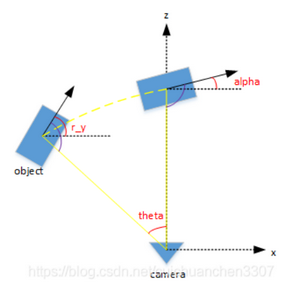
- Note:相机坐标系下,以相机原点为中心,相机原点到物体中心的连线为半径,将物体绕相机y轴旋转至相机z轴,此时物体方向与相机x轴的夹角。 KITTI数据集--参数_cuichuanchen3307的博客-CSDN博客_kitti
-
bbox(4 values): 2D bounding box of object in the image (0-based index): contains left, top(left top), right, bottom(right bottom) pixel coordinates. Note: x_min, y_min, x_max, y_max -
dimensions(3 values): 3D object dimensions: height, width, length (in meters)- Note:从这个域开始是关于3d bbox的信息,这里即是在bbox局部坐标系下对应于自己三个轴的正数数值的长宽高。注意kitti的标注信息是相机坐标系下的,相机坐标系下的bbox坐标系自然与相机坐标系遵循同样的manner,即z front/x right/y down,在这里利用查看mmdet3d中kitti_dataset 加载标注的方式说明一下
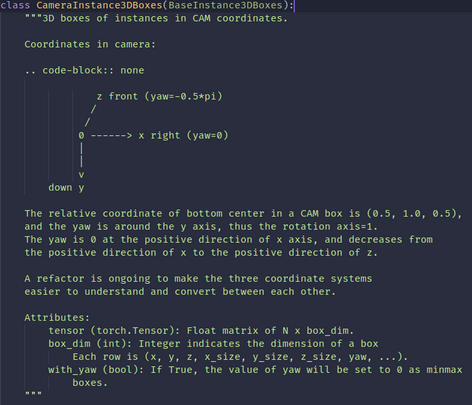
- Note:从这个域开始是关于3d bbox的信息,这里即是在bbox局部坐标系下对应于自己三个轴的正数数值的长宽高。注意kitti的标注信息是相机坐标系下的,相机坐标系下的bbox坐标系自然与相机坐标系遵循同样的manner,即z front/x right/y down,在这里利用查看mmdet3d中kitti_dataset 加载标注的方式说明一下
-
location(3 values): 3D object location x,y,z in camera coordinates (in meters)- Note:注意这里的location/origin/center是bottom center,这点通过devkit和标注文件的数值不太容易看,不过通过看mmdet3d中kitti_dataset加载标注的方式和height计算可以看出确实是这样,其在初始化的时候origin就是加载的原本的标注中的location。另外注意某个点的height也是相对于相机坐标系的height,所以其实是越下面越“高” (所以dimensions标签中的height并没有因为bottom_center而且坐标系y朝下而变成负数,因为所谓的bottom_center其实是个"top_center",按照我们习惯的重力方向理解的话)(太重要了)
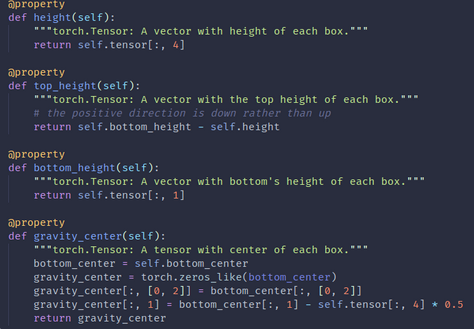
- Note:注意这里的location/origin/center是bottom center,这点通过devkit和标注文件的数值不太容易看,不过通过看mmdet3d中kitti_dataset加载标注的方式和height计算可以看出确实是这样,其在初始化的时候origin就是加载的原本的标注中的location。另外注意某个点的height也是相对于相机坐标系的height,所以其实是越下面越“高” (所以dimensions标签中的height并没有因为bottom_center而且坐标系y朝下而变成负数,因为所谓的bottom_center其实是个"top_center",按照我们习惯的重力方向理解的话)(太重要了)
-
rotation_y(1 value): rotation ry around Y-axis in camera coordinates [-pi..pi]-
Note:在照相机坐标系下,物体的全局方向角(物体前进方向z'与相机坐标系x轴的夹角)。注意,在相机坐标系下根据右手坐标系,大拇指是朝下的,所以其实对比我们之前经常使用的xyz右手系,这里的z相当于x,x相当于y,但应该出于习惯仍然定义yaw angle是相对于x轴,也就是从x开始以右手系转的。而z'是在bbox自身坐标系中向前的轴,于是就是z'与x的夹角了。从000000.txt的标注可以证实,确实是对齐x是yaw=0
-
Note:The difference between rotation_y and alpha is, that rotation_y is directly given in camera coordinates, while alpha also considers the vector from the camera center to the object center, to compute the relative orientation of the object with respect to the camera. For example, a car which is facing along the X-axis of the camera coordinate system corresponds to rotation_y=0, no matter where it is located in the X/Z plane (bird's eye view), while alpha is zero only, when this object is located along the Z-axis of the camera. When moving a car away from the Z-axis, the observation angle will change
-
-
score(1 value): only for results: Float, indicating confidence in detection, needed for p/r curves, higher is better. Note: the 16th column (score) in KITTI is only used when you make a submission to the KITTI web site- The 16'th value must be provided with a floating value of the score for a particular detection, where higher indicates higher confidence in the detection. The range of your scores will be automatically determined by our evaluation server, you don't have to normalize it, but it should be roughly linear.
对标签信息的一点小实验
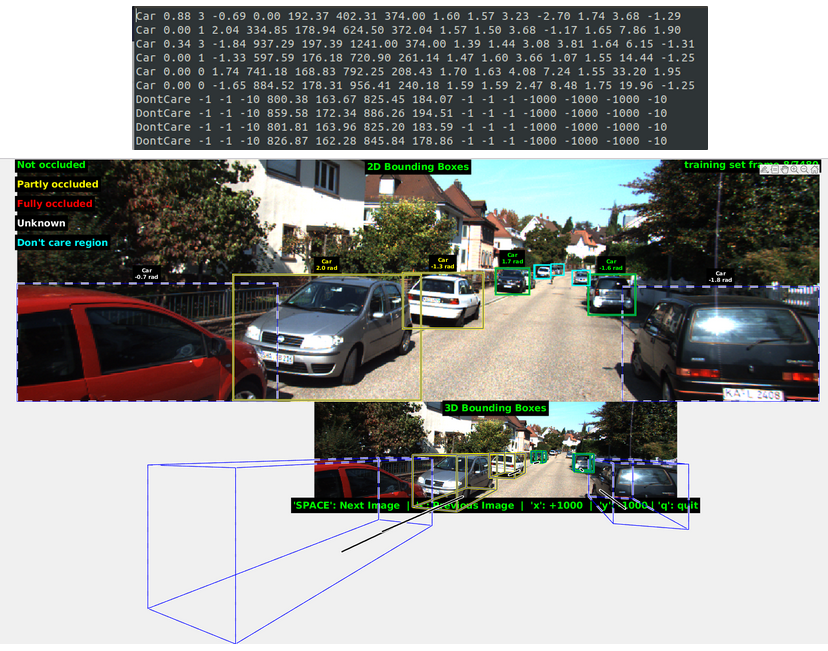
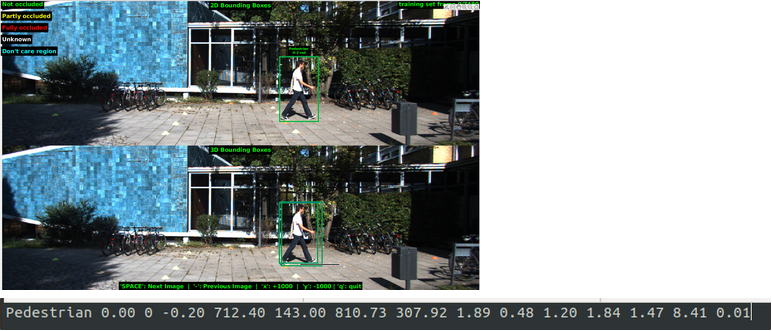
综合前三行的信息可以判断出是离我们最近的三辆车,红色第一行(occlude最大,x_min为零且z location最小),银色第二行(z不远,occlude为零且yaw angle与第一和第三行相反),黑色第三行(occlude有一点且x_max最大),可以对照其他数据检验各个量的理解是否正确
标定信息:calib
The coordinates in the camera coordinate system can be projected in the image by using the 3x4 projection matrix in the calib folder, where for the left color camera for which the images are provided, P2 must be used
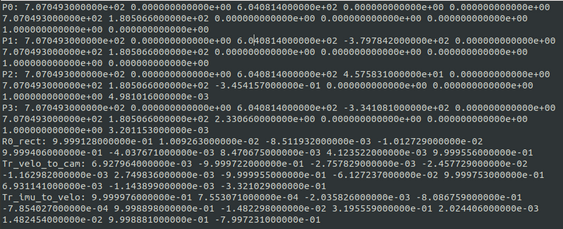

To project a point from Velodyne coordinates into the left color image, you can use this formula: x = P2 * R0_rect * Tr_velo_to_cam * y. For the right color image: x = P3 * R0_rect * Tr_velo_to_cam * y
All matrices are stored row-major, i.e., the first values correspond to the first row. R0_rect contains a 3x3 matrix which you need to extend to a 4x4 matrix by adding a 1 as the bottom-right element and 0's elsewhere. Tr_xxx is a 3x4 matrix (R|t), which you need to extend to a 4x4 matrix in the same way!
2D Object Detection Benchmark
The goal in the 2D object detection task is to train object detectors for the classes 'Car', 'Pedestrian', and 'Cyclist'.
In our evaluation we only evaluate detections/ objects larger than 25 pixel (height) in the image and do not count 'Van' as false positives for 'Car' or 'Sitting Person' as false positive for 'Pedestrian' due to their similarity in appearance.
As evaluation criterion we follow PASCAL and require the intersection-over-union of bounding boxes to be larger than 50% for an object to be detected correctly.
3D Object Detection Benchmark
The goal in the 3D object detection task is to train object detectors for the classes 'Car', 'Pedestrian', and 'Cyclist'.
The object detectors must provide BOTH the 2D 0-based bounding box in the image as well as the 3D bounding box (in the format specified above, i.e. 3D dimensions and 3D locations) and the detection score/confidence. Note that the 2D bounding box should correspond to the projection of the 3D bounding box - this is required to filter objects larger than 25 pixel (height).
To avoid FP, detections not visible on the image plane should be filtered
Bird's Eye View Benchmark
The goal in the bird's eye view detection task is to train object detectors for the classes 'Car', 'Pedestrian', and 'Cyclist' where the detectors must provide BOTH the 2D 0-based bounding box in the image as well as the 3D bounding box in bird's eye view and the detection score/confidence. This means that the 3D bounding box does not have to include information on the height axis
Are we ready for Autonomous Driving? The KITTI Vision Benchmark Suite [...]
Vision meets Robotics: The KITTI Dataset
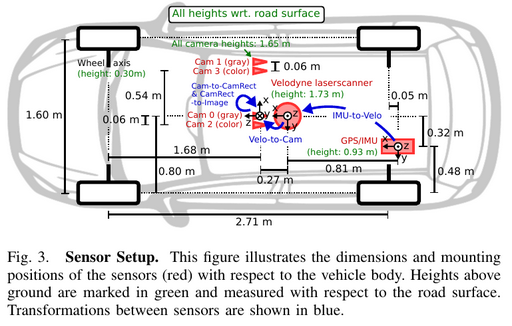
II. SENSOR SETUP
IV. SENSOR CALIBRATION
The coordinate systems: Camera: x = right, y = down, z = forward; Velodyne: x = forward, y = left, z = up; GPS/IMU: x = forward, y = left, z = up
A. Synchronization
We use the timestamps of the Velodyne 3D laser scanner as a reference and consider each spin as a frame.
Lidar and camera: we mounted a reed contact at the bottom of the continuously rotating scanner, triggering the cameras when facing forward; Lidar and IMU: as it provides updates at 100 Hz, we collect the information with the closest timestamp to the laser scanner timestamp for a particular frame
B. Camera Calibration
Note that all camera centers are aligned, i.e., they lie on the same x/y-plane. This is important as it allows us to rectify all images jointly.
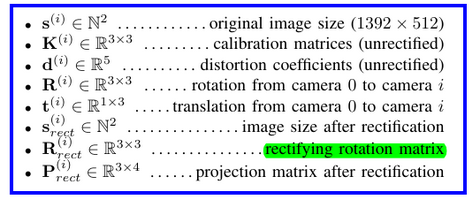
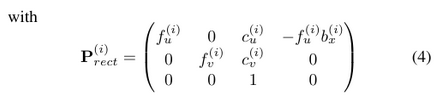
The projection of a 3D point x = (x, y, z, 1)T in rectified (rotated) camera coordinates to a point y = (u, v, 1)T in the i’th camera image is given as
- With the i'th projection matrix \(\textbf{P}_{\text{rect}}^{(i)}\). Here, \(b_x^{(i)}\) denotes the baseline (in meters) with respect to reference camera 0
Note: 这里的projection matrix就是把learning opencv那里学的两个矩阵相乘给乘开了,是一样的。记得回顾
(除了真正的M,其他camera到该ref camera是有平移的,所以不是单纯的R_rect,只有0是R_rect,因为就是它自己)
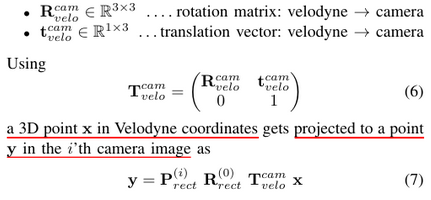
Note that in order to project a 3D point in reference camera coordinates to a point y on the i'th image plane, the rectifying rotation matrix of the reference camera R_rect^0 must be considered as well:
Here, R_rect^0 has been expanded into a 4x4 matrix by appending a fourth zero-row and column, and setting the bottom right as 1
C. Velodyne and IMU Calibration
Lidar with camera: initializing using [11], then 3 top performing stereo methods on kitti
Lidar with IMU: we first recorded a sequence with an ’∞’-loop and registered the (untwisted) point clouds using the Point-to-Plane ICP algorithm. Given two trajectories this problem corresponds to the well-known hand-eye calibration problem which can be solved using standard tools [12]

3D Object Detection for Autonomous Driving: A Survey以及相关博客的笔记
V. BENCHMARK EVALUATION
KITTI protocol has inspired almost all subsequent datasets (e.g., nuScences [84], Lyft dataset [90], Waymo open dataset [91], and Applloscape dataset
These three categories are further divided into three levels of difficulty, easy, moderate and hard, according to the level of occlusion and truncation
A. Metrics
Before introducing AP, some basic concepts should be reviewed in the the scope of object detection.
Rotated Intersection over Union (IoU3D)

Precision-recall curve (PRC)
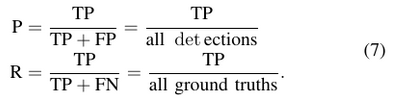
Using the IoU stated above, we can define what True Positive (TP) and False Positive (FP). A detection is considered as TP with IoU ≥ threshold, otherwise is FP. (e.g., for KITTI, the threshold is set to 0.7 for car, 0.5 for pedestrians. Note that true negative (TN) does not apply since there exist infinite possible candidates
Further, the precision P and recall R is formulated as follow
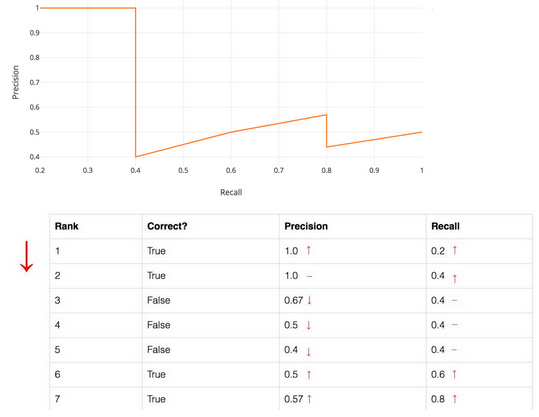
By plotting the Precision × Recall Curve (PRC), the area under the curve tends to indicate the performance of a detector
Note:注意这里PRC的画法。还记得自己最开始学的时候就是手动变化threshold来画的,但后来遇到cs4245那里的ranking problem以及ae4317的排序values(scores)然后使用"真实threshold"来画roc曲线,所以意识到这个东西实际上就是在这么求的。可以看这里:mAP (mean Average Precision) for Object Detection
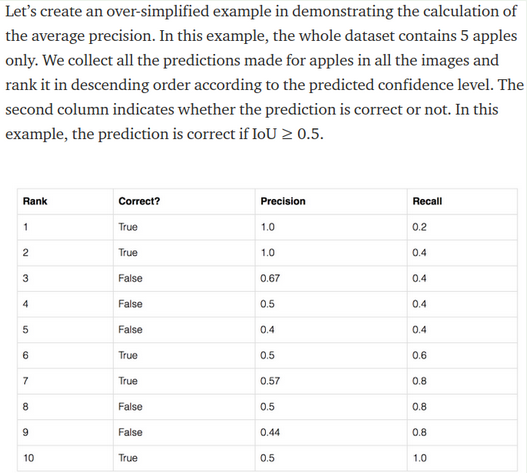
即利用ranking problem绘制PRC。设置固定的iou threshold用于判断该预测是否correct,这时各个框框通过和gt对比就已经把t/f确定了。按照预测的scores descending排序ranking,然后从上到下对以不同prediction box截止的score threshold决定当前预测的box是哪些,算precision和recall,形成PRC上面的一个data pair点
于是定下一个rank时,其和其排行榜上面的都是当前被认为是预测的box,即all detections,其中正确的就是tp,除以all detections数量算precision,注意根据定义recall依然是针对全gt算的,因为定义就是判断找回来了多少相对所有gt的。复习时,根据下面这个图从上向下一个个算几个即可了解
Average Precision (AP)
KITTI adopted AP@SN Metric as an alternative to circumvent the calculations directly
Note:前面我们已经可以根据ranking problem的方法绘制出PRC,而the general definition for the Average Precision (AP) 就是the area under the precision-recall curve above,看似可以积分直接求了。但是recall values increase as we go down the prediction ranking. However, precision has a zigzag pattern — it goes down with false positives and goes up again with true positives. In practical cases, however, zigzag-like PRC poses challenges to accurately calculate its area,所以需要进一步处理
We presume \(S=\lbrack q_0, q_0+\frac{q_1-q_0}{N-1}, q_0+2\frac{q_1-q_0}{N-1} ,...,q_1\rbrack\), where we denote by S a subset of N equally spaced recall levels
The previous version of KITTI benchmark performs evaluation on AP@S11 Metric via taking the maximum precision whose recall is greater than r̃, denote by Pinterpolate(r), of which S11 = [0, 0.1, 0.2, ..., 1] is considered
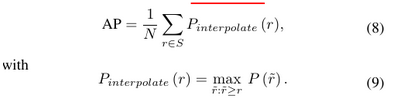
Note:所以S_N就是一个等块划分q_0到q_1为一个array的方法,其将q_0到q_1划分出中间N-1个块,所以总共是N个数。在这里应用S_N划分了不同的recall值,既然是recall那么q_0为0,q_1为1,S_11就是把0到1划了等距的十个块。在每个recall下,取新的precision为能够大于这个recall的最大值,通过这种方式将PRC finetune / smooth一下,即可据此算AP了。可以想象,在precision-recall曲线上那就是横坐标取了11个点,在每个横坐标的位置上找曲线上大于这个横坐标范围中纵坐标的最大值取平均。
而求解AP,在这里用的是求和每个位置recall的precision再取平均(除以划分时的N),是一种 average for the 11-point interpolated AP。进一步来说,更准确的另一种就是算我们一直认为的曲线下的面积即Area Under Curve (AUC)

It is important to note that, KITTI updates its protocol on 08.10.2019 for fairly assessing the performance of a detector via using AP@S40 Metric [94], with 40 recall levels being evaluated, of which S40 = [1/40, 2/40, 3/40, ..., 1].
Mean Average Precision (mAP)
The mean AP(mAP) can be easily obtained by averaging AP over all classes

where C is a subset of interested categories, APi denotes the AP of i-th class.
Note:所以留意前面整个过程都是分class进行的,从选threshold开始就是对各class单独的

 浙公网安备 33010602011771号