


UniApp小程序开发避坑事项
首次使用UniApp及其UI进行小程序开发,记录项目中需要注意事项,方便以后避坑^_^!
1、uni-forms的使用,如果需要自定义校验,uni-forms上不能绑定rules,需要在data中定义rules,然后在onReady中将uni-forms与rules绑定。
<uni-forms ref="valiForm" :modelValue="valiFormData"></uni-forms>
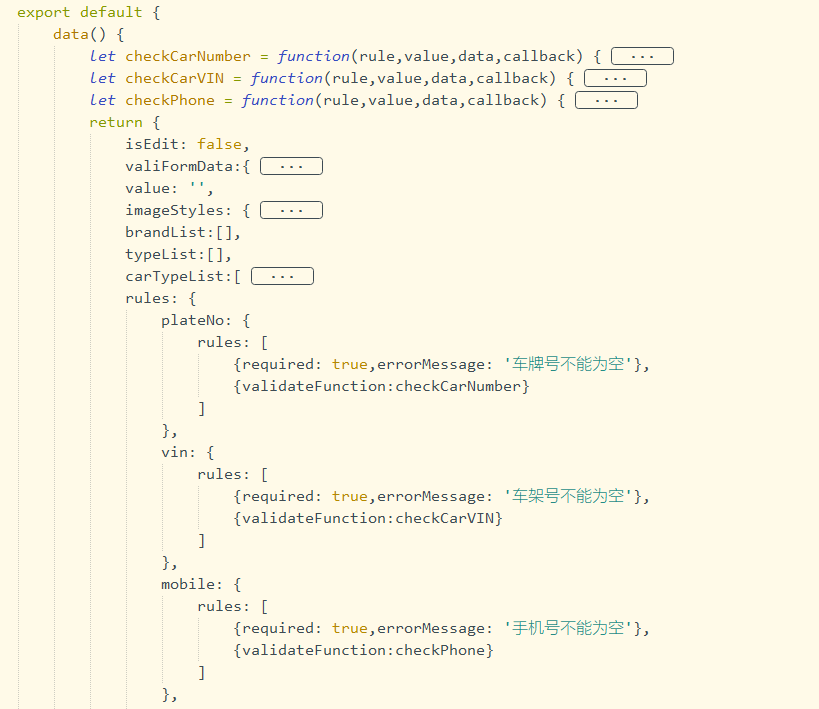
onReady() {
    this.$refs.valiForm.setRules(this.rules);
},
最后,在表单提交方法中关联校验成功或失败的方法:
submit(ref) {
    this.$refs[ref].validate().then(res => {
                //校验成功
         }).catch(err => {
                //校验失败
        console.log('err', err);
    })
},
2、uni-file-picker图片上传的使用,单图片上传,需要对部分属性进行设定,如下:(黄颜色部分需要注意必须保持一致,后台接口需要根据这个字段来获取图片)

<uni-forms-item name="idcardFront">
<input class="uni-input" v-model="valiFormData.idcardFront" placeholder="" v-show="false" />
<uni-file-picker v-model="valiFormData.idFront" limit="1" :imageStyles="imageStyles" file-mediatype="image" return-type="object" file-extname="png,jpg" @select="uploadIdcardFront">
<uni-icons custom-prefix="iconfont" type="icon-xiangji" size="40" class="slot-image"></uni-icons>
</uni-file-picker>
<uni-section class="mb-10" title="身份证正面"></uni-section>
</uni-forms-item>
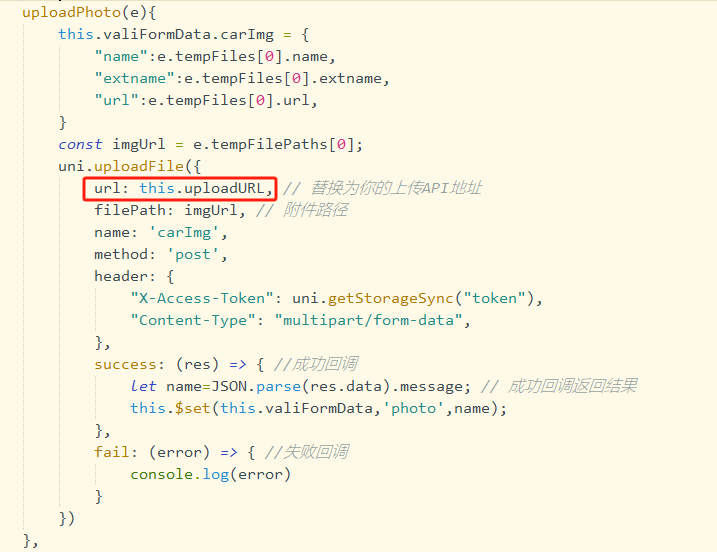
图片上传方法:(注意:小程序中不支持new FormData(),不能使用传统方法上传,需要遵循小程序中的规则)
uploadIdcardFront(e){
                const imgUrl = e.tempFilePaths[0];
                this.valiFormData.idFront = {
                    "name":e.tempFiles[0].name,
                    "extname":e.tempFiles[0].extname,
                    "url":e.tempFiles[0].url,
                }
                uni.uploadFile({
                    url: this.uploadURL, // 替换为你的上传API地址
                    filePath: imgUrl, // 附件路径
                    name: 'idcardFront',
                    method: 'post',
                    header: {
                        "X-Access-Token": uni.getStorageSync("token"),
                        "Content-Type": "multipart/form-data",
                    },
                    success: (res) => { //成功回调
                        let name=JSON.parse(res.data).message; // 成功回调返回结果
                        this.$set(this.valiFormData,'idcardFront',name);
                    },
                    fail: (error) => { //失败回调
                        console.log(error)
                    }
                })
},
考虑到,新增页面跟编辑页面共用一个页面,编辑时需要数据回显,增加一个监听事件:(后台接口返回的是图片名称而不是图片路径,编辑时图片回显需要前端拼接图片路径,黄颜色部分是必须设置的字段,否则图片不显示)
watch:{
    'valiFormData.idcardFront':{
      handler(newVal, oldVal) {
          if(newVal && this.isEdit){
              if(newVal.indexOf('https')>-1){
                  const index = newVal.lastIndexOf(".")+1;
                  const nIndex = newVal.lastIndexOf("/")+1;
                  const extname = newVal.substring(index,);
                  const name = newVal.substring(nIndex,);
                  this.valiFormData.idFront = {
                      "name":name,
                      "extname":extname,
                      "url":newVal,
                  }
              }
          }
      }
    }
}
3、列表页中点击多次进入详情页后,点击小程序左上角的回退,会发现需要回退多次才能退出,解决方案:
在添加或编辑页面的表单提交成功的方法中,使用uni.navigateBack跳转对应页面,而不是使用uni.navigateTo跳转
uni.navigateBack({
    url: '/pages/personal/myCarList/myCarList'
});
4、动态标题实现+路由传参
要实现动态标题,首先要注意pages.json文件中,对应页面的navigationBarTitleText需要设置为空,如下:
{
    "path": "pages/personal/correlateCar/correlateCar",
    "style": {
        "navigationBarTitleText": "",
        "navigationBarBackgroundColor": "#3B7FFC",
        "navigationBarTextStyle": "#fff"
    }
},
列表页中的点击事件,如下:(参数传递)
addCar(){
    uni.navigateTo({
        url: '/pages/personal/correlateCar/correlateCar?key='+encodeURIComponent(JSON.stringify({}))
    });
},
editCar(car){
    uni.navigateTo({
        url: '/pages/personal/correlateCar/correlateCar?key='+encodeURIComponent(JSON.stringify(car))
    });
},
添加页面或编辑页面中接收参数,如下:
onLoad(option) {
    let obj = JSON.parse(decodeURIComponent(option.key))
    if(obj.plateNo) {
        uni.setNavigationBarTitle({title:"编辑车辆"})
        this.valiFormData = obj;
    } else {
        uni.setNavigationBarTitle({title:"添加车辆"})
    }
},
5、上传图片路径可以通过在main.js中设定全局变量来实现,如下:

具体接口中调用,如下:


【推荐】国内首个AI IDE,深度理解中文开发场景,立即下载体验Trae
【推荐】编程新体验,更懂你的AI,立即体验豆包MarsCode编程助手
【推荐】抖音旗下AI助手豆包,你的智能百科全书,全免费不限次数
【推荐】轻量又高性能的 SSH 工具 IShell:AI 加持,快人一步
· 无需6万激活码!GitHub神秘组织3小时极速复刻Manus,手把手教你使用OpenManus搭建本
· C#/.NET/.NET Core优秀项目和框架2025年2月简报
· Manus爆火,是硬核还是营销?
· 一文读懂知识蒸馏
· 终于写完轮子一部分:tcp代理 了,记录一下