ansible剧本编写
ansible剧本编写:
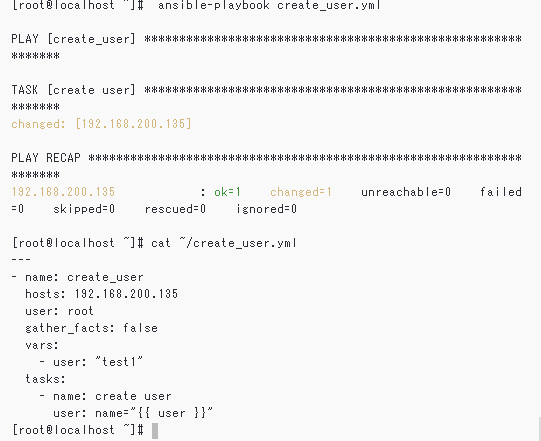
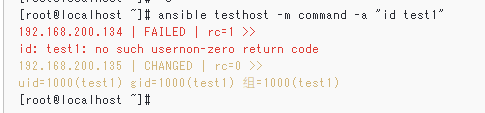
1.创建用户:
---
- name: create_user
  hosts: 192.168.200.135
  user: root
  gather_facts: false
  vars:
    - user: "test1"
  tasks:
    - name: create user
      user: name="{{ user }}"
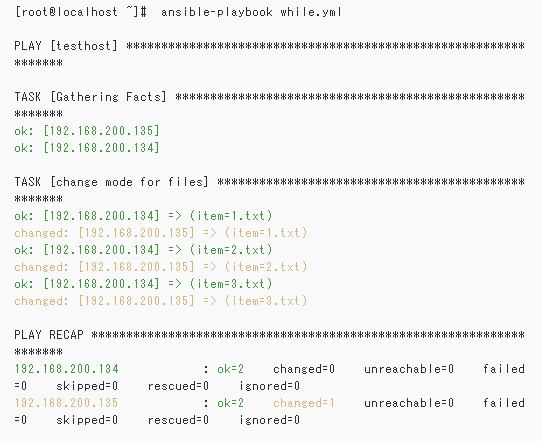
2. ansible playbook中的循环
---
- hosts: testhost
  user: root
  tasks:
    - name: change mode for files
      file: path=/tmp/{{ item }} mode=600
      with_items:
        - 1.txt
        - 2.txt
        - 3.txt
ansible实战:
ansible安装nginx
Ansible playbook实战
4.1 ansible自动化安装nginx
(1)编译安装nginx
1)使用wget下载nginx包,下载地址:
http://mirrors.sohu.com/nginx/nginx-1.9.6.tar.gz
2)解压下载的nginx包
./configure --prefix=/usr/local/nginx
make && make install
3)编写/etc/init.d/nginx文件
内容如下:
#!/bin/bash

# chkconfig: - 30 21

# description: http service.

# Source Function Library

. /etc/init.d/functions

# Nginx Settings

NGINX_SBIN="/usr/local/nginx/sbin/nginx"

NGINX_CONF="/usr/local/nginx/conf/nginx.conf"

NGINX_PID="/usx/local/nginx/logs/nginx.pid"

RETVAL=0

prog="Nginx"


start()

{

        echo -n $"Starting $prog: "

        mkdir -p /dev/shm/nginx_temp

        daemon $NGINX_SBIN -c $NGINX_CONF

        RETVAL=$?

        echo

        return $RETVAL

}

stop()

{

        echo -n $"Stopping $prog: "

        killproc -p $NGINX_PID $NGINX_SBIN -TERM

        rm -rf /dev/shm/nginx_temp

        RETVAL=$?

        echo

        return $RETVAL

}

reload()

{

        echo -n $"Reloading $prog: "

        killproc -p $NGINX_PID $NGINX_SBIN -HUP

        RETVAL=$?

        echo

        return $RETVAL

}

restart()

{

        stop

        start

}

configtest()

{

        $NGINX_SBIN -c $NGINX_CONF -t

        return 0

}

case "$1" in

        start)

                start

                ;;

        stop)

                stop

                ;;

        reload)

                reload

                ;;

        restart)

                restart

                ;;

        configtest)

                configtest

                ;;

        *)

                echo $"Usage: $0 {start|stop|reload|restart|configtest}"

                RETVAL=1

esac

exit $RETVAL
4)清空配置文件并重新编写
# > /usr/local/nginx/conf/nginx.conf
内容如下:

user nobody nobody; //定义nginx运行的用户和用户组

worker_processes 2; //nginx进程数,一般为CPU总核心数

error_log /usr/local/nginx/logs/nginx_error.log crit; //全局错误日志定义类型

pid /usr/local/nginx/logs/nginx.pid; //进程文件

worker_rlimit_nofile 51200;

events //工作模式与连接数上限

{

use epoll;

worker_connections 6000;

}

http //http下的一些配置

{

include mime.types; //文件扩展名与文件类型映射表

default_type application/octet-stream; //默认文件类型

server_names_hash_bucket_size 3526;

server_names_hash_max_size 4096;

log_format combined_realip '$remote_addr $http_x_forwarded_for [$time_local]'

'$host "$request_uri" $status'

'"$http_referer" "$http_user_agent"';

sendfile on; //开启高效文件传输模式

tcp_nopush on; //防止网络阻塞

keepalive_timeout 30; //长连接超时时间,单位为秒

client_header_timeout 3m;

client_body_timeout 3m;

send_timeout 3m;

connection_pool_size 256;

client_header_buffer_size 1k;

large_client_header_buffers 8 4k;

request_pool_size 4k;

output_buffers 4 32k;

postpone_output 1460;

client_max_body_size 10m;

client_body_buffer_size 256k;

client_body_temp_path /usr/local/nginx/client_body_temp;

proxy_temp_path /usr/local/nginx/proxy_temp;

fastcgi_temp_path /usr/local/nginx/fastcgi_temp;

fastcgi_intercept_errors on;

tcp_nodelay on; //防止网络阻塞

gzip on; //开启gzip压缩输出

gzip_min_length 1k;

gzip_buffers 4 8k;

gzip_comp_level 5;

gzip_http_version 1.1;

gzip_types text/plain application/x-javascript text/css text/htm

application/xml;

server //虚拟主机配置

{

listen 80;

server_name localhost;

index index.html index.htm index.php;

root /usr/local/nginx/html;

location ~ \.php$

{

include fastcgi_params;

fastcgi_pass unix:/tmp/php-fcgi.sock;

fastcgi_index index.php;

fastcgi_param SCRIPT_FILENAME /usr/1ocal/nginx/html$fastcgi_script_name;

}

}

}
5)编写完成后可以检查一下
# /usr/local/nginx/sbin/nginx -t
6)启动nginx
# service nginx start
编译安装完成
(2)环境准备
1)将nginx.tar.gz复制到/etc/ansible/nginx_install/roles/install/files下
启动脚本和配置文件都放到/etc/ansible/nginx_install/roles/install/template下
# mv nginx.tar.gz /etc/ansible/nginx_install/roles/install/files/
# cp nginx/conf/nginx.conf /etc/ansible/nginx_install/roles/install/templates/
# cp /etc/init.d/nginx /etc/ansible/nginx_install/roles/install/templates/
2)编写需要的yml文件
[root@ansible2 nginx_install]# cat install.yml
---
- hosts: 192.168.2.101 //入口文件
remote_user: root
gather_facts: True
roles:
- common
- install
[root@ansible2 nginx_install]# cat roles/common/tasks/main.yml
- name: install initialization require software //安装需要的依赖
yum: name={{ item }} state=installed
with_items:
- zlib-devel
- pcre-devel
- gcc
[root@ansible2 nginx_install]# cat roles/install/vars/main.yml
nginx_user: www //定义所需变量

nginx_port: 80

nginx_basedir: /usr/local/nginx

[root@ansible2 nginx_install]# cat roles/install/tasks/copy.yml

- name: Copy Nginx Software //复制压缩包

  copy: src=nginx.tar.gz dest=/tmp/nginx.tar.gz owner=root group=root

- name: Uncompression Nginx Software //解压压缩包

  shell: tar zxf /tmp/nginx.tar.gz -C /usr/local/

- name: Copy Nginx Start Script //复制启动脚本

  template: src=nginx dest=/etc/init.d/nginx owner=root group=root mode=0755

- name: Copy Nginx Config //复制nginx配置文件

  template: src=nginx.conf dest={{ nginx_basedir }}/conf/ owner=root group=root

mode=0644

[root@ansible2 nginx_install]# cat roles/install/tasks/install.yml

- name: create nginx user //创建用户

  user: name={{ nginx_user }} state=present createhome=no shell=/sbin/nologin

- name: start nginx service //开启服务

  shell: /etc/init.d/nginx start

- name: add boot start nginx service //加入开机启动

  shell: chkconfig --level 345 nginx on

- name: delete nginx compression files //删除压缩包

  shell: rm -rf /tmp/nginx.tar.gz

[root@ansible2 nginx_install]# cat roles/install/tasks/main.yml

- include: copy.yml //调用copy.yml和install.yml

- include: install.yml
(3)执行文件
运行install.yml文件
# ansible-playbook /etc/ansible/nginx_install/install.yml
注:要检查远程机器存在端口占用,及时卸载。
结果如下:
[root@ansible-01 ~]# ansible-playbook /etc/ansible/nginx_install/install.yml
PLAY [192.168.2.31] ****************************************************************************************************


TASK [Gathering Facts] *************************************************************************************************

ok: [192.168.2.31]


TASK [common : install initializtion requre software] ******************************************************************

[DEPRECATION WARNING]: Invoking "yum" only once while using a loop via squash_actions is deprecated. Instead of using a

 loop to supply multiple items and specifying `name: "{{ item }}"`, please use `name: ['zlib-devel', 'pcre-devel']` and

 remove the loop. This feature will be removed in version 2.11. Deprecation warnings can be disabled by setting

deprecation_warnings=False in ansible.cfg.

ok: [192.168.2.31] => (item=[u'zlib-devel', u'pcre-devel'])


TASK [install : Copy Nginx Software] ***********************************************************************************

changed: [192.168.2.31]


TASK [install : Uncompression Nginx Software] **************************************************************************

[WARNING]: Consider using the unarchive module rather than running 'tar'.  If you need to use command because unarchive

is insufficient you can add 'warn: false' to this command task or set 'command_warnings=False' in ansible.cfg to get

rid of this message.

changed: [192.168.2.31]


TASK [install : Copy Nginx Start Script] *******************************************************************************

ok: [192.168.2.31]


TASK [install : Copy Nginx Config] *************************************************************************************

ok: [192.168.2.31]


TASK [install : Create Nginx User] *************************************************************************************

ok: [192.168.2.31]


TASK [install : Start Nginx Service] ***********************************************************************************

changed: [192.168.2.31]


TASK [install : Add Boot start Nginx service] **************************************************************************

changed: [192.168.2.31]


TASK [install : Delete Nginx compression files] ************************************************************************

[WARNING]: Consider using the file module with state=absent rather than running 'rm'.  If you need to use command

because file is insufficient you can add 'warn: false' to this command task or set 'command_warnings=False' in

ansible.cfg to get rid of this message.

changed: [192.168.2.31]


PLAY RECAP *************************************************************************************************************

192.168.2.31               : ok=10   changed=5    unreachable=0    failed=0    skipped=0    rescued=0    ignored=0

 浙公网安备 33010602011771号