nginx简单学习总结
一、简介
1、什么是nginx
Nginx是一个高性能的HTTP和反向代理服务器,特点是占用内存少,并发能力强,事实上nginx的并发能力确实在同类型的网页服务器中表现较好
Nginx专为性能优化而开发,性能是其最重要的考量,实际上非常注重效率,能够经受高负载的考研,有报告表明,能支持高达50000个并发连接数。
2、反向代理
(1)正向代理
在客户端(浏览器)配置代理服务器,通过代理服务器进行互联网访问

(2)反向代理
我们只需要将请求发送到反向代理服务器,由反向代理服务器去选择目标服务器获取数据后,再返回给客户端,此时反向代理服务器和目标服务器对外就是一个服务器,暴露的是代理服务器地址,隐藏真实的服务器地址。
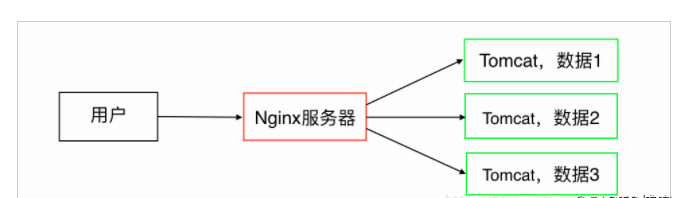
3、负载均衡
单个服务器解决不了,我们增加服务器的数量,然后将请求分发到各个服务器上,将原先请求集中到单个我服务器上的情况改为将请求分发到多个服务器上,将负载分发到不同的服务器,也就是我们所说的负载均衡。
4、动静分离
为了加快网站的解析速度,可以把动态页面和静态页面由不同的服务器来解析,加快解析速度。降低原来单个服务器的压力
二、nginx
1、nginx安装
(1)依赖安装
yum -y install make zlib zlib-devel gcc-c++ libtool openssl openssl-devel
(2)nginx安装
下载:wget http://downloads.sourceforge.net/project/pcre/pcre/8.35/pcre-8.35.tar.gz
解压:tar zxvf pcre-8.35.tar.gz
然后进入解压目录,执行./configure
  最后执行 make&&make install,安装完成之后在usr多出来一个文件夹local/nginx,在nginx中sbin有启动脚本

注意:查看开放的端口号
systemctl status firewalld		 			#查看firewall防火墙状态
firewall-cmd --list-ports					#查看firewall防火墙开放端口
systemctl start firewalld.service			    #打开firewall防火墙
systemctl stop firewalld.service			    #关闭firewall防火墙
firewall-cmd --reload						#重启firewal防火墙
systemctl disable firewalld.service			    #禁止firewall开机启动

#开放firewall防火墙端口,需重启防火墙生效 firewall-cmd --zone=public --add-port=80/tcp --permanent

命令含义: –zone #作用域 –add-port=80/tcp #添加端口,格式为:端口/通讯协议 –permanent #永久生效,没有此参数重启后失效
三、nginx操作的常用命令
1、查看nginx的版本号
[root@torchstar sbin]# ./nginx -v
nginx version: nginx/1.19.6
[root@torchstar sbin]#
2、关闭nginx
[root@torchstar sbin]# ./nginx -s stop
nginx: [error] open() "/usr/local/nginx/logs/nginx.pid" failed (2: No such file or directory)
[root@torchstar sbin]# ps -ef | grep nginx
root      9423  8914  0 23:12 pts/0    00:00:00 grep --color=auto nginx
3、启动nginx
[root@torchstar sbin]# ./nginx
[root@torchstar sbin]# ps -ef | grep nginx
root      9427     1  0 23:13 ?        00:00:00 nginx: master process ./nginx
nobody    9428  9427  0 23:13 ?        00:00:00 nginx: worker process
root      9430  8914  0 23:13 pts/0    00:00:00 grep --color=auto nginx
4、重加载
[root@torchstar sbin]# ./nginx -s reload
四、配置文件解析
1、全局块
从配置文件到events块之间的内容,主要配置一些影响nginx服务器整体运行配置指令,主要包括配置nginx服务器的用户组、允许生成的worker process数,进程PID存放路径、日志存放路径和类型以及配置文件的引入
#user  nobody;
#Nginx用户及组:用户 组。window下不指定


worker_processes  1;
#工作进程:数目。根据硬件调整,通常等于CPU数量或者2倍于CPU。


#error_log  logs/error.log;
#error_log  logs/error.log  notice;
#error_log  logs/error.log  info;
#错误日志:存放路径。

#pid        logs/nginx.pid;
#pid(进程标识符):存放路径。
2、events块
event块涉及的指令主要影响Nginx服务器与用户的网络连接,常用的设置包括是否开启一对多work process下的网络连接进行序列化,是否允许同时接收多个网络连接,选取哪种事件驱动模型来处理连接请求,每个word process可以同时支持的最大连接数量等,
events {
    worker_connections  1024;
#支持的最大连接数量为1024、这部分的配置对nginx的性能影响较大在实际中应该灵活配置
}
3、http块
这个是nginx中修改最频繁的部分,代理,缓存,日志定义等绝大多数功能和第三方模块的配置都在这里,需要注意的是:http块也可以包括http全局块、server块
http块指令包括文件的引入、MIME-TYPE定义、日志自定义、连接超时时间、单链接请求数上限等。
server块
http {
    include       mime.types;
    default_type  application/octet-stream;

    #log_format  main  '$remote_addr - $remote_user [$time_local] "$request" '
    #                  '$status $body_bytes_sent "$http_referer" '
    #                  '"$http_user_agent" "$http_x_forwarded_for"';

    #access_log  logs/access.log  main;

    sendfile        on;
    #tcp_nopush     on;

    #keepalive_timeout  0;
    keepalive_timeout  65;

    #gzip  on;

    server {
        listen       80;
        server_name  localhost;

        #charset koi8-r;

        #access_log  logs/host.access.log  main;

        location / {
            root   html;
            index  index.html index.htm;
        }

        #error_page  404              /404.html;

        # redirect server error pages to the static page /50x.html
        #
        error_page   500 502 503 504  /50x.html;
        location = /50x.html {
            root   html;
        }

        # proxy the PHP scripts to Apache listening on 127.0.0.1:80
        #
        #location ~ \.php$ {
        #    proxy_pass   http://127.0.0.1;
        #}

        # pass the PHP scripts to FastCGI server listening on 127.0.0.1:9000
        #
        #location ~ \.php$ {
        #    root           html;
        #    fastcgi_pass   127.0.0.1:9000;
        #    fastcgi_index  index.php;
        #    fastcgi_param  SCRIPT_FILENAME  /scripts$fastcgi_script_name;
        #    include        fastcgi_params;
        #}

        # deny access to .htaccess files, if Apache's document root
        # concurs with nginx's one
        #
        #location ~ /\.ht {
        #    deny  all;
        #}
    }


    # another virtual host using mix of IP-, name-, and port-based configuration
    #
    #server {
    #    listen       8000;
    #    listen       somename:8080;
    #    server_name  somename  alias  another.alias;

    #    location / {
    #        root   html;
    #        index  index.html index.htm;
    #    }
    #}


    # HTTPS server
    #
    #server {
    #    listen       443 ssl;
    #    server_name  localhost;

    #    ssl_certificate      cert.pem;
    #    ssl_certificate_key  cert.key;

    #    ssl_session_cache    shared:SSL:1m;
    #    ssl_session_timeout  5m;

    #    ssl_ciphers  HIGH:!aNULL:!MD5;
    #    ssl_prefer_server_ciphers  on;

    #    location / {
    #        root   html;
    #        index  index.html index.htm;
    #    }
    #}

}
五、nginx配置实例
1、实现效果
打开浏览器,在浏览器中输入网址www.pekin.store,跳转到linux系统tomcat主页页面
(1)在linux中安装tomcat环境,使用默认的端口8080
#防火墙开启的话
#添加防火墙端口
firewall-cmd --zone=public --add-port=8081/tcp --permanent
firewall-cmd --reload
查看开放的端口号
firewall-cmd --list-ports 或者
firewall-cmd --list-all

#(确保阿里云的安全组入口配置成功)

#修改本地hosts文件添加一条
47.114.159.120 www.test.com

#然后修改nginx中的nginx.conf文件
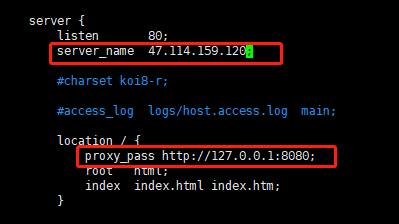
将localhost 修改为ip
添加proxy_pass http://127.0.0.1:8080;
配置完成后需要,重启nginx
 ./nginx -s reload
现在访问网址就可以到到tomcat的欢迎界面

2、通过访问不同的路径来跳转不同的端口号
www.pekin.store/edu/ 直接跳转到:www.pekin.store:8080
www.pekin.store/dev/    直接跳转到:www.pekin.store:8081

准备两个tomcat服务器,一个端口围殴8080,一个端口为8081
修改nginx配置文件

 配置中
  = :用于正则表达式的uri前,要求请求字符串与uri严格匹配,如果匹配成功,就停止向下搜索并立即处理该请求。

  ~:用于表示uri包含正则表达式,并且区分大小写

  ~* 用于表示uri包含正则表达式,并且不区分大小写

  ^~:用于不含正则表达式的uri前,要求nginx服务器找到标识uri和请求字符串匹配度最高的location后,立即使用此location处理请求,而不再使用location块中的正则uri和请求字符串做匹配。

  注意:如果uri包含正则表达式则必须要有~或者~*标识
3、负载均衡
实现效果,访问网址,请求分发到不同的端口中
准备两台tomcat 一台8080 一台8081
创建相同的项目目录,
配置nginx
http {
include mime.types;
default_type application/octet-stream;
sendfile on;
keepalive_timeout 65;
#gzip on;
upstream myserver{ #添加
server 47.114.159.120:8080;
server 47.114.159.120:8081;
}
server {
listen 80;
server_name 47.114.159.120; #修改
location / {
proxy_pass http://myserver; #添加
proxy_connect_timeout 10;
}
访问测试,刷新界面,跳转到不同的服务器中。
nginx分配服务器的策略 :
第一种:轮询(默认)
每个请求按时间顺序逐一分配到不同的后端服务器,如果后端服务器宕掉,自动剔除
第二种:weight
weight代表权重默认为1,权重越高,分配的客户端越多
upstream myserver{    #添加
server 47.114.159.120:8080 weigth=10;
server 47.114.159.120:8081 weigth=6;
}
第三种:ip_hash
每个请求按访问ip是hash结果分配,这样每个访客固定访问一个后端服务器,可以解决session问题
upstream myserver{    #添加
ip_hash;
server 47.114.159.120:8080;
server 47.114.159.120:8081;
}
第四种:fair(第三方)
按照访问服务器的响应时间来分配请求,响应时间越短优先分配
4、动静分离(动态请求和静态请求分开)
准备工作
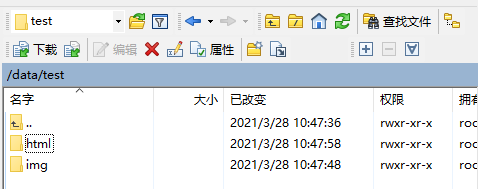

server {
        listen       80;
        server_name  47.114.159.120;


        location /test/html/{
            root /data/;
        }

        location /test/img/{
            root /data/;
            autoindex on; #列出文件目录
        }
nginx配置高可用的集群(keepalived)
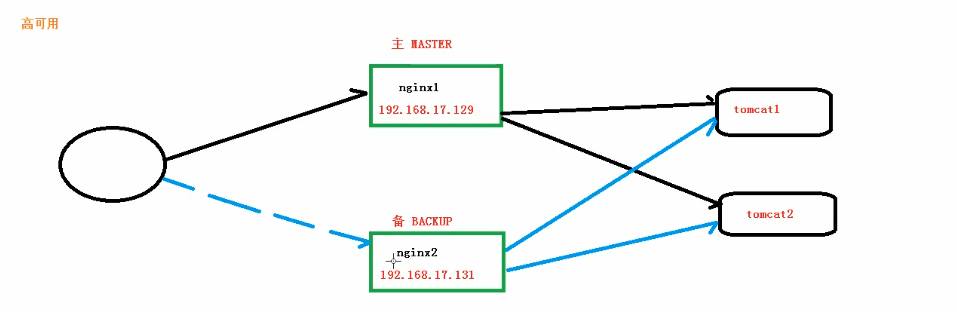
需要两套nginx
需要keepalived
需要虚拟ip
安装步骤
keepalived安装
yum install keepalived -y
安装完后,会在etc文件夹下面生成keepalived,有文件keepalived.conf
完成高可用配置
! Configuration File for keepalived

global_defs {
   notification_email {
     acassen@firewall.loc
     failover@firewall.loc
     sysadmin@firewall.loc
   }
   notification_email_from Alexandre.Cassen@firewall.loc
   smtp_server 192.168.200.1
   smtp_connect_timeout 30
   router_id LVS_DEVEL
   vrrp_skip_check_adv_addr
   vrrp_strict
   vrrp_garp_interval 0
   vrrp_gna_interval 0
}

vrrp_instance VI_1 {
    state MASTER	#备份服务器上将MASTER修改为BACKUP
    interface eth0	#网卡
    virtual_router_id 51	#主、备机的virtual_router_id必须相同
    priority 100	#主、备机不同的优先级主机值较大,备机值较小
    advert_int 1
    authentication {
        auth_type PASS
        auth_pass 1111
    }
    virtual_ipaddress {
        192.168.200.16	#	虚拟地址
        192.168.200.17
        192.168.200.18
    }
}

virtual_server 192.168.200.100 443 {
    delay_loop 6
    lb_algo rr
    lb_kind NAT
    persistence_timeout 50
    protocol TCP

    real_server 192.168.201.100 443 {
        weight 1
        SSL_GET {
            url {
              path /
              digest ff20ad2481f97b1754ef3e12ecd3a9cc
            }
            url {
              path /mrtg/
              digest 9b3a0c85a887a256d6939da88aabd8cd
            }
            connect_timeout 3
            retry 3
            delay_before_retry 3
        }
    }
}

virtual_server 10.10.10.2 1358 {
    delay_loop 6
    lb_algo rr
    lb_kind NAT
    persistence_timeout 50
    protocol TCP

    sorry_server 192.168.200.200 1358

    real_server 192.168.200.2 1358 {
        weight 1
        HTTP_GET {
            url {
              path /testurl/test.jsp
              digest 640205b7b0fc66c1ea91c463fac6334d
            }
            url {
              path /testurl2/test.jsp
              digest 640205b7b0fc66c1ea91c463fac6334d
            }
            url {
              path /testurl3/test.jsp
              digest 640205b7b0fc66c1ea91c463fac6334d
            }
            connect_timeout 3
            retry 3
            delay_before_retry 3
        }
    }

    real_server 192.168.200.3 1358 {
        weight 1
        HTTP_GET {
            url {
              path /testurl/test.jsp
              digest 640205b7b0fc66c1ea91c463fac6334c
            }
            url {
              path /testurl2/test.jsp
              digest 640205b7b0fc66c1ea91c463fac6334c
            }
            connect_timeout 3
            retry 3
            delay_before_retry 3
        }
    }
}

virtual_server 10.10.10.3 1358 {
    delay_loop 3
    lb_algo rr
    lb_kind NAT
    persistence_timeout 50
    protocol TCP

    real_server 192.168.200.4 1358 {
        weight 1
        HTTP_GET {
            url {
              path /testurl/test.jsp
              digest 640205b7b0fc66c1ea91c463fac6334d
            }
            url {
              path /testurl2/test.jsp
              digest 640205b7b0fc66c1ea91c463fac6334d
            }
            url {
              path /testurl3/test.jsp
              digest 640205b7b0fc66c1ea91c463fac6334d
            }
            connect_timeout 3
            retry 3
            delay_before_retry 3
        }
    }

    real_server 192.168.200.5 1358 {
        weight 1
        HTTP_GET {
            url {
              path /testurl/test.jsp
              digest 640205b7b0fc66c1ea91c463fac6334d
            }
            url {
              path /testurl2/test.jsp
              digest 640205b7b0fc66c1ea91c463fac6334d
            }
            url {
              path /testurl3/test.jsp
              digest 640205b7b0fc66c1ea91c463fac6334d
            }
            connect_timeout 3
            retry 3
            delay_before_retry 3
        }
    }
}
检测脚本
#!/bin/bash
A='ps -C nginx -no-header |wc -l'
if[$A -eq 0];then
    /usr/local/nginx/sbin/nginx
    sleep 2
    if['ps -C nginx --no-header |wc -l' -eq 0 ];then
        killall keeplived
    fi
fi
启动nginx和keepalived
./nginx
systemctl start keepalived.service
查看进程启动状态
ps -ef | grep keepalived
########### 每个指令必须有分号结束。#################
#user administrator administrators;  #配置用户或者组,默认为nobody nobody。
#worker_processes 2;  #允许生成的进程数,默认为1
#pid /nginx/pid/nginx.pid;   #指定nginx进程运行文件存放地址
error_log log/error.log debug;  #制定日志路径,级别。这个设置可以放入全局块,http块,server块,级别以此为:debug|info|notice|warn|error|crit|alert|emerg
events {
    accept_mutex on;   #设置网路连接序列化,防止惊群现象发生,默认为on
    multi_accept on;  #设置一个进程是否同时接受多个网络连接,默认为off
    #use epoll;      #事件驱动模型,select|poll|kqueue|epoll|resig|/dev/poll|eventport
    worker_connections  1024;    #最大连接数,默认为512
}
http {
    include       mime.types;   #文件扩展名与文件类型映射表
    default_type  application/octet-stream; #默认文件类型,默认为text/plain
    #access_log off; #取消服务日志
    log_format myFormat '$remote_addr–$remote_user [$time_local] $request $status $body_bytes_sent $http_referer $http_user_agent $http_x_forwarded_for'; #自定义格式
    access_log log/access.log myFormat;  #combined为日志格式的默认值
    sendfile on;   #允许sendfile方式传输文件,默认为off,可以在http块,server块,location块。
    sendfile_max_chunk 100k;  #每个进程每次调用传输数量不能大于设定的值,默认为0,即不设上限。
    keepalive_timeout 65;  #连接超时时间,默认为75s,可以在http,server,location块。

    upstream mysvr {
      server 127.0.0.1:7878;
      server 192.168.10.121:3333 backup;  #热备
    }
    error_page 404 https://www.baidu.com; #错误页
    server {
        keepalive_requests 120; #单连接请求上限次数。
        listen       4545;   #监听端口
        server_name  127.0.0.1;   #监听地址
        location  ~*^.+$ {       #请求的url过滤,正则匹配,~为区分大小写,~*为不区分大小写。
           #root path;  #根目录
           #index vv.txt;  #设置默认页
           proxy_pass  http://mysvr;  #请求转向mysvr 定义的服务器列表
           deny 127.0.0.1;  #拒绝的ip
           allow 172.18.5.54; #允许的ip
        }
    }
}

 浙公网安备 33010602011771号