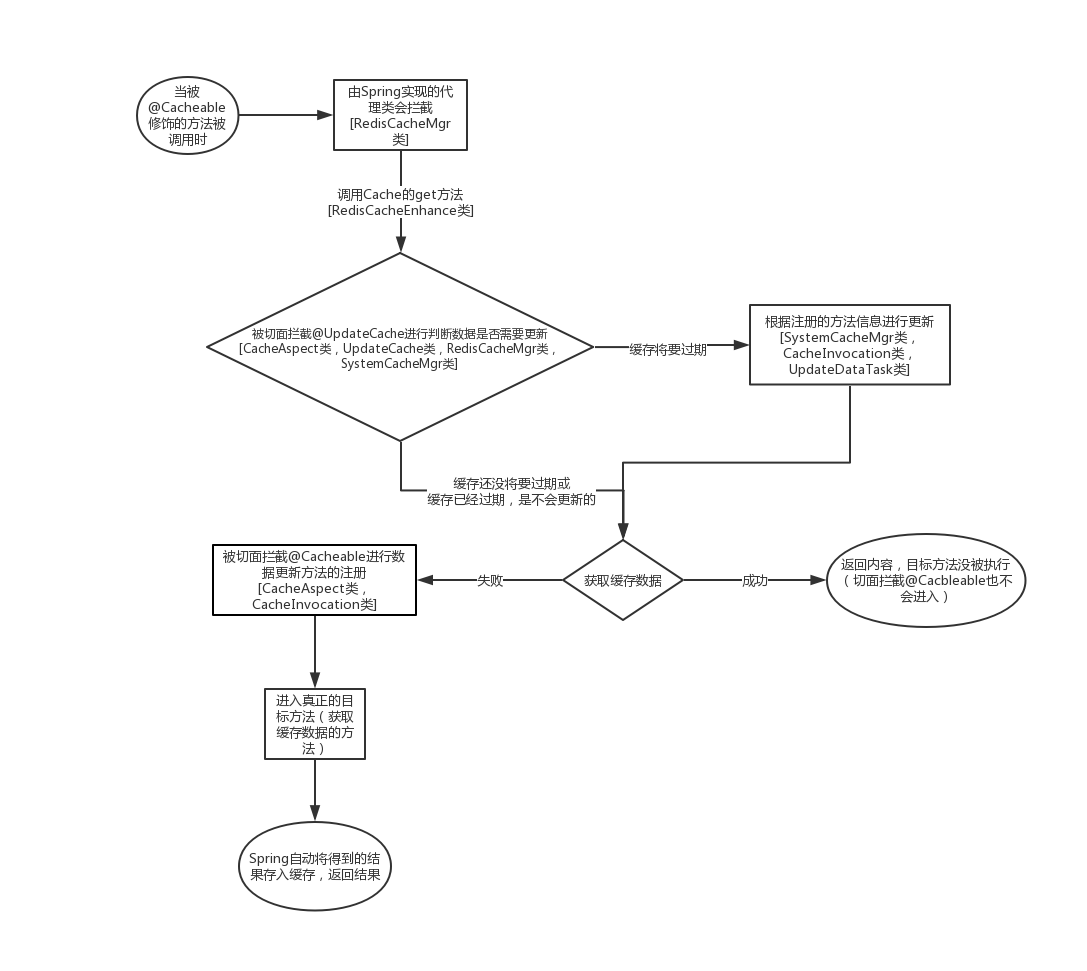
SpringCache自定义过期时间及自动刷新
背景前提
阅读说明(十分重要)
对于Cache和SpringCache原理不太清楚的朋友,可以看我之前写的文章:Springboot中的缓存Cache和CacheManager原理介绍
可能有人会问为什么要缓存自动更新,我的理解是这样的:
假设缓存没有自动更新,那么当某一时刻过期了,系统重新计算获得缓存值的时候,这段时间的请求都得处于阻塞状态(或者直接给客户端返回失败,稍后重试)
这是不友好的,并且获得新缓存可能还没这么快,需要的时间越久,就越多用户获得差劲的体验,所以需要缓存自动更新
言归正传
能关注SpringCache,想了解过期实现和自动刷新的朋友,肯定有一定Java基础的,所以先了解我的思想,达成共识比直接看代码重要许多
你可能只需要我里面其中一个点而不是原搬照抄
我在实现过程遇到三大坑,先跟大家说下,兴许对你有帮助
坑一:自己造轮子
对SpringCache不怎么了解,直接百度缓存看到Redis后,就直接使用RedisTemple开始工具类的搭建(说白了就是自己撸一个增删查改功能的类,然后到处使用)
自己造轮子不仅重复了前人的工作,还做的没别人好... ,不让Spring帮忙管理就享受不到@Cacheable这些注解等一系列福利
对于管理,扩展,使用方便程度都不友好
结论:不能放弃别人写好的工具类(我用Redis做缓存,那么对应的就是RedisCache、RedisManager和SpringCache注解等一套要用上)
坑二:Cache的设计思想不对(最重要)
在了解了SpringCache后,我十分愉快的用上了RedisCache和RedisCacheManager,真的十分简单方便
但跟看这边文章的你们一样,不满足于此,想着如果一个频繁访问缓存,到时候过期一个或多个过期了,是不是就缓存雪崩了
可当时我纠结的粗粒度太细了:
我希望每个缓存里的每个数据都能控制过期时间
比如:CacheName为systemCache的Cache里有a,b两个数据,我希望a数据5分钟过期,b数据10分钟过期
结论:这是完全没必要的,我们控制过期时间,应该以Cache为最小单位,而不是以里面单个数据
实际中缓存数据是不需要精细到单独处理的,都是一组一组的,如这几个数据在30分钟内失效,那一组数据是在
1小时内失效等等
例如:systemCache的ttl(详见1.2的CacheConfig)设置为半小时,那么它里面所有的数据都为离存入时间间隔30分钟后过期
我希望数据能纯自动刷新(不需要外在的触发条件)
比如:跑个线程,隔断时间自动扫描数据,进行纯自动更新
结论:目前没办法实现缓存纯自动更新,必须要使用到该缓存拿数据才能触发更新检查
纯自动更新没有意义,假设一个数据放了半小时没人访问要过期了,那就过期吧
因为缓存前提是一段时间频繁访问的数据,如果都没人访问了,就不能称之为缓存
不然就是一个系统长期存在的动态变量,不适用于缓存
坑三:对@Cacheble的理解太浅
于是想缓存数据能在过期前的几分钟里自动刷新一下,那就很不错
着手实现就想拦截@Cacheble,因为我们把@Cacheble放在访问数据库的方法上,那么做个切面针对@Cacheble,在调用目标方法前判断一下储存的时间,快过期就重新取数据,不过期就不执行方法不就行了(不得不吐槽SpringCache对于过期设计有点考虑不足,封装的死死的,没向外暴露任何接口)
结果@Cacheble的代理类的逻辑是这样的:
发现系统需要此缓存数据 -> 自动尝试get方法获得缓存 -> 存在则返回
发现系统需要此缓存数据 -> 自动尝试get方法获得缓存 -> 不存在才调用目标方法
所以切面切@Cacheble压根没用,别人是在缓存失效的情况下才进入目标方法,这个过程才会被你写的切面切!!
我的设计
网上有个比较好的自动刷新的实现(参考):https://www.jianshu.com/p/275cb42080d9 但是不太喜欢
原因主要是不喜欢在@Cacheable里面的变量做文章(会对原来已有的注解有影响),关键还会覆盖,以第一个
@Cacheble写的时间为准,代码开发一段时间,天知道这个Cache哪个地方第一次指定
在这阐述下设计逻辑,大家看看下面内容不懂的时候可以回来这里看看
思路:对@Cacheable进行切入,在此期间将缓存相关的数据通通保存到一个地方
设计一个新的Cache,在get方法标记上新的注解@UpdateCache
对@UpdateCache进行切入,在此期间检查缓存是否将要过期,如果是,则更新缓存
GitHub地址:https://github.com/NiceJason/top-housekeeper
[中括号为涉及到的类]

涉及到如下8个类:
系统更新缓存的注解:
@UpdataCache:是缓存自动更新的标志,在Cache的get方法上表明,然后每次get数据时就会在切面判断是否快要过期
系统缓存管理器的接口:
I_SystemCacheMgr:此接口继承CacheManager,自定义缓存管理器需要实现此接口,需要实现里面一些更新缓存相关的方法
Spring中的Cache接口和CacheManager的实现:
RedisCacheEnhance:继承RedisCache,对其增强
RedisCacheMgr:继承RedisManager,对其增强(说白了就是增加些自己的方法,改写方法)
系统缓存管理器的注册类(向Spring注册):
CacheConfig:Spring初始化时,向其注册管理类,里面写自己实现的注册逻辑
目标方法记载类:
CacheInvocation:为了能自动更新,那目标获得数据的方法要记录下来,才能要调用的时候主动调用
系统更新缓存的线程:
UpdateDataTask:实现Callable接口的线程类,负责数据更新时执行目标方法,写入缓存
系统缓存管理:
SystemCacheMgr:缓存数据存储信息在此保存,也负责管理I_SystemCacheMgr的实现类,进行更新操作的调用
系统缓存AOP切面:
CacheAspect:对@Cacheable拦截,进行获取数据的方法注册。对@UpdateCache注解进行拦截,进行自动更新判
断
接下来将依次展示代码,说下关键点
代码展示
@UpdataCache
该注解主要是对Cache的get方法进行标记,然后用AOP切面进行更新检查
 1 /**
 2  * @author NiceBin
 3  * @description: 缓存更新接口,在Cache实现类的get方法上注解即可
 4  * @date 2019/11/18 8:56
 5  */
 6 @Target({ElementType.METHOD, ElementType.TYPE})
 7 @Retention(RetentionPolicy.RUNTIME)
 8 @Inherited
 9 public @interface UpdateCache {
10 }
I_SystemCacheMgr
主要是规定了系统缓存管理器应该有的行为
 1 /**
 2  * 本系统的缓存接口,SystemCacheMgr统一保存数据记录的时间和控制缓存自动刷新流程
 3  *
 4  * 为了实现数据快过期前的自动刷新,需要以下操作:
 5  * 1.实现此接口
 6  *   如果用如RedisCacheManager这种写好的类,需要子类继承再实现此接口
 7  *   如果Cache是CacheManager内部生成的,还需要重写createCache方法
 8  *   使生成的Cache走一遍Spring初始化Bean的过程,交给Spring管理
 9  *   这里主要为了Spring帮忙生成代理类,让注解生效
10  * 2.实现了 {@link Cache} 接口的类在get方法上加上注解 {@link UpdateCache} 才有更新效果,所以如果要用如RedisCache
11  *   这种写好的类,需要子类继承,并重写get方法
12  *   然后在get方法上加@UpdateCache
13  */
14 public interface I_SystemCacheMgr extends CacheManager{
15     /**
16      * 该数据是否过期
17      * true为已经过期
18      * @param cacheName 缓存名字
19      * @param id 数据id
20      * @param saveTime 该缓存内该数据的存储时间
21      * @return
22      * @throws Exception
23      */
24     boolean isApproachExpire(String cacheName, Object id, Timestamp saveTime) throws Exception;
25
26     /**
27      * 删除指定Cache里的指定数据
28      * @param cacheName
29      * @param id
30      * @throws Exception
31      */
32     void remove(String cacheName, Object id) throws Exception;
33
34     /**
35      * 清除所有缓存内容
36      * @throws Exception
37      */
38     void clearAll() throws Exception;
39
40     /**
41      * 获得所有的Cache
42      * @return
43      */
44     ConcurrentMap<String, Cache> getAllCaches();
45 }
RedisCacheEnhance
写上@UpdateCache后,才能被AOP切入
 1 /**
 2  * @author NiceBin
 3  * @description:    增强RedisCache
 4  *                  为了能在get方法写上@Update注解,实现自动刷新
 5  * @date 2019/7/4 13:24
 6  */
 7 public class RedisCacheEnhance extends RedisCache {
 8
 9     /**
10      * Create new {@link RedisCacheEnhance}.
11      *
12      * @param name        must not be {@literal null}.
13      * @param cacheWriter must not be {@literal null}.
14      * @param cacheConfig must not be {@literal null}.
15      */
16     protected RedisCacheEnhance(String name, RedisCacheWriter cacheWriter, RedisCacheConfiguration cacheConfig) {
17         super(name, cacheWriter, cacheConfig);
18     }
19
20     @UpdateCache
21     public ValueWrapper get(Object key){
22         System.out.println("进入get方法");
23         return super.get(key);
24     }
25
26     @UpdateCache
27     public <T> T get(Object key, @Nullable Class<T> type){
28         return super.get(key,type);
29     }
30
31     @UpdateCache
32     public <T> T get(Object key, Callable<T> valueLoader){
33         return super.get(key,valueLoader);
34     }
RedisCacheMgr
RedisManager的增强类,这里涉及的知识点比较多,跟大家简单聊聊
  1 /**
  2  * @author NiceBin
  3  * @description: RedisCacheManager增强类,为了实现本系统缓存自动更新功能
  4  * @date 2019/11/25 9:07
  5  */
  6 public class RedisCacheMgr extends RedisCacheManager implements I_SystemCacheMgr {
  7
  8     private final RedisCacheWriter cacheWriter;
  9     private ConcurrentMap<String, Cache> caches = new ConcurrentHashMap<>();
 10
 11     private DefaultListableBeanFactory defaultListableBeanFactory;
 12
 13     public RedisCacheMgr(RedisCacheWriter cacheWriter, RedisCacheConfiguration defaultCacheConfiguration, Map<String, RedisCacheConfiguration> initialCacheConfigurations, boolean allowInFlightCacheCreation) {
 14         super(cacheWriter, defaultCacheConfiguration, initialCacheConfigurations, allowInFlightCacheCreation);
 15         this.cacheWriter = cacheWriter;
 16
 17     }
 18
 19     /**
 20      * 重写createRedisCache的方法,生成自己定义的Cache
 21      * 这里主要要让Spring来生成代理Cache,不然在Cache上的注解是无效的
 22      * @param name
 23      * @param cacheConfig
 24      * @return
 25      */
 26     @Override
 27     protected RedisCacheEnhance createRedisCache(String name, @Nullable RedisCacheConfiguration cacheConfig) {
 28         //利用Spring生成代理Cache
 29         BeanDefinition beanDefinition = new RootBeanDefinition(RedisCacheEnhance.class);
 30         //因为只有有参构造方法,所以要添加参数
 31         ConstructorArgumentValues constructorArgumentValues = beanDefinition.getConstructorArgumentValues();
 32         constructorArgumentValues.addIndexedArgumentValue(0,name);
 33         constructorArgumentValues.addIndexedArgumentValue(1,cacheWriter);
 34         constructorArgumentValues.addIndexedArgumentValue(2,cacheConfig);
 35
 36         //如果有属性需要设置,还能这样做,不过需要有对应属性名的set方法
 37         //definition.getPropertyValues().add("propertyName", beanDefinition.getBeanClassName());
 38
 39         ApplicationContext applicationContext = SystemContext.getSystemContext()
 40                 .getApplicationContext();
 41         //需要这样获取的DefaultListableBeanFactory类才能走一遍完整的Bean初始化流程!!
 42         //像applicationContext.getBean(DefaultListableBeanFactory.class)都不好使!!
 43         DefaultListableBeanFactory defaultListableBeanFactory = (DefaultListableBeanFactory)applicationContext.getAutowireCapableBeanFactory();
 44         defaultListableBeanFactory.registerBeanDefinition(name,beanDefinition);
 45
 46         RedisCacheEnhance redisCacheEnhance = (RedisCacheEnhance)applicationContext.getBean(name);
 47         caches.put(name, redisCacheEnhance);
 48         return redisCacheEnhance;
 49     }
 50
 51     /**
 52      * 过期规则为:缓存有效时间-(目前时间-记录时间)<= 随机时间
 53      * 随机时间是防止同一时刻过期时间太多,造成缓存雪崩,在SystemStaticValue中缓存项里配置
 54      * true为将要过期(可以刷新了)
 55      *
 56      * @param cacheName 缓存名称
 57      * @param id 数据id
 58      * @param saveTime 储存时间
 59      * @return
 60      */
 61     @Override
 62     public boolean isApproachExpire(String cacheName, Object id, Timestamp saveTime) throws NoSuchAlgorithmException {
 63         long ttl = -1;
 64
 65         RedisCacheConfiguration configuration = this.getCacheConfigurations().get(cacheName);
 66         ttl = configuration.getTtl().getSeconds();
 67
 68         if (ttl != -1 && saveTime!=null) {
 69                 int random = Tool.getSecureRandom(SystemStaticValue.CACHE_MIN_EXPIRE, SystemStaticValue.CACHE_MAX_EXPIRE);
 70                 Date date = new Date();
 71                 long theNowTime = date.getTime() / 1000;
 72                 long theSaveTime = saveTime.getTime() / 1000;
 73                 if (ttl - (theNowTime - theSaveTime) <= random) {
 74                     return true;
 75                 }
 76         }
 77         return false;
 78     }
 79
 80     @Override
 81     public void remove(String cacheName, Object id) throws Exception {
 82         Cache cache = this.getCache(cacheName);
 83         cache.evict(id);
 84     }
 85
 86
 87     /**
 88      * 清除所有缓存内容
 89      *
 90      * @throws Exception
 91      */
 92     @Override
 93     public void clearAll() throws Exception {
 94         Collection<String> cacheNames = this.getCacheNames();
 95         Iterator<String> iterator = cacheNames.iterator();
 96         while (iterator.hasNext()) {
 97             String cacheName = iterator.next();
 98             Cache redisCache = this.getCache(cacheName);
 99             redisCache.clear();
100         }
101     }
102
103     @Override
104     public ConcurrentMap<String, Cache> getAllCaches() {
105         return caches;
106     }
107 }
知识点:如何阅读源码来帮助自己注册目标类
这是个很关键的点,我们想继承RedisManager,那构造函数肯定要super父类的构造函数(而且RedisManager看设计并不太推荐让我们继承它的)
所以父类构造函数的参数,我们怎么获取,怎么模拟就是关键性问题
第一步:百度,继承RedisManager怎么写
不过这类不热门的问题,大多数没完美答案(就是能针对你的问题),可是有很多擦边答案可以给你借鉴,我获取到这样的信息
1 RedisCacheManager redisCacheManager = RedisCacheManager.builder(redisConnectionFactory)
2                 .cacheDefaults(defaultCacheConfig) // 默认配置(强烈建议配置上)。  比如动态创建出来的都会走此默认配置
3                 .withInitialCacheConfigurations(initialCacheConfiguration) // 不同cache的个性化配置
4                 .build();
如果我们想配个性化的RedisCacheManager,可以这样创建
可以发现,这个build()方法就是我们的入手点,我们跟进去看看它的参数有什么
 1 /**
 2 * Create new instance of {@link RedisCacheManager} with configuration options applied.
 3 *
 4 * @return new instance of {@link RedisCacheManager}.
 5 */
 6 public RedisCacheManager build() {
 7
 8   RedisCacheManager cm = new RedisCacheManager(cacheWriter, defaultCacheConfiguration, initialCaches,
 9                     allowInFlightCacheCreation);
10
11   cm.setTransactionAware(enableTransactions);
12
13   return cm;
14 }
继续跟踪看RedisCacheManager的方法
1 public RedisCacheManager(RedisCacheWriter cacheWriter, RedisCacheConfiguration defaultCacheConfiguration,
2             Map<String, RedisCacheConfiguration> initialCacheConfigurations, boolean allowInFlightCacheCreation) {
3
4         this(cacheWriter, defaultCacheConfiguration, allowInFlightCacheCreation);
5
6         Assert.notNull(initialCacheConfigurations, "InitialCacheConfigurations must not be null!");
7
8         this.initialCacheConfiguration.putAll(initialCacheConfigurations);
9     }
这里可发现defaultCacheConfiguration和initialCacheConfigurations是我们传入的参数,allowInFlightCacheCreation就是简单的布尔值,能不能动态创建Cache而已
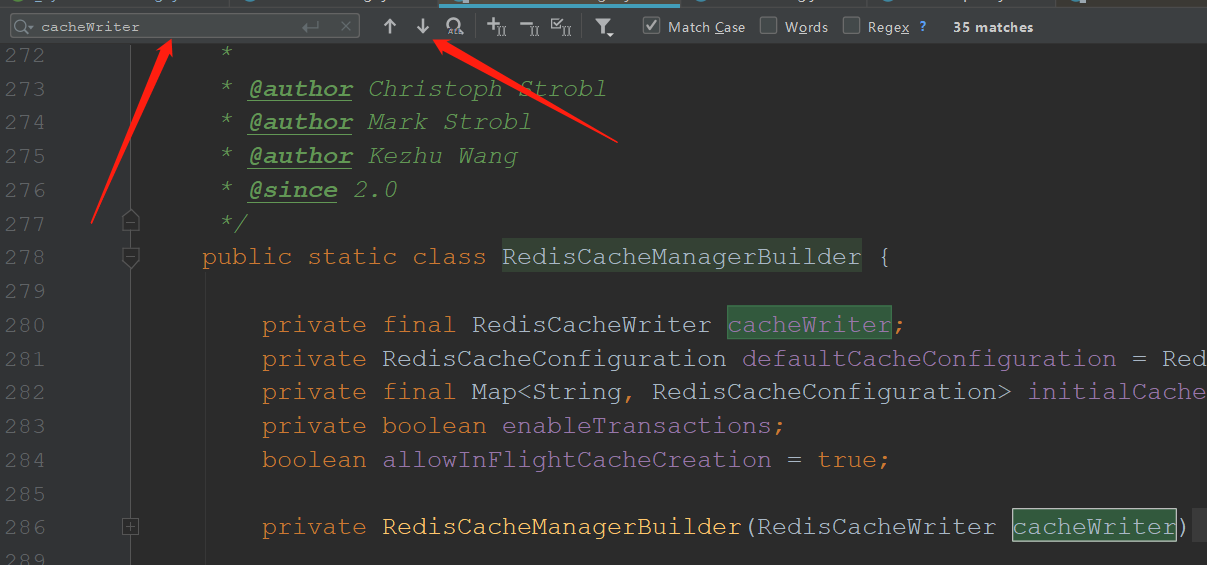
所以我们想办法得到RedisCacheWriter这就大功告成了呀,怎么找,Ctrl+F,搜索变量,如图:
一个个查找,看cacheWriter是哪里赋值进来的,最后发现
1 private RedisCacheManagerBuilder(RedisCacheWriter cacheWriter) {
2             this.cacheWriter = cacheWriter;
3         }
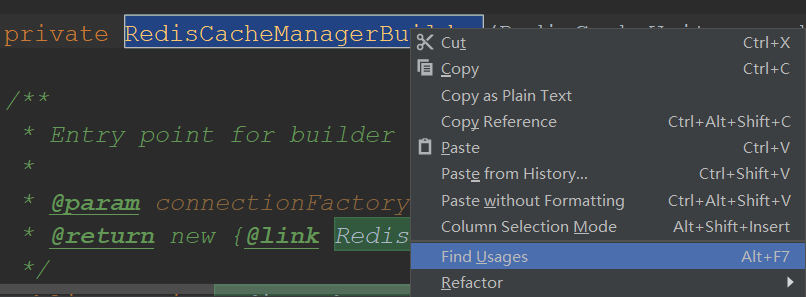
然后继续搜索RedisCacheManagerBuilder哪里被调用:

重复以上步骤,有变量就搜索变量,有方法就搜索调用的地方,最后发现
1         public static RedisCacheManagerBuilder fromConnectionFactory(RedisConnectionFactory connectionFactory) {
2
3             Assert.notNull(connectionFactory, "ConnectionFactory must not be null!");
4
5             return builder(new DefaultRedisCacheWriter(connectionFactory));
6         }
看第5行,我只要有了RedisConnectionFactory,直接new一个就行(事实真的如此吗),进去后发现

这个类不是public,外部是不允许new的,兄弟,还得继续跟代码呀,这个类不是public,所以再看这个类已经无意义了,我们发现它实现了RedisCacheWriter接口,应该从这入手看看
 1 public interface RedisCacheWriter {
 2
 3     /**
 4      * Create new {@link RedisCacheWriter} without locking behavior.
 5      *
 6      * @param connectionFactory must not be {@literal null}.
 7      * @return new instance of {@link DefaultRedisCacheWriter}.
 8      */
 9     static RedisCacheWriter nonLockingRedisCacheWriter(RedisConnectionFactory connectionFactory) {
10
11         Assert.notNull(connectionFactory, "ConnectionFactory must not be null!");
12
13         return new DefaultRedisCacheWriter(connectionFactory);
14     }
15
16     /**
17      * Create new {@link RedisCacheWriter} with locking behavior.
18      *
19      * @param connectionFactory must not be {@literal null}.
20      * @return new instance of {@link DefaultRedisCacheWriter}.
21      */
22     static RedisCacheWriter lockingRedisCacheWriter(RedisConnectionFactory connectionFactory) {
23
24         Assert.notNull(connectionFactory, "ConnectionFactory must not be null!");
25
26         return new DefaultRedisCacheWriter(connectionFactory, Duration.ofMillis(50));
27     }
到这问题就彻底解决了,接口定义了两个获取RedisCacheWriter的方法,只需要传参数RedisConnectionFactory即可,而这个类Spring会自动配置(具体Spring中如何配置Redis自行百度,十分简单)
至此super父类所需要的参数,我们都能自己构造了
这个知识点主要是想让大家遇到问题有这个最基本的解决的思路,迎难而上~
知识点:用代码动态向Spring注册Bean
RedisCacheMgr的createRedisCache方法中看到,我们生成的Cache需要像Spring注册,这是为什么呢
因为我们要想@UpdateCache注解,那必须得生成代理类,交给Spring管理,否则注解无效的
具体注册我也没深入研究(今后会写一篇此博文),不过要按照这种方式注册才有效
1 ApplicationContext applicationContext = SystemContext.getSystemContext()
2                 .getApplicationContext();
3         //需要这样获取的DefaultListableBeanFactory类才能走一遍完整的Bean初始化流程!!
4         //像applicationContext.getBean(DefaultListableBeanFactory.class)都不好使!!
5         DefaultListableBeanFactory defaultListableBeanFactory = (DefaultListableBeanFactory)applicationContext.getAutowireCapableBeanFactory();
6         defaultListableBeanFactory.registerBeanDefinition(name,beanDefinition);
CacheConfig
这个类是为了加载自定义的CacheManager
 1 /**
 2  * @author NiceBin
 3  * @description: CacheManager初始化
 4  *               目前系统只用一个Manager,使用RedisCacheManager
 5  *               根据SystemStaticValue中的SystemCache枚举内容进行Cache的注册
 6  *               配置启动前需要DefaultListableBeanFactory.class先加载完成
 7  *               不然CacheManager或者Cache想用的时候会报错
 8  * @date 2019/11/13 17:02
 9  */
10 @Configuration
11 @Import(DefaultListableBeanFactory.class)
12 public class CacheConfig {
13
14     @Autowired
15     RedisConnectionFactory redisConnectionFactory;
16
17     @Bean
18     public RedisCacheMgr cacheManager() {
19
20         //创建Json自定义序列化器
21         FastJsonRedisSerializer<Object> fastJsonRedisSerializer = new FastJsonRedisSerializer<>(Object.class);
22         //包装成SerializationPair类型
23         RedisSerializationContext.SerializationPair serializationPair = RedisSerializationContext.SerializationPair.fromSerializer(fastJsonRedisSerializer);
24
25         RedisCacheConfiguration defaultCacheConfig = RedisCacheConfiguration.defaultCacheConfig()
26                 .entryTtl(Duration.ofDays(1))
27                 .computePrefixWith(cacheName -> "Cache"+cacheName);
28         // 针对不同cacheName,设置不同的过期时间,用了双括号初始化方法~
29         Map<String, RedisCacheConfiguration> initialCacheConfiguration = new HashMap<String, RedisCacheConfiguration>() {{
30             SystemStaticValue.SystemCache[] systemCaches = SystemStaticValue.SystemCache.values();
31             Arrays.asList(systemCaches).forEach((systemCache)->
32                     put(systemCache.getCacheName(),RedisCacheConfiguration.defaultCacheConfig().entryTtl(Duration.ofSeconds(systemCache.getSurviveTime()))
33                     .serializeValuesWith(serializationPair)));
34         }};
35         RedisCacheMgr redisCacheMgr = new RedisCacheMgr(RedisCacheWriter.lockingRedisCacheWriter(redisConnectionFactory),defaultCacheConfig,initialCacheConfiguration,true);
36
37         //设置白名单---非常重要********
38         /*
39         使用fastjson的时候:序列化时将class信息写入,反解析的时候,
40         fastjson默认情况下会开启autoType的检查,相当于一个白名单检查,
41         如果序列化信息中的类路径不在autoType中,autoType会默认开启
42         反解析就会报com.alibaba.fastjson.JSONException: autoType is not support的异常
43         */
44         ParserConfig.getGlobalInstance().addAccept("com.tophousekeeper");
45         return redisCacheMgr;
46     }
47 }
自定义JSON序列化类
 1 /*
 2 要实现对象的缓存,定义自己的序列化和反序列化器。使用阿里的fastjson来实现的方便多。
 3  */
 4 public class FastJsonRedisSerializer<T> implements RedisSerializer<T> {
 5     private static final Charset DEFAULT_CHARSET = Charset.forName("UTF-8");
 6     private Class<T> clazz;
 7
 8     public FastJsonRedisSerializer(Class<T> clazz) {
 9         super();
10         this.clazz = clazz;
11     }
12
13     @Override
14     public byte[] serialize(T t) throws SerializationException {
15         if (null == t) {
16             return new byte[0];
17         }
18         return JSON.toJSONString(t, SerializerFeature.WriteClassName).getBytes(DEFAULT_CHARSET);
19     }
20
21     @Override
22     public T deserialize(byte[] bytes) throws SerializationException {
23         if (null == bytes || bytes.length <= 0) {
24             return null;
25         }
26         String str = new String(bytes, DEFAULT_CHARSET);
27         return (T) JSON.parseObject(str, clazz);
28     }
29 }
29-34行就是根据配置加载系统默认的几个缓存(涉及到Lambda表达式的循环知识)
 1 public class SystemStaticValue {
 2    .....
 3 //以下为缓存信息的配置(CACHE开头)--------------------------------------------------------
 4     //系统缓存名称及过期时间(秒)
 5     public enum SystemCache{
 6         //每日缓存,有效时间24小时
 7         DAY("dailyCache",60),
 8         //半日缓存,有效时间12小时
 9         HALF_DAY("halfDayCache",12*60*60),
10         //1小时缓存
11         ONE_HOUR("oneHour",1*60*60),
12         //半小时缓存
13         HALF_HOUR("halfHour",30*60);
14         private String cacheName;
15         private long surviveTime;
16
17         SystemCache(String cacheName,long surviveTime){
18             this.cacheName = cacheName;
19             this.surviveTime = surviveTime;
20         }
21
22         public String getCacheName() {
23             return cacheName;
24         }
25
26         public void setCacheName(String cacheName) {
27             this.cacheName = cacheName;
28         }
29
30         public long getSurviveTime() {
31             return surviveTime;
32         }
33
34         public void setSurviveTime(long surviveTime) {
35             this.surviveTime = surviveTime;
36         }
37     }
38 }
知识点:@Import的重要性
在35行,创建RedisCacheMgr 的时候,就会调用里面的CreateCache的方法,里面会把Cache向Spring注册,需要用到DefaultListableBeanFactory类
所以在这里必须要@import,保证其已经加载,不然到时候创建会报类不存在
知识点:自定义序列化
因为不自定义成JSON格式序列化,那么存在Redis的内容不可直观的看出来(都是乱七八糟的东西,不知道存的对不对),所以在21-23行要换成JSON序列化格式
大家有兴趣可以看下这篇博文:https://blog.csdn.net/u010928589/article/details/84313987 这是一篇说Redis序列化如何自定义的思考过程,跟我上面的RedisCacheMgr实现思想类似
知识点:Lambda表达式
之前我也觉得不好用,不便于理解(其实就是我不会),然后这次下定决心弄懂,发现还是很不错的(真香),给大家推荐这篇博文理解:https://blog.csdn.net/qq_25955145/article/details/82670160
CacheInvocation:
这个类主要是为了记录调用的获得缓存数据的方法信息,以便于自动更新时主动调用(下面这个Task就用到了)
 1 /**
 2  * @author NiceBin
 3  * @description: 记录被 {@link Cacheable} 注解过的方法信息,为了主动更新缓存去调用对应方法
 4  * @date 2019/11/26 16:28
 5  */
 6 public class CacheInvocation {
 7     private Object key;
 8     private final Object targetBean;
 9     private final Method targetMethod;
10     private Object[] arguments;
11
12     public CacheInvocation(Object key, Object targetBean, Method targetMethod, Object[] arguments) {
13         this.key = key;
14         this.targetBean = targetBean;
15         this.targetMethod = targetMethod;
16         //反射时不用检查修饰符,略微提高性能
17         this.targetMethod.setAccessible(true);
18         if (arguments != null && arguments.length != 0) {
19             this.arguments = Arrays.copyOf(arguments, arguments.length);
20         }
21     }
22
23     public Object[] getArguments() {
24         return arguments;
25     }
26
27     public Object getTargetBean() {
28         return targetBean;
29     }
30
31     public Method getTargetMethod() {
32         return targetMethod;
33     }
34
35     public Object getKey() {
36         return key;
37     }
38 }
UpdateDataTask:
这里就是主动更新数据的地方啦
 1 /**
 2  * @author NiceBin
 3  * @description: 刷新缓存某个数据的任务
 4  * @date 2019/11/29 15:29
 5  */
 6 public class UpdateDataTask implements Callable {
 7     //将要执行的方法信息
 8     private CacheInvocation cacheInvocation;
 9     //对应要操作的缓存
10     private Cache cache;
11     //对应要更新的数据id
12     private Object id;
13
14     /**
15      * 初始化任务
16      * @param cacheInvocation
17      * @param cache
18      * @param id
19      */
20     public UpdateDataTask(CacheInvocation cacheInvocation,Cache cache,Object id){
21         this.cacheInvocation = cacheInvocation;
22         this.cache = cache;
23         this.id = id;
24     }
25
26     @Override
27     public Object call() throws Exception {
28         if(cacheInvocation == null){
29             throw new SystemException(SystemStaticValue.CACHE_EXCEPTION_CODE,"更新数据线程方法信息不能为null");
30         }
31         cache.put(id,methodInvoke());
32         return true;
33     }
34
35     /**
36      * 代理方法的调用
37      * @return
38      */
39     private Object methodInvoke() throws Exception{
40         MethodInvoker methodInvoker = new MethodInvoker();
41         methodInvoker.setArguments(cacheInvocation.getArguments());
42         methodInvoker.setTargetMethod(cacheInvocation.getTargetMethod().getName());
43         methodInvoker.setTargetObject(cacheInvocation.getTargetBean());
44         methodInvoker.prepare();
45         return methodInvoker.invoke();
46     }
47 }
SystemCacheMgr:
系统缓存管理的核心类,统筹全局
  1 /**
  2  * @author NiceBin
  3  * @description: 本系统的缓存管理器
  4  * 数据自动刷新功能,要配合 {@link UpdateCache}才能实现
  5  *
  6  * 目前没办法实现缓存纯自动更新,必须要使用到该缓存拿数据进行触发
  7  * 纯自动更新没有意义,假设一个数据放了半小时没人访问要过期了,那就过期吧
  8  * 因为缓存前提是一段时间频繁访问的数据,如果都没人访问了,就不能称之为缓存
  9  * 不然就是一个系统长期存在的动态变量,不适用于缓存
 10  * @date 2019/11/14 16:18
 11  */
 12 @Component
 13 public class SystemCacheMgr {
 14     //目前系统只考虑一个CacheManager
 15     //必须有一个I_SystemCache的实现类,多个实现类用@Primary注解,类似于Spring的缓存管理器
 16     @Autowired
 17     private I_SystemCacheMgr defaultCacheMgr;
 18     //系统的线程池类
 19     @Autowired
 20     private SystemThreadPool systemThreadPool;
 21     //所有缓存的所有数据记录Map
 22     //外部Map中,key为缓存名称,value为该缓存内的数据储存信息Map
 23     //内部Map中,key为数据的id,value为记录该数据的储存信息
 24     private ConcurrentHashMap<String, ConcurrentHashMap<Object, DataInfo>> dataInfoMaps = new ConcurrentHashMap<>();
 25
 26     /**
 27      * 储存信息内部类,用于记录
 28      * 获取要调用获取方法,因为加锁了线程才安全
 29      */
 30     class DataInfo {
 31         //记录该数据的时间
 32         private Timestamp saveTime;
 33         //获得此数据的方法信息
 34         private CacheInvocation cacheInvocation;
 35         //保证只有一个线程提前更新此数据
 36         private ReentrantLock lock;
 37
 38         public synchronized void setSaveTime(Timestamp saveTime) {
 39             this.saveTime = saveTime;
 40         }
 41
 42
 43         public synchronized void setCacheInvocation(CacheInvocation cacheInvocation) {
 44             this.cacheInvocation = cacheInvocation;
 45         }
 46
 47         public synchronized void setLock(ReentrantLock lock) {
 48             this.lock = lock;
 49         }
 50     }
 51
 52     /**
 53      * 获得DataInfo类,如果为空则创建一个
 54      * @param cacheName
 55      * @param id
 56      * @return
 57      */
 58     private DataInfo getDataInfo(String cacheName, Object id) {
 59         ConcurrentHashMap<Object, DataInfo> dateInfoMap = dataInfoMaps.get((cacheName));
 60         DataInfo dataInfo;
 61         if (dateInfoMap == null) {
 62             //简单的锁住了,因为创建这个对象挺快的
 63             synchronized (this) {
 64                 //重新获取一次进行判断,因为dateInfoMap是局部变量,不能保证同步
 65                 dateInfoMap = dataInfoMaps.get((cacheName));
 66                 if (dateInfoMap == null) {
 67                     dateInfoMap = new ConcurrentHashMap<>();
 68                     dataInfo = new DataInfo();
 69                     dataInfo.setLock(new ReentrantLock(true));
 70                     dateInfoMap.put(id, dataInfo);
 71                     dataInfoMaps.put(cacheName, dateInfoMap);
 72                 }
 73             }
 74         }
 75         //这里不能用else,因为多线程同时进入if,后面进的dataInfo会是null
 76         dataInfo = dateInfoMap.get(id);
 77
 78         return dataInfo;
 79     }
 80
 81     /**
 82      * 为该数据放入缓存的时间记录
 83      *
 84      * @param id 数据id
 85      */
 86     public void recordDataSaveTime(String cacheName, Object id) {
 87         Date date = new Date();
 88         Timestamp nowtime = new Timestamp(date.getTime());
 89         DataInfo dataInfo = getDataInfo(cacheName, id);
 90         dataInfo.setSaveTime(nowtime);
 91     }
 92
 93     /**
 94      * 记录获得此数据的方法信息,为了主动更新缓存时的调用
 95      *
 96      * @param cacheName    缓存名称
 97      * @param id           数据id
 98      * @param targetBean   目标类
 99      * @param targetMethod 目标方法
100      * @param arguments    目标方法的参数
101      */
102     public void recordCacheInvocation(String cacheName, String id, Object targetBean, Method targetMethod, Object[] arguments) {
103         DataInfo dataInfo = getDataInfo(cacheName, id);
104         CacheInvocation cacheInvocation = new CacheInvocation(id, targetBean, targetMethod, arguments);
105         //锁在这方法里面有
106         dataInfo.setCacheInvocation(cacheInvocation);
107     }
108
109     /**
110      * 数据自动刷新功能,要配合 {@link UpdateCache}才能实现
111      * 原理:先判断数据是否过期,如果数据过期则从缓存删除。
112      *
113      * @param cacheName 缓存名称
114      * @param id        数据id
115      * @return
116      */
117     public void autoUpdate(String cacheName, Object id) throws Exception {
118         DataInfo dataInfo = getDataInfo(cacheName, id);
119         Cache cache = defaultCacheMgr.getCache(cacheName);
120
121
122         //如果没有保存的时间,说明该数据还从未载入过
123         if (dataInfo.saveTime == null) {
124             return;
125         }
126         if (defaultCacheMgr.isApproachExpire(cacheName, id, dataInfo.saveTime)) {
127             if (dataInfo.lock.tryLock()) { //这里用非阻塞的tryLock,有一个用户进来触发缓存过期判断即可,其他用户继续获得当时的缓存值
128                 //获取锁后再次判断数据是否过期
129                 if (defaultCacheMgr.isApproachExpire(cacheName, id, dataInfo.saveTime)) {
130                     ThreadPoolExecutor threadPoolExecutor = systemThreadPool.getThreadPoolExecutor();
131                     UpdateDataTask updateDataTask = new UpdateDataTask(dataInfo.cacheInvocation, cache, id);
132                     FutureTask futureTask = new FutureTask(updateDataTask);
133
134                     try {
135                         threadPoolExecutor.submit(futureTask);
136                         futureTask.get(1, TimeUnit.MINUTES);
137                         //如果上一步执行完成没报错,那么重新记录保存时间
138                         recordDataSaveTime(cacheName,id);
139                     } catch (TimeoutException ex) {
140                         //如果访问数据库超时
141                         throw new SystemException(SystemStaticValue.CACHE_EXCEPTION_CODE, "系统繁忙,稍后再试");
142                     } catch (RejectedExecutionException ex) {
143                         //如果被线程池拒绝了
144                         throw new SystemException(SystemStaticValue.CACHE_EXCEPTION_CODE, "系统繁忙,稍后再试");
145                     } finally {
146                         dataInfo.lock.unlock();
147                     }
148                 }
149             }
150         }
151     }
152
153     /**
154      * 清除所有缓存内容
155      */
156     public void clearAll() throws Exception {
157         defaultCacheMgr.clearAll();
158     }
159
160     //以下为Set和Get
161     public I_SystemCacheMgr getDefaultCacheMgr() {
162         return defaultCacheMgr;
163     }
164
165     public void setDefaultCacheMgr(I_SystemCacheMgr defaultCacheMgr) {
166         this.defaultCacheMgr = defaultCacheMgr;
167     }
168
169     public ConcurrentHashMap<String, ConcurrentHashMap<Object, DataInfo>> getDataInfoMaps() {
170         return dataInfoMaps;
171     }
172
173     public void setDataInfoMaps(ConcurrentHashMap<String, ConcurrentHashMap<Object, DataInfo>> dataInfoMaps) {
174         this.dataInfoMaps = dataInfoMaps;
175     }
176 }
知识点:再次说下接口的重要性
17行直接让Spring注入实现了I_SystemCacheMgr的类,直接使用实现的方法而不用关心具体的实现细节(对于SystemCacheMgr类来说,你换了它的实现逻辑也丝毫不影响它原来的代码调用)
CacheAspect
CacheAspect是注册和触发更新的核心类,Tool是用到的工具类的方法
 1 /**
 2  * @author NiceBin
 3  * @description: 处理缓存注解的地方:包括@UpdateCache,@Cacheable
 4  *
 5  * @date 2019/11/18 14:57
 6  */
 7 @Aspect
 8 @Component
 9 public class CacheAspect {
10     @Autowired
11     SystemCacheMgr systemCacheMgr;
12
13     /**
14      * 数据注册到SystemCacheMgr
15      * 为数据自动更新做准备
16      */
17     @Before("@annotation(org.springframework.cache.annotation.Cacheable)")
18     public void registerCache(JoinPoint joinPoint){
19         System.out.println("拦截了@Cacheable");
20         //获取到该方法前的@Cacheable注解,来获取CacheName和key的信息
21         Method method = Tool.getSpecificMethod(joinPoint);
22         Cacheable cacleable = method.getAnnotation(Cacheable.class);
23         String[] cacheNames = cacleable.value()!=null?cacleable.value():cacleable.cacheNames();
24         String theKey = cacleable.key();
25         //取出来的字符串是'key',需要去掉''
26         String key = theKey.substring(1,theKey.length()-1);
27         Arrays.stream(cacheNames).forEach(cacheName ->{
28             //记录数据保存时间
29             systemCacheMgr.recordDataSaveTime(cacheName,key);
30             //记录数据对应的方法信息
31             systemCacheMgr.recordCacheInvocation(cacheName,key,joinPoint.getTarget(),method,joinPoint.getArgs());
32         });
33     }
34
35     /**
36      * 检测该键是否快过期了
37      * 如果快过期则进行自动更新
38      * @param joinPoint
39      */
40     @Before(value = "@annotation(com.tophousekeeper.system.annotation.UpdateCache)&&args(id)")
41     public void checkExpire(JoinPoint joinPoint,String id) throws Exception {
42         System.out.println("拦截了@UpdateCache");
43         RedisCacheEnhance redisCacheEnhance = (RedisCacheEnhance) joinPoint.getTarget();
44         systemCacheMgr.autoUpdate(redisCacheEnhance.getName(),id);
45     }
46 }
 1 public class Tool {
 2
 3     /**
 4      * 获得代理类方法中真实的方法
 5      * 小知识:
 6      * ClassUtils.getMostSpecificMethod(Method method, Class<?> targetClass)
 7      * 该方法是一个有趣的方法,他能从代理对象上的一个方法,找到真实对象上对应的方法。
 8      * 举个例子,MyComponent代理之后的对象上的someLogic方法,肯定是属于cglib代理之后的类上的method,
 9      * 使用这个method是没法去执行目标MyComponent的someLogic方法,
10      * 这种情况下,就可以使用getMostSpecificMethod,
11      * 找到真实对象上的someLogic方法,并执行真实方法
12      *
13      * BridgeMethodResolver.findBridgedMethod(Method bridgeMethod)
14      * 如果当前方法是一个泛型方法,则会找Class文件中实际实现的方法
15      * @param poxyMethod 代理的方法
16      * @param targetclass 真实的目标类
17      * @return
18      */
19     public static Method getSpecificMethod(Method poxyMethod,Class targetclass){
20         Method specificMethod = ClassUtils.getMostSpecificMethod(poxyMethod,targetclass);
21         specificMethod = BridgeMethodResolver.findBridgedMethod(specificMethod);
22         return specificMethod;
23     }
24
25     /**
26      * 获得代理类方法中真实的方法
27      * 小知识:
28      * AopProxyUtils.ultimateTargetClass()
29      * 获取一个代理对象的最终对象类型
30      * @param joinPoint 切面的切点类
31      * @return
32      */
33     public static Method getSpecificMethod(JoinPoint joinPoint){
34         MethodSignature methodSignature = (MethodSignature) joinPoint.getSignature();
35         Method poxyMethod = methodSignature.getMethod();
36         Class targetClass = AopProxyUtils.ultimateTargetClass(joinPoint.getTarget());
37         return Tool.getSpecificMethod(poxyMethod,targetClass);
38     }
39 }
总结
整套流程在磕磕碰碰中弄出来了,最后简单的用了jmeter测试了一下,感觉还不错
收获最多的不只是新知识的学习,更多是解决问题的能力,在碰到这种并不是很热门的问题,网上的答案没有完全针对你问的,只能从中获取你需要的小部分知识(就像现在你看这篇博文一样)
然后自己再尝试拼凑起来,有些问题百度无果之后,不妨自己跟跟源码,或者搜索XXX源码解析,看看流程,没准就有新发现
有什么想法或问题欢迎评论区留言,一起探讨~
尽我最大努力分享给大家,欢迎大家转载(写作不易,请标明出处)或者给我点个赞呀(右下角),谢啦!


