SpringBoot基础的使用
springboot的基础使用 和 内部原理
高级使用整合
进行web开发
springboot
看下spring的所有项目:https://spring.io/projects
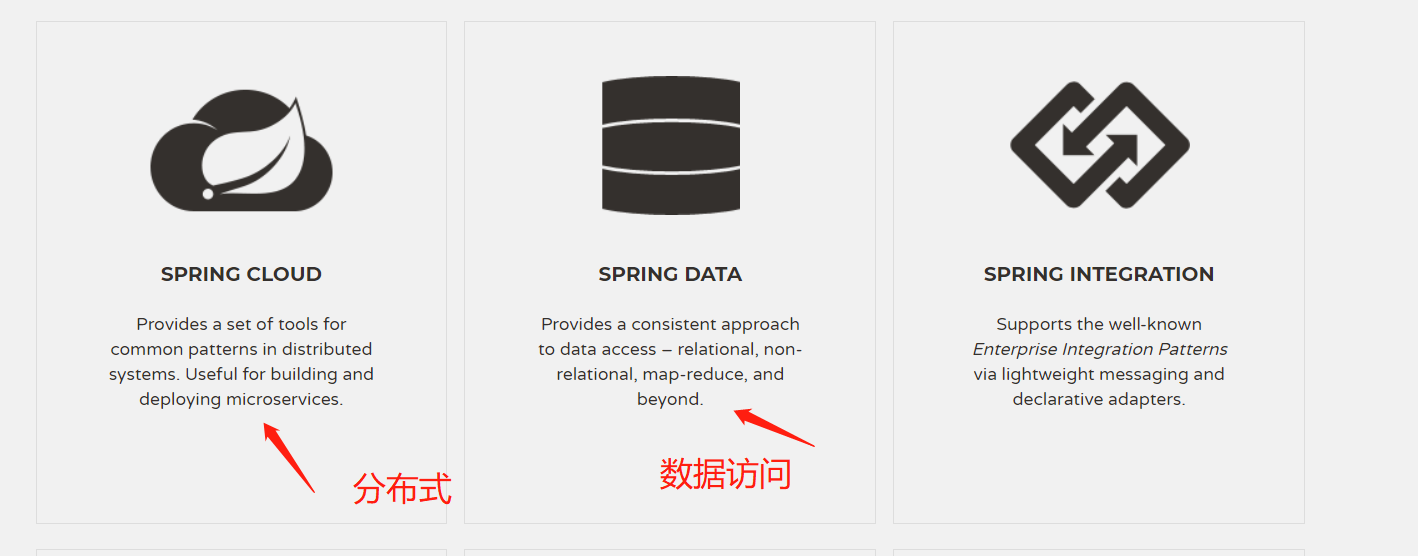
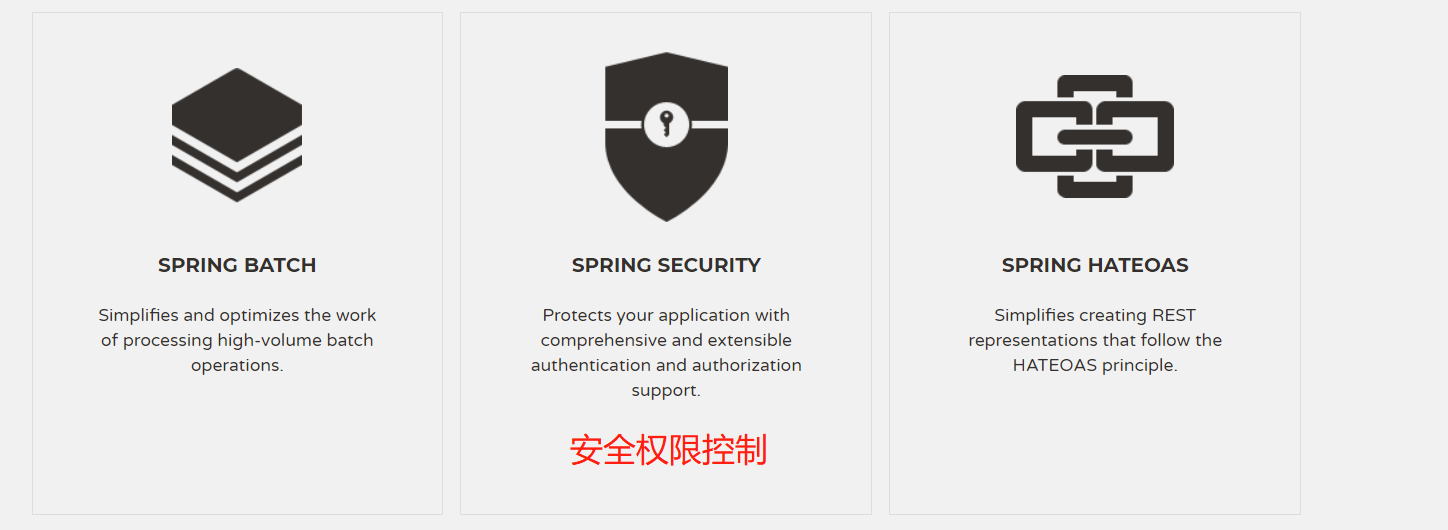
等等 就不一一介绍了
springboot 就是整合spring的一系列技术栈 进行简化 企业级开发
springboot 自动配置好相关的环境。用户可以使用封装好的框架进行开发
Spring全家桶”时代: Spring Boot J2EE一站式解决方案、Spring Cloud 分布式整体解决方案
优点:
– 快速创建独立运行的Spring项目以及与主流框架集成
– 使用嵌入式的Servlet容器,应用无需打成WAR包
– starters自动依赖与版本控制
– 大量的自动配置,简化开发,也可修改默认值
– 无需配置XML,无代码生成,开箱即用
– 准生产环境的运行时应用监控
– 与云计算的天然集成
微服务 一个应用是一组小服务 可以通过http方式进行互通
spring的技术栈架构:
Springboot -- > spring cloud --> spring cloud data flow
博主的环境是 jdk8 maven3.0 idea2018
给maven的settings配置文件中的profiles标签添加属性:
那如何设置默认使用JDK1.8呢?
在settings文件中配置即可。具体代码如下:
<profile>
  <id>jdk-1.8</id>
   <activation>
     <activeByDefault>true</activeByDefault>
     <jdk>1.8</jdk>
   </activation>
<properties>
<maven.compiler.source>1.8</maven.compiler.source>
<maven.compiler.target>1.8</maven.compiler.target>
<maven.compiler.compilerVersion>1.8</maven.compiler.compilerVersion>
</properties>
</profile>
创建一个maven工程
导入springboot相关的依赖
<parent>
    <groupId>org.springframework.boot</groupId>
    <artifactId>spring-boot-starter-parent</artifactId>
    <version>1.5.9.RELEASE</version>
</parent>
导入spring boot的依赖

<dependency>
    <groupId>org.springframework.boot</groupId>
    <artifactId>spring-boot-starter-web</artifactId>
</dependency>
主程序:
@SpringBootApplication
public class HelloWorldApp {
    public static void main(String[] args) {
        SpringApplication.run(HelloWorldApp.class);
    }
}
控制层:
@Controller
public class HelloController {

    @ResponseBody
    @RequestMapping
    public String hello(){
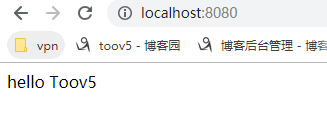
        return "hello Toov5";
    }
}
http://localhost:8080/
如何进行部署呢?
导入springboot的maven插件
作用: 将应用打包成一个可执行的jar包。 将这个应用大成jar包,直接使用java - jar命令进行
  <build>
        <plugins>
            <plugin>
                <groupId>org.springframework.boot</groupId>
                <artifactId>spring-boot-maven-plugin</artifactId>
            </plugin>
        </plugins>
    </build>
通过生命周期进行打包:
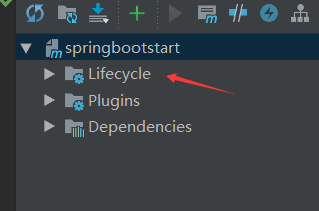
package:
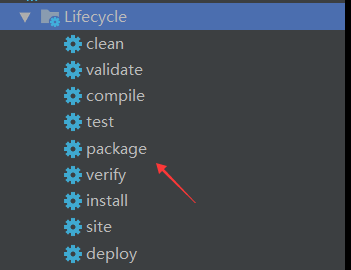
配置的maven插件 spring-boot-maven-plugin 介入
target:

将其复制出来:
运行:

通过java -jar 运行
打开那个jar包:

BOOT-INF 目录:

lib 就是springboot等依赖jar包 并携带了嵌入式tomcatjar包

classes:

原理:
pom:
作为依赖管理的 有很多依赖的 整理好了
<parent>
        <groupId>org.springframework.boot</groupId>
        <artifactId>spring-boot-starter-parent</artifactId>
        <version>1.5.9.RELEASE</version>
    </parent>
点击进入这个父项目还是依赖一个父项目的,真正管理spring boot应用里面的所有依赖版本呢
以后我们导入依赖默认是不需要写版本的
出来父项目还有一个依赖
<artifactId>spring-boot-starter-web</artifactId>
点击进入:
可以看到好多依赖:
<dependencies>
        <dependency>
            <groupId>org.springframework.boot</groupId>
            <artifactId>spring-boot-starter</artifactId>
        </dependency>
        <dependency>
            <groupId>org.springframework.boot</groupId>
            <artifactId>spring-boot-starter-tomcat</artifactId>
        </dependency>
        <dependency>
            <groupId>org.hibernate</groupId>
            <artifactId>hibernate-validator</artifactId>
        </dependency>
        <dependency>
            <groupId>com.fasterxml.jackson.core</groupId>
            <artifactId>jackson-databind</artifactId>
        </dependency>
        <dependency>
            <groupId>org.springframework</groupId>
            <artifactId>spring-web</artifactId>
        </dependency>
        <dependency>
            <groupId>org.springframework</groupId>
            <artifactId>spring-webmvc</artifactId>
        </dependency>
    </dependencies>
帮我们导入了web模块正常运行所依赖的组件
当然spring boot里面还有更多的这样的 Starters 好多的启动器
官网列表参考: https://docs.spring.io/spring-boot/docs/1.5.9.RELEASE/reference/htmlsingle/#using-boot-starter
springboot 将所有的功能场景 抽取出来 做成一个个的starters,只需要根据场景功能依赖导入。
关于主程序的入口类:
@SpringBootApplication
spring boot启动运行这个类的main方法
这是个组合注解:
@Target({ElementType.TYPE})
@Retention(RetentionPolicy.RUNTIME)
@Documented
@Inherited
@SpringBootConfiguration
@EnableAutoConfiguration
@ComponentScan(
    excludeFilters = {@Filter(
    type = FilterType.CUSTOM,
    classes = {TypeExcludeFilter.class}
), @Filter(
    type = FilterType.CUSTOM,
    classes = {AutoConfigurationExcludeFilter.class}
)}
)
public @interface SpringBootApplication {
@EnableAutoConfiguration : 开启自动配置
以前我们需要配置的,Spring Boot帮我们自动实现配置
@Target({ElementType.TYPE})
@Retention(RetentionPolicy.RUNTIME)
@Documented
@Inherited
@AutoConfigurationPackage
@Import({EnableAutoConfigurationImportSelector.class})
public @interface EnableAutoConfiguration {
@AutoConfigurationPackage: 自动配置包
@Target({ElementType.TYPE})
@Retention(RetentionPolicy.RUNTIME)
@Documented
@Inherited
@Import({Registrar.class})  //spring 的底层注解
public @interface AutoConfigurationPackage {
}
@Import({Registrar.class}) 给容器中导入一个组件,导入的组件由 Registrar.class
 @Order(-2147483648)
    static class Registrar implements ImportBeanDefinitionRegistrar, DeterminableImports {
        Registrar() {
        }

        public void registerBeanDefinitions(AnnotationMetadata metadata, BeanDefinitionRegistry registry) {    //注册一些bean定义信息
            AutoConfigurationPackages.register(registry, (new AutoConfigurationPackages.PackageImport(metadata)).getPackageName());
        }

        public Set<Object> determineImports(AnnotationMetadata metadata) {   //注解标注的元信息
            return Collections.singleton(new AutoConfigurationPackages.PackageImport(metadata));
        }
    }
打个断点运行下:
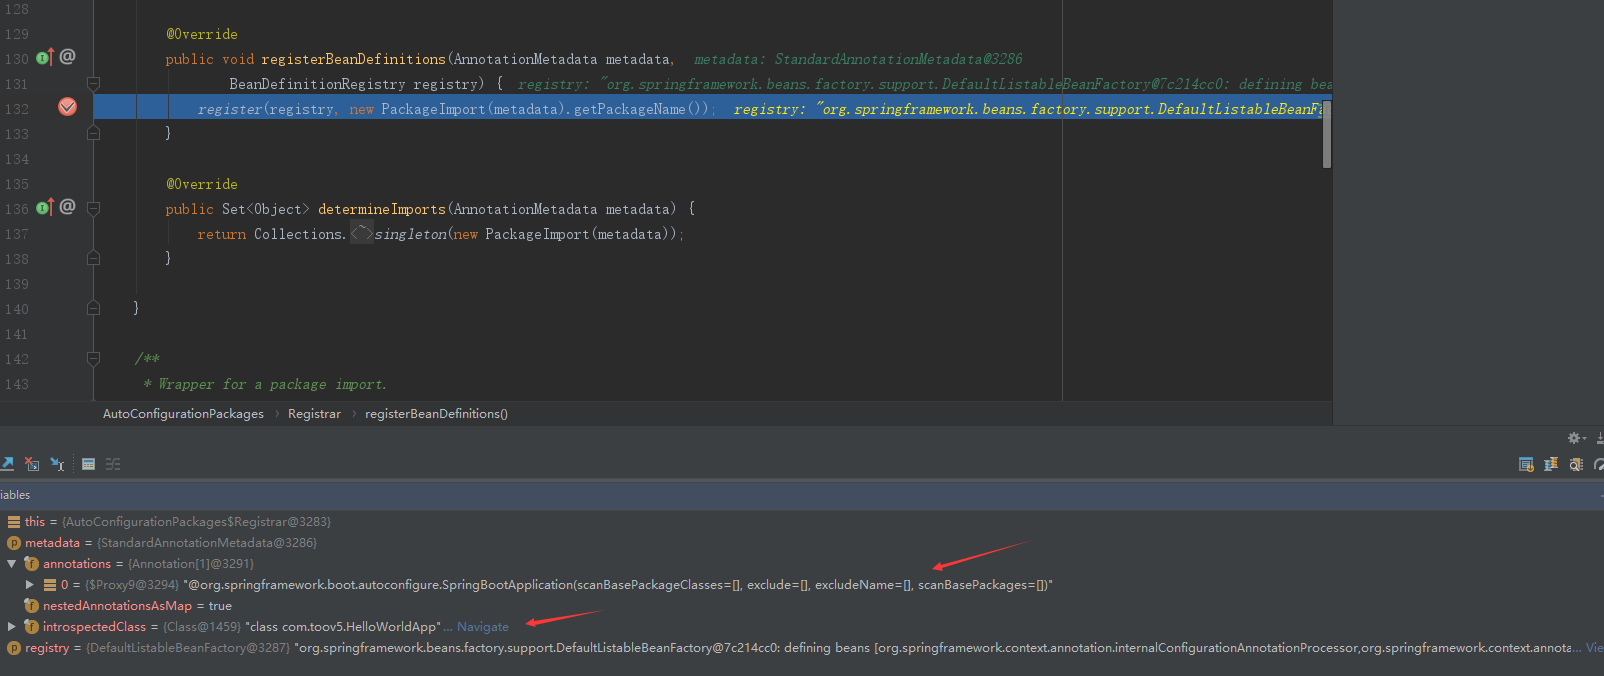
可以看到注解的元信息!
选中并且计算:

@AutoConfigurationPackage: 的作用是 将主配置类的所在包以及下面的所有的组件扫描到Spring容器
关于@Import的注解
@Import(EnableAutoConfigurationImportSelector.class)
给容器中导入一些组件
EnableAutoConfigurationImportSelector: 导入哪些组件选择器
类代码就只有一个方法:
@Deprecated
public class EnableAutoConfigurationImportSelector
        extends AutoConfigurationImportSelector {

    @Override
    protected boolean isEnabled(AnnotationMetadata metadata) {
        if (getClass().equals(EnableAutoConfigurationImportSelector.class)) {
            return getEnvironment().getProperty(
                    EnableAutoConfiguration.ENABLED_OVERRIDE_PROPERTY, Boolean.class,
                    true);
        }
        return true;
    }

点击进入:
父类有个方法:
@Override
public String[] selectImports(AnnotationMetadata annotationMetadata) {
   if (!isEnabled(annotationMetadata)) {
      return NO_IMPORTS;
   }
Spring容器到底要导入哪些组件,以Spring 数组的方式返回组件的全类名,这些组件就会被添加到容器中
打个断点看下

可以看到一共有96个组件
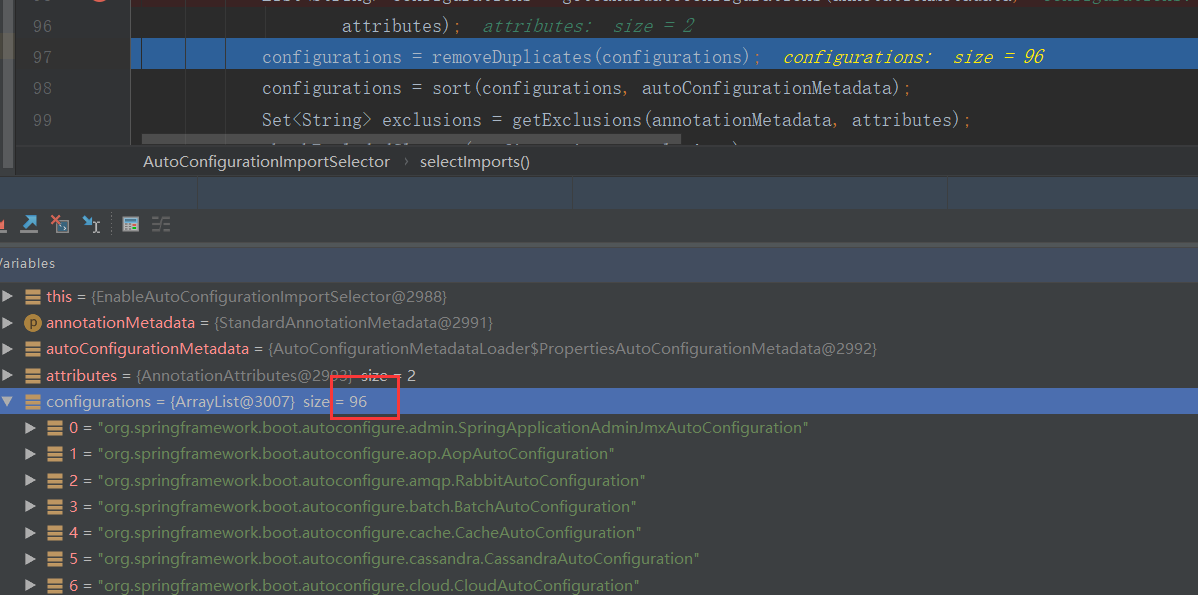
会给容器中 导入非常多的自动配置类(xxAutoConfiguration),就是给容器中导入这个场景所需要的所有组件,并配置好这些组件。
有了自动配置类,就免去了手动编写配置和注入功能组件等工作
主要原因是调用了这个方法:

然后;

然后:
public static List<String> loadFactoryNames(Class<?> factoryClass, ClassLoader classLoader) {
        String factoryClassName = factoryClass.getName();
        try {
            Enumeration<URL> urls = (classLoader != null ? classLoader.getResources(FACTORIES_RESOURCE_LOCATION) :    //用类加载器获取资源
                    ClassLoader.getSystemResources(FACTORIES_RESOURCE_LOCATION));
            List<String> result = new ArrayList<String>();
            while (urls.hasMoreElements()) {
                URL url = urls.nextElement();
                Properties properties = PropertiesLoaderUtils.loadProperties(new UrlResource(url));   //把这个资源当成properties文件
                String factoryClassNames = properties.getProperty(factoryClassName);   //获取到工厂的名字
                result.addAll(Arrays.asList(StringUtils.commaDelimitedListToStringArray(factoryClassNames)));
            }
            return result;
        }
        catch (IOException ex) {
            throw new IllegalArgumentException("Unable to load [" + factoryClass.getName() +
                    "] factories from location [" + FACTORIES_RESOURCE_LOCATION + "]", ex);
        }
    }
位置信息:
catch (IOException ex) {
            throw new IllegalArgumentException("Unable to load [" + factoryClass.getName() +
                    "] factories from location [" + FACTORIES_RESOURCE_LOCATION + "]", ex);
        }
持续点击:
public static final String FACTORIES_RESOURCE_LOCATION = "META-INF/spring.factories";
从类路径下获取EnableAutoConfituration指定的值
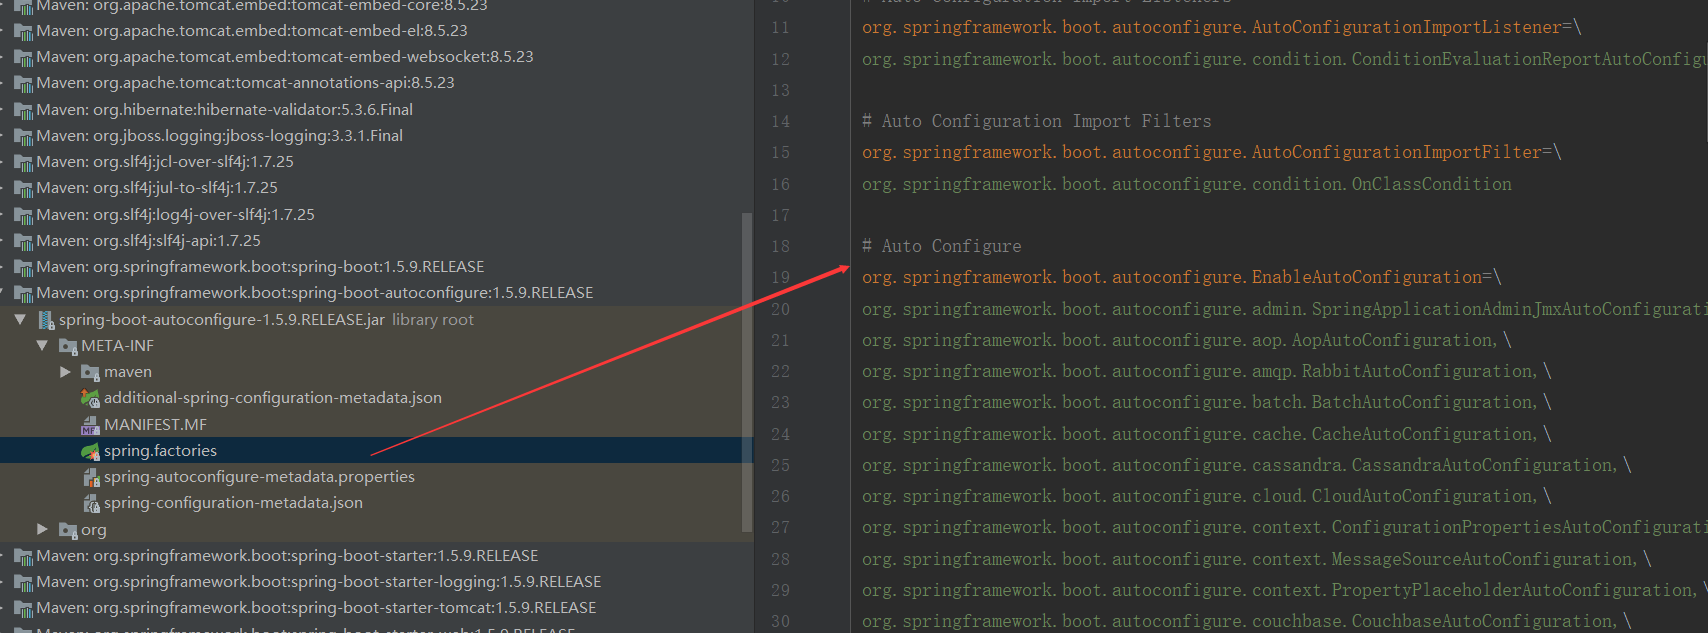
这些就是导入的自动配置类。
总结: Spring Boot启动的时候从类路径下的 META-INF/spring.factories中获取EnableConfiguration指定的值,将这些值作为自动配置类导入到容器中。自动配置类就生效了,帮我们进行自动配置工作。
我们现在用的是web应用想关的

点击进入
@Configuration
@ConditionalOnWebApplication
@ConditionalOnClass({ Servlet.class, DispatcherServlet.class,
        WebMvcConfigurerAdapter.class })
@ConditionalOnMissingBean(WebMvcConfigurationSupport.class)
@AutoConfigureOrder(Ordered.HIGHEST_PRECEDENCE + 10)
@AutoConfigureAfter({ DispatcherServletAutoConfiguration.class,
        ValidationAutoConfiguration.class })
public class WebMvcAutoConfiguration {

    public static final String DEFAULT_PREFIX = "";

    public static final String DEFAULT_SUFFIX = "";

    @Bean    //给容器添加一个组件
    @ConditionalOnMissingBean(HiddenHttpMethodFilter.class)
    public OrderedHiddenHttpMethodFilter hiddenHttpMethodFilter() {
        return new OrderedHiddenHttpMethodFilter();
    }

    @Bean
    @ConditionalOnMissingBean(HttpPutFormContentFilter.class)
    @ConditionalOnProperty(prefix = "spring.mvc.formcontent.putfilter", name = "enabled", matchIfMissing = true)
    public OrderedHttpPutFormContentFilter httpPutFormContentFilter() {
        return new OrderedHttpPutFormContentFilter();
    }

    // Defined as a nested config to ensure WebMvcConfigurerAdapter is not read when not
    // on the classpath
    @Configuration
    @Import(EnableWebMvcConfiguration.class)
    @EnableConfigurationProperties({ WebMvcProperties.class, ResourceProperties.class })
    public static class WebMvcAutoConfigurationAdapter extends WebMvcConfigurerAdapter {

        private static final Log logger = LogFactory
                .getLog(WebMvcConfigurerAdapter.class);

        private final ResourceProperties resourceProperties;

        private final WebMvcProperties mvcProperties;

        private final ListableBeanFactory beanFactory;

        private final HttpMessageConverters messageConverters;

        final ResourceHandlerRegistrationCustomizer resourceHandlerRegistrationCustomizer;

        public WebMvcAutoConfigurationAdapter(ResourceProperties resourceProperties,
                WebMvcProperties mvcProperties, ListableBeanFactory beanFactory,
                @Lazy HttpMessageConverters messageConverters,
                ObjectProvider<ResourceHandlerRegistrationCustomizer> resourceHandlerRegistrationCustomizerProvider) {
            this.resourceProperties = resourceProperties;
            this.mvcProperties = mvcProperties;
            this.beanFactory = beanFactory;
            this.messageConverters = messageConverters;
            this.resourceHandlerRegistrationCustomizer = resourceHandlerRegistrationCustomizerProvider
                    .getIfAvailable();
        }

        @Override
        public void configureMessageConverters(List<HttpMessageConverter<?>> converters) {
            converters.addAll(this.messageConverters.getConverters());
        }
以前我们需要自己配置的组件,自动配置类都帮我们配置了。
SpringBoot 对所有J2EE的大整合
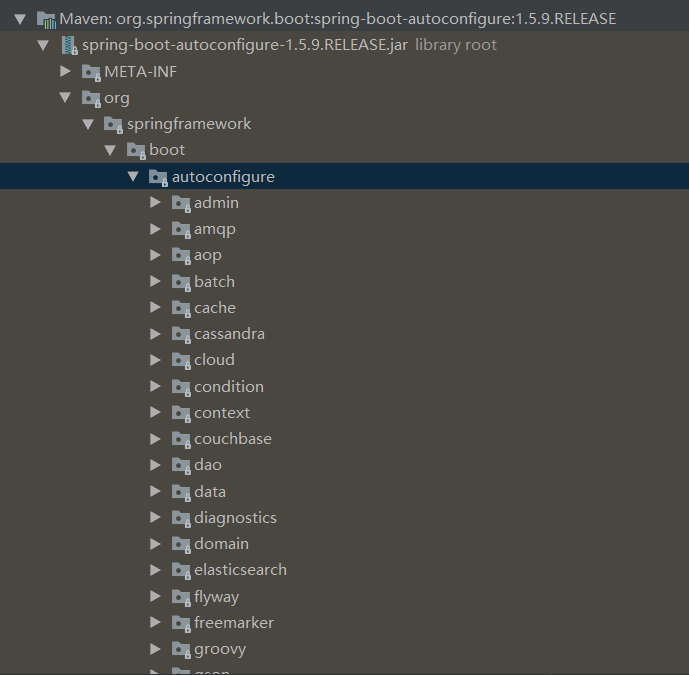
所有解决方案都在这里摆着,自动配置都在这个包里面:
如果不满意我们还可以自己修改这些配置

使用IDEA可以使用创建向导快速创建Spring boot项目,大家可以自行百度查找教程。
注意Spring Boot 默认jar包使用嵌入式的Tomcat,默认不支持JSP页面
Spring Boot默认一切都是配置好的
可以通过配置文件进行修改,比如端口号之类的: server.port=8089
配置文件:
SpringBoot使用一个全局的配置文件,配置文件名是固定的;
•application.properties
•application.yml
配置文件的作用:Spring Boot在底层都给我们配置好了。修改SpringBoot自动配置的默认值;SpringBoot在底层都给我们自动配置好;
yml语法:
k:(空格)v:表示一对键值对(空格必须有);
以空格的缩进来控制层级关系;只要是左对齐的一列数据,都是同一个层级的
左边能对齐的都是一个层级的
server:
    port: 8081
    path: /hello
注意 属性和值都是大小写敏感的! 玩的是空格!
值的写法
字面量:普通的值(数字,字符串,布尔)
k: v:字面直接来写;
字符串默认不用加上单引号或者双引号;
"":双引号;不会转义字符串里面的特殊字符;特殊字符会作为本身想表示的意思
name: "zhangsan \n lisi":输出;zhangsan 换行 lisi
'':单引号;会转义特殊字符,特殊字符最终只是一个普通的字符串数据
name: ‘zhangsan \n lisi’:输出;zhangsan \n lisi
这些值最终都会被封装到Java Bean来进行获取
类型:
对象(属性和值) 也就是键值对
数组 list set
对象或者Map(属性和值)(键值对):
k: v:在下一行来写对象的属性和值的关系;注意缩进
对象还是k: v的方式
friends:
    lastName: zhangsan
    age: 20
行内写法
friends: {lastName: zhangsan,age: 18}
数组(List、Set):
用- 值表示数组中的一个元素
pets:
 ‐ cat
 ‐ dog
 ‐ pig
行内写法
pets: [cat,dog,pig]
格式对应好了,鼠标点击上去时候会有显示:
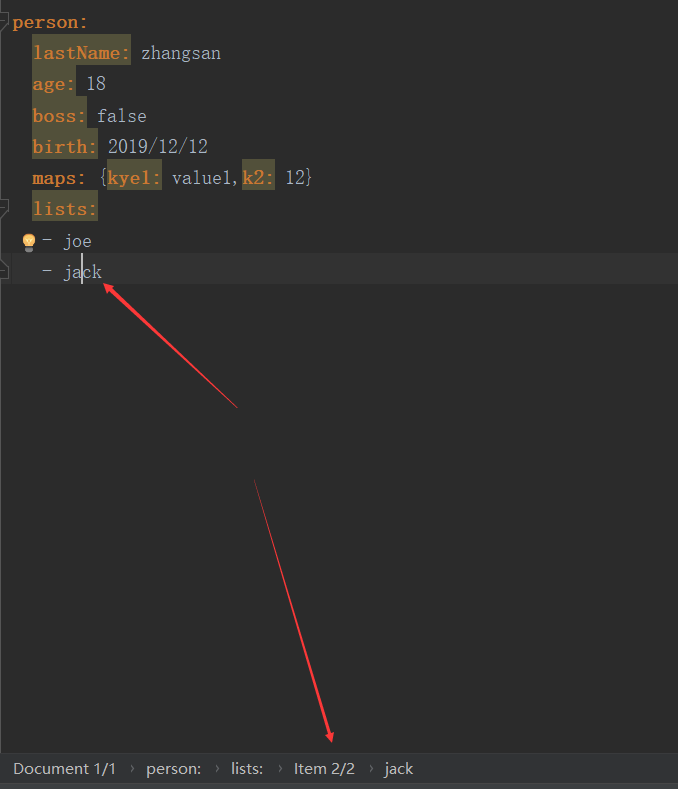
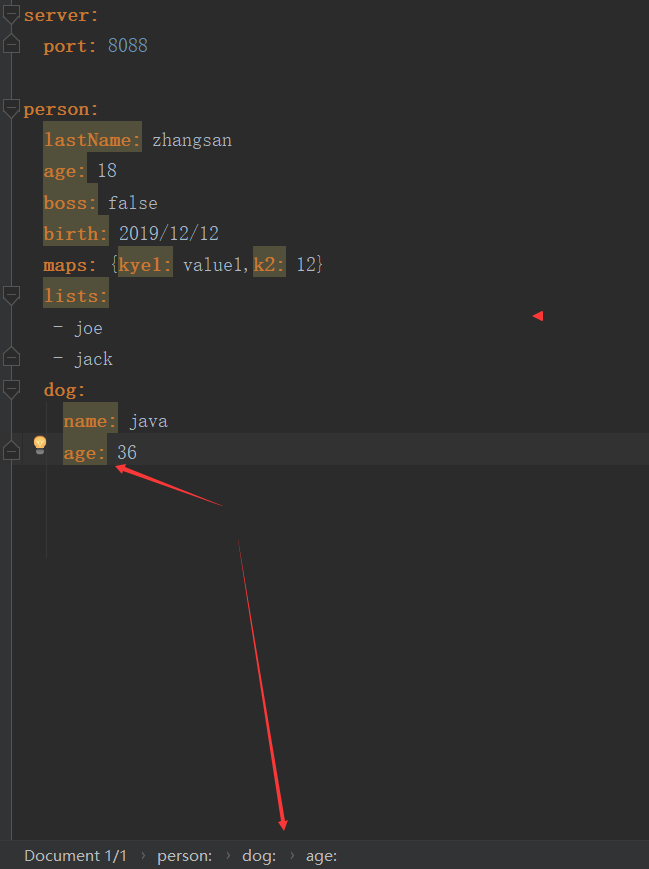
将配置文件中配置的每一个属性的值,映射到这个组件中

yml:
server:
  port: 8088

person:
  lastName: zhangsan
  age: 18
  boss: false
  birth: 2019/12/12
  maps: {kye1: value1,k2: 12}
  lists:
   - joe
   - jack
  dog:
    name: java
    age: 36
Bean: 只有这个组件是容器中的组件,才能使用容器提供的@ConfigurationProperties功能。
@Component
@ConfigurationProperties(prefix = "person")  //这个配置类中的属性都是 配置文件中的属性 相关属性绑定
public class Person {

    private String lastName;
    private Integer age;
    private Boolean boss;
    private Date birth;

    private Map<String,Object> maps;
    private List<Object> lists;
    private Dog dog;

    public String getLastName() {
        return lastName;
    }

    public void setLastName(String lastName) {
        this.lastName = lastName;
    }

    public Integer getAge() {
        return age;
    }

    public void setAge(Integer age) {
        this.age = age;
    }

    public Boolean getBoss() {
        return boss;
    }

    public void setBoss(Boolean boss) {
        this.boss = boss;
    }

    public Date getBirth() {
        return birth;
    }

    public void setBirth(Date birth) {
        this.birth = birth;
    }

    public Map<String, Object> getMaps() {
        return maps;
    }

    public void setMaps(Map<String, Object> maps) {
        this.maps = maps;
    }

    public List<Object> getLists() {
        return lists;
    }

    public void setLists(List<Object> lists) {
        this.lists = lists;
    }

    public Dog getDog() {
        return dog;
    }

    public void setDog(Dog dog) {
        this.dog = dog;
    }

    @Override
    public String toString() {
        return "Person{" +
                "lastName='" + lastName + '\'' +
                ", age=" + age +
                ", boss=" + boss +
                ", birth=" + birth +
                ", maps=" + maps +
                ", lists=" + lists +
                ", dog=" + dog +
                '}';
    }
}
一直在提示:
打开之
提示:
You can easily generate your own configuration metadata file from items annotated with @ConfigurationProperties by using the spring-boot-configuration-processor jar. The jar includes a Java annotation processor which is invoked as your project is compiled. To use the processor, include a dependency on spring-boot-configuration-processor.
帮我们生成一些配置文件的元数据信息
With Maven the dependency should be declared as optional, as shown in the following example:

<dependency>
    <groupId>org.springframework.boot</groupId>
    <artifactId>spring-boot-configuration-processor</artifactId>
    <optional>true</optional>
</dependency>
导入配置文件处理器,配置文件进行绑定就会有提示
测试
/**
 * 单元测试 SpringRunner 是spring提供的驱动器跑 而不是Junit
 * 可以在测试期间很方便的类似编码一样进行自动注入等
 */
@RunWith(SpringRunner.class)
@SpringBootTest
public class SpringbootApplicationTests {
    @Autowired
    Person person;
    @Test
    public void contextLoads() {
        System.out.println(person);
    }

}
打印:

可以看到值都可以获取到
idea默认使用的properties使用的是utf-8编码,而properties需要的是ascii码 。idea需要进行设置编码转换
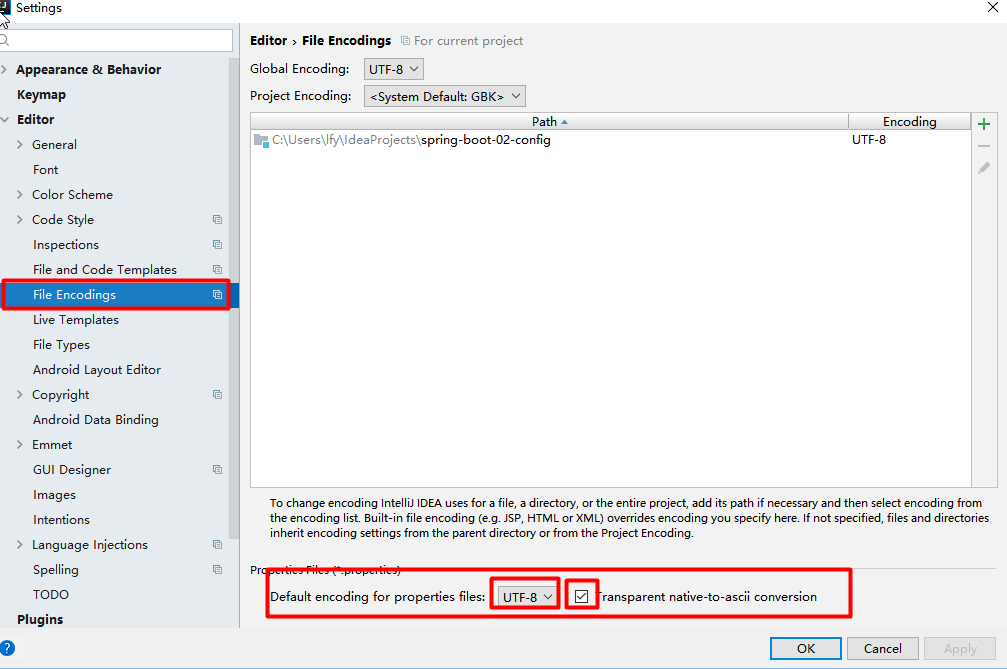
另外的获取值的方式:
@Value
注意 #{SpEL} 是Spring表达式 @value 和 xml配置的bean属性都可以 使用这个表达式
Bean: 注释掉自动配置的注解 @ConfigurationProperties(prefix = "person")
@Component
//@ConfigurationProperties(prefix = "person")  //这个配置类中的属性都是 配置文件中的属性 相关属性绑定
public class Person {
    /**
     * <bean class="Person">
     *      <property name="lastName" value="Toov5Java"></property>
     *     </bean>
     */
    @Value("${person.last-name}")
    private String lastName;
    @Value("#{11*2}")
    private Integer age;
    @Value("true")
    private Boolean boss;
    private Date birth;

    private Map<String,Object> maps;
    private List<Object> lists;
    private Dog dog;

    public String getLastName() {
        return lastName;
    }

    public void setLastName(String lastName) {
        this.lastName = lastName;
    }

    public Integer getAge() {
        return age;
    }

    public void setAge(Integer age) {
        this.age = age;
    }

    public Boolean getBoss() {
        return boss;
    }

    public void setBoss(Boolean boss) {
        this.boss = boss;
    }

    public Date getBirth() {
        return birth;
    }

    public void setBirth(Date birth) {
        this.birth = birth;
    }

    public Map<String, Object> getMaps() {
        return maps;
    }

    public void setMaps(Map<String, Object> maps) {
        this.maps = maps;
    }

    public List<Object> getLists() {
        return lists;
    }

    public void setLists(List<Object> lists) {
        this.lists = lists;
    }

    public Dog getDog() {
        return dog;
    }

    public void setDog(Dog dog) {
        this.dog = dog;
    }

    @Override
    public String toString() {
        return "Person{" +
                "lastName='" + lastName + '\'' +
                ", age=" + age +
                ", boss=" + boss +
                ", birth=" + birth +
                ", maps=" + maps +
                ", lists=" + lists +
                ", dog=" + dog +
                '}';
    }
}
运行:

可以看出 可以一一对应
但是 如果用注解的话 一统绑定
@Value获取值和@ConfigurationProperties获取值比较

配置文件yml还是properties他们都能获取到值;
如果说,我们只是在某个业务逻辑中需要获取一下配置文件中的某项值,使用@Value;
如果说,我们专门编写了一个javaBean来和配置文件进行映射,我们就直接使用@ConfigurationProperties;
@Validated
@Component
@ConfigurationProperties(prefix = "person")  //这个配置类中的属性都是 配置文件中的属性 相关属性绑定
public class Person {
    /**
     * <bean class="Person">
     *      <property name="lastName" value="Toov5Java"></property>
     *     </bean>
     */
    @Email
    @Value("${person.last-name}")
    private String lastName;
    @Value("#{11*2}")
    private Integer age;
    @Value("true")
    private Boolean boss;
    private Date birth;
通过@Value 获取 配置文件中的 map 是获取不到的
另外的绑定数值相关的注解:
1)@PropertySource
2)@ImportResource&@Bean
1) @PropertySource 加载指定的配置文件;
注意:
@ConfigurationProperties(prefix = "person")  默认是从全局配置文件中获取值

如果项目很大,所有配置文件都放在一个配置文件中,就很复杂了。
如果写一个与Spring boot无关的配置文件 需要声明引入之
person.properties:
person.last-name=toov5Java
person.age=18
person.birth=2019/3/4
person.boss=false
person.maps.k1=v1
person.maps..k2=23
person.lists=a,b,c
person.dog.name=lovely
person.dog.age=2

测试:

2)@ImportResource: 导入Spring的配置文件,让配置文件里面的内容生效
我们在spring boot项目里面配置xml:
<?xml version="1.0" encoding="UTF-8"?>
<beans xmlns="http://www.springframework.org/schema/beans"
       xmlns:xsi="http://www.w3.org/2001/XMLSchema-instance"
       xsi:schemaLocation="
        http://www.springframework.org/schema/beans http://www.springframework.org/schema/beans/spring-beans.xsd">
    <bean id="helloToov5" class="com.toov5.Bean.HelloToov5"></bean>
</beans>
在ioc容器中是没有这个bean的!
Spring Boot里面没有Spring的配置文件,我们自己编写的配置文件,也不能自动识别;
想让Spring的配置文件生效,加载进来;@ImportResource标注在一个配置类上
标记在我们项目中的主配置类上面
@ImportResource(locations = "classpath:beans.xml")   //导入Spring的配置文件让其生效
@SpringBootApplication
public class SpringbootApplication {

    public static void main(String[] args) {
        SpringApplication.run(SpringbootApplication.class, args);
    }

}
运行:

springboot不推荐上面的方式,推荐如下:
给容器添加组件,需要配置类:
@Configuration  //指明当前类是个配置类 代替spring的配置文件<bean
public class MyAppConfig {

    //将方法的返回值添加到容器中;容器中这个组件默认的id 就是方法名字
    @Bean
    public HelloToov5 helloToov5(){  //ioc中注册的名字与方法名字有关!!
        System.out.println("容器添加了组件HelloToov5");
         return new HelloToov5();
    }

}
Bean的组件:
public class HelloToov5 {
}
不通过xml了,通过全注解的方式

关于配置文件的占位符:
博主在开发时候,在url拼接时候经常使用奥。
1、随机数
${random.value}、${random.int}、${random.long}
${random.int(10)}、${random.int[1024,65536]}
2、占位符获取之前配置的值,如果没有可以是用:指定默认值
person.last‐name=张三${random.uuid}
person.age=${random.int}
person.birth=2017/12/15
person.boss=false
person.maps.k1=v1
person.maps.k2=14
person.lists=a,b,c
person.dog.name=${person.hello:hello}_dog
person.dog.age=15

Bean:
@Component
//@PropertySource(value = {"classpath:person.properties"})
@ConfigurationProperties(prefix = "person")  //这个配置类中的属性都是 配置文件中的属性 相关属性绑定
public class Person {

    @Value("${person.last-name}")
    private String lastName;
    @Value("#{11*2}")
    private Integer age;
    @Value("true")
    private Boolean boss;
    private Date birth;

    private Map<String,Object> maps;
    private List<Object> lists;
    private Dog dog;

    public String getLastName() {
        return lastName;
    }

    public void setLastName(String lastName) {
        this.lastName = lastName;
    }

    public Integer getAge() {
        return age;
    }

    public void setAge(Integer age) {
        this.age = age;
    }

    public Boolean getBoss() {
        return boss;
    }

    public void setBoss(Boolean boss) {
        this.boss = boss;
    }

    public Date getBirth() {
        return birth;
    }

    public void setBirth(Date birth) {
        this.birth = birth;
    }

    public Map<String, Object> getMaps() {
        return maps;
    }

    public void setMaps(Map<String, Object> maps) {
        this.maps = maps;
    }

    public List<Object> getLists() {
        return lists;
    }

    public void setLists(List<Object> lists) {
        this.lists = lists;
    }

    public Dog getDog() {
        return dog;
    }

    public void setDog(Dog dog) {
        this.dog = dog;
    }

    @Override
    public String toString() {
        return "Person{" +
                "lastName='" + lastName + '\'' +
                ", age=" + age +
                ", boss=" + boss +
                ", birth=" + birth +
                ", maps=" + maps +
                ", lists=" + lists +
                ", dog=" + dog +
                '}';
    }
}
运行结果:
2019-04-21 10:43:41.664  INFO 12396 --- [           main] c.t.s.SpringbootApplicationTests         : Starting SpringbootApplicationTests on RE5RLZUU8MPSW7A with PID 12396 (started by Administrator in D:\eclipse_pj\foodProject\springboot)
2019-04-21 10:43:41.665  INFO 12396 --- [           main] c.t.s.SpringbootApplicationTests         : No active profile set, falling back to default profiles: default
容器添加了组件HelloToov5
2019-04-21 10:43:43.730  INFO 12396 --- [           main] o.s.s.concurrent.ThreadPoolTaskExecutor  : Initializing ExecutorService 'applicationTaskExecutor'
2019-04-21 10:43:44.038  INFO 12396 --- [           main] c.t.s.SpringbootApplicationTests         : Started SpringbootApplicationTests in 2.762 seconds (JVM running for 3.895)
Person{lastName='toov540738455-ecc8-4efa-9874-bd7a2504d87a}', age=-208365648, boss=false, birth=Mon Mar 04 00:00:00 CST 2019, maps={k1=v1, k2=23}, lists=[a, b, c], dog=Dog{name='toov5a34d8625-3715-4d17-8ccb-8617f68e13ef}_lovely', age=18}}
2019-04-21 10:43:44.266  INFO 12396 --- [       Thread-2] o.s.s.concurrent.ThreadPoolTaskExecutor  : Shutting down ExecutorService 'applicationTaskExecutor'
总结: 占位符获取之前配置的值,如果没有可以是用:指定默认值
比如:

Profile
1)多Profile文件
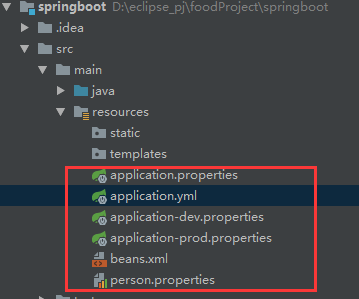
我们在主配置文件编写的时候,文件名可以是 application-{profile}.properties 或者是 yml
默认使用application.properties的配置;
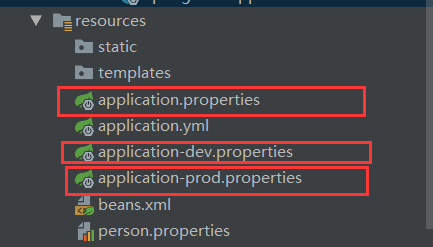
启动后默认:

如何激活:
方式一:
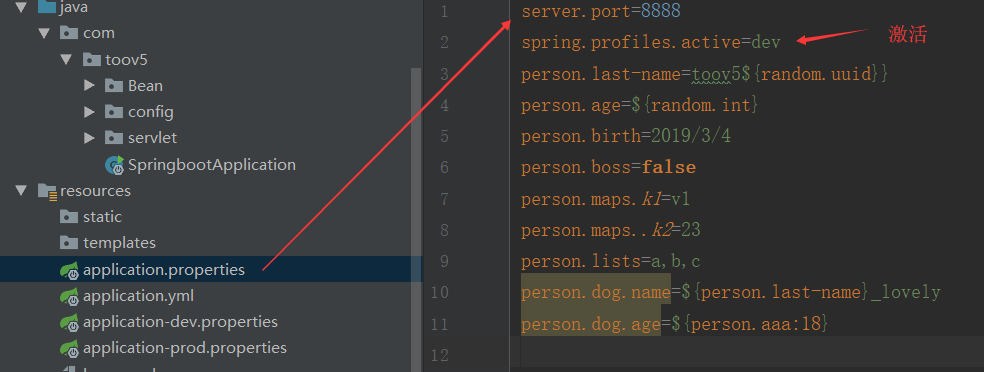
运行结果:

方式二 是对于yml支持多文档块方式,不用写多个环境下的 properties 配置文件了,一个就可以搞定
”---“ 是yml特有的文档块标记 document1 document2...
1)在配置文件中指定 spring.profiles.active=dev
server:
  port: 8088
spring:
  profiles:
    active: dev

---
server:
  port: 6666
spring:
  profiles: dev

---
server:
  port: 777
spring:
  profiles: prod
激活指定yml的profile

2)虚拟机参数;
server:
  port: 8088
spring:
  profiles:
    active: dev

---
server:
  port: 6666
spring:
  profiles: dev

---
server:
  port: 777
spring:
  profiles: prod
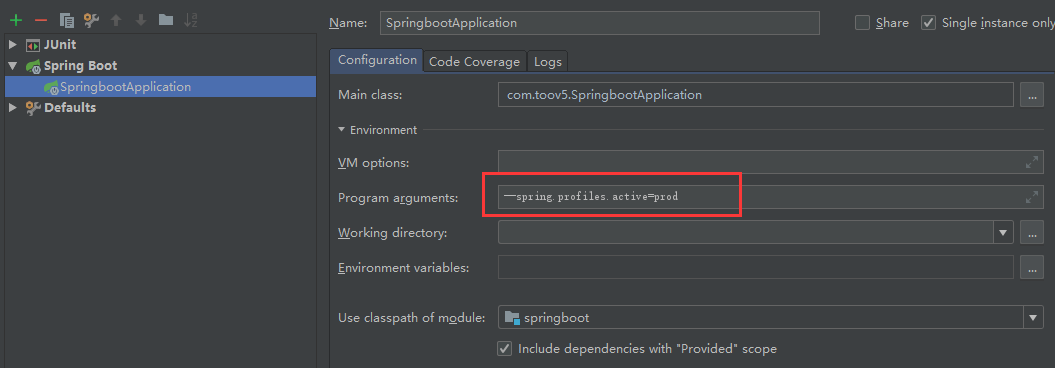
3) 虚拟机参数方式
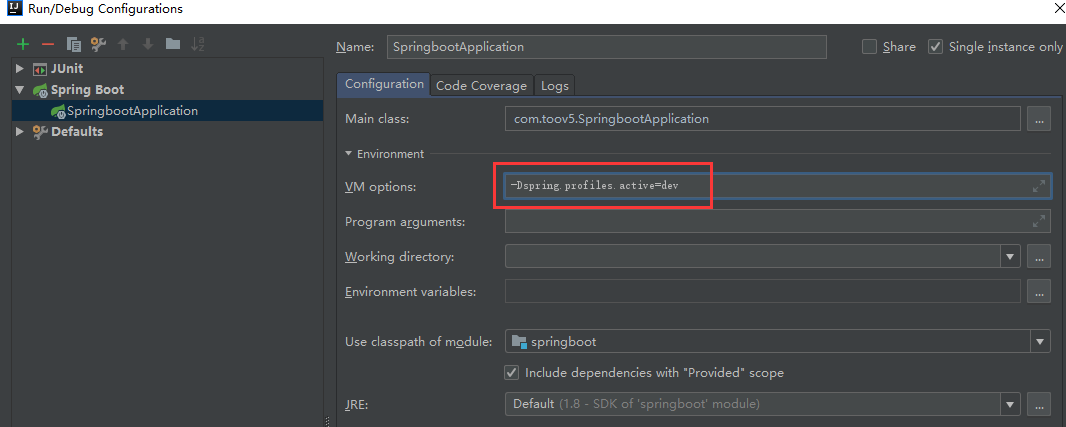
4) jar包 命令行方式运行:
java -jar spring-boot-02-config-0.0.1-SNAPSHOT.jar --spring.profiles.active=dev;
可以直接在测试的时候,配置传入命令行参数
关于SpringBoot配置文件加载位置
springboot 启动会扫描以下位置的application.properties或者application.yml文件作为Spring boot的默认配置文
件
–file:./config/
–file:./ (当前项目根目录)
–classpath:/config/
–classpath:/
四个位置优先级由高到底,高优先级的配置会覆盖低优先级的配置;
测试:

启动打印:

根目录下的测试:

启动:

根目录下的 config文件夹下的优先级是最高的:
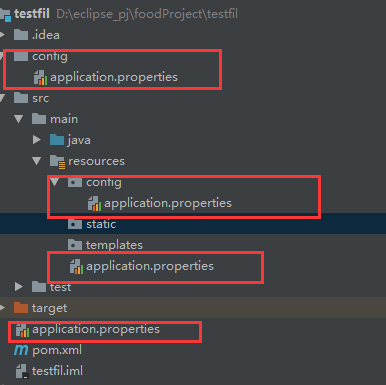
配置文件:

结果:

总结:
配置文件可以放在此位置,也可以指定位置。
小结:
SpringBoot会从这四个位置全部加载主配置文件(高低优先级都会加载的);互补配置;
我们还可以通过spring.config.location来改变默认的配置文件位置
项目打包好以后,我们可以使用命令行参数的形式,启动项目的时候来指定配置文件的新位置;指定配置文件和默
认加载的这些配置文件共同起作用形成互补配置;
java -jar spring-boot-02-config-02-0.0.1-SNAPSHOT.jar --spring.config.location=G:/application.properties
通过高优先级覆盖一部分内容:
随便写一个controller:
@RestController
public class Hello {

    @RequestMapping("/hello")
    public String hello(){
        return "hello Toov5 file!";
    }
}
按照上面所述的,在项目 config 目录下面配置访问路径:

启动后访问:

高优先级配置部分内容,低优先级配置全部内容的思想
运维常用:
还可以通过spring.config.location 修改默认的配置文件位置,打成jar包后 仅仅修改一部分内容 内容配置文件在 :G:/application.properties
java -jar spring-boot-02-config-02-0.0.1-SNAPSHOT.jar --spring.config.location=G:/application.properties
其他的配置可以不变哦~
Spring boot外部配置文件的加载顺序,有很多种
参考:https://docs.spring.io/spring-boot/docs/current-SNAPSHOT/reference/htmlsingle/#boot-features-external-config
总结: 按照优先级从高到低,高优先级的配置覆盖低优先级的配置。配置之间形成互补。
1. 命令行参数
2. 来自java:comp/env的JNDI属性
3. Java系统属性(System.getProperties())
4. 操作系统环境变量
5. RandomValuePropertySource配置的random.*属性值
6. jar包外部的application-{profile}.properties或application.yml(带spring.profile)配置文件
7. jar包内部的application-{profile}.properties或application.yml(带spring.profile)配置文件
8. jar包外部的application.properties或application.yml(不带spring.profile)配置文件
9. jar包内部的application.properties或application.yml(不带spring.profile)配置文件
10. @Configuration注解类上的@PropertySource
11. 通过SpringApplication.setDefaultProperties指定的默认属性
1 配置可以放在命令行参数上,打包后访问。 打包只涉及到:
符合maven工程规范
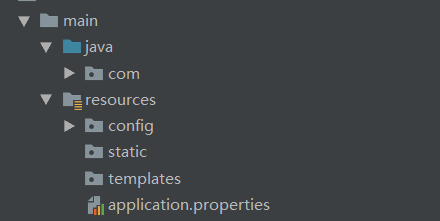
其余的不打包。
打包后执行:
所有的配置都可以在命令行上进行指定 (有几个参数 添加几个,多个配置用空格分开)
java -jar spring-boot-02-config-02-0.0.1-SNAPSHOT.jar --server.port=8087 --server.context-path=/abc
如果太多就不合适了
专门写一个配置文件 写在jar包外面
不用输入任何参数
注意:
优先加载带profile的
再加载不带profile的
所有支持的配置加载来源有很多,可以参考官方文档:https://docs.spring.io/spring-boot/docs/current-SNAPSHOT/reference/htmlsingle/#boot-features-external-config
关于自动配置原理:https://www.cnblogs.com/toov5/p/10728261.html


