SpringBoot2.0之整合Kafka
maven依赖:
<project xmlns="http://maven.apache.org/POM/4.0.0" xmlns:xsi="http://www.w3.org/2001/XMLSchema-instance"
    xsi:schemaLocation="http://maven.apache.org/POM/4.0.0 http://maven.apache.org/xsd/maven-4.0.0.xsd">
    <modelVersion>4.0.0</modelVersion>
    <groupId>com.itmayiedu</groupId>
    <artifactId>springboot2.0_kafka</artifactId>
    <version>0.0.1-SNAPSHOT</version>
    <parent>
        <groupId>org.springframework.boot</groupId>
        <artifactId>spring-boot-starter-parent</artifactId>
        <version>2.0.1.RELEASE</version>
    </parent>
    <dependencies>
        <!-- springBoot集成kafka -->
        <dependency>
            <groupId>org.springframework.kafka</groupId>
            <artifactId>spring-kafka</artifactId>
        </dependency>
        <!-- SpringBoot整合Web组件 -->
        <dependency>
            <groupId>org.springframework.boot</groupId>
            <artifactId>spring-boot-starter-web</artifactId>
        </dependency>
    </dependencies>

</project>
yml:
# kafka
spring:
  kafka:
    # kafka服务器地址(可以多个)
    bootstrap-servers: 192.168.91.1:9092,192.168.91.3:9092,192.168.91.4:9092
    consumer:
      # 指定一个默认的组名
      group-id: kafka2
      # earliest:当各分区下有已提交的offset时,从提交的offset开始消费;无提交的offset时,从头开始消费
      # latest:当各分区下有已提交的offset时,从提交的offset开始消费;无提交的offset时,消费新产生的该分区下的数据
      # none:topic各分区都存在已提交的offset时,从offset后开始消费;只要有一个分区不存在已提交的offset,则抛出异常
      auto-offset-reset: earliest
      # key/value的反序列化
      key-deserializer: org.apache.kafka.common.serialization.StringDeserializer
      value-deserializer: org.apache.kafka.common.serialization.StringDeserializer
    producer:
      # key/value的序列化
      key-serializer: org.apache.kafka.common.serialization.StringSerializer
      value-serializer: org.apache.kafka.common.serialization.StringSerializer
      # 批量抓取
      batch-size: 65536
      # 缓存容量
      buffer-memory: 524288
      # 服务器地址
      bootstrap-servers: 192.168.91.1:9092,192.168.91.3:9092,192.168.91.4:9092
消费者:消费 topic为“test”的消息
/**
     * 消费者使用日志打印消息
     */

    @KafkaListener(topics = "test")   //监听同一个主题
    public void receive(ConsumerRecord<?, ?> consumer) {
        System.out.println("topic名称:" + consumer.topic() + ",key:" + consumer.key() + ",分区位置:" + consumer.partition()
                + ", 下标" + consumer.offset());
    }
可以看到分区都是0昂~ tets创建时候 partition是1哦 就是在proker1上创建的主题

写个controller,自己生产 ,自己消费
import org.apache.kafka.clients.consumer.ConsumerRecord;
import org.springframework.beans.factory.annotation.Autowired;
import org.springframework.boot.SpringApplication;
import org.springframework.boot.autoconfigure.SpringBootApplication;
import org.springframework.kafka.annotation.KafkaListener;
import org.springframework.kafka.core.KafkaTemplate;
import org.springframework.web.bind.annotation.RequestMapping;
import org.springframework.web.bind.annotation.RestController;

@RestController
@SpringBootApplication
public class KafkaController {

    /**
     * 注入kafkaTemplate
     */
    @Autowired
    private KafkaTemplate<String, String> kafkaTemplate;

    /**
     * 发送消息的方法
     *
     * @param key
     *            推送数据的key
     * @param data
     *            推送数据的data
     */
    private void send(String key, String data) {
        // topic 名称 key data 消息数据
        kafkaTemplate.send("my_test_topic", key, data);  //三个参数: topic名称      key   消息数据

    }
    // test 主题 1 my_test 3

    @RequestMapping("/kafka")
    public String testKafka() {
        int iMax = 6;
        for (int i = 1; i < iMax; i++) {  //循环发6次kafka消息
            send("key" + i, "data" + i);
        }
        return "success";
    }

    public static void main(String[] args) {
        SpringApplication.run(KafkaController.class, args);
    }

    /**
     * 消费者使用日志打印消息
     */

    @KafkaListener(topics = "my_test_topic")   //监听同一个主题
    public void receive(ConsumerRecord<?, ?> consumer) {
        System.out.println("topic名称:" + consumer.topic() + ",key:" + consumer.key() + ",分区位置:" + consumer.partition()
                + ", 下标" + consumer.offset());
    }

}
运行后:

可以看到key与对应的分区存储情况! 分区就是不同的 broker 比如key1 和 key2 存放在 第三个broker~
也可以查看每个节点的日志 000000000.log的情况 我这边显示乱码 我就不多做展示了
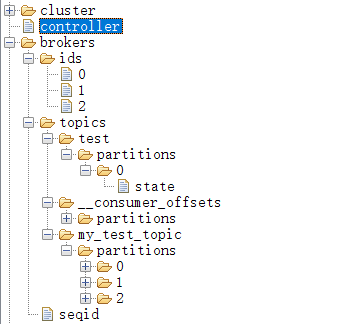
看看我们的zk:


