Win32 GDI中通过手动计算高斯模糊实现阴影效果
先说一句,Photoshop的图层样式中的**“阴影”,“外发光”**效果,实质上都是高斯模糊实现的。阴影效果是在图层后偏移叠加(也就是平面投影)一个纯黑的层,然后对RGB和alpha通道做高斯模糊。外发光效果是在图层后叠加一个黄色描边的层,然后做高斯模糊。
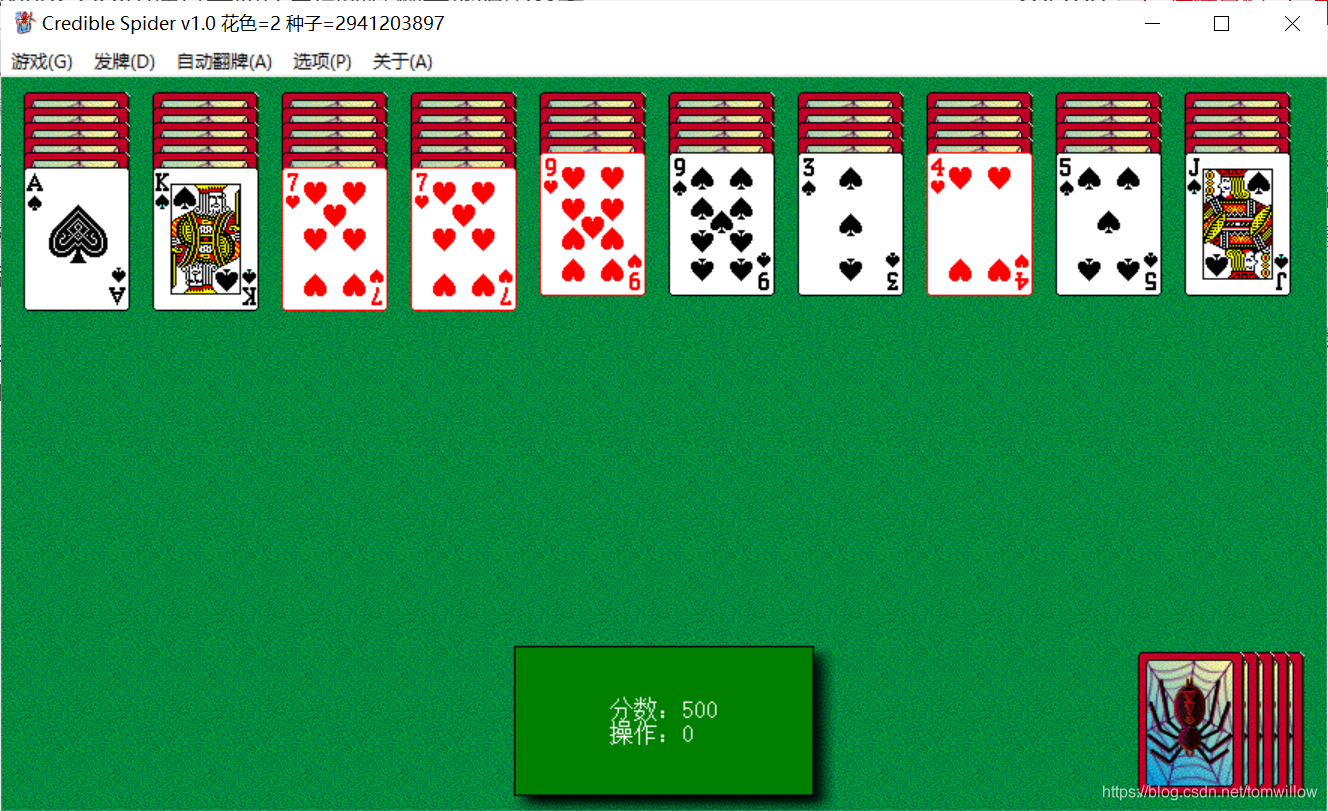
本文通过CreateDIBSection取得位图指针,直接对位图数据alpha通道进行处理,调用AlphaBlend函数实现阴影效果。
效果图(注意下方的提示框):

步骤1:实现高斯模糊类
高斯模糊的原理不细说了,本质上就是用二维正态分布函数计算一个像素受周围像素影响的权重,得到权重矩阵,然后对每个点分别计算新的值。
GauseBlur.h:
#pragma once
#include <Windows.h>

class GauseBlur
{
private:
	int dist;
	double* matrix;
	double* CalcGauseBlurMatrix(double sigma, int dist);
	UINT GetGauseBlur(int x, int y, const UINT* puStart, int width, const RECT& rect, double* matrix, int dist);
public:
	GauseBlur(double sigma, int dist);
	~GauseBlur();

	void Do(UINT* puStart, int width, int height);
};
GauseBlur.cpp:
#define _USE_MATH_DEFINES
#include <math.h>

#include "GauseBlur.h"

GauseBlur::GauseBlur(double sigma, int dist) :dist(dist)
{
	matrix = CalcGauseBlurMatrix(sigma, dist);
}

GauseBlur::~GauseBlur()
{
	delete[] matrix;
}

double* GauseBlur::CalcGauseBlurMatrix(double sigma, int dist)
{
	unsigned int sz = 1 + dist * 2;
	double* ret = new double[sz * sz];
	double sum = 0;
	for (int i = 0; i < sz; ++i)
		for (int j = 0; j < sz; ++j)
		{
			int x = j - dist, y = i - dist;
			ret[i * sz + j] = exp(-(x * x + y * y) / (2.0 * sigma * sigma)) / (2 * M_PI * sigma * sigma);
			sum += ret[i * sz + j];
		}

	//均一化权重,使所有权重加起来为1
	for (int i = 0; i < sz; ++i)
		for (int j = 0; j < sz; ++j)
			ret[i * sz + j] /= sum;
	return ret;
}

UINT GauseBlur::GetGauseBlur(int x, int y, const UINT* puStart, int width, const RECT& rect, double* matrix, int dist)
{
	UINT ret = 0;
	float r = 0, g = 0, b = 0, alpha = 0;
	int sz = 1 + dist * 2;

	//不超出限定框
	int ystart = max(rect.top, y - dist);
	int yend = min(rect.bottom - 1, y + dist);
	int xstart = max(rect.left, x - dist);
	int xend = min(rect.right - 1, x + dist);
	for (int yn = ystart, i = max(0, dist - y); yn <= yend && i < sz; ++yn, ++i)
		for (int xn = xstart, j = max(0, dist - x); xn <= xend && j < sz; ++xn, ++j)
		{
			BYTE* p = (BYTE*)&puStart[yn * width + xn];

			b += matrix[i * sz + j] * p[0];
			g += matrix[i * sz + j] * p[1];
			r += matrix[i * sz + j] * p[2];
			alpha += matrix[i * sz + j] * p[3];
		}
	BYTE* p = (BYTE*)&ret;
	p[0] = b;
	p[1] = g;
	p[2] = r;
	p[3] = alpha;
	return ret;
}

void GauseBlur::Do(UINT* puStart, int width, int height)
{
	RECT rc = { 0,0,width,height };
	int index = 0;
	for (int y=0;y<height;++y)
		for (int x = 0; x < width; ++x)
		{
			puStart[index] = GetGauseBlur(x, y, puStart, width, rc, matrix, dist);
			++index;
		}
}
GauseBlur类的构造函数只有2个参数,sigma影响高斯模糊的强度,第1个图是sigma=5.0的效果,dist是高斯模糊的影响距离。调用非常简单:
	GauseBlur gauseBlur(sigma, min(abs(dx),abs(dy)));
	gauseBlur.Do(pu, width, height);
其中,pu是指向4字节位图数据的指针,这样就能对整个位图做高斯模糊处理。
步骤2:RectShadow类
RectShadow类的定义同样非常简单:
#pragma once
#include <Windows.h>
#pragma comment(lib,"msimg32.lib")//AlphaBlend

class RectShadow
{
private:
	int width, height;
	RECT rcShadowOut;
	HWND hWnd;
	HDC hdcShadow;
public:
	RectShadow(HDC hdc, HWND hWnd, const RECT &rc,int dist,double angleDEG,double sigma);
	~RectShadow();
	void Draw(HDC hdc);
};
只有一个构造函数和一个Draw,hdc用于创建内部的hdcShadow,hWnd用于释放hdcShadow,rc是需要投影的矩形坐标,dist为投影距离,angleDEG为投影角度,sigma则是高斯模糊强度。
RectShadow.cpp:
#define _USE_MATH_DEFINES
#include <math.h>

#include "RectShadow.h"

#include "GauseBlur.h"
#include "POINT.h"

//创建位图,返回HBITMAP,传入指针地址,修改数据可直接影响位图
//来自:https://github.com/setoutsoft/soui/blob/master/components/render-gdi/render-gdi.cpp
HBITMAP CreateGDIBitmap(int nWid, int nHei, void** ppBits)
{
	BITMAPINFO bmi;
	memset(&bmi, 0, sizeof(bmi));
	bmi.bmiHeader.biSize = sizeof(BITMAPINFOHEADER);
	bmi.bmiHeader.biWidth = nWid;
	bmi.bmiHeader.biHeight = -nHei; // top-down image
	bmi.bmiHeader.biPlanes = 1;
	bmi.bmiHeader.biBitCount = 32;
	bmi.bmiHeader.biCompression = BI_RGB;
	bmi.bmiHeader.biSizeImage = 0;

	HDC hdc = GetDC(NULL);
	HBITMAP hBmp = CreateDIBSection(hdc, &bmi, DIB_RGB_COLORS, ppBits, 0, 0);
	ReleaseDC(NULL, hdc);
	return hBmp;
}

RectShadow::RectShadow(HDC hdc,HWND hWnd,const RECT& rc, int d, double angleDEG, double sigma):hWnd(hWnd)
{
	double angleRED = angleDEG / 180.0 * M_PI;
	int dx = d * cos(angleRED);
	int dy = -d * sin(angleRED);

	//计算阴影坐标
	RECT rcShadow = rc + POINT{ dx,dy };
	rcShadowOut = ExpandRect(rcShadow, abs(dx), abs(dy));

	width = GetWidth(rcShadowOut);
	height = GetHeight(rcShadowOut);

	//初始化HDC和HBITMAP
	hdcShadow = CreateCompatibleDC(hdc);
	BYTE* pb = nullptr;
	hBitmapShadow = CreateGDIBitmap(width, height, (void**)&pb);
	SelectObject(hdcShadow, hBitmapShadow);
	DeleteObject(hBitmapShadow);

	//alpha通道设置为0xff
	UINT* pu = (UINT*)pb;
	for (int k = 0; k < width * height; ++k)
	{
		pu[k] = 0xff000000;
	}

	//rcShadow移到画面正中
	MoveToZero(rcShadow);
	rcShadow += POINT{ abs(dx), abs(dy) };
	SelectObject(hdcShadow, GetStockObject(BLACK_BRUSH));

	//GDI函数会将alpha通道置0
	Rectangle(hdcShadow, rcShadow);

	//alpha通道取反
	for (int k = 3; k < width * height * 4; k += 4)
	{
		pb[k] = ~pb[k];
	}

	//对全部像素包括alpha通道做高斯模糊
	GauseBlur gauseBlur(sigma, min(abs(dx),abs(dy)));
	gauseBlur.Do(pu, width, height);
}

RectShadow::~RectShadow()
{
	ReleaseDC(hWnd,hdcShadow);
}

void RectShadow::Draw(HDC hdc)
{
	//以alpha通道进行叠加
	BLENDFUNCTION bf = { AC_SRC_OVER,0,0xff,AC_SRC_ALPHA };
	BOOL bRet = ::AlphaBlend(hdc, rcShadowOut.left, rcShadowOut.top, width, height, hdcShadow, 0, 0, width, height, bf);

	//BitBlt(hdc, rcShadowOut.left, rcShadowOut.top, width, height, hdcShadow, 0, 0, SRCCOPY);
}
在透明度的处理中参考了SOUI库的做法,即创建位图,取得位图数据指针,将alpha通道全部置0xff,然后使用GDI绘制。由于GDI函数会将alpha通道置0,所以,在绘制后对alpha通道取反,即可得到带alpha通道值的位图。
之后的高斯模糊处理必须要有alpha通道参与,因为阴影边缘是逐渐透明的,如果没有对alpha通道处理,就会得到锋利的黑边。
这样,alpha通道正确,就可以调用AlphaBlend在背景上贴图了。
如果把AlphaBlend换成BitBlt,阴影颜色换成白色,再去掉前景内容,效果如下:

步骤3:绘制
由于高斯模糊计算量较大,时间复杂度为O(n*(2*dist+1)^2),并且阴影也不是实时变化的,所以可以把阴影计算放在OnCreate或者OnSize中。
LRESULT MainWindow::OnSize(UINT uMsg, WPARAM wParam, LPARAM lParam, BOOL& bHandled)
{
	//因为WM_SIZE会手动发送,所以rcClient不能取用wParam中的值
	GetClientRect(&rcClient);

	//刷新提示框位置
	rectTipBox.left = (rcClient.right - TIPBOX_WIDTH) / 2;
	rectTipBox.right = rectTipBox.left + TIPBOX_WIDTH;
	rectTipBox.bottom = rcClient.bottom - border;
	rectTipBox.top = rectTipBox.bottom - TIPBOX_HEIGHT;

	HDC hdc = GetDC();

	//创建阴影
	delete rectShadow;
	rectShadow = new RectShadow(hdc, m_hWnd, rectTipBox, 10, -45, 5.0);
	//下略
我这里是放在OnSize中,提示框位置变化时重新计算阴影。注意GetDC获得的HDC必须释放。
之后在OnPaint中调用RectShadow的Draw方法即可。我用了双缓冲,下面的Draw函数是在OnPaint中被调用的。
void MainWindow::Draw(HDC hdc, const RECT& rect)
{
	//贴上背景
	BitBlt(hdc, 0, 0, rect.right, rect.bottom, hdcBackground, 0, 0, SRCCOPY);

	//绘制阴影
	rectShadow->Draw(hdc);

	//以下绘制前景内容,略
这样就完成了。

本文代码是我的《可靠蜘蛛纸牌》的一部分。
地址:https://github.com/tomwillow/Credible-Spider


