
Springboot 整合mybatis 加导入导出excel
快速写一个springboot,mybatis的demo,最后用excel导入导出。
第一步,创建一个新maven


- 命名就按自己的来啦
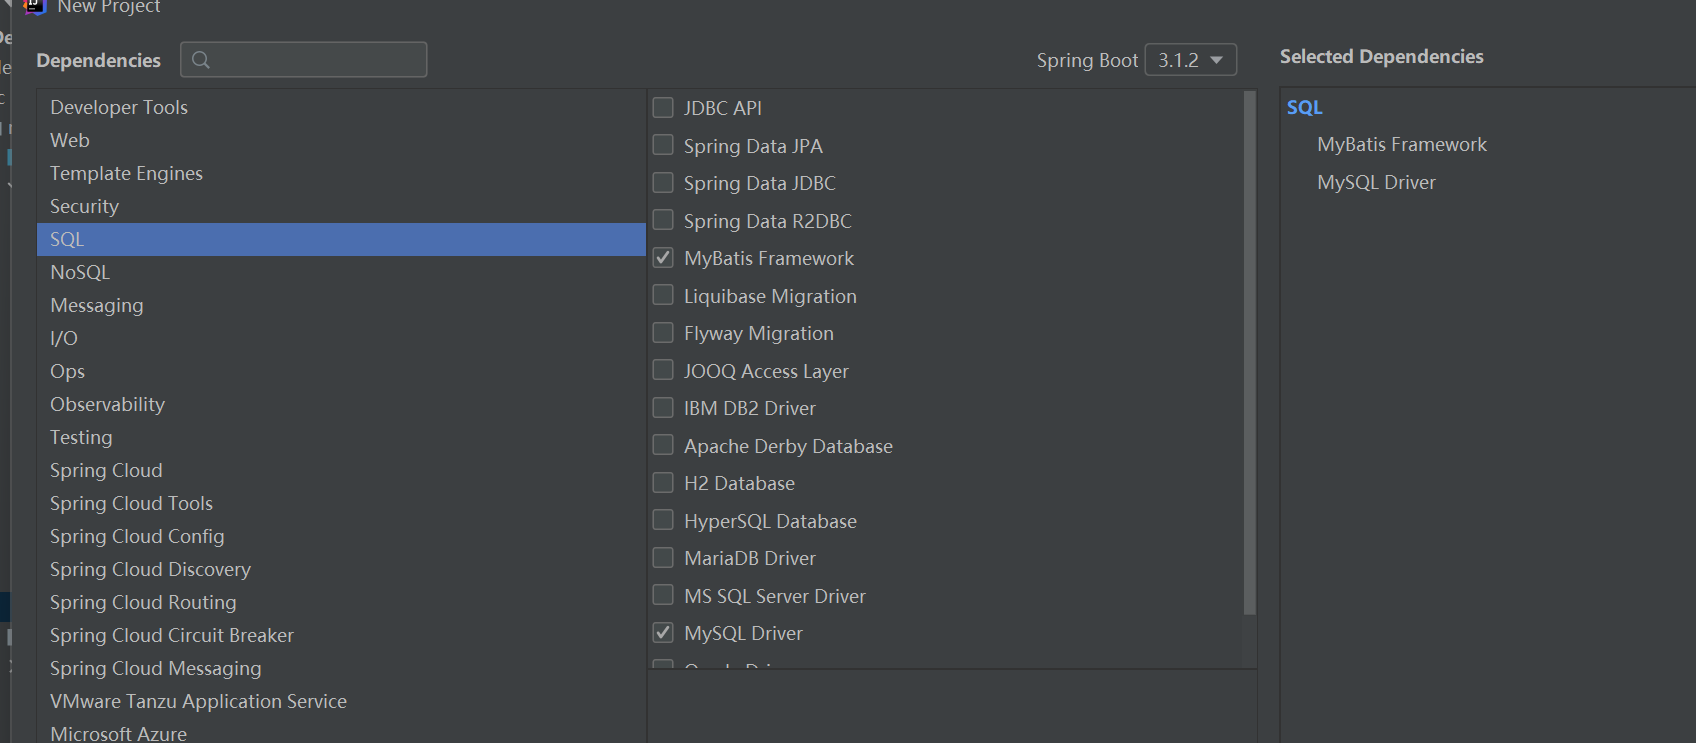
第二步,配置pom文件
<parent>
        <groupId>org.springframework.boot</groupId>
        <artifactId>spring-boot-starter-parent</artifactId>
        <version>2.3.4.RELEASE</version>
</parent>

 <dependencies>
        <dependency>
            <groupId>org.springframework.boot</groupId>
            <artifactId>spring-boot-starter-web</artifactId>
        </dependency>

        <dependency>
            <groupId>org.mybatis.spring.boot</groupId>
            <artifactId>mybatis-spring-boot-starter</artifactId>
            <version>2.1.4</version>
        </dependency>

        <dependency>
            <groupId>junit</groupId>
            <artifactId>junit</artifactId>
            <version>4.12</version>
        </dependency>

        <dependency>
            <groupId>mysql</groupId>
            <artifactId>mysql-connector-java</artifactId>
            <version>5.1.47</version>
        </dependency>


        <!-- EasyExcel -->
        <dependency>
            <groupId>com.alibaba</groupId>
            <artifactId>fastjson</artifactId>
            <version>1.2.5</version>
        </dependency>

        <dependency>
            <groupId>com.alibaba</groupId>
            <artifactId>easyexcel</artifactId>
            <version>2.2.6</version>
        </dependency>
    </dependencies>

    <build>
        <plugins>
            <plugin>
                <groupId>org.springframework.boot</groupId>
                <artifactId>spring-boot-maven-plugin</artifactId>
            </plugin>
        </plugins>
        <!--   **.xml写在src找不到问题解决方案     -->
        <resources>
            <resource>
                <!-- directory:指定资源文件的位置 -->
                <directory>src/main/java</directory>
                <includes>
                    <!-- “**” 表示任意级目录    “*”表示任意任意文件 -->
                    <!-- mvn resources:resources :对资源做出处理,先于compile阶段  -->
                    <include>**/*.properties</include>
                    <include>**/*.xml</include>
                    <include>**/*.yaml</include>
                </includes>
                <!--  filtering:开启过滤,用指定的参数替换directory下的文件中的参数(eg. ${name}) -->
                <filtering>false</filtering>
            </resource>
            <resource>
                <directory>src/main/resources</directory>
            </resource>
        </resources>
    </build>
第三步,配置mybatis的全局文件和数据库的url
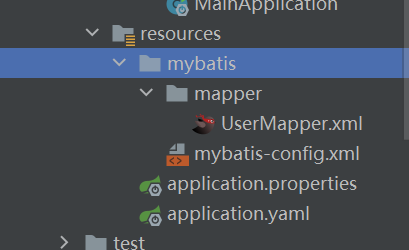
- 对两个application.xxx进行配置
![]()

mybatis:
  config-location: classpath:mybatis/mybatis-config.xml  #全局配置文件位置
  mapper-locations: classpath:mybatis/mapper/*.xml  #sql映射文件位置

  #在application.properties/或者application.yml文件中没有添加数据库配置信息.
  spring:
    datasource:
      url: jdbc:mysql://localhost:3306/mybatis?useUnicode=true&characterEncoding=UTF-8&useSSL=false
      username: root
      password: 123456
      driver-class-name: com.mysql.jdbc.Driver

server.port=8080
spring.datasource.username=root
spring.datasource.password=123456
spring.datasource.url=jdbc:mysql://localhost:3306/mybatis?useUnicode=true&characterEncoding=utf8&useSSL=falseS
spring.datasource.driver-class-name=com.mysql.jdbc.Driver
- 配置mybatis的全局文件(注释代码是因为导出了mybatis-springboot那个依赖)
![]()

<?xml version="1.0" encoding="UTF-8" ?>
<!DOCTYPE configuration
        PUBLIC "-//mybatis.org//DTD Config 3.0//EN"
        "http://mybatis.org/dtd/mybatis-3-config.dtd">
<configuration>

</configuration>
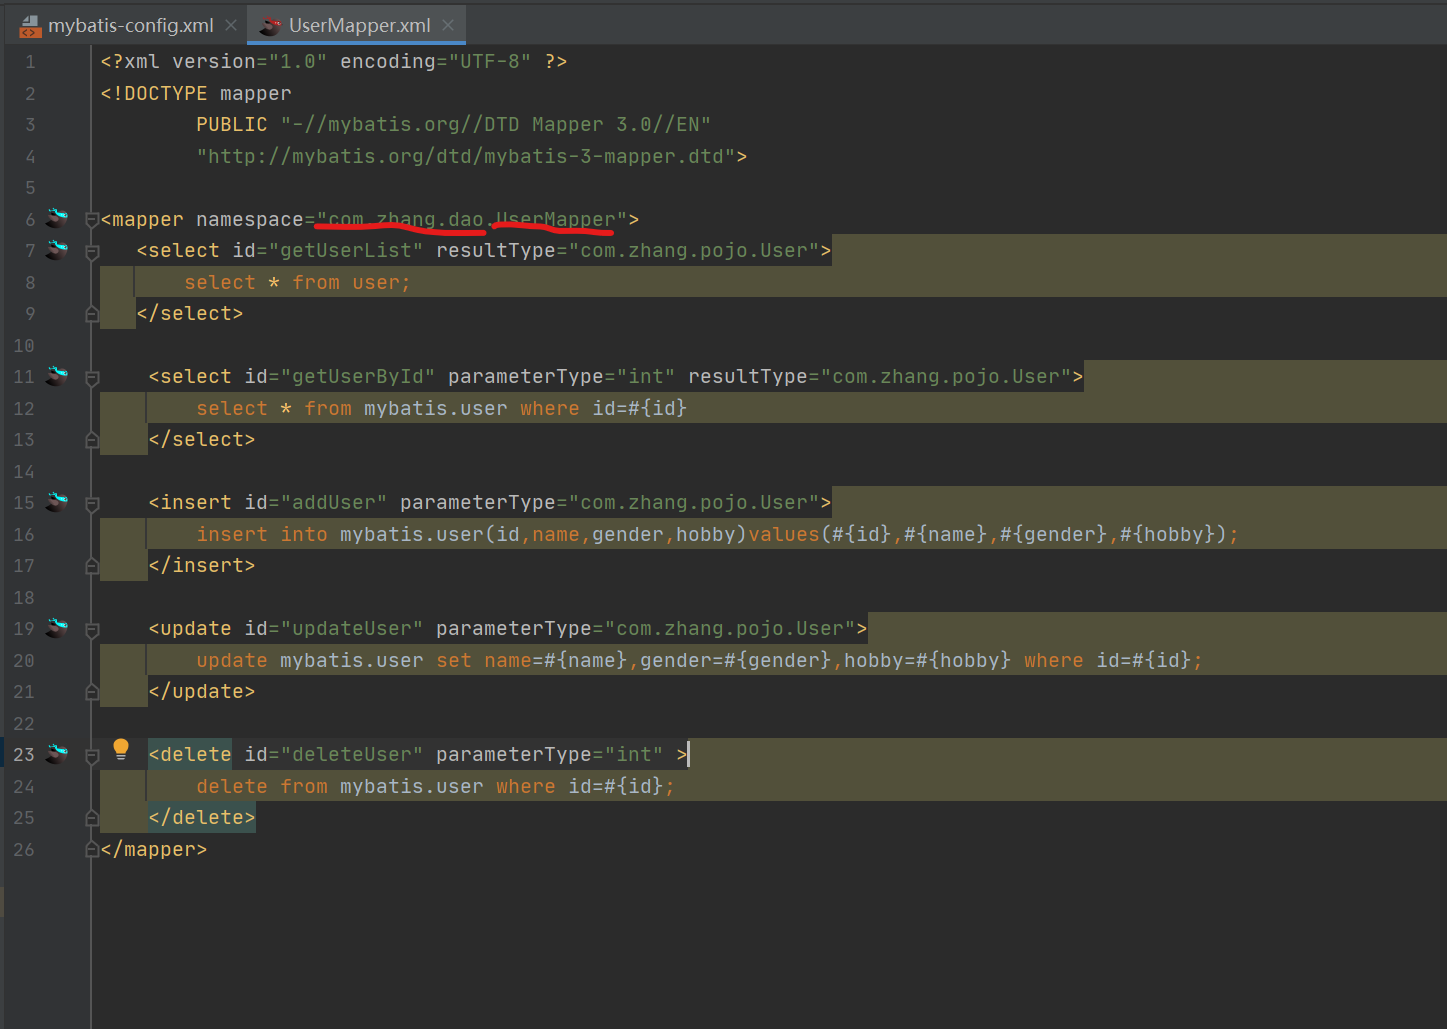
- 接下来就是sql映射文件(就是mysql语句文件)
- 这里是简单的curd,注意namespace需要写入pojo类的路径
![]()
- 这里是简单的curd,注意namespace需要写入pojo类的路径
<?xml version="1.0" encoding="UTF-8" ?>
<!DOCTYPE mapper
        PUBLIC "-//mybatis.org//DTD Mapper 3.0//EN"
        "http://mybatis.org/dtd/mybatis-3-mapper.dtd">

<mapper namespace="com.zhang.dao.UserMapper">
   <select id="getUserList" resultType="com.zhang.pojo.User">
       select * from user;
   </select>

    <select id="getUserById" parameterType="int" resultType="com.zhang.pojo.User">
        select * from mybatis.user where id=#{id}
    </select>

    <insert id="addUser" parameterType="com.zhang.pojo.User">
        insert into mybatis.user(id,name,gender,hobby)values(#{id},#{name},#{gender},#{hobby});
    </insert>

    <update id="updateUser" parameterType="com.zhang.pojo.User">
        update mybatis.user set name=#{name},gender=#{gender},hobby=#{hobby} where id=#{id};
    </update>

    <delete id="deleteUser" parameterType="int" >
        delete from mybatis.user where id=#{id};
    </delete>
</mapper>
(到这里,文件和依赖基本已经好了)
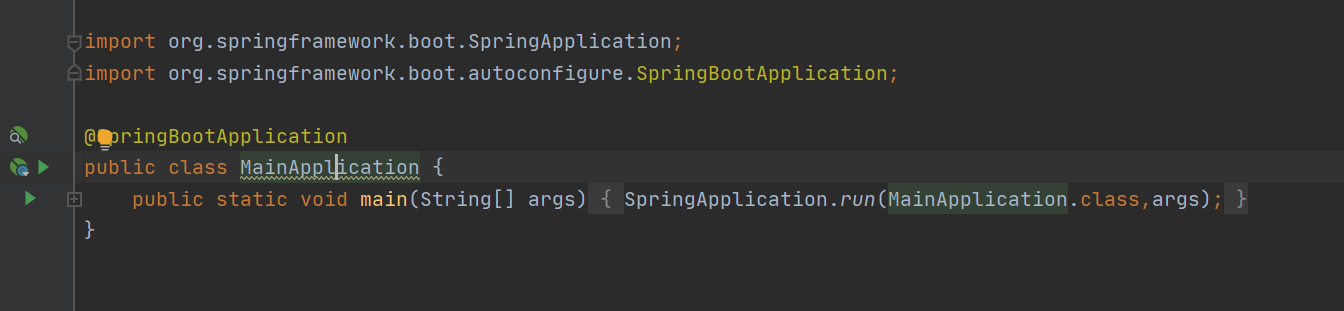
第四步,写程序
主程序(@SpringBootApplication)
pojo类

Controller层
package com.zhang.controller;

import com.zhang.pojo.User;
import com.zhang.service.UserService;
import org.springframework.beans.factory.annotation.Autowired;
import org.springframework.web.bind.annotation.PathVariable;
import org.springframework.web.bind.annotation.RequestMapping;
import org.springframework.web.bind.annotation.RequestParam;
import org.springframework.web.bind.annotation.RestController;

import java.util.List;

@RestController
public class UserController {
    @Autowired
    UserService userService;
    @RequestMapping("/hello")
    public String hello01(){
        return "Hello,Spring Boot 2!"+"您好";
    }

    @RequestMapping("/getList")
    public List<User> getUserList(){
        return userService.getUserList();
    }

    @RequestMapping("/getUser")
    public User getUserById(@RequestParam("id") int id){
        return userService.getUserById(id);
    }

    @RequestMapping("/addUser")
    public String addUser(@RequestParam("id") int id,@RequestParam("name") String name,
                          @RequestParam("gender") String gender,@RequestParam("hobby") String hobby){
        User user = new User(id, name, gender, hobby);
        if(userService.addUser(user)>0){
            return "添加成功!";
        }
        return "添加失败!";
    }

    @RequestMapping("/updateUser")
    public String updateUser(@RequestParam("id") int id, @RequestParam("name") String name,
                             @RequestParam("gender") String gender, @RequestParam("hobby") String hobby){
        User user = new User(id, name, gender, hobby);
        if(userService.updateUser(user)>0) {
            return "更改成功!";
        }
        return "删除失败!";
    }

    @RequestMapping("/deleteUser")
    public String deleteUser(@RequestParam("id") int id){
        if(userService.deleteUser(id)>0) {
            return "删除成功!";
        }
        return "删除失败!";
    }
}
service层
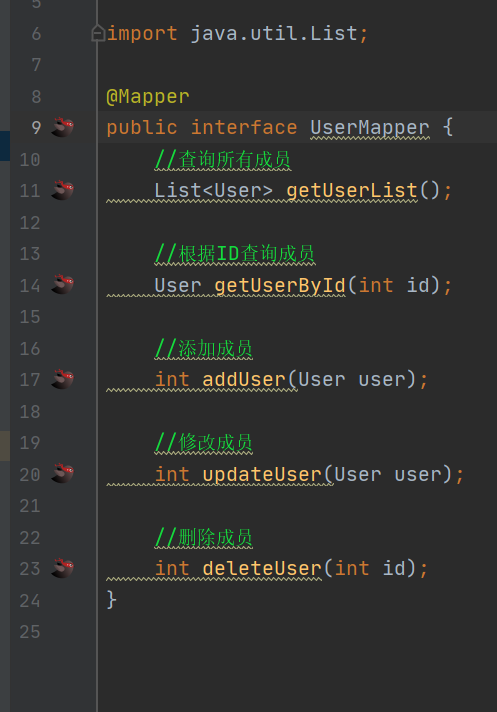
- 接口
![]()
- impl(这里爆红不会影响运行,可暂时忽视)
![]()

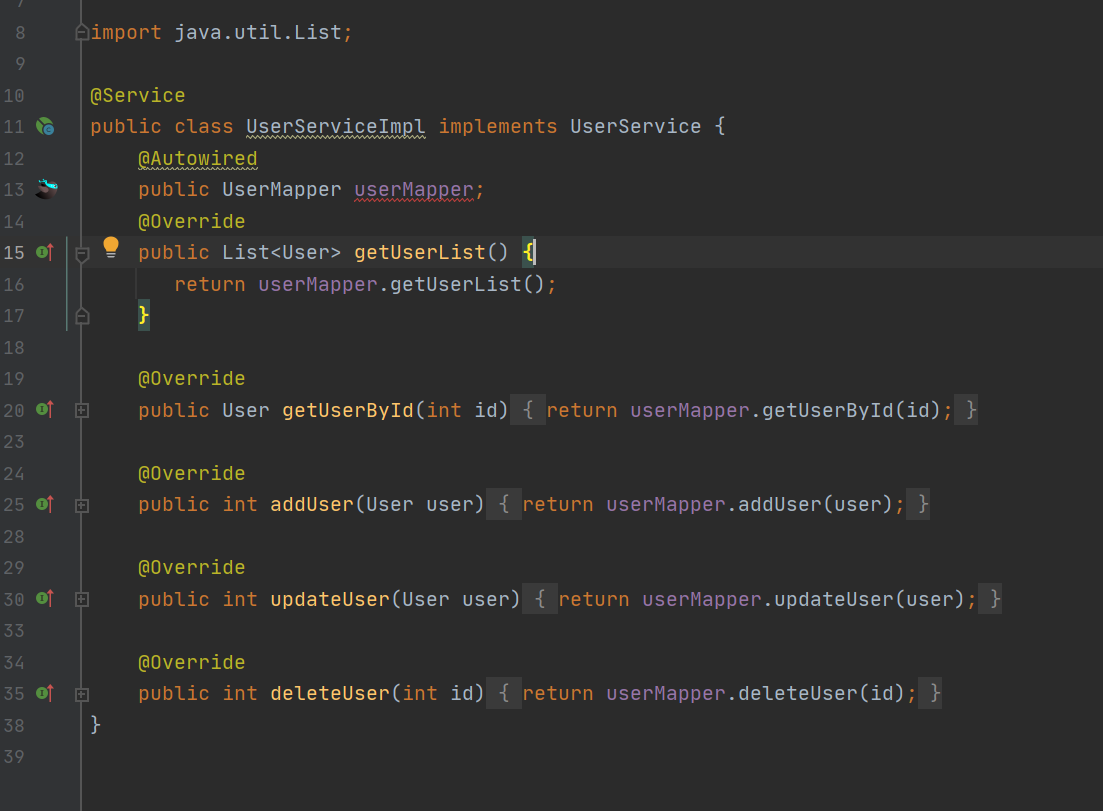
Mapper(Dao)层
- sql映射文件已经写在resources下了
- 需要注意的是,写注解将每个层注册入容器内
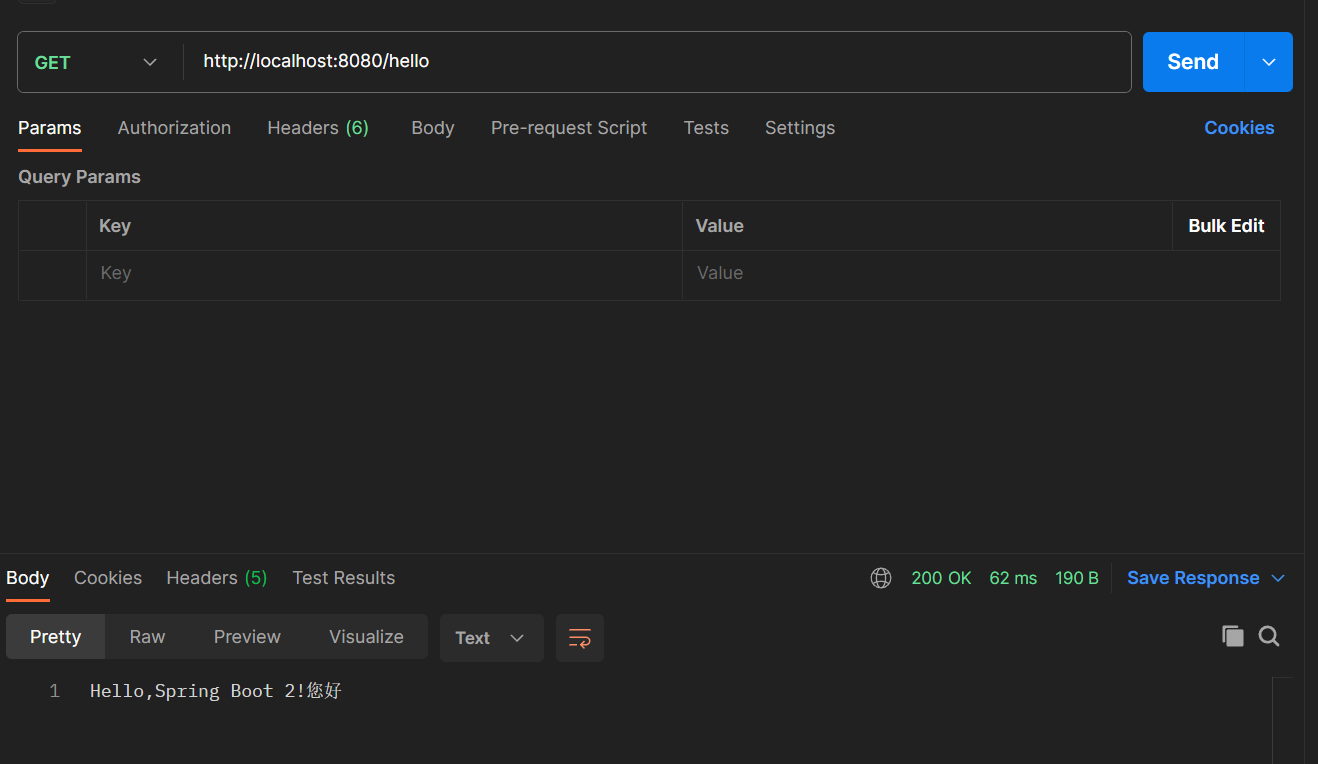
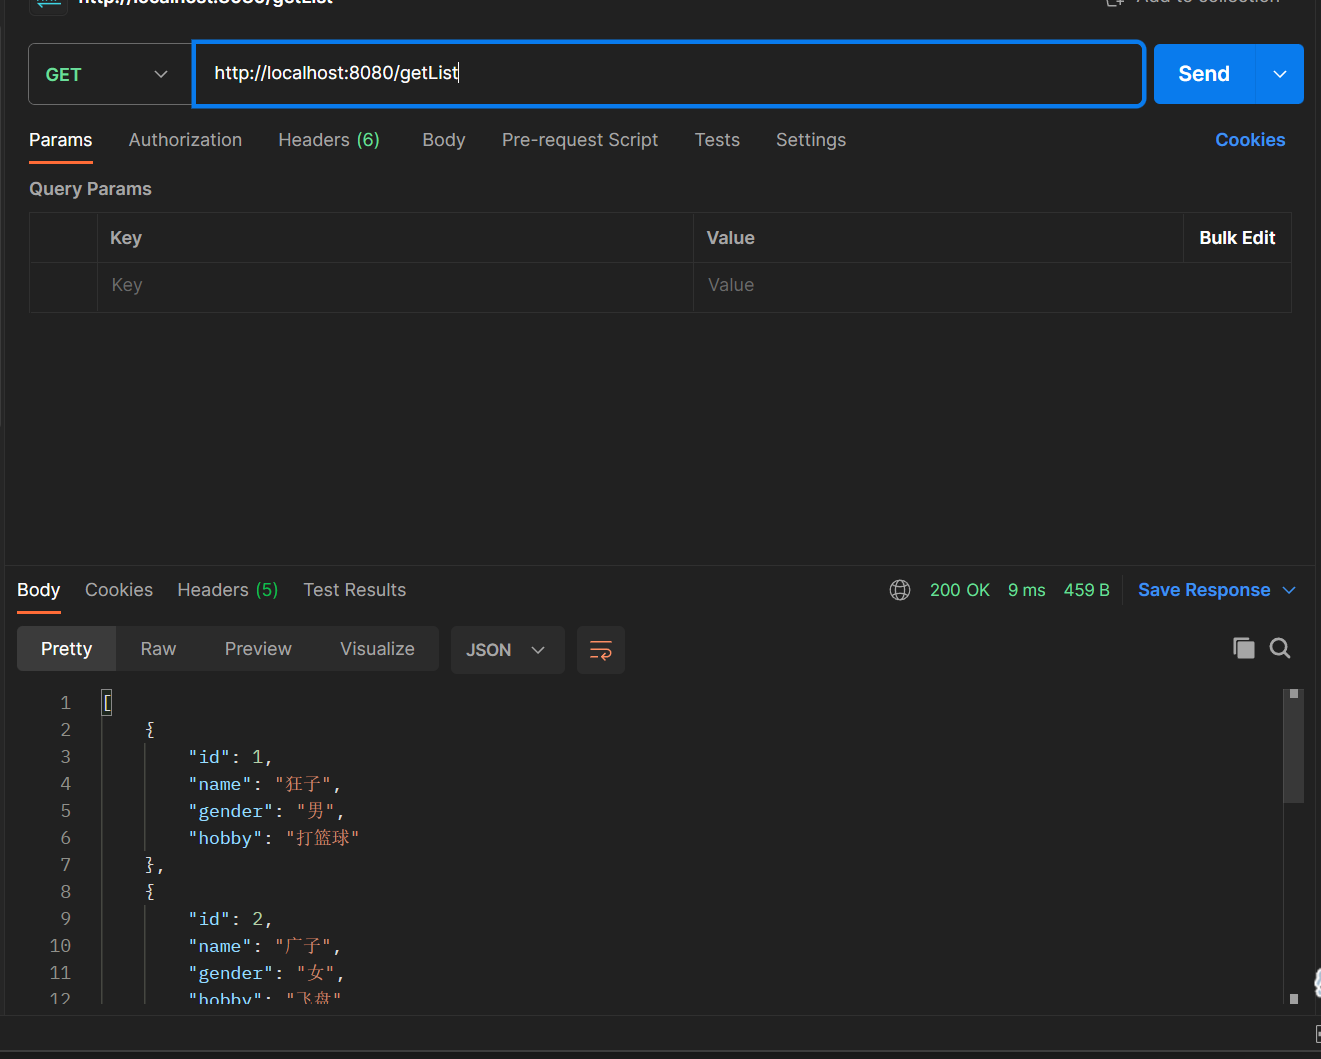
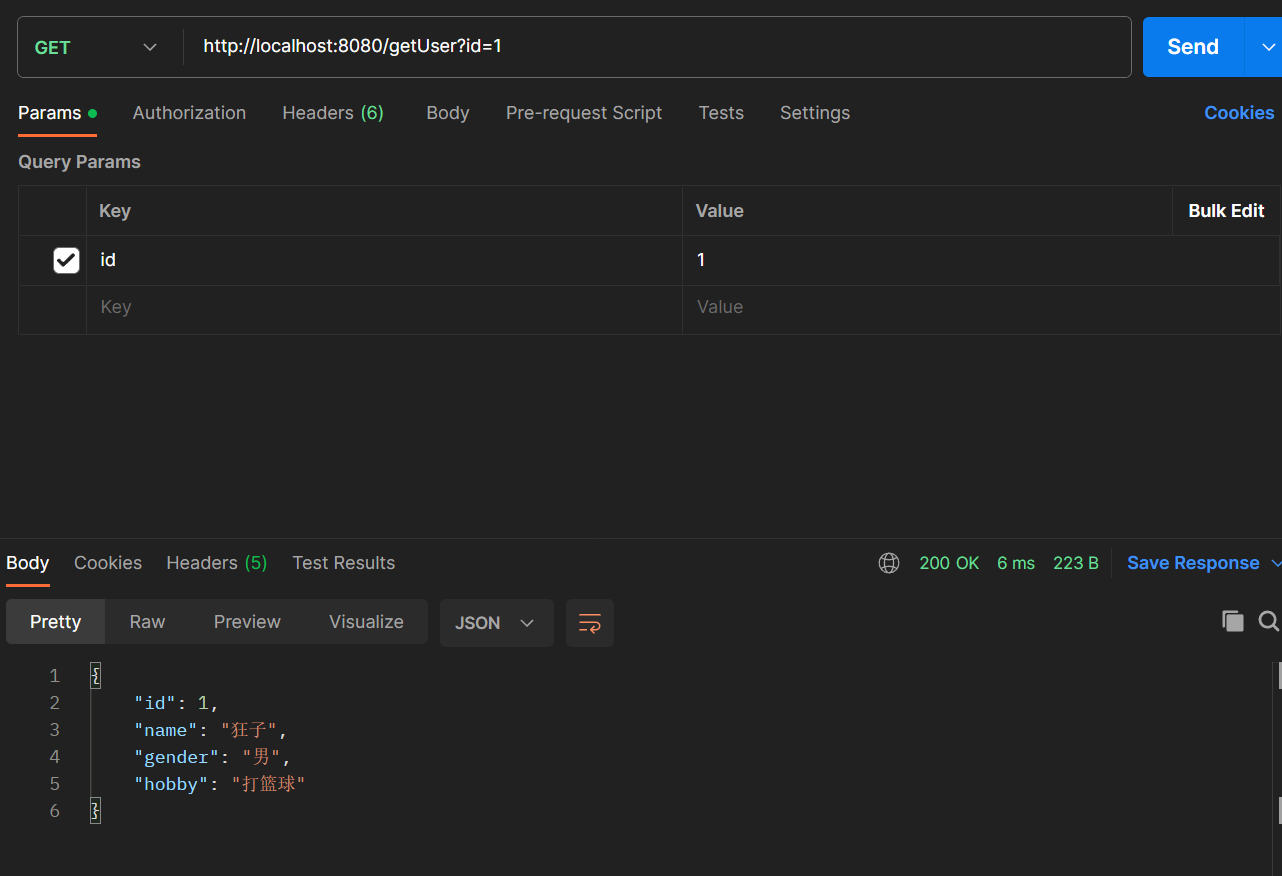
至此,springboot + mybatis整合基本完成,测试运行(这里使用postman)
![]()
![]()
![]()
ok,简单测试一下前两个功能,接下来实现excel导出文件
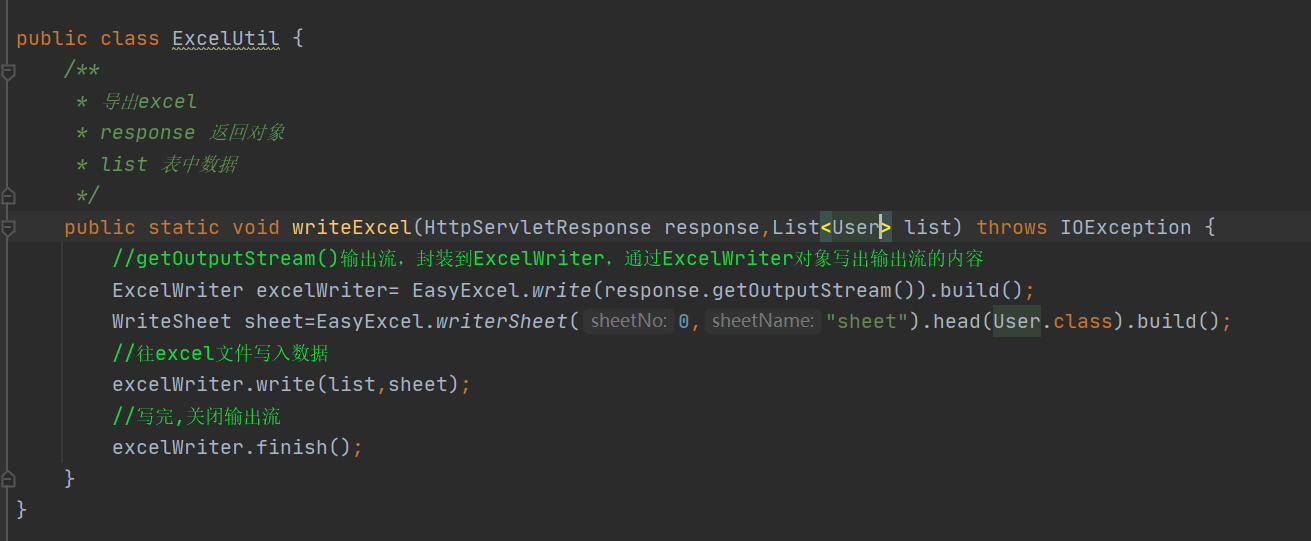
导出excel
创建一个ExcelUtil
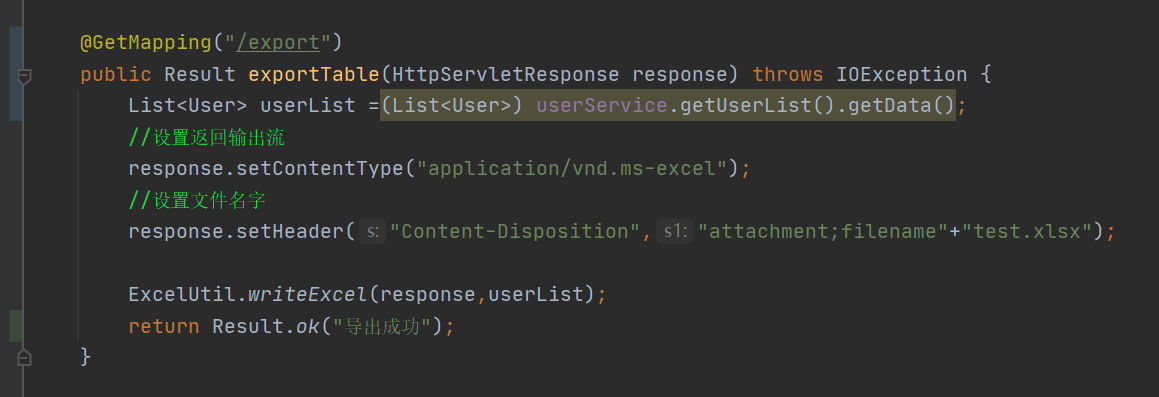
controller,获取导出的javabean集合,输出流和文件名字可照搬
 ,
,
运行,访问,下载文件即可
导入excel
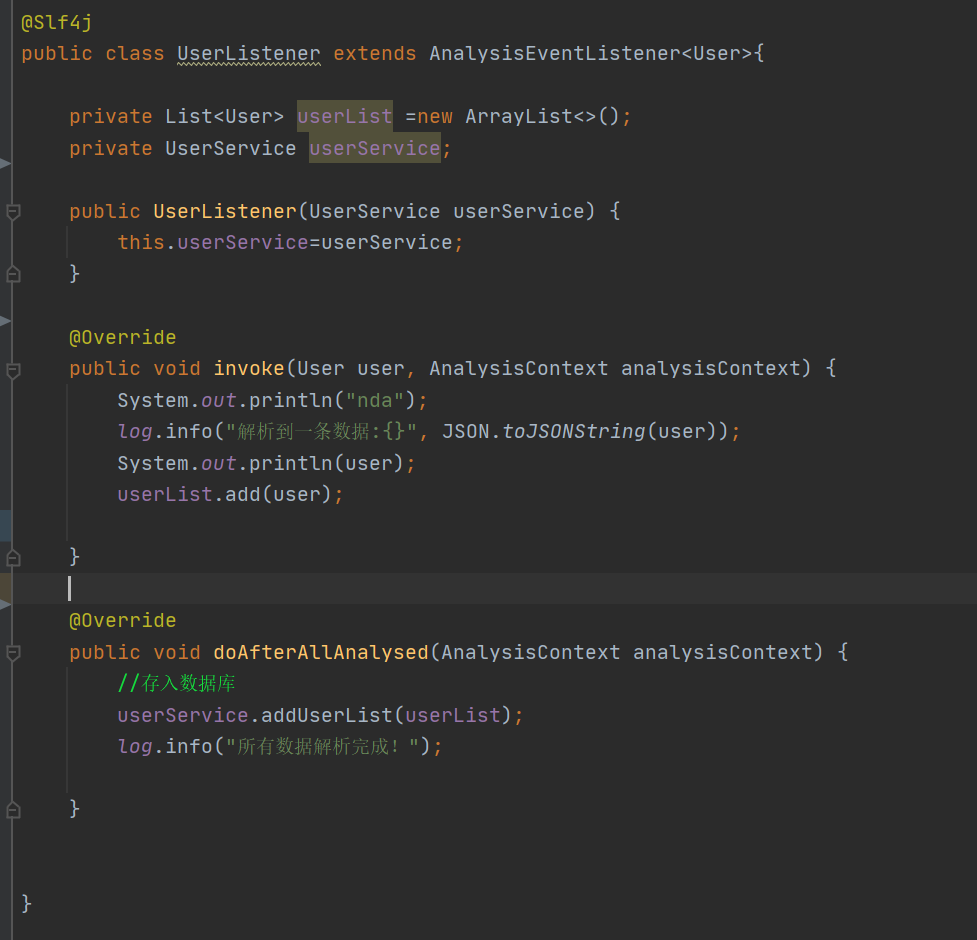
创建一个监听器
继承AnalysisEventListener,由于不可直接注入,故通过构造器注入,invoke()会解析每条数据,doAfterAllAnalysed()解析完数据执行
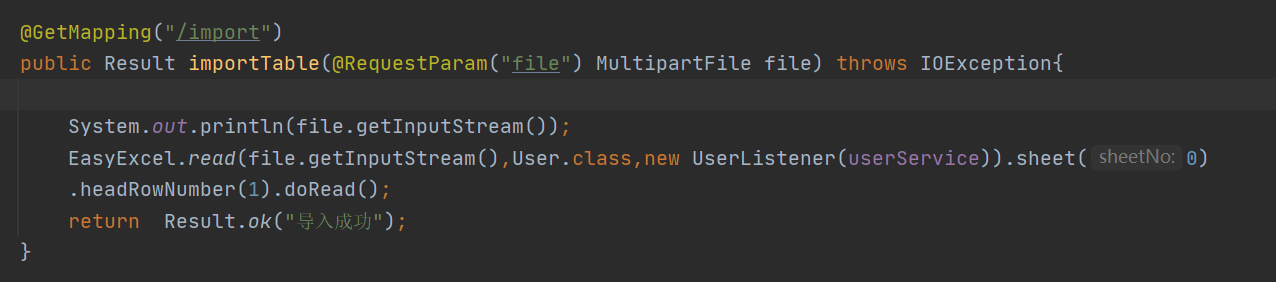
controller,sheet指excel中的列,0是包括第一列;headRowNumber(1)从第二行开始,不包括第一行的字段名
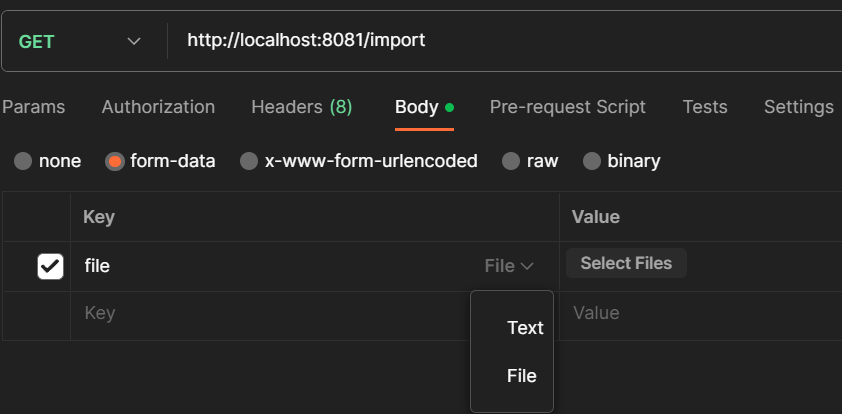
打开postman,上传excel文件,点击select file选择文件
到此,简易版的springboot+mybatis的curd和excel导入导出就已经实现。进一步的完善可以从请求类型,返回统一用result类,请求参数的封装考虑,
对于excel的导出信息可以有选择性,比如id列可以选择不导出,更细节用法可参考官方文档https://alibaba-easyexcel.github.io/index.html

 浙公网安备 33010602011771号