【SpringCloud】(二)Eureka注册中心和Feign远程调用
1 SpringCloud 核心
SpringCloud基于HTTP协议,这是和Dubbo最本质的区别,Dubbo的核心是RPC(远程方法调用)
-
Eureka:注册中心
-
Ribbon:客户端负载均衡
-
Feign:远程接口调用
-
Hystrix:服务的熔断、降级、监控
-
Zuul:网关

在客户端进行远程方法调用时,
Ribbon称为客户端的负载均衡,它决定Consumer向集群中的哪一个Provider发送请求。而
Feign是以Ribbon为基础的,Feign是一个声明式调用,客户端只需要通过装配调用Provider暴露出来的接口即可。
Hystrix则是提供了服务的熔断和降级,熔断是Provider端提供的Provider提供的服务无法响应时应急备用方案,降级是Consumer端提供的Provider提供的服务无法响应时应急备用方案。
HystrixDashBoard是Hystrix提供的监视整个服务状态的仪表盘。
Zuul网关作为服务的统一入口,zuul能够找到各种服务的原因也是以Ribbon为基础的,Ribbon通过查询Eureka注册中心找到各种服务。
2 SpringCloud测试
2.1 创建测试环境
① 新建Spring-cloud-parnet作为父工程,设置pom文件中打包方式为pom并在dependencyManagement中导入SpringCloud以及SpringBoot需要的依赖。
<?xml version="1.0" encoding="UTF-8"?>
<project xmlns="http://maven.apache.org/POM/4.0.0"
         xmlns:xsi="http://www.w3.org/2001/XMLSchema-instance"
         xsi:schemaLocation="http://maven.apache.org/POM/4.0.0 http://maven.apache.org/xsd/maven-4.0.0.xsd">
    <modelVersion>4.0.0</modelVersion>

    <groupId>org.example</groupId>
    <artifactId>spring-cloud-parnet</artifactId>
    <packaging>pom</packaging>
    <version>1.0-SNAPSHOT</version>
    <modules>
        <module>spring-cloud-common</module>
        <module>spring-cloud-provider</module>
        <module>spring-boot-consumer</module>
    </modules>

    <properties>
        <maven.compiler.source>8</maven.compiler.source>
        <maven.compiler.target>8</maven.compiler.target>
    </properties>


    <dependencies>
        <dependency>
            <groupId>org.projectlombok</groupId>
            <artifactId>lombok</artifactId>
        </dependency>
    </dependencies>

    <dependencyManagement>
        <dependencies>

            <dependency>
                <!--       SpringCloud需要的依赖         -->
                <groupId>org.springframework.cloud</groupId>
                <artifactId>spring-cloud-dependencies</artifactId>
                <version>Hoxton.SR9</version>
                <type>pom</type>
                <!--        将 spring-cloud-dependencies 中的依赖全部导入       -->
                <scope>import</scope>
            </dependency>

            <dependency>
                <!--       SpringBoot需要的依赖         -->
                <groupId>org.springframework.boot</groupId>
                <artifactId>spring-boot-dependencies</artifactId>
                <version>2.3.7.RELEASE</version>
                <type>pom</type>
                <scope>import</scope>
            </dependency>

        </dependencies>
    </dependencyManagement>
</project>
scope import用来导入Spring-boot-denpencies中的所有依赖,是为了实现maven的多继承,可以参考我之前的maven笔记:博客园
② 创建Spring-cloud-common maven模块,用于存放Employee实体
public class Employee {
    private int empId;
    private String empName;
    private double empSalary;

    public Employee() {
    }

    public Employee(int empId, String empName, double empSalary) {
        this.empId = empId;
        this.empName = empName;
        this.empSalary = empSalary;
    }

    public int getEmpId() {
        return empId;
    }

    public void setEmpId(int empId) {
        this.empId = empId;
    }

    public String getEmpName() {
        return empName;
    }

    public void setEmpName(String empName) {
        this.empName = empName;
    }

    public double getEmpSalary() {
        return empSalary;
    }

    public void setEmpSalary(double empSalary) {
        this.empSalary = empSalary;
    }
}
在父工程下创建的模块会自动继承并导入父工程的依赖,以及在子工程引入的依赖需要收到父工程中dependencyManagement依赖管理器中设置的相关依赖版本的限制。
③ 创建生产者和消费者模块,在pom文件中导入spring-boot-starter-web以及common模块(懒就不写了)
设置生产者的端口号为1000,消费者访问端口号为4000,生产者控制器为:
@RestController
public class EmployeeController {

    @RequestMapping("/provider/get/employee/remote")
    public Employee getEmployeeRemote() {
        return new Employee(5, "5555", 5555);
    }
}
2.2 RestTemplate远程调用测试
⑤ 在消费者控制器通过restTemplate访问远程端口
首先,将RestTemplate注入IOC容器
@Configuration
public class HikaruSpringCloudConfig {
    @Bean
    public RestTemplate restTemplate() {
        return new RestTemplate();
    }
}
然后,在消费者控制器中通过RestTemplate调用远程服务。
@RestController
public class HumanResourceController {
    @Autowired
    private RestTemplate restTemplate;

    @RequestMapping("/consumer/get/employee")
    public Employee getEmployeeRemote() {
        String host = "http://localhost:1000";

        String url = "/provider/get/employee/remote";

        Employee employee = restTemplate.getForObject(host + url, Employee.class);

        // 通过RestTemplate调用远程微服务
        return employee;
    }

    @RequestMapping("/get/employee")
    public Employee getEmployee() {
        return new Employee(1, "11", 1111);
    }
}
记录一个坑点
这里如果实体使用lombok的话远程调用是失败的,爆出的错误是json不支持没有构造器的对象转换,可以看到我在下面还写了一个直接返回的是能够得到的,原因不明。。🙅
3 Eureka注册中心
3.1 引入依赖
创建spring-cloud-eureka并导入依赖:
    <dependencies>
        <dependency>
            <groupId>org.springframework.cloud</groupId>
            <artifactId>spring-cloud-starter-netflix-eureka-server</artifactId>
        </dependency>
    </dependencies>
3.2 在启动类中开启Eureka服务
@EnableEurekaServer
@SpringBootApplication
public class HikaruMainType {
    public static void main(String[] args) {
        SpringApplication.run(HikaruMainType.class);
    }
}
这里对SpringCloud的版本有要求的,原来使用的 Hoxton.SR9 版本的SpringCloud这里会出现@EnableEurekaServer注解找不到的情况
所以如下修改了父工程的依赖管理器中的SpringCloud版本号,SpringBoot的版本查询完官网后不需要改变
    <dependencyManagement>
        <dependencies>

            <dependency>
                <!--       SpringCloud需要的依赖         -->
                <groupId>org.springframework.cloud</groupId>
                <artifactId>spring-cloud-dependencies</artifactId>
                <version>Hoxton.SR12</version>
                <type>pom</type>
                <!--        将 spring-cloud-dependencies 中的依赖全部导入       -->
                <scope>import</scope>
            </dependency>

            <dependency>
                <!--       SpringBoot需要的依赖         -->
                <groupId>org.springframework.boot</groupId>
                <artifactId>spring-boot-dependencies</artifactId>
                <version>2.3.7.RELEASE</version>
                <type>pom</type>
                <scope>import</scope>
            </dependency>

        </dependencies>
    </dependencyManagement>
3.3 配置Eeureka
server:
  port: 5000

eureka:
  instance:
    hostname: localhost # 配置当前Eureka服务的主机地址
  client:
    register-with-eureka: false # 是否需要进行eureka注册
    fetch-registry: false # 是否从eureka中取回信息
    service-url: # 客户端(指的是consumer、provider)访问当前注册中心时使用的地址
      defaultZone: http://${eureka.instance.hostname}/${server.port}/eureka
eureka自身自然不需要注册和获取信息了
3.4 启动Eureka(一些小坑
这里启动搞了很久,最后修改SpringCloud和SpringBoot版本分别为Hoxton.SR12和2.3.12.RELEASE:
    <dependencyManagement>
        <dependencies>

            <dependency>
                <!--       SpringCloud需要的依赖         -->
                <groupId>org.springframework.cloud</groupId>
                <artifactId>spring-cloud-dependencies</artifactId>
                <version>Hoxton.SR12</version>
                <type>pom</type>
                <!--        将 spring-cloud-dependencies 中的依赖全部导入       -->
                <scope>import</scope>
            </dependency>

            <dependency>
                <!--       SpringBoot需要的依赖         -->
                <groupId>org.springframework.boot</groupId>
                <artifactId>spring-boot-dependencies</artifactId>
                <version>2.3.12.RELEASE</version>
                <type>pom</type>
                <scope>import</scope>
            </dependency>

        </dependencies>
    </dependencyManagement>
然后启动报找不到AbstractDiscoveryClientOptionalArgs Bean的错误需要导入spring-boot-starter-web
    <dependencies>
        <dependency>
            <groupId>org.springframework.cloud</groupId>
            <artifactId>spring-cloud-starter-netflix-eureka-server</artifactId>
        </dependency>

        <dependency>
            <groupId>org.springframework.boot</groupId>
            <artifactId>spring-boot-starter-web</artifactId>
        </dependency>

    </dependencies>

然后在网址输入http://localhost:5000/显示上面页面即成功,# Instances currently registered with Eureka表示注册到Eureka的实例。
3.5 注册Provider
① 在provider中导入依赖
        <dependency>
            <groupId>org.springframework.cloud</groupId>
            <artifactId>spring-cloud-starter-netflix-eureka-client</artifactId>
        </dependency>
② 配置eureka
server:
  port: 1000

eureka:
  client:
    service-url:
      defaultZone: http://localhost:5000/eureka

spring:
  application:
    name: hikaru-provider
配置完成之后即可在页面看到注册的Instances,名称即为设置的name
3.6 调整consumer:使用微服务名称进行远程调用

分析:consumer通过配置的eureka客户端的ribbon按照微服务名查找eureka注册中心中的实例,然后由eureka将微服务名称转换为真实地址(ip+端口号),由restTemplate进行具体调用并将结果返回给consumer。restTemplate添加@LoadBanlanced可以实现客户端的负载均衡。
① 导入依赖
        <dependency>
            <groupId>org.springframework.cloud</groupId>
            <artifactId>spring-cloud-starter-netflix-eureka-client</artifactId>
        </dependency>
eureka底层自带ribbon所以不需要再添加ribbon了
② 配置eureka客户端并设置服务名称
server:
  port: 4000

spring:
  application:
    name: hikaru-consumer

eureka:
  client:
    service-url:
      defaultZone: http://localhost:5000/eureka
③ restTemplate开启负载均衡
@Configuration
public class HikaruSpringCloudConfig {
    @Bean
    @LoadBalanced
    public RestTemplate restTemplate() {
        return new RestTemplate();
    }
}
@LoadBanlanced让RestTemplate有负载均衡的功能,能够访问provider的集群。
④ 调整controller测试
    @RequestMapping("/consumer/eureka/get/employee")
    public Employee getEmployeeRemote() {
        //String host = "http://localhost:1000";

        String host = "http://hikaru-provider";

        String url = "/provider/get/employee/remote";

        Employee employee = restTemplate.getForObject(host + url, Employee.class);

        // 通过RestTemplate调用远程微服务
        return employee;
    }
如此便实现了使用服务名代替地址进行远程调用
@EnableDiscoveryClient 和 @EnableEurekaClient都是开启注册中心客户端服务,只不过前者不局限于eureka(如nacos),并且在较高版本的SpringBoot中都可以省略
3.7 以集群方式启动provider
idea在Run -》 edit configration中右上角设置Allow parallel run即可同时运行多个实例,然后分别运行eureka、consumer以及端口号为1000 2000 3000 的provider,这时候的eureka页面为:
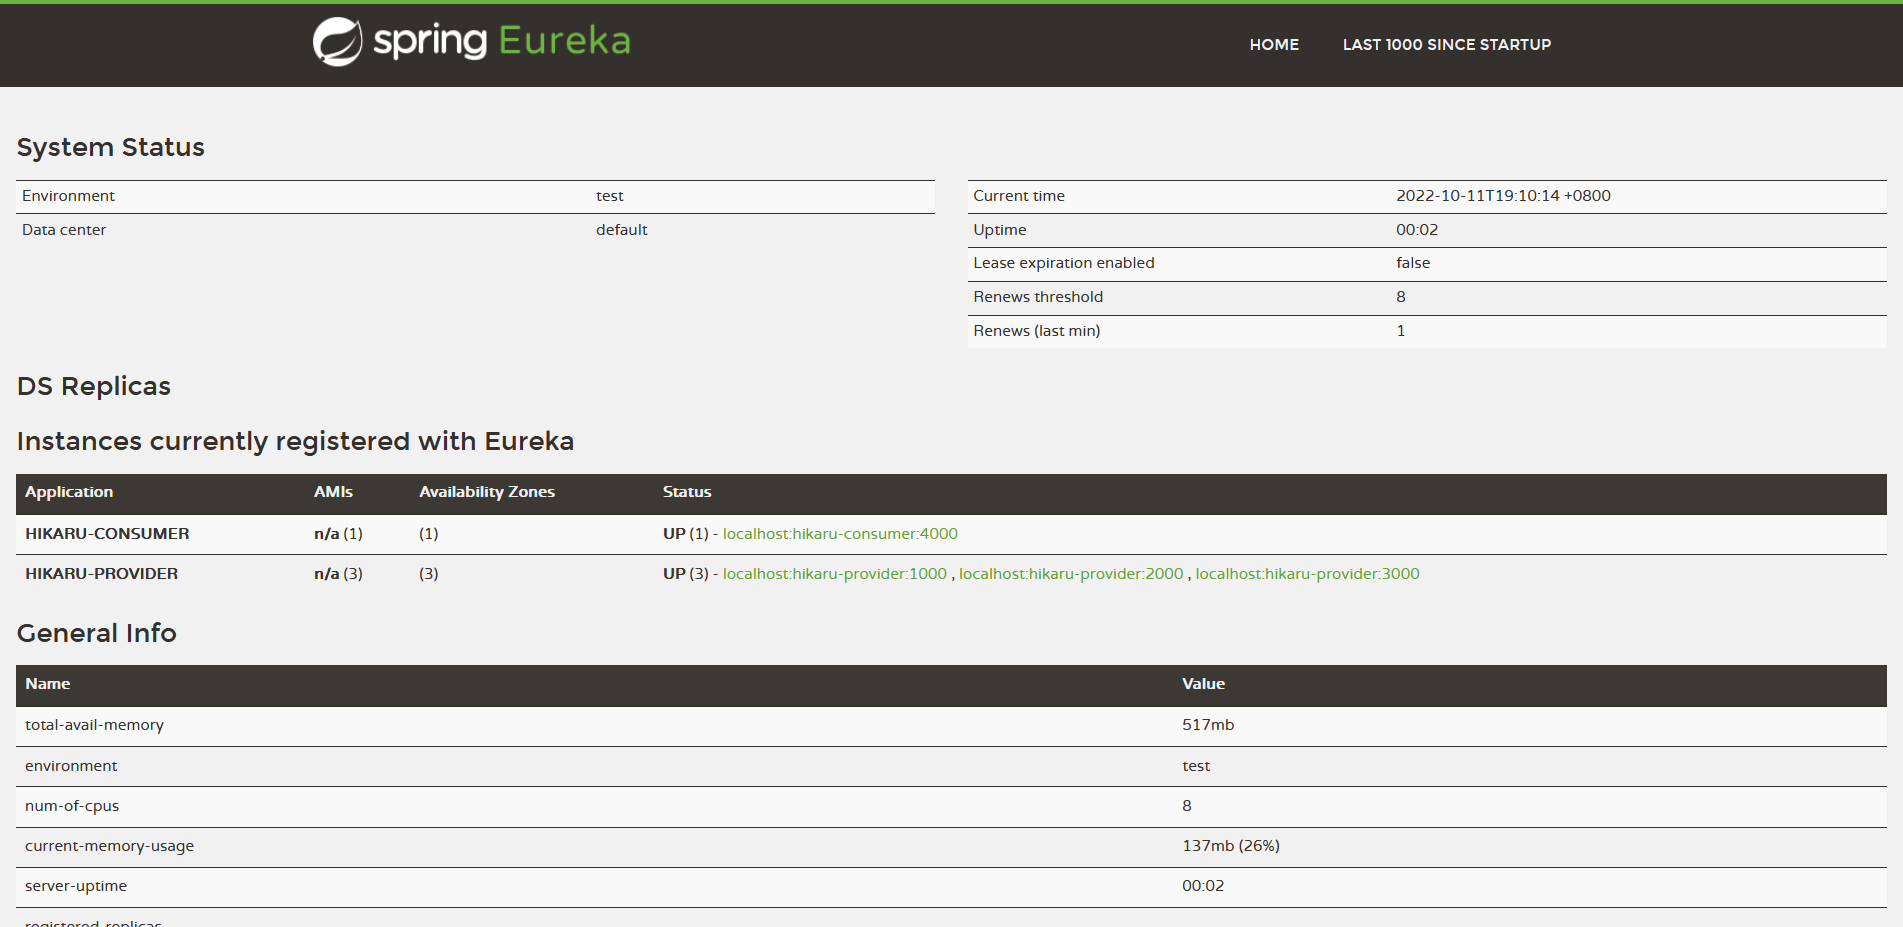
然后多次访问 \http://localhost:4000/consumer/eureka/get/employee发现是以3000 2000 1000的轮调的顺序访问的
本质是ribbon拿着服务名去eureka中找到的三个端口号再去请求的服务。
4 Feign远程方法调用
4.1 Feign的使用
① 创建一个使用feign的consumer模块
② 在创建的模块和common模块中导入openfeign依赖
        <dependency>
            <groupId>org.springframework.cloud</groupId>
            <artifactId>spring-cloud-starter-openfeign</artifactId>
        </dependency>
③ 创建接口 EmployeeRemoteService,并使用FeignClient注解绑定接口和一个微服务名称
@FeignClient("hikaru-provider")
public interface EmployeeRemoteService {
    /**
     * 远程调用的接口方法
     * 要求:
     * ① @RequestMapping地址一致
     * ② 方法声明一致
     * ③ 用来获取请求参数的@RequestParam、@PathVariable、@RequestBody一致
     * @return
     */
    @RequestMapping("/provider/get/employee/remote")
    public Employee getEmployeeRemote();
}
远程调用的接口方法
要求:
① @RequestMapping地址一致
② 方法声明一致
③ 用来获取请求参数的@RequestParam、@PathVariable、@RequestBody一致
④ 对应的provider的远程方法
@RestController
public class EmployeeController {

    @RequestMapping("/provider/get/employee/remote")
    public Employee getEmployeeRemote() {
        return new Employee(5, "5555", 5555);
    }
⑤ 在feignConsumer中开启FeignClients
@EnableFeignClients
@SpringBootApplication
public class HikaruMainType {
    public static void main(String[] args) {
        SpringApplication.run(HikaruMainType.class);
    }
}
⑥ 在feinConsumer装配使用common模块的接口方法
@RestController
public class FeignHumanResource {
    @Autowired
    EmployeeRemoteService employeeRemoteService;

    @RequestMapping("/feign/consumer/get/emp")
    public Employee getEmployee() {
        return employeeRemoteService.getEmployeeRemote();
    }
}
这里装配一个接口能够成功就是因为接口类通过 @FeignClient("hikaru-provider")绑定了一个微服务应用,然后feign会根据方法再在底层由
retemplate调用ribbon去eureka注册中心去找对应微服务应用名的实例,调用实例暴露的方法然后返回。

如上图,其实是为了解耦将一个微服务Provider提供的接口服务抽取出来放到了common模块,这样就不需要在每次远程调用都去使用@FeignClient("hikaru-provider")去绑定微服务应用。
使用Feign实现了对resTemplate的封装,从而也不需要创建配置类配置resTemplate;而在consumer中只需要使用注解@EnableFeignClients开启feign客户端,其他实现和单一架构完全相同;而远程服务结构的绑定则是在写在common模块使用注解@FeignClient("hikaru-provider")实现

 浙公网安备 33010602011771号