【Spring】SpringSecurity的使用
4 SpringSecurity
只需要协助SpringSecurity创建好用户对应的角色和权限组,同时把各个资源所要求的权限信息设定好,剩下的像 “登录验证”、"权限验证" 等等工作都交给SpringSecurity。
4.1 权限控制的相关概念
4.2 引入依赖
        <!--   SpringSecurity     -->
        <dependency>
            <groupId>org.springframework.security</groupId>
            <artifactId>spring-security-web</artifactId>
            <version>4.2.10.RELEASE</version>
        </dependency>

        <dependency>
            <groupId>org.springframework.security</groupId>
            <artifactId>spring-security-core</artifactId>
            <version>4.2.10.RELEASE</version>
        </dependency>

        <dependency>
            <groupId>org.springframework.security</groupId>
            <artifactId>spring-security-config</artifactId>
            <version>4.2.10.RELEASE</version>
        </dependency>
4.3 SpringSecurity配置
①AbstractSecurityWebApplicationInitializer子类
public class SecurityWebInitializer extends AbstractSecurityWebApplicationInitializer {

}
② WebSecurityConfigurerAdapter子类
@Configuration
@EnableWebSecurity
public class WebAppSecurityConfig extends WebSecurityConfigurerAdapter {

}
配置完成之后发现SpringSecurity控制住了所有的请求和静态资源

4.4 放行首页和静态资源

layui中存放的是静态资源。
WebAppSecurityConfig
@Configuration
@EnableWebSecurity
public class WebAppSecurityConfig extends WebSecurityConfigurerAdapter {
    @Override
    protected void configure(HttpSecurity security) throws Exception {
        security
                .authorizeRequests() // 开始授权请求
                .antMatchers("/index.jsp") // 针对请求路径进行授权
                .permitAll() // 可以无条件访问
                .antMatchers("/layui/**") // 针对请求路径进行授权
                .permitAll() // 可以无条件访问
                .and()
                .authorizeRequests() // 开始授权请求
                .anyRequest()  // 任何请求
                .authenticated(); // 需要登录之后才能访问
    }
}ted();
    }
}
放行首页和静态资源
4.5 指定登录页面
@Configuration
@EnableWebSecurity
public class WebAppSecurityConfig extends WebSecurityConfigurerAdapter {
    @Override
    protected void configure(HttpSecurity security) throws Exception {
        security
                .authorizeRequests() // 开始授权请求
                .antMatchers("/index.jsp") // 针对请求路径进行授权
                .permitAll() // 可以无条件访问
                .antMatchers("/layui/**") // 针对请求路径进行授权
                .permitAll() // 可以无条件访问
                .and()
                .authorizeRequests() // 开始授权请求
                .anyRequest()  // 任何请求
                .authenticated() // 需要登录之后才能访问

                .and()
                .formLogin() // 使用表单形式登录
                .loginPage("/index.jsp") // 指定登录页面
                .loginProcessingUrl("/do/login.html"); // 指定提交登录表单的地址
    }
}
不指定loginPage的话会使用SpringSecurity自带的登录页面。
而且登录指定的页面地址会自动进行promitAll()授权访问,如下面的代码注释掉上面的permitAll也是同样的效果
@Configuration
@EnableWebSecurity
public class WebAppSecurityConfig extends WebSecurityConfigurerAdapter {
    @Override
    protected void configure(HttpSecurity security) throws Exception {
        security
                .authorizeRequests() // 开始授权请求
                //.antMatchers("/index.jsp") // 针对请求路径进行授权
                //.permitAll() // 可以无条件访问
                .antMatchers("/layui/**") // 针对请求路径进行授权
                .permitAll() // 可以无条件访问

                .and()
                .authorizeRequests() // 开始授权请求
                .anyRequest()  // 任何请求
                .authenticated() // 需要登录之后才能访问

                .and()
                .formLogin() // 使用表单形式登录
                .loginPage("/index.jsp") // 指定登录页面
                .loginProcessingUrl("/do/login.html"); // 指定提交登录表单的地址,登录地址本身也需要放行
    }
}
4.6 设置登录的用户名和密码
前端发送的登录请求要么使用SpringSecurity的默认值,要么使用定制的请求参数名。
① 在前端页面设置请求参数和请求地址
<form action="${pageContext.request.contextPath}/login" method="post">
    <input type="hidden" name="${_csrf.parameterName}" value="${_csrf.token}"/>
    <input type="text"
                           name="loginAcct" id="LAY-user-login-username" lay-verify="required"
                           placeholder="用户名" class="layui-input">
    <input type="text"
                           name="userPswd" id="LAY-user-login-password"
                           lay-verify="required"
                           placeholder="密码" class="layui-input">
</form>
如上,前端设置的请求地址为/login,请求参数名为loginAcct、userPswd
<input type="hidden" name="${_csrf.parameterName}" value="${_csrf.token}"/> 不能缺少
② 在SpringSecurity中进行自定义配置
WebAppSecurityConfig
@Configuration
@EnableWebSecurity
public class WebAppSecurityConfig extends WebSecurityConfigurerAdapter {
    @Override
    protected void configure(AuthenticationManagerBuilder builder) throws Exception {
        // 进行内存认证
        builder.inMemoryAuthentication()
                .withUser("tom")
                .password("tom")
                .roles("ADMIN")
                .and()
                .withUser("jerry")
                .password("jerry")
                .authorities("ADD", "DELETE");
    }

    @Override
    protected void configure(HttpSecurity security) throws Exception {
        security
                .authorizeRequests() // 开始授权请求
                .antMatchers("/index.jsp") // 针对请求路径进行授权
                .permitAll() // 可以无条件访问
                .antMatchers("/layui/**") // 针对请求路径进行授权
                .permitAll() // 可以无条件访问

                .and()
                .authorizeRequests() // 开始授权请求
                .anyRequest()  // 任何请求
                .authenticated() // 需要登录之后才能访问

                .and()
                .formLogin() // 使用表单形式登录
                .loginPage("/index.jsp") // 指定登录页面
                .loginProcessingUrl("/login") // 指定提交登录表单的地址
                .usernameParameter("loginAcct")
                .passwordParameter("userPswd")
                .successForwardUrl("/WEB-INF/views/main.jsp");
    }
}
这样SpringSecurity就与前端的接口、参数对应上了
SpringSecurity中,只有通过通过用户名密码认证并且拥有角色或权限才能成为一个实体。
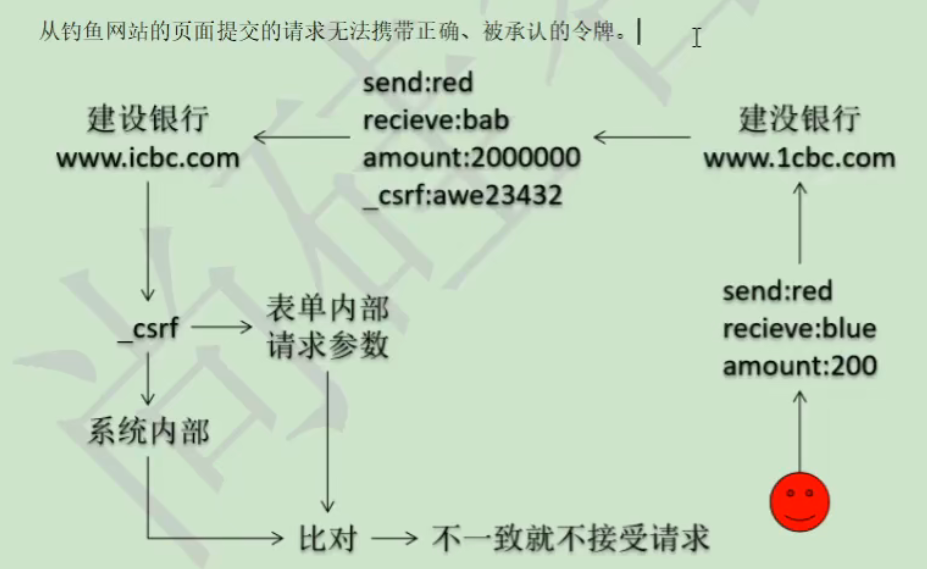
4.7 CSRF跨站请求伪造
当前端的代码中去掉了CSRF后,页面会报错:
<form action="${pageContext.request.contextPath}/login" method="post">
<%--        <input type="hidden" name="${_csrf.parameterName}" value="${_csrf.token}"/>--%>
        <div class="layadmin-user-login-main">

这是为了防止跨站请求伪造的情况
4.8 实现退出
在SpringSecurity中自定义配置退出的请求地址和退出后的地址
    @Override
    protected void configure(HttpSecurity security) throws Exception {
        security
                .authorizeRequests() // 开始授权请求
                .antMatchers("/index.jsp") // 针对请求路径进行授权
                .permitAll() // 可以无条件访问
                .antMatchers("/layui/**") // 针对请求路径进行授权
                .permitAll() // 可以无条件访问

                .and()
                .authorizeRequests() // 开始授权请求
                .anyRequest()  // 任何请求
                .authenticated() // 需要登录之后才能访问

                .and()
                .formLogin() // 使用表单形式登录
                .loginPage("/index.jsp") // 指定登录页面
                .loginProcessingUrl("/login") // 指定提交登录表单的地址
                .usernameParameter("loginAcct")
                .passwordParameter("userPswd")
                .successForwardUrl("/WEB-INF/views/main.jsp")

                .and()
                .logout()
                .logoutUrl("/logout")
                .logoutSuccessUrl("/index.jsp");

    }
在前端设置对应的请求地址 /logout
<a id="logoutAnchor" href="${pageContext.request.contextPath}/logout">退出</a>
然后发现页面退出时报错,请求的资源[/SpringSecurityPro/my/app/logout]不可用(
这是由于在开启CSRF的情况下所有的请求必须是POST的,而我们退出的请求是a标签即get所以出现这个错误。
禁用CSRF
@Override
    protected void configure(HttpSecurity security) throws Exception {
        security
                .authorizeRequests() // 开始授权请求
                .antMatchers("/index.jsp") // 针对请求路径进行授权
                .permitAll() // 可以无条件访问
                .antMatchers("/layui/**") // 针对请求路径进行授权
                .permitAll() // 可以无条件访问

                .and()
                .authorizeRequests() // 开始授权请求
                .anyRequest()  // 任何请求
                .authenticated() // 需要登录之后才能访问

                .and()
                .formLogin() // 使用表单形式登录
                .loginPage("/index.jsp") // 指定登录页面
                .loginProcessingUrl("/login") // 指定提交登录表单的地址
                .usernameParameter("loginAcct")
                .passwordParameter("userPswd")
                .successForwardUrl("/WEB-INF/views/main.jsp")

                .and()
                .csrf()
                .disable() // 禁用CSRF以便于get请求
                .logout()
                .logoutUrl("/logout")
                .logoutSuccessUrl("/index.jsp");

    }
4.9 基于角色或权限进行访问
之前的做法是用户绑定角色,然后角色绑定权限,但是在SpringSecurity中用户既可以绑定角色也可以绑定权限来进行资源访问。
@Configuration
@EnableWebSecurity
public class WebAppSecurityConfig extends WebSecurityConfigurerAdapter {
    @Override
    protected void configure(AuthenticationManagerBuilder builder) throws Exception {
        // 进行内存认证
        builder.inMemoryAuthentication()
                .withUser("tom")
                .password("tom")
                .roles("ADMIN", "学徒")
                .and()
                .withUser("jerry")
                .password("jerry")
                .authorities("ADD", "DELETE", "关门弟子");
    }

    @Override
    protected void configure(HttpSecurity security) throws Exception {
        security
                .authorizeRequests() // 开始授权请求
                .antMatchers("/level1/**") // ant风格匹配需要授权的请求
                .hasRole("学徒") // 为匹配的请求添加角色认证
                .antMatchers("/level2/**")
                .hasAuthority("关门弟子") // 为匹配的请求添加授权认证
                .antMatchers("/index.jsp") // 针对请求路径进行授权
                .permitAll() // 可以无条件访问
                .antMatchers("/layui/**") // 针对请求路径进行授权
                .permitAll() // 可以无条件访问

                .and()
                .authorizeRequests() // 开始授权请求
                .anyRequest()  // 任何请求
                .authenticated() // 需要登录之后才能访问

                .and()
                .formLogin() // 使用表单形式登录
                .loginPage("/index.jsp") // 指定登录页面
                .loginProcessingUrl("/login") // 指定提交登录表单的地址
                .usernameParameter("loginAcct")
                .passwordParameter("userPswd")
                .successForwardUrl("/WEB-INF/views/main.jsp")

                .and()
                //.csrf()
                //.disable() // 禁用CSRF以便于get请求
                .logout()
                .logoutUrl("/my/app/logout")
                .logoutSuccessUrl("/index.jsp");

    }
}
如此一来tom拥有弟子的角色可以发出/level1/开头的所有请求
jerry拥有 关门弟子 的权限,可以发出/level2开头的所有请求
SpringSecurity角色前缀“ROLE_”
首先看一下SpringSecurity在处理内存认证时添加用户角色 以及 配置请求角色时的底层逻辑:


可以发现角色的添加和认证都在前面添加了一个"ROLE_"的前缀,这是因为SpringSecurity将角色和权限一起放在了一个容器authorities里面,为了区分两者才添加了这个前缀。但是这是内存验证SpringSecurity有自动的设置,我们后面在处理数据库验证的时候就需要手动为角色添加前缀了。
4.10 自定义403权限不足页面
                .and()
                .exceptionHandling() // 指定异常处理器
                .accessDeniedPage("/WEB-INF/views/no_auth.jsp"); // 异常处理后前往的页面
这里以及上面的jsp请求因为在webInitializer中配置了DispatherServlet的映射地址为"/"(拦截除了jsp的请求),所以不会经过前端拦截器的页面解析器进行前后缀拼接
通过handle处理
                .and()
                .exceptionHandling() // 指定异常处理器
                .accessDeniedHandler(new AccessDeniedHandler() {
                    @Override
                    public void handle(HttpServletRequest httpServletRequest, HttpServletResponse httpServletResponse, AccessDeniedException e) throws IOException, ServletException {
                        httpServletRequest.setAttribute("message", "您没有资格访问这个页面");
                        httpServletRequest.getRequestDispatcher("/WEB-INF/views/no_auth.jsp").forward(httpServletRequest, httpServletResponse);
                    }
                })
相当于使用了一个拦截器,可以在里面书写java代码进行响应处理
像退出等处理里面也有响应的handle可以进行后序处理
4.11 remeber me
① 在SpringSecurity对象中调用rememberMe()方法。
@Override
    protected void configure(HttpSecurity security) throws Exception {
        security
                .authorizeRequests() // 开始授权请求
                .antMatchers("/level1/**") // ant风格匹配需要授权的请求
                .hasRole("学徒") // 为匹配的请求添加角色认证
                .antMatchers("/level2/**")
                .hasAuthority("关门弟子") // 为匹配的请求添加授权认证
                .antMatchers("/index.jsp") // 针对请求路径进行授权
                .permitAll() // 可以无条件访问
                .antMatchers("/layui/**") // 针对请求路径进行授权
                .permitAll() // 可以无条件访问

                .and()
                .authorizeRequests() // 开始授权请求
                .anyRequest()  // 任何请求
                .authenticated() // 需要登录之后才能访问

                .and()
                .formLogin() // 使用表单形式登录
                .loginPage("/index.jsp") // 指定登录页面
                .loginProcessingUrl("/login") // 指定提交登录表单的地址
                .usernameParameter("loginAcct")
                .passwordParameter("userPswd")
                .successForwardUrl("/WEB-INF/views/main.jsp")

                .and()
                //.csrf()
                //.disable() // 禁用CSRF以便于get请求
                .logout()
                .logoutUrl("/my/app/logout")
                .logoutSuccessUrl("/index.jsp")

                .and()
                .exceptionHandling() // 指定异常处理器
                .accessDeniedHandler(new AccessDeniedHandler() {
                    @Override
                    public void handle(HttpServletRequest httpServletRequest, HttpServletResponse httpServletResponse, AccessDeniedException e) throws IOException, ServletException {
                        httpServletRequest.setAttribute("message", "您没有资格访问这个页面");
                        httpServletRequest.getRequestDispatcher("/WEB-INF/views/no_auth.jsp").forward(httpServletRequest, httpServletResponse);
                    }
                }).
                and()
                .rememberMe()
        ; // 异常处理后前往的页面
    }
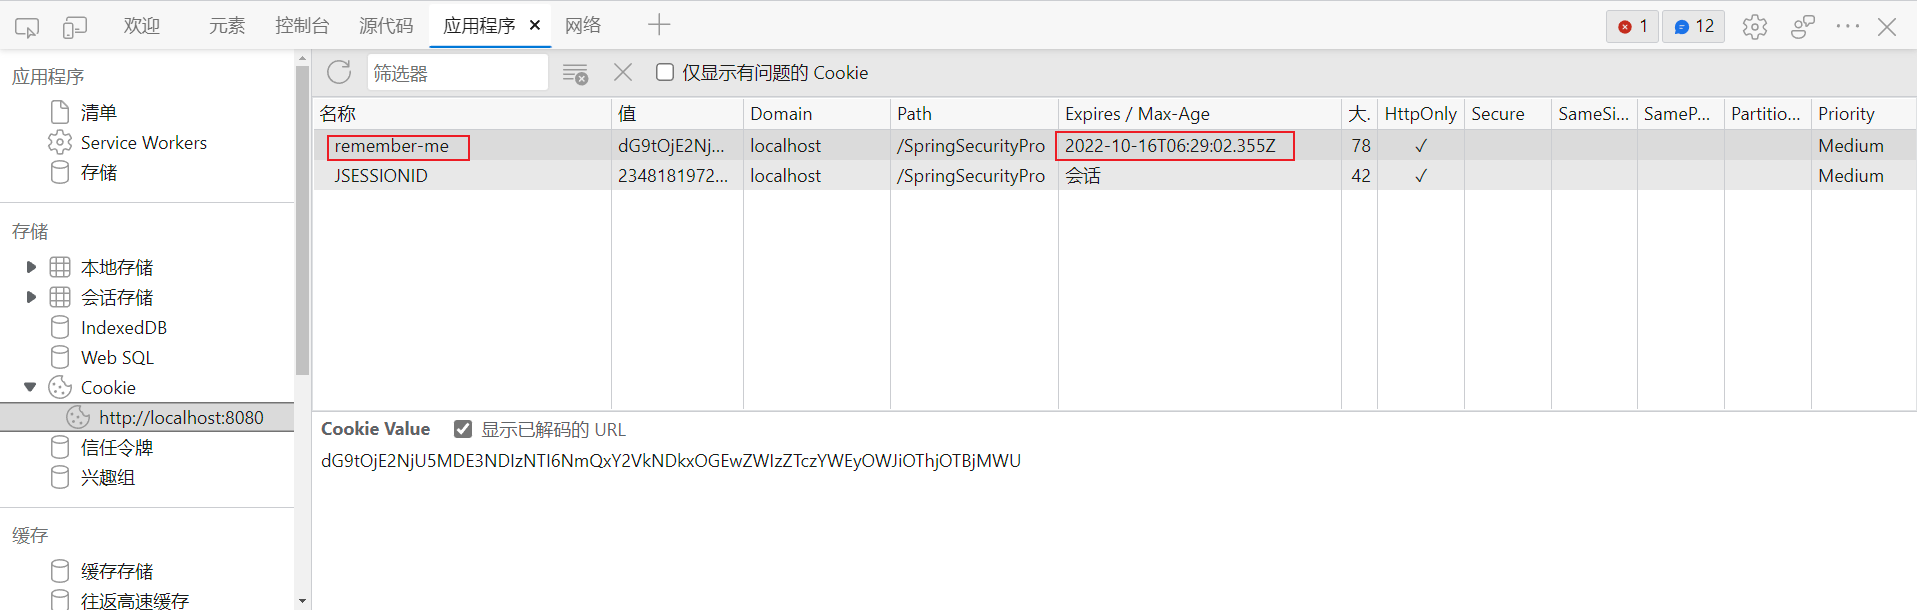
② 在登录表单中携带上 remember-me 的请求参数。具体做法是将请求表单的checkbox的name设置为remember-me。
<input type="checkbox" name="remember-me" lay-skin="primary"
       title="记住我"> <a href="forget.html"
                       class="layadmin-user-jump-change layadmin-link"
                       style="margin-top: 7px;">忘记密码?</a>
原理:服务器根据提交的登录表单是否携带remember-me参数返回一个期限cookie,区别于会话cookie在会话结束的时候就会被清除,期限cookie则不会,然后每次登录时只要期限cookie没有过期则不需要登录。但是这只是SpringSecurity在内存层面的登录检验,这意味着当服务器重启的时候即使客户端存在期限cookie也不能进行登录。
数据库层面remember-me
① 将数据源注入IOC容器
@ComponentScan(value = "com.hikaru", excludeFilters = {
        @ComponentScan.Filter(value = {Controller.class, RestController.class})
})
@Configuration
public class RootConfig {

    @Bean
    public DruidDataSource dataSource() {
        DruidDataSource dataSource = new DruidDataSource();

        dataSource.setUrl("jdbc:mysql://192.168.60.100:3306/mydb?characterEncoding=UTF-8&useSSL=false&serverTimezone=Asia/Shanghai");
        dataSource.setPassword("root");
        dataSource.setDriverClassName("com.mysql.cj.jdbc.Driver");
        dataSource.setUsername("root");

        return dataSource;
    }

}
这里有个地方记录一下:在@Configration注解的配置类中使用@Test做单元测试会报空指针异常,但是在使用@RunWith以及配置加载注解@ContextConfiguration的单元测试上就没有这个问题,猜测和IOC容器的加载顺序有关系,不是很清楚以后多看书
@ComponentScan(value = "com.hikaru", excludeFilters = {
        @ComponentScan.Filter(value = {Controller.class, RestController.class})
})
@Configuration
public class RootConfig {

    @Bean
    public DruidDataSource dataSource() {
        DruidDataSource dataSource = new DruidDataSource();

        dataSource.setUrl("jdbc:mysql://192.168.60.100:3306/mydb?characterEncoding=UTF-8&useSSL=false&serverTimezone=Asia/Shanghai");
        dataSource.setPassword("root");
        dataSource.setDriverClassName("com.mysql.cj.jdbc.Driver");
        dataSource.setUsername("root");

        return dataSource;
    }
    @Autowired
    DruidDataSource dataSource;
    @Test
    public void test() {
        System.out.println(dataSource);
    }
}
这个会报空指针
@RunWith(SpringJUnit4ClassRunner.class)
@ContextConfiguration(classes = RootConfig.class)
public class SpringSecurityTest {
    @Autowired
    DruidDataSource dataSource;

    @Test
    public void test() throws SQLException {
        System.out.println(dataSource.getConnection());
    }

}
这个则不会
② 在HttpSecurity对象上开启rememberMe的token持久化tokenRepository,并传入一个转配了数据源的JdbcTokenRepositoryImpl对象。
    @Override
    protected void configure(HttpSecurity security) throws Exception {
        JdbcTokenRepositoryImpl tokenRepository = new JdbcTokenRepositoryImpl();
        tokenRepository.setDataSource(dataSource);
        tokenRepository.setCreateTableOnStartup(true);
        tokenRepository.initDao();

        security
                .authorizeRequests() // 开始授权请求
                .antMatchers("/level1/**") // ant风格匹配需要授权的请求
                .hasRole("学徒") // 为匹配的请求添加角色认证
                .antMatchers("/level2/**")
                .hasAuthority("关门弟子") // 为匹配的请求添加授权认证
                .antMatchers("/index.jsp") // 针对请求路径进行授权
                .permitAll() // 可以无条件访问
                .antMatchers("/layui/**") // 针对请求路径进行授权
                .permitAll() // 可以无条件访问

                .and()
                .authorizeRequests() // 开始授权请求
                .anyRequest()  // 任何请求
                .authenticated() // 需要登录之后才能访问

                .and()
                .formLogin() // 使用表单形式登录
                .loginPage("/index.jsp") // 指定登录页面
                .loginProcessingUrl("/login") // 指定提交登录表单的地址
                .usernameParameter("loginAcct")
                .passwordParameter("userPswd")
                .successForwardUrl("/WEB-INF/views/main.jsp")

                .and()
                //.csrf()
                //.disable() // 禁用CSRF以便于get请求
                .logout()
                .logoutUrl("/my/app/logout")
                .logoutSuccessUrl("/index.jsp")

                .and()
                .exceptionHandling() // 指定异常处理器
                .accessDeniedHandler(new AccessDeniedHandler() {
                    @Override
                    public void handle(HttpServletRequest httpServletRequest, HttpServletResponse httpServletResponse, AccessDeniedException e) throws IOException, ServletException {
                        httpServletRequest.setAttribute("message", "您没有资格访问这个页面");
                        httpServletRequest.getRequestDispatcher("/WEB-INF/views/no_auth.jsp").forward(httpServletRequest, httpServletResponse);
                    }
                }).
                and()
                .rememberMe()
                .tokenRepository(tokenRepository)
        ; // 异常处理后前往的页面
    }
③ 重写JdbcTokenRepositoryImpl
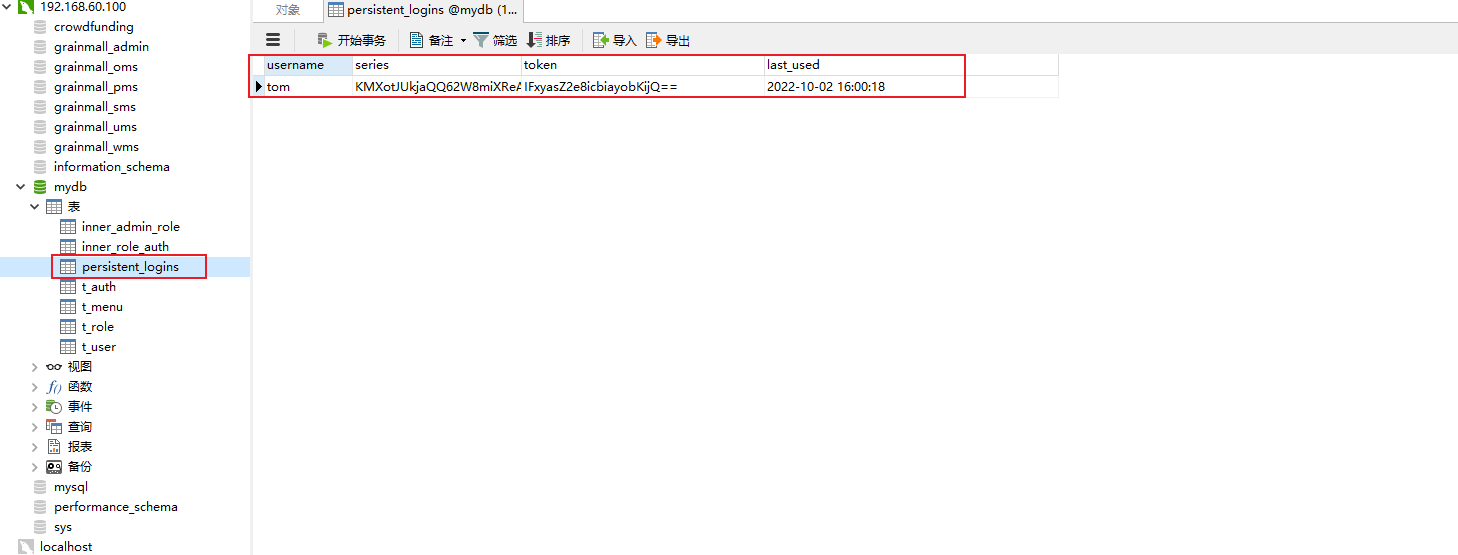
在JdbcTokenRepositoryImpl的源码中,initDao方法用于创建数据库表,但是这个方法是protected的,因此要么手动创建一张数据库表,要么重写一下源码。
    @Override
    public void initDao() {
        if (this.createTableOnStartup) {
            this.getJdbcTemplate().execute("create table if not exists persistent_logins (username varchar(64) not null, series varchar(64) primary key, token varchar(64) not null, last_used timestamp not null)");
        }

    }
然后启动服务器会自动创建一张persistent_logins的表,并在选中remember时自动进行登录信息持久化,这样即使服务器重启也不影响已经登录的用户信息了。
4.12 查询数据库完成认证
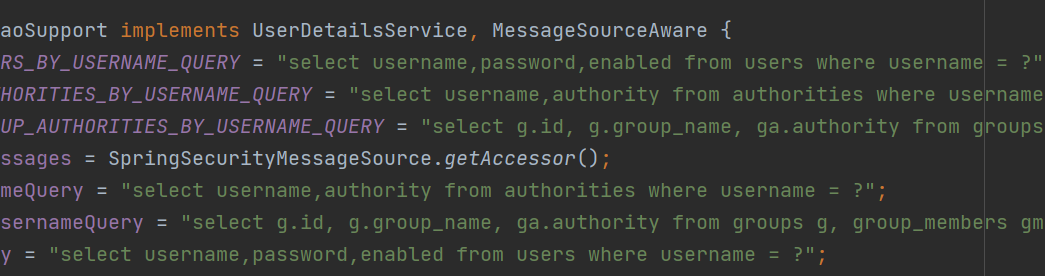
SpringSecurity的默认实现
执行下面语句会使用SpringSecurity的默认数据库认证,最终会调用JdbcDao类的方法查询数据库,SpringSecurity的默认实现已经将SQL语句编写在了DAOImpl中,这就要求我们需要严格按照SQL语句设计用户、角色、权限的表结构,这显然不合理。
builder.jdbcAuthentication().usersByUsernameQuery("Tom");
自定义UserDetailService类
① 自定义UserDetailService类
@Slf4j
@Component
public class MyUserDetailService implements UserDetailsService {
    @Autowired
    JdbcTemplate jdbcTemplate;
    /**
     * 根据表单提供的用户名查询User对象,并装配角色权限信息返回UserDetails
     * @param username
     * @return
     * @throws UsernameNotFoundException
     */
    @Override
    public UserDetails loadUserByUsername(String username) throws UsernameNotFoundException {
        // 从数据库查询admin对象
        String sql = "select loginacct, userpswd, username, email from t_admin where loginacct = ?";
        List<Admin> list = jdbcTemplate.query(sql, new BeanPropertyRowMapper<>(Admin.class), username);
        Admin admin = list.get(0);
        // 给admin设置角色权限信息
        List<GrantedAuthority> authorities = new ArrayList<>();
        authorities.add(new SimpleGrantedAuthority("ROLE_ADMIN"));
        authorities.add(new SimpleGrantedAuthority("UPDATE"));
        String password = admin.getUserpswd();
        log.info(password);
        // 把admin对象和authorities封装到userDetails里面
        return new User(username, password, authorities);
    }
}
② 在AuthenticationManagerBuilder对象上开启数据库认证
    @Autowired
    DruidDataSource dataSource;
    @Autowired
    UserDetailsService userDetailsService;

    @Override
    protected void configure(AuthenticationManagerBuilder builder) throws Exception {
        // 进行内存认证
        //builder.inMemoryAuthentication()
        //        .withUser("tom")
        //        .password("tom")
        //        .roles("ADMIN", "学徒")
        //        .and()
        //        .withUser("jerry")
        //        .password("jerry")
        //        .authorities("ADD", "DELETE", "关门弟子");

        // 数据库验证
        builder.userDetailsService(userDetailsService);
    }
4.13 密码加密
SpringSecurity提供的密码加密接口
public interface PasswordEncoder {
    // 进行密码加密
    String encode(CharSequence var1);
    // 检验一个明文密码是否和一个密文密码一致
    boolean matches(CharSequence var1, String var2);
}
① 创建一个PasswordEncoder实现类
@Component
public class MyPasswordEncoder implements PasswordEncoder {
    @Override
    public String encode(CharSequence charSequence) {
        return privateEncoder(charSequence);
    }

    @Override
    public boolean matches(CharSequence charSequence, String s) {
        String formPassword = privateEncoder(charSequence);
        String dbPassword = s;
        return Objects.equals(formPassword, dbPassword);
    }

    private String privateEncoder(CharSequence charSequence) {
        String algorithm = "MD5";
        try {
            // 1 创建 MessageDigest 对象
            MessageDigest messageDigest = MessageDigest.getInstance(algorithm);
            // 2 获取字符数组
            byte[] input = ((String) charSequence).getBytes();
            // 3 进行加密
            byte[] output = messageDigest.digest(input);
            String encoded = new BigInteger(1, output).toString(16).toUpperCase();

            return encoded;
        } catch (NoSuchAlgorithmException e) {
            e.printStackTrace();
            return null;
        }
    }
② 在SpringSecurity中装配并使用自定义的PasswordEncoder实现类。
@Configuration
@EnableWebSecurity
public class WebAppSecurityConfig extends WebSecurityConfigurerAdapter {
    @Autowired
    DruidDataSource dataSource;
    @Autowired
    UserDetailsService userDetailsService;
    @Autowired
    MyPasswordEncoder myPasswordEncoder;

    @Override
    protected void configure(AuthenticationManagerBuilder builder) throws Exception {
        // 进行内存认证
        //builder.inMemoryAuthentication()
        //        .withUser("tom")
        //        .password("tom")
        //        .roles("ADMIN", "学徒")
        //        .and()
        //        .withUser("jerry")
        //        .password("jerry")
        //        .authorities("ADD", "DELETE", "关门弟子");

        // 数据库验证
        builder.userDetailsService(userDetailsService).passwordEncoder(myPasswordEncoder);
    }
然后进行测试发现可以登录。
4.14 带盐值的加密 BCryptPasswordEncoder
上述的md5等加密方法存在着风险:固定的明文对应着固定的暗文,虽然很难从暗文推算出明文,但是可以借助已有的明文和暗文的对应关系进行猜解:
123123 -> 4297F44B13955235245B2497399D7A93
这时候其实也可以对密码的加密做一些复杂处理,如重复一定的次数以及使用不同的进制等手段保证拿到数据库的暗文也无法知晓明文
而带盐值的加密BCryptPasswordEncoder会每次针对同一个明文产生不同的密文,且不同的密文都能和明文相对应,BCryptPasswordEncoder同样也像上面自定义的MyPasswordEncoder一样继承自PasswordEncoder。
① 使BCryptPasswordEncoder类加入IOC容器并自动装配
@Configuration
@EnableWebSecurity
@Import(BCryptPasswordEncoder.class)
public class WebAppSecurityConfig extends WebSecurityConfigurerAdapter {
    @Autowired
    DruidDataSource dataSource;
    @Autowired
    UserDetailsService userDetailsService;
    @Autowired
    MyPasswordEncoder myPasswordEncoder;

    @Autowired
    BCryptPasswordEncoder bCryptPasswordEncoder;
② 在SpringSecurity的配置对象AuthenticationManagerBuilder配置BCryptPasswordEncoder
    @Override
    protected void configure(AuthenticationManagerBuilder builder) throws Exception {
        // 进行内存认证
        //builder.inMemoryAuthentication()
        //        .withUser("tom")
        //        .password("tom")
        //        .roles("ADMIN", "学徒")
        //        .and()
        //        .withUser("jerry")
        //        .password("jerry")
        //        .authorities("ADD", "DELETE", "关门弟子");

        // 数据库验证
        builder.userDetailsService(userDetailsService).passwordEncoder(bCryptPasswordEncoder);
    }

 浙公网安备 33010602011771号