全网最详细超长python学习笔记、14章节知识点很全面十分详细,快速入门,只用看这一篇你就学会了!
相关文章:
全网最详细超长python学习笔记、14章节知识点很全面十分详细,快速入门,只用看这一篇你就学会了!
【1】windows系统如何安装后缀是whl的python库
【2】超级详细Python-matplotlib画图,手把手教你画图!(线条颜色、大小、线形、标签)
【3】超级详细matplotlib使用教程,手把手教你画图!(多个图、刻度、标签、图例等)
python入门合集:
python快速入门【三】-----For 循环、While 循环
python学习笔记 jupyter notebook教学,14章节知识点很全面十分详细。
注意事项:本博客是我早起自己写的python笔记word版本,现在转成博客形式,由于ipython文件找不到了,很多代码都会以图片形式出现,不过放心不影响学习,对于比较长的程序例子我回重新贴好代码放入。
python笔记+代码下载地址:https://download.csdn.net/download/sinat_39620217/16658064
DLE (Integrated Development and Learning Environment)集成开发与学习环境
编辑器 交互模式---指令直接反馈
编辑器—new file
修改编辑器字体:Options --- configure IDLE 
Alt+p 重复上面输入 Alt+n,获取下一部分代码 ctrl+c 终止,整体缩进:tab 整体取消缩进:tab+shift,整体缩进 Ctrl+【 整体取消缩进 Ctrl+】。
1.变量名
py3.7中文可以当作变量名
#引入第三变量
#引用第三变量
X=3
Y=5
x,y=y,x
Print(x,y)
2.字符串
①单引号和双引号----基本差别
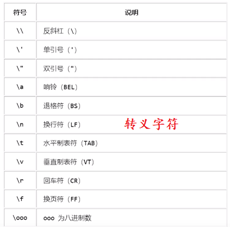
.单引号(双引号)用于引用; 转义字符
print("\"let\'s,go\"")
#"let's,go"---------------------转义字符保证引号无别的含义
#显示路径:
Print(d:\\das\\dasd\\das\\now)#---反斜杠转义反斜杠
②原始字符串:
print(r"d:dasd\dasda\gdf")     #加r 为原始字符串,及后面字符无含义

#d:dasd\dasda\gdf
字符串相加===字符串拼接:
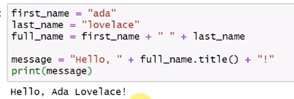
>>> first_name=("abc")
>>> last_name=("efg")
>>> full_name=first_name+" "+last_name
>>> print(full_name)
abc efg
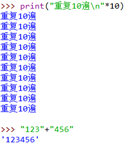
乘法----代表复制
3.修改字符串大小写等
>>> name=('asd love')
>>> print(name)
asd love
>>> print(name.title()) #只把首字母变大写
Asd Love

>>> print(name.upper()) #全部变大写
ASD LOVE
删除空白:
>>> massge=("python   ")
>>> massge.rstrip()    #删除末尾空白
'python'
>>> massge=("    python   ")
>>> massge.lstrip()          #删除前面的空白
'python
其中:函数:Str() 转为字符串
3.Game:基础语法测试程序:
"""python game"""
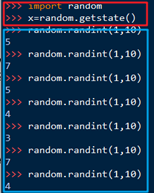
import random
count=10 #猜三次
answer=random.randint(1,10) #生成随机数
while count > 0:
temp = input("猜猜数字")
guess =int(temp)
if guess == answer:
print("right")
break
else:
if guess < answer:
print("小了")
else:
print("大了")
count-=1 #py没有自增自减
print("end")
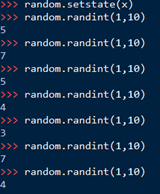
随机数状态:Random.getstate() random.setstate()获得原来的数字
4.数字类型
浮点数精度有误差0.1+0.2=0.30000004 ;
- Decimal 十进制模块
decimal.Dicimal(‘’)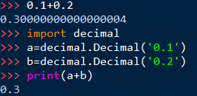
保证计算正确性。
- 运算
//[向下去整] 3/2=1; -3/2=-2地板除
取余%
divmod()  直接求得 取余和取商(//)
divmod(3,2)得(1,1)
dicmod(-3,2)得(-2,1)
int(3.14)=3  不是四舍五入
complex(“1+2j”)复数;
1e6 十的六次方  2e6:2十的六次方
Pow(x,y)计算x的y次方
X**y 计算x的y次方
其中:pow(x,y,z)==x**y%z
- 布尔类型
Bool()false true

定义为false对象:none和false

         值为零的数字类型:0,0.0,0J,decimal(0),fraction(0,1)

         空的序列和集合:’’.[],{},set(),range(0)

True==1,false==0;
>>>3and4
4
>>>4or3
4
>>> "123" and "456 '
456
>>> " 123 and 345
345
>>>
除了逻辑运算,数值也可以
>>>(not1)or(0and1)or(3and4)or(5and6)or(7and8and9)
4
短路逻辑:从左往右,只有当第一个操作数的值无法确定逻辑运算的时候,才对第二个数进行求值
And 右边结果最终影响逻辑结果,3为true  4也为true 取4   or 第一个为4时就已经判断;
O or 3  ==3  o and 3==0(and两个都为真为true;or两个都为假为假 )
not 1 or 0 and 1 or 3 and 4 and 5 and 6
6
优先级 not > and >or
not 1 or 0 and 1 or 3 and 4 or 5 and 6 or 7 and 8 and 9 ---------------4
小括号内容:False  0  4  6  9
因为是or  到4
得4
5.列表
①列表normal:
①列表normal:
>>> list = ["a","b","c","d"]   #构建列表
>>> print(list)
['a', 'b', 'c', 'd']
>>> print(list[0])   #找到列表中第一个元素
a
>>> print(list[0].title())   #首字母变大写
A
修改列表值:直接赋值
		>>> list[0]="A"
>>> print(list)                                  ②massage=[]
['A', 'b', 'c', 'd']                                   massage.append("a")
在列表末尾添加元素:①list.append("e")                      massage.append("b")
>>> print(list)                          massage.append("c")
['A', 'b', 'c', 'd', 'e']             print---['a', 'b', 'c']  #不断为空列表添加内容
在列表中插入元素:
                  massage.insert(0,"a")       ['a', 'a', 'b', 'c']    位置+内容化 insert
在列表中删除元素:>>> ①del massage[0]     #删除位置下标
>>> print(massage)
['a', 'b', 'c']
Pop()删除末尾元素  ②>>> massage=["a","b","c"]
>>> poped_massage=massage.pop()
>>> print(massage)                #pop删除的元素,可以调用
['a', 'b']
>>> print(poped_massage)
C                         #并且每使用一次pop,都会删除最后一个。如下:
>>> print(massage.pop())
b
>>> print(massage)
['a']
弹出列表任意位置元素:
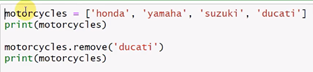
根据值删除元素:

②组织列表
Sort()对列表进行永久性排序
>>> list=["aa","cc","bb"]
>>> list.sort() #按字母排序,不能恢复
>>> print(list)
['aa', 'bb', 'cc']
>>> list=["aa","cc","bb"]
>>> list.sort(reverse=True) 相反打印排序;
>>> print(list)
['cc', 'bb', 'aa']
Sorted()临时排序
>>> list=["aa","cc","bb"]
>>> print(sorted(list)) 对原序列不产生影响
['aa', 'bb', 'cc']
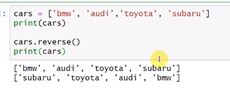
Reverse()倒着打印
③操作列表
①遍历整个列表: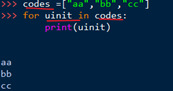
在for循环内可以进行别的·操作
②数值列表:
⑴>>> for value in range(1,5):
	print(value)           #打印1—n-1

⑵>>> num =list(range(1,6))
>>> print(num)
[1, 2, 3, 4, 5]
>>> num =list(range(1,8,2))   #步进为二
>>> print(num)
[1, 3, 5, 7]

⑶squars = []
for value in range(1,11):
	squar = value**2
	squars.append(squar) #添加到末尾         squars.append(value**2)
print(squars)
max(),sum(),min()等进行计算
④	列表解析
>>> nun=[value**2 for value in range(1,11)]
>>> print(nun)
[1, 4, 9, 16, 25, 36, 49, 64, 81, 100]
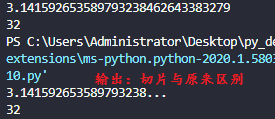
④部分元素——切片等
- 切片
![]() 0---n-1个
0---n-1个
索引数组,【:,4】则把前面四个打印出来
 【2:】则打印第二个开始的所有后面
players =["aa","bb","cc","dd"]
print(players[-2:])              ['cc', 'dd'] -2也可以打印出后面两个
②	遍历切片
players =["aa","bb","cc","dd"]
for player in players[:2]:           #遍历切片打印出前两个   没有切片则遍历全部全部列表。
        print(player)
③	复制列表
players =["aa","bb","cc","dd"]
num=players[:]     #即复制列表
print(num)
players.append("ee")  #后面添加新元素
num.append("ff")
④	定义元组
- 定义元组
 元组小括号
元组小括号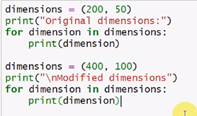 采用复制的方法修改;遍历所有值
6.If条件
cars=["audi","bmw","aubaru","toyota"]
for car in cars:
if car=="bmw":
print(car.upper())
else :
print(car.title())
大小写不相等,也会不相等
条件判断不相等!=,and or的使用;
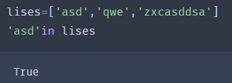
① 检查特定值是否在列表中:
in
If elif else ;
可以多个elif, 数值转换str;
都加冒号:·, else可以等价为elif中条件最后一个的填入即可
 in
in 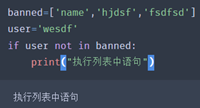
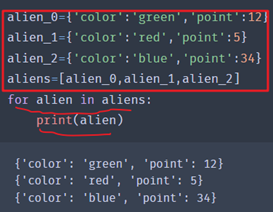
7.字典
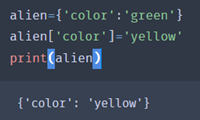
①alien={'color':'green','point':'5'}#键color 值green
print(alien['color'])

也可以在空白alien{}添加
修改字典中的值---直接赋值覆盖
![]()
alien={'color':'green','point':'5'}#键color 值green
del alien['point']
print(alien)            删除的键值永远消失

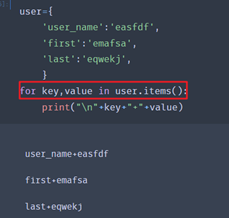
- 遍历字典键值(一对)
声明两个变量 items返回一个键值对
遍历所有键
遍历所有值
找出列表中独一无二的元素,并使用这些元素创建一个新的列表等
 声明两个变量 items返回一个键值对
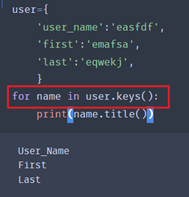 遍历所有键
遍历所有键 遍历所有值
遍历所有值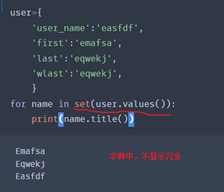 找出列表中独一无二的元素,并使用这些元素创建一个新的列表等
- 嵌套,字典列表
切片显示
前三个参数修改字典中存储列表
字典嵌套字典
 切片显示
切片显示 前三个参数修改字典中存储列表
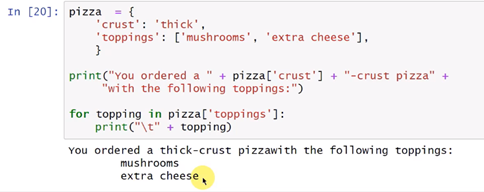

8.input&while
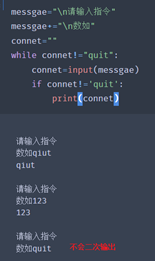
message=input("输入")
print(message)
输入打印前缀处理
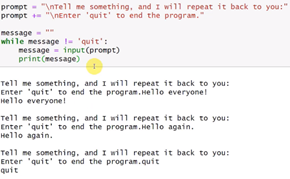
- 让用户选择合适退出:
![]()
- 标志 true来标志程序运行状态
②	标志 true来标志程序运行状态
prompt="\n输入信息"
prompt+="\n信息为:"
active=True        #使用标志
while active:
    message=input(prompt)
    if message=="quit":
            active=False
    else:
        print(message)      break
打印奇数
删除列表中特定值:
用户输入填充字典

 打印奇数
打印奇数


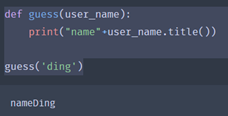
9.函数定义
①简单的定义:
①def guess():
    print("name")
guess()   输出name
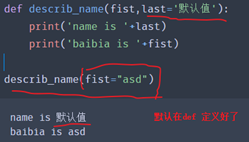
- 关键字实参(顺序注意)
def describ_name(fist,last):
    print('name is '+last)
    print('baibia is '+fist)
    #因为是字符串,输出写上字符串
describ_name('asd','fsd')
#为了保证参数顺序,
describ_name(fist="asd",last="fsd")    默认值
等效的函数调用:
![]()
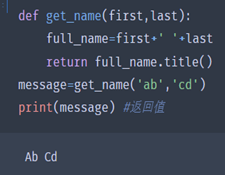
def get_name(first,last,middle_name=''):
        if middle_name:
            full_name=first+' '+middle_name+' '+last
        else:
            full_name=first+' '+last
        return full_name.title()
 message=get_name('ab','cd')
print(message) #返回值
message=get_name('ab','cd','bb')
print(message)      #可选实参
②返回值 def get_name(first,last,middle_name=''): if middle_name: full_name=first+' '+middle_name+' '+last else: full_name=first+' '+last return full_name.title() message=get_name('ab','cd') print(message) #返回值 message=get_name('ab','cd','bb') print(message) #可选实参 返回字典: def get_name(first_name,last_name): """构建一个返回字典,包含个人信息""" person={'first':first_name,'last':last_name} return person message=get_name('ab','cd') print(message) #返回值 循环+函数,用户输入:→→→→(2192)

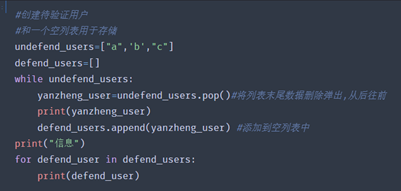
⭐10.传递列表:
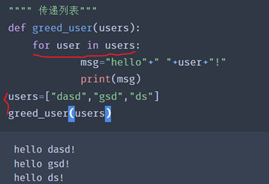
①函数中修改列表,
"""信息存储在一个列表中,打印后移到另一个列表中"""
"""不使用函数模拟过程"""
un_desigins=["iphone","robot","unkonow"]
completed_models=[]
#模拟打印每个列表内容,全部打印完结束;
#打印原列表内容后转移到列表complete_models中
while un_desigins:
    cunrrent_design=un_desigins.pop()
    print("model"+":"+cunrrent_design)
    completed_models.append(cunrrent_design)
#显示所有信息
print("\nthe following models")
for completed_model in completed_models:
    print(completed_model)


model:unkonow
model:robot
model:iphone

the following models
unkonow
robot
iphone
def print_models(un_designs,complete_design):
"""打印并复制列表到下一个列表中"""
while un_desigins:
cunrrent_design=un_desigins.pop()
print("model"+":"+cunrrent_design)
completed_models.append(cunrrent_design)
def show_models(completed_models):
print("\nthe following models")
for completed_model in completed_models:
print(completed_model)
un_desigins=["iphone","robot","unkonow"]
completed_models=[]
print_models(un_desigins,completed_models)
show_models(completed_models)
model:unkonow
model:robot
model:iphone
the following models
unkonow
robot
iphone②传递任意数量实参
def make_pizza(price,*toppings):  #*创建一个topping的空元组
    """打印顾客菜单配料"""
    i=0
    for topping in toppings:
        i+=1
        print('价格'+str(price)+","+"配料"+" "+str(i)+" "+topping)

make_pizza(16,"meat","beaf","sala")


('meat',)
('sala',)
def make_pizza(*toppings): #*创建一个topping的空元组
"""打印顾客菜单配料"""
i=0
for topping in toppings:
i+=1
print("配料"+" "+str(i)+" "+topping)
make_pizza("meat","beaf","sala")
配料 1 meat
配料 2 beaf
配料 3 saladef make_pizza(price,*toppings): #*创建一个topping的空元组
"""打印顾客菜单配料"""
i=0
for topping in toppings:
i+=1
print('价格'+str(price)+","+"配料"+" "+str(i)+" "+topping)
make_pizza(16,"meat","beaf","sala")
价格16,配料 1 meat
价格16,配料 2 beaf
价格16,配料 3 sala③使用任意数量的关键字实参
def build_profile(first,last,**user_info):
    """创建字典,包含用户所有信息"""
    profile={}
    profile["first_name"]=first
    profile["last_name"]=last
    for key,value in user_info.items():
        profile[key]=value
    return profile
user_profile=build_profile("asd","qwe",
                          location="beijing",
                          field="pysicis")
print(user_profile)

{'first_name': 'asd', 'last_name': 'qwe', 'location': 'beijing', 'field': 'pysicis'}
④导入文件
①Import xxx #文件 可以再Python vs都行
Demo:
Import pizza #可以调用def 的文件里所有函数
Pizza.make_pizaa(xxxxxx) 需要模块模块名
②导入特定的函数
Form pizza import make_pizza
make_pizaa(xxxxxx) 不需要指定模块名了
③把指定调用函数函数名-----自己命名调用
Form pizza import make_pizza as mp
mp(xxxx)
④ 给模块命名
Import pizza as p
11.⭐⭐类 面相对象编程
①类创建以及属性值等
#创建小狗类别 dog
#包括名字+年龄 行为:蹲下+打滚
#创建类
class Dog():     #首字母大写就是类
    def __init__(self,name,age):   #两个下划线  __init__方法,初始化变量  self在其他形参前面
        """初始化"""
        self.name=name           #通过传递姓名+年龄,self会自动传递
        self.age=age
        #以SELF为前缀的昂量可以供类中变量所有方法使用
        #获取存贮在形参name中的值,并将其存储到变量name中,变量会被关联到当前创建实例
    def sit(self):
        """模拟小狗蹲下"""
        print(self.name.title()+"小狗下蹲")
    def roll_over(self):
        """模拟小狗蹲下"""
        print(self.name.title()+"小狗打滚")
my_dog=Dog("blue",4)
print("my dog is"+" "+my_dog.name.title())
print("my dog is"+" "+str(my_dog.age)+" "+"years old")
my_dog.sit()
my_dog.roll_over()
my dog is Blue
my dog is 4 years old
Blue小狗下蹲
Blue小狗打滚汽车例子
#创建一个表示汽车的类,存储汽车的信息,还有一个汇总这些信息的方法   get_descriptive_name
class Car():
        def __init__(self,make,model,year):
                        """初始化汽车属性"""
                        self.make=make
                        self.model=model
                        self.year=year
                        self.odometer=0
        def get_descriptive_name(self):
            """返回信息描述"""
            long_name=str(self.year)+" "+self.model+" "+self.make
            return long_name.title()
        def read_odometer(self):
            """打印里程数"""
            print("this car is "+str(self.odometer)+" km")

        def update_odometer(self,odo):
            """修改里程数值"""              #2通过方法修改里程值,
            if odo>=self.odometer:
                self.odometer=odo
            else:
                print("你不可以更改")


my_newcar=Car("audi","a4",2018)
print(my_newcar.get_descriptive_name())
#1.直接修改属性值
my_newcar.odometer=23
my_newcar.update_odometer(24)
my_newcar.read_odometer()
2018 A4 Audi
this car is 24 km
#创建一个表示汽车的类,存储汽车的信息,还有一个汇总这些信息的方法 get_descriptive_name
class Car():
def __init__(self,make,model,year):
"""初始化汽车属性"""
self.make=make
self.model=model
self.year=year
self.odometer=0
def get_descriptive_name(self):
"""返回信息描述"""
long_name=str(self.year)+" "+self.model+" "+self.make
return long_name.title()
def read_odometer(self):
"""打印里程数"""
print("this car is "+str(self.odometer)+" km")
def update_odometer(self,odo):
"""修改里程数值""" #2通过方法修改里程值,
if odo>=self.odometer:
self.odometer=odo
else:
print("你不可以更改")
def increase_odometer(self,miles):
"""增加制定里程读数""" #3.通过方法对属性的值进行递增
self.odometer+=miles
my_newcar=Car("audi","a4",2018)
print(my_newcar.get_descriptive_name())
#1.直接修改属性值
my_newcar.odometer=10
my_newcar.read_odometer()
my_newcar.update_odometer(20)
my_newcar.read_odometer()
my_newcar.increase_odometer(30)
my_newcar.read_odometer()2018 A4 Audi
this car is 10 km
this car is 20 km
this car is 50 km修改属性的值三种方法
- 直接修改属性
- 通过方法修改属性值
- 通过方法对属性的值进行递增
②继承
1.原有类为父类,新类为子类
#创建一个表示汽车的类,存储汽车的信息,还有一个汇总这些信息的方法   get_descriptive_name
class Car():
        def __init__(self,make,model,year):
                        """初始化汽车属性"""
                        self.make=make
                        self.model=model
                        self.year=year
                        self.odometer=0
        def get_descriptive_name(self):
            """返回信息描述"""
            long_name=str(self.year)+" "+self.model+" "+self.make
            return long_name.title()
        def read_odometer(self):
            """打印里程数"""
            print("this car is "+str(self.odometer)+" km")

        def update_odometer(self,odo):
            """修改里程数值"""              #2通过方法修改里程值,
            if odo>=self.odometer:
                self.odometer=odo
            else:
                print("你不可以更改")
        def increase_odometer(self,miles):
            """增加制定里程读数"""    #3.通过方法对属性的值进行递增
            self.odometer+=miles

class EletricCar(Car):     #继承父类 Car
    def __init__(self,make,model,year):
        """初始化父类属性"""
        super().__init__(make,model,year)  #super使父类子类关联起来
my_car=EletricCar("bmw","model2",2020)
my_car.get_descriptive_name()
'2020 Model2 Bmw'2.给子类定义属性和方法

3.重写父类(在子类写相同的类)
!子类和父类def 相同则只会运行子类的定义函数函数

4.⭐将实例用作属性----把属性放到另外一个类中---重新定类

电瓶续航补充

注意实例作为属性的调用

完整代码:
#创建一个表示汽车的类,存储汽车的信息,还有一个汇总这些信息的方法   get_descriptive_name
class Car():
        def __init__(self,make,model,year):
                        """初始化汽车属性"""
                        self.make=make
                        self.model=model
                        self.year=year
                        self.odometer=0
        def get_descriptive_name(self):
            """返回信息描述"""
            long_name=str(self.year)+" "+self.model+" "+self.make
            return long_name.title()
        def read_odometer(self):
            """打印里程数"""
            print("this car is "+str(self.odometer)+" km")

        def update_odometer(self,odo):
            """修改里程数值"""              #2通过方法修改里程值,
            if odo>=self.odometer:
                self.odometer=odo
            else:
                print("你不可以更改")
        def increase_odometer(self,miles):
            """增加制定里程读数"""    #3.通过方法对属性的值进行递增
            self.odometer+=miles

class Battery():    #无继承
        def __init__(self,battery_size=70):
            self.battery_size=battery_size
            """初始化属性"""
        def describe_battery(self):
            """打印描述电瓶容量信息"""    #将实例放到新的
            print("电池 "+str(self.battery_size)+" kwh")
        def get_range(self):
            """打印电瓶续航里程"""
            if self.battery_size==70:
                range=240
            elif self.battery_size==85:
                range=270
            message="this car can go approximately "+str(range)
            message+="miles on a full charge"  #不上语句
            print(message)

class EletricCar(Car):     #继承父类 Car
        def __init__(self,make,model,year):
            """初始化父类,在初始化子类"""
            super().__init__(make,model,year)
            self.battery=Battery()       #电池,子类属性

        def increase_odometer(self,miles):
                """增加制定里程读数"""    #3.通过方法对属性的值进行递增
                self.odometer+=miles*10

my_car=EletricCar("bmw","model2",2020)
print(my_car.get_descriptive_name())
my_car.battery.describe_battery()
my_car.battery.get_range()
2020 Model2 Bmw
电池 70 kwh
this car can go approximately 240miles on a full charge
12.Vs code文件导入以及异常处理
基础配置完成后:
绝对路径时:
会报错,
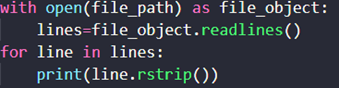
斜杠反方向 rstrip删除末尾空白
读取每一行:
Or


判断内容有无在文件text中:
写入文本中:
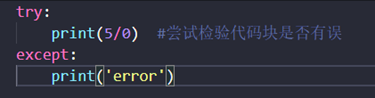
file_path='C:/Users/Administrator/Desktop/py_demo/test_files/kong.txt'
with open(file_path,'w') as file_object:
    file_object.write("i love you \n")
    file_object.write("you \n")
with open(file_path,'a') as file_object:   #附加到文本里 add
    file_object.write("i love you \n")
    file_object.write("you \n")
检验代码:
文件不存在提示:


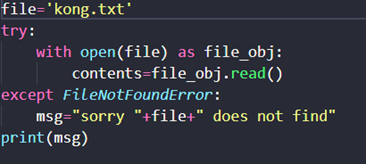
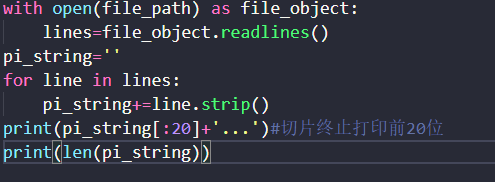
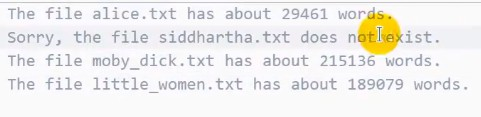
一个字符串分割成字符串数组

json
文件加载:
加载不存在信息
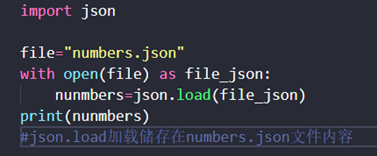

import json

file="numbers.json"
try:
    with open(file) as file_json:
        username=json.load(file_json)
except FileNotFoundError:
    username=input("you name\n")
    with open(file,"w")  as file_json:
        json.dump(username,file_json)
        print("加载成功")
else:
    print("see you"+str(username))
#json.load加载储存在numbers.json文件内容
13文件测试
测试函数

①测试文件是否能通过:

显示ok则测试通过,
assertEqual 核实a==b unittest测试,创建类
②demo


结果


测试多个答案的,确保每个答案都在my_survey.reponses

Srtup创建例子供测试调用
14.项目实战
①生成折线图:

x.ylabel 在下面散点图中绘制修复了
原因:可能之前运行,变量或者参数erro导致的,重新构建即可
②散点图—渐变色

生成多个点数据

颜色设置
plt.scatter(x_values,y_values,c='red',s=40) RGB模式:c=(0,0,0.8) 蓝的,RGB 色彩模式默认采用小数值
![]()

颜色映射,Plt.cm
保存在文件图片指令。![]()
项目三-随机漫步
#模拟随机漫步
from random import choice
#choice 返回非空序列里的随机元素
class RandomWalk():
    """生成随机漫步数的类"""
    def __init__(self,num_points=5000):
        self.num_points=num_points
        #所有随机漫步都始于(0,0)
        self.x_value=[0]   #FIXME: 标识处代码需要修正,甚至代码是错误的
        self.y_value=[0]  #TODO:标识处有功能代码待编写

    def fill_walk(self):
        #不断漫步,直到达到表达指定长度
        while len(self.x_value)<self.num_points:

            #决定前进方向以及沿着这个方向前进的距离
            x_direction=choice([-1,1])
            x_distance=choice([0,1,2,3,4])
            x_step=x_direction*x_distance
            #choice([0, 1, 2, 3, 4]) 随机地选择一个0~4之间的整数
            y_direction=choice([-1,1])
            y_distance=choice([0,1,2,3,4])
            y_step=y_direction*y_distance

            #拒绝原地踏步
            if x_step==0 and y_step==0:
                continue
            #计算下一个点的x和y值
            next_x=self.x_value[-1]+x_step  #将x_step x_value最后值相加
            next_y=self.y_value[-1]+y_step

            self.x_value.append(next_x)
            self.y_value.append(next_y)

进阶版:


效果:

import matplotlib.pyplot as plt
#import matplotlib as mpl
import numpy as np
from submanbu import RandomWalk

while True:

    rw=RandomWalk(50000)  #自己设置点数5w.原来为5k
    rw.fill_walk()
    #设置绘图窗口的尺寸n
    #分辨率128,dpi 确定了图形每英寸包含的像素数,图形尺寸相同的情况下, dpi 越高,则图像的清晰度越高
    plt.figure(dpi=128,figsize=(10,6))
    #给数据点着色,渐变色无轮廓-----------cmap=plt.cm.Blues 大写颜色,这个erro不用管
    point_number=list(range(rw.num_points))
    plt.scatter(rw.x_value,rw.y_value,c=point_number,cmap=plt.cm.Blues,edgecolors="none",s=1)
    #突出起点和终点
    plt.scatter(0,0,c="green",edgecolors="none",s=50)
    plt.scatter(rw.x_value[-1],rw.y_value[-1],c="red",edgecolors="none",s=50)

    #隐藏坐标轴
    plt.axes().get_xaxis().set_visible(False)
    plt.axes().get_yaxis().set_visible(False)
    plt.show()

    keep_running=input("make another walk?(y/n): ")
    if keep_running=='n':
        break
    #(看终端处,当图片被关闭,就会询问是否再次模拟漫步,需要保存)
    #无法在编辑中操作,去setting中设置run code config,保存即可
四掷骰子可视化
- 一个骰子:基础版
from random import randint
#导入函数randint可以返回(a,b)范围内的数
class Shaizi():
"""一类骰子"""
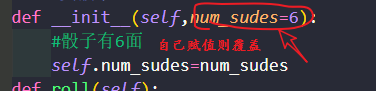
def __init__(self,num_sudes=6):
#骰子有6面
self.num_sudes=num_sudes
def roll(self):
#返回一个位于1和骰子面熟之间的随机值
return randint(1,self.num_sudes)
Svg文件浏览器可以打开

- 两个骰子


import pygal
from shaizi import Shaizi
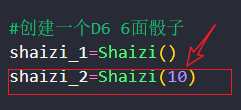
#创建一个D6 6面骰子
shaizi_1=Shaizi()
shaizi_2=Shaizi(10)
#投几次并将结果存储在一个列表中
results=[]
for roll_num in range(1000):
result=shaizi_1.roll()+shaizi_2.roll()
results.append(result)
#分析结果频率
frequencies=[]
max_result=shaizi_1.num_sudes+shaizi_2.num_sudes
for value in range(2,max_result+1):
frequency=results.count(value) #计算每种点数在结果中出现次数
frequencies.append(frequency)
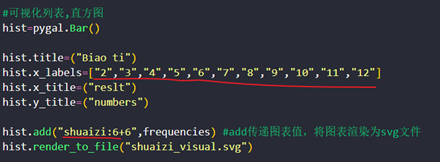
#可视化列表,直方图
hist=pygal.Bar()
hist.title=("Biao ti")
hist.x_labels=["2","3","4","5","6","7","8","9","10","11","12","13","14","15","16"]
hist.x_title=("reslt")
hist.y_title=("numbers")
hist.add("shuaizi:6+10",frequencies) #add传递图表值,将图表渲染为svg文件
hist.render_to_file("shuaizi_visual.svg")
"""
range(start, stop[, step])
start: 计数从 start 开始。默认是从 0 开始。例如range(5)等价于range(0, 5);
stop: 计数到 stop 结束,但不包括 stop。例如:range(0, 5) 是[0, 1, 2, 3, 4]没有5
step:步长,默认为1。例如:range(0, 5) 等价于 range(0, 5, 1)
Svg文件浏览器可以打开

至此教程全部结束,辛苦学习了!

 浙公网安备 33010602011771号