
黑客工具之BurpSuite详解
BurpSuite是用于攻击Web应用程序的集合平台,包含了许多工具。BurpSuite为这些工具设计了许多接口,以加快攻击应用程序的过程。所有工具都共享一个请求,并能处理对应的HTTP消息、持久性、认证、代理、日志、警报。BurpSuite基于Java开发,所以你的电脑上必须得安装有JDK
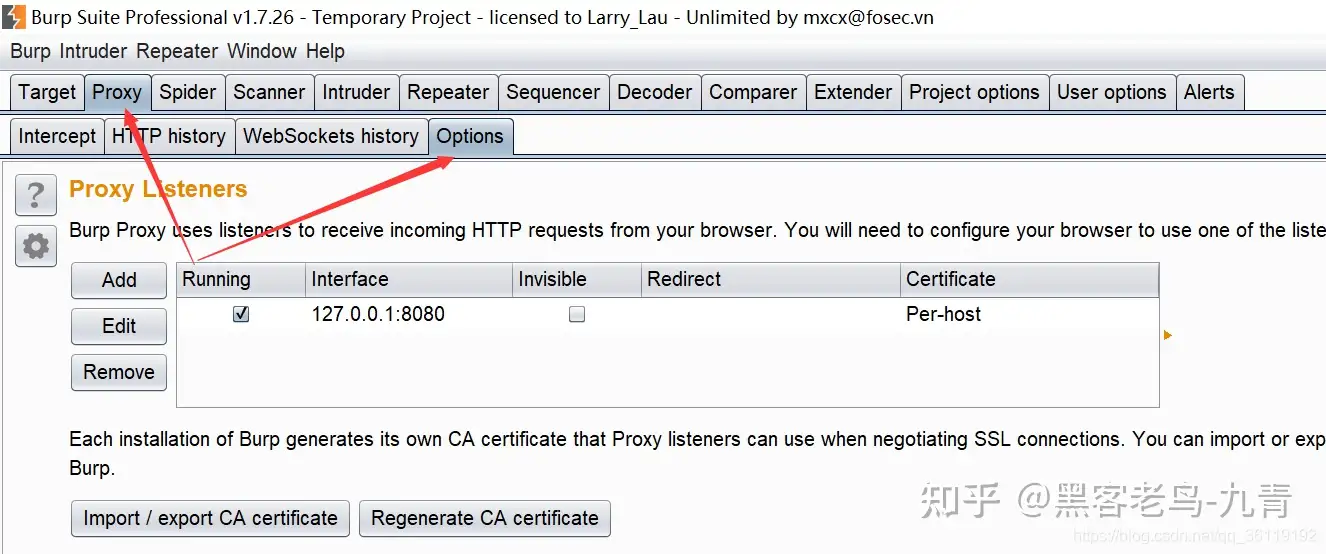
Proxy代理模块
BurpSuite默认使用8080端口作为代理,当然,你也可以自己修改端口号
Proxy--Options,然后下面可以自己修改代理的端口号,默认是8080
这里Proxy的intercept这里显示Intercept is on表示拦截包开启,所有代理的包都必须经过BurpSuite放行才可以走

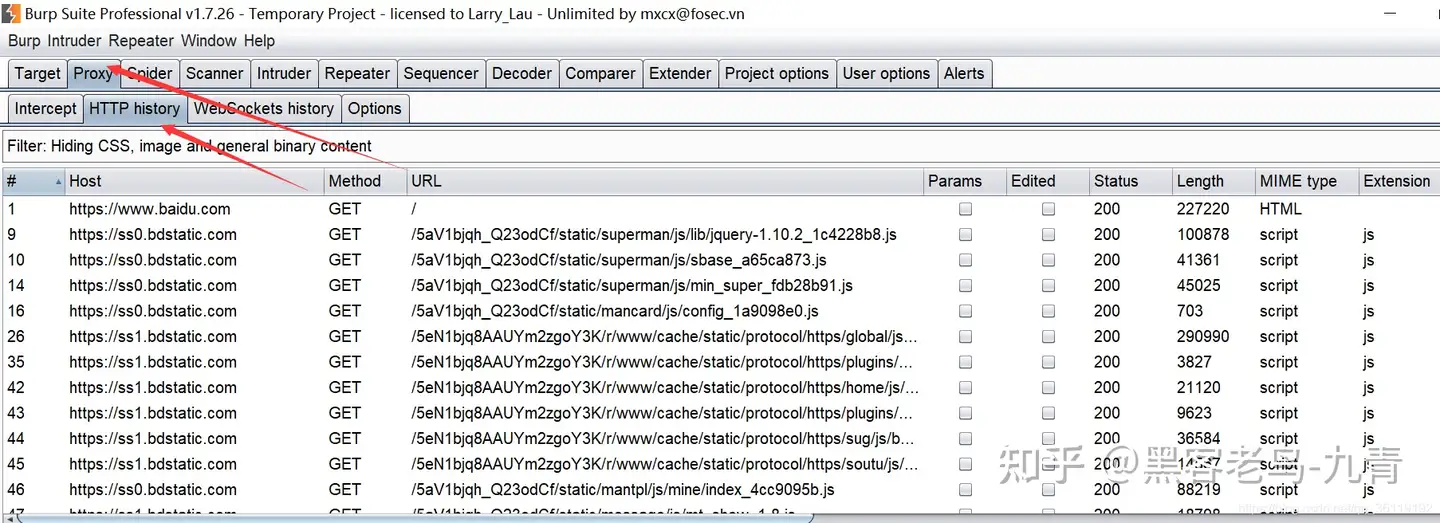
如果这里我们选择Intercept is off的话,那么所有的包都会经过BurpSuite,可以在HTTP history看所有经过的包,但是BurpSuite不会对经过的包进行拦截
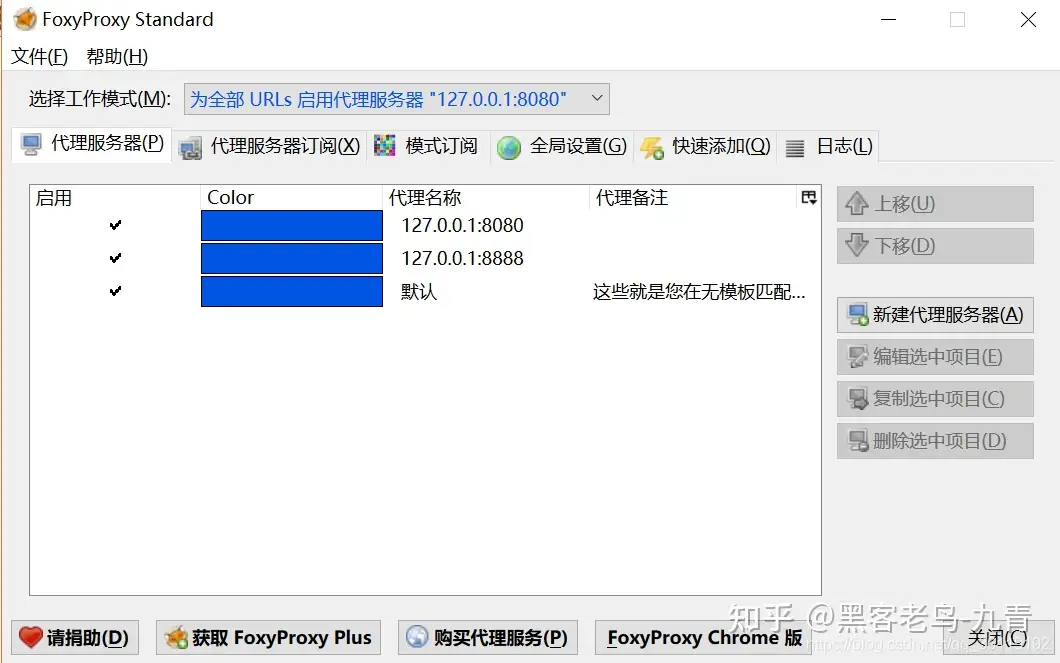
关于浏览器端怎么设置代理我就不讲了,推荐一款Firefox浏览器中最好用的代理插件FoxyProxy Standard
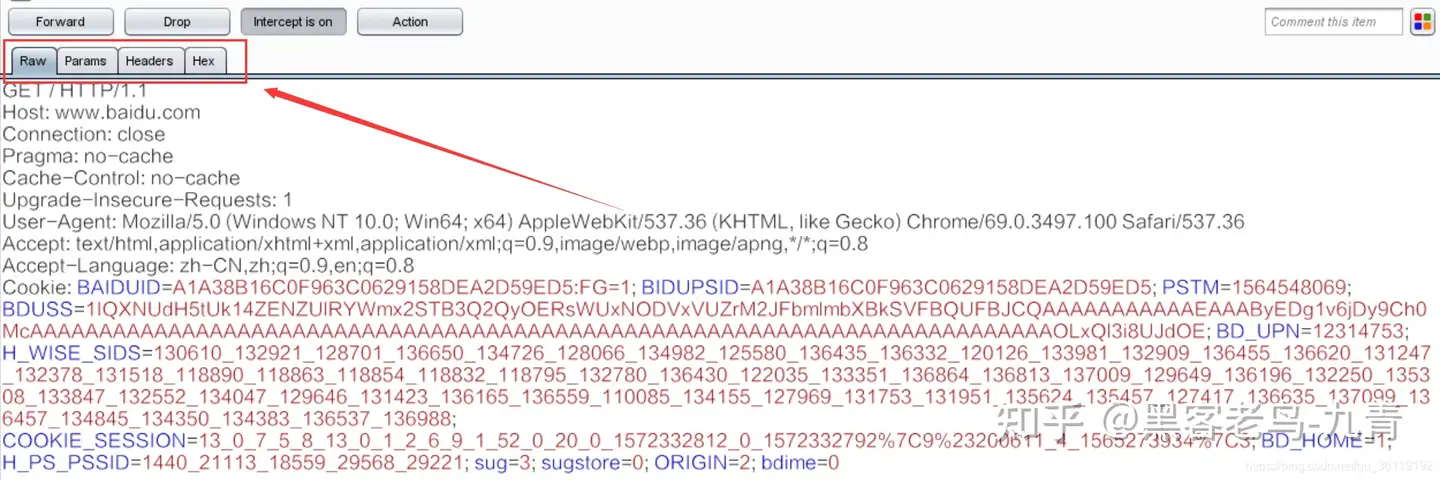
当我们拦截数据包后,如图,这里有4个选项
Raw:抓取的请求数据包
Params:请求数据包的参数信息,包括GET/POST请求的参数,cookies参数
Headers:请求数据包的头部信息
Hex:Raw中信息的二进制内容
Repeater模块(改包,重放)
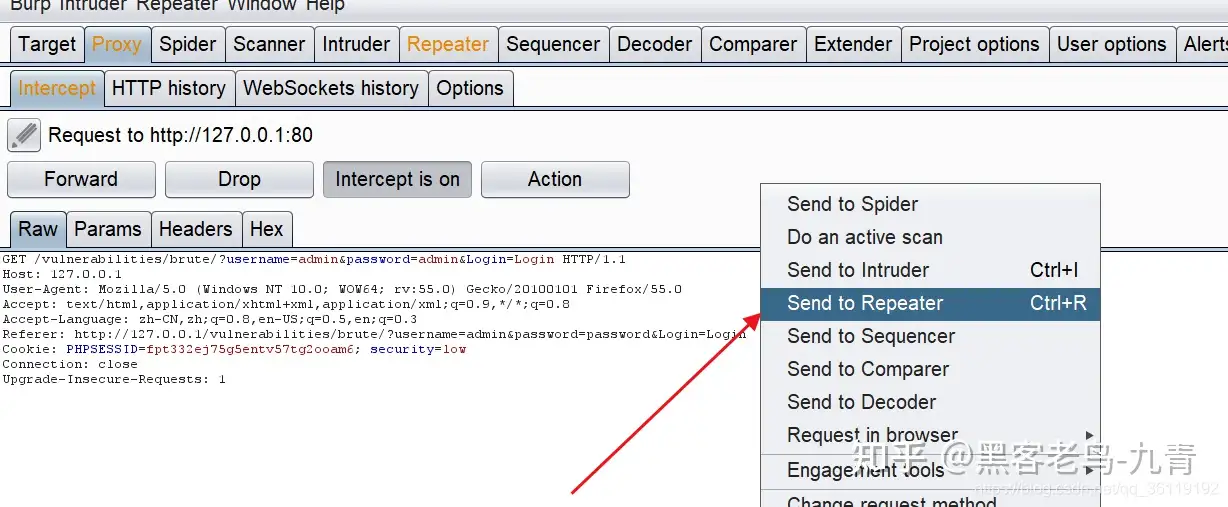
我们抓一个包来看看,抓取包之后,右键Send to Repeater发送重放模块
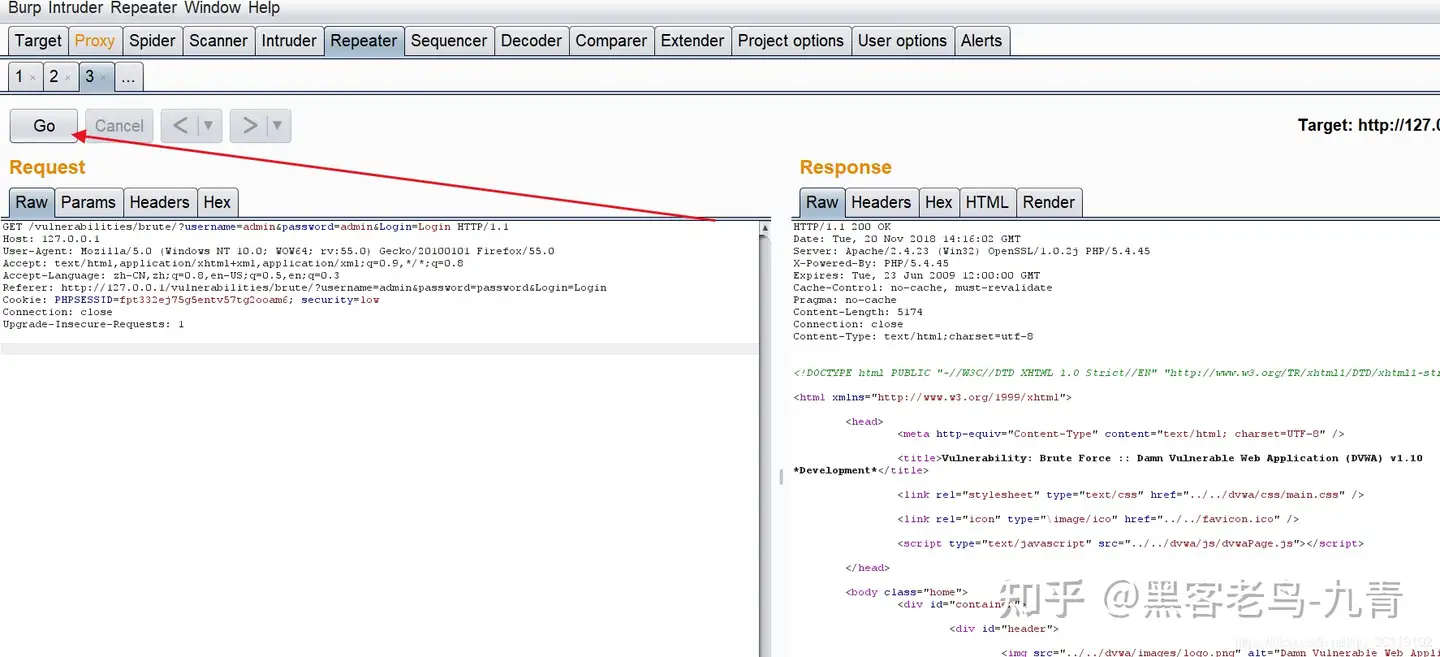
在Repeater模块,我们可以随意修改数据包。修改完后,点击go,就可以发包了。右边就会显示服务器回的包
Intruder模块(爆破)
Burp Intruder爆破主要由四个模块组成
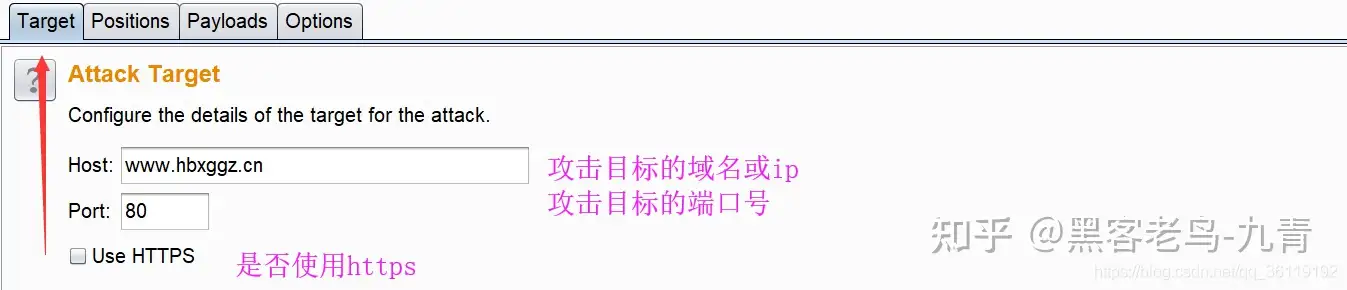
- 1: Target用于配置目标服务器进行攻击的详细信息
- 2: Positions设置 Payloads的插入点以及攻击类型(攻击模式)
- 3: Payloads设置 payload,配置字典
- 4: Options此选项卡包含了 request headers, request engine, attack results, grep match
grep extrac, grep payloads和 redirections。你可以发动攻击之前,在主要 Intruder的U上编辑这些
选项,大部分设置也可以在攻击时对已在运行的窗口进行修改
Target模块
Target模块设置攻击的信息
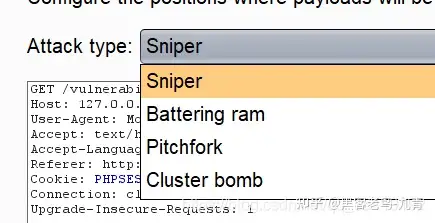
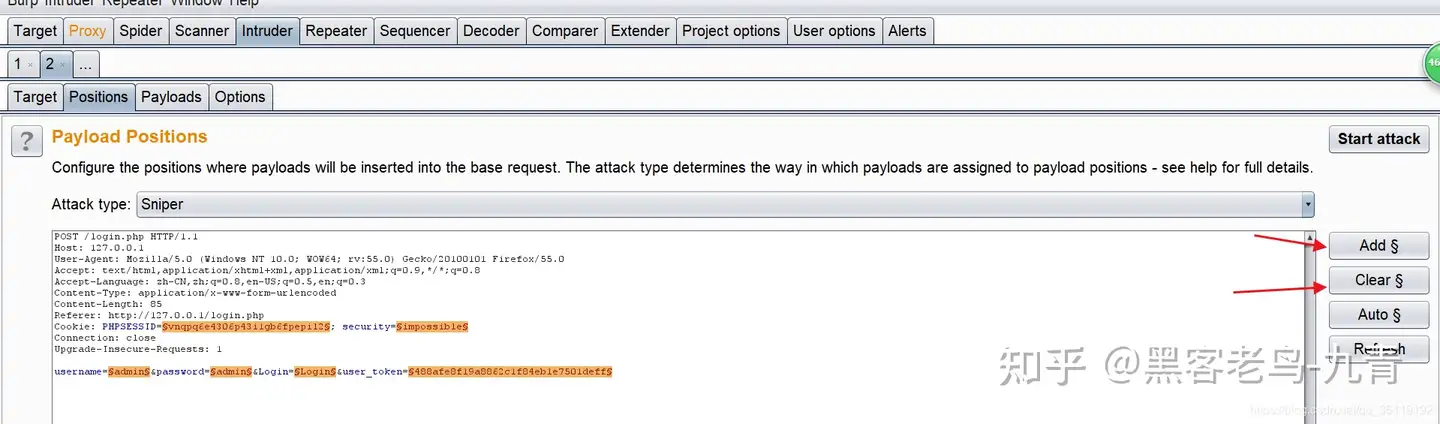
position模块
position模块配置攻击类型和攻击点
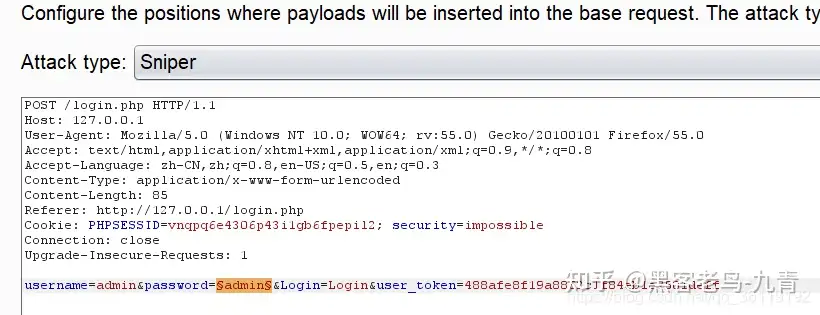
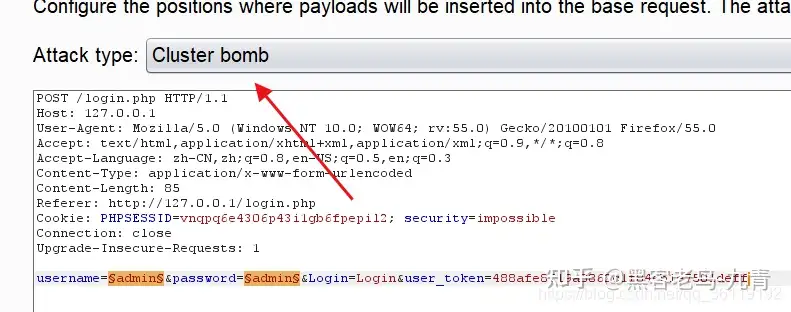
Attack-type攻击类型,这里有四种可以选择
- Sniper:对变量依次进行破解,如果有多个攻击点,则多个攻击点依次进行。只能用一份密码字
- Battering ram:对变量同时进行破解,如果有多个攻击点,多个标记点同时进行。只能用一份密码字典
- Pitchfork:每一个变量标记对应一个字典,取每个字典的对应项。最少设置2处攻击点,最多设置20处攻击点。每个攻击点设置一个密码字典
- Cluster bomb:每个变量对应一个字典,并且进行交集破解,尝试各种组合。最少设置2处攻击点,最多设置20处攻击点。适用于用户名+密码的组合
假如现在有两份密码字典,每份密码字典里都有5个爆破字符的话。设置两处爆破点, Sniper会尝试10次, Battering ram会尝试5次, Pitchfork会尝试5次, Cluster bomb会尝试25次
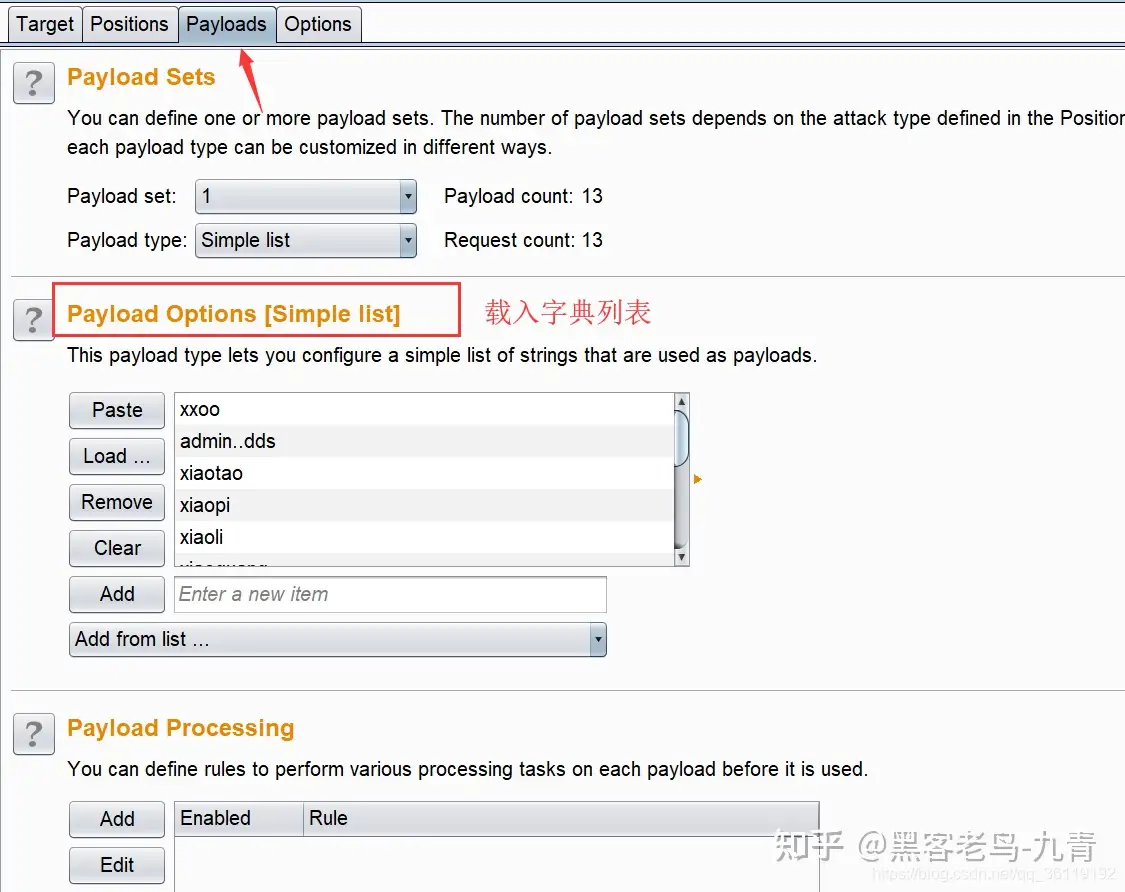
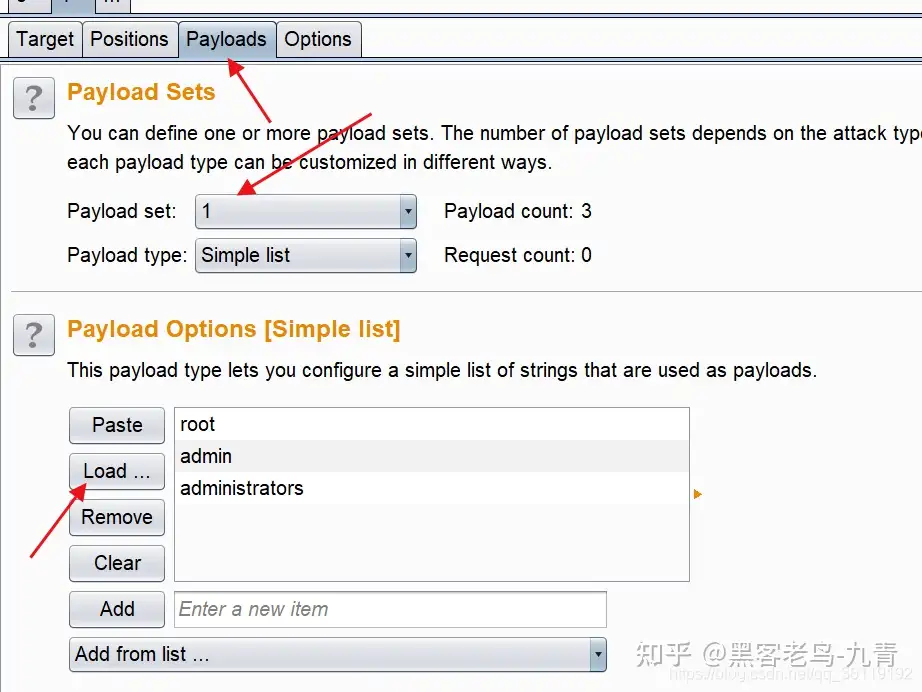
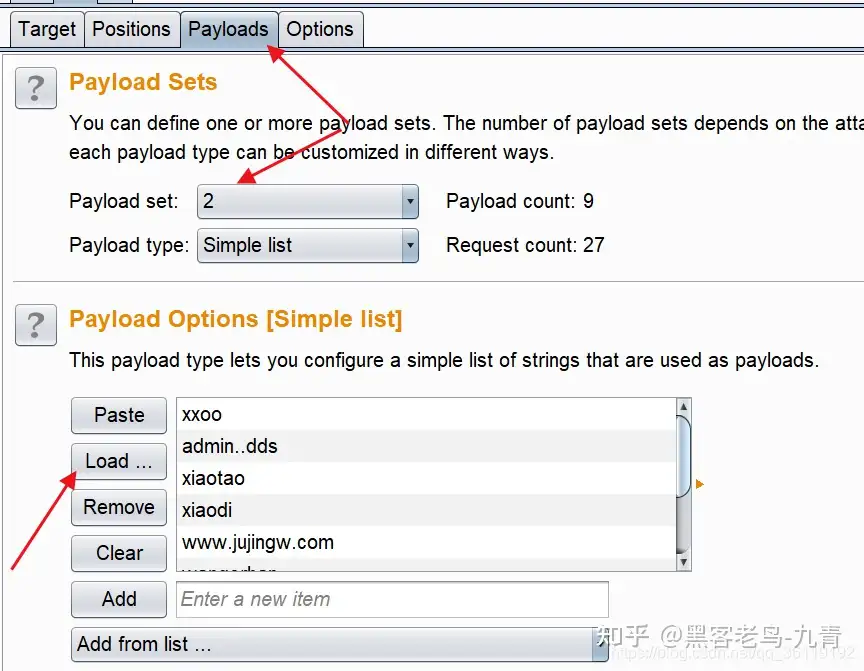
Payloads模块
这个模式是用来配置攻击载荷Payloads
Payloads Sets:这里我们设置我们Payloads的数量类型。你可以定义一个或多个有效载荷;有效载荷的数量取决于攻击类型定义;对于未知标签中定义的攻击类型;可以为每个有效载荷提供有效载荷类型;并且每种有效载荷类型可以以不同方式定制
- Simple lis:简单字典
- Runtime file:运行文件
- Custom iterator:自定义迭代器(可以在字典前后加任意字符)
- Character substitution字符替换
- Case modification
- Recursive grep
- illegal unicode:非法字符
- Character blocks:字符块
- Numbers:数字组合
- Dates:日期组合
- Brute force:暴力破解
- Null payloads:空payload
- Username generator:用户名生成
- copy other payload:复制其他payload
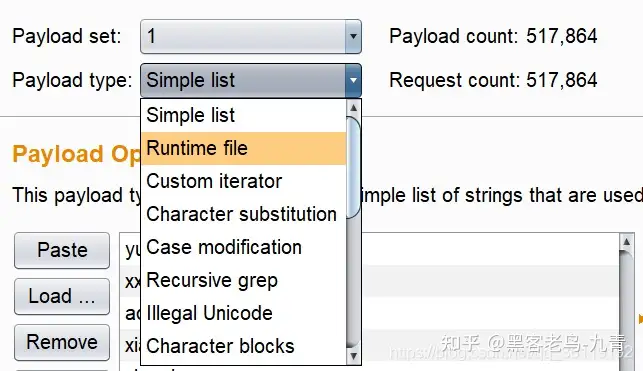
Payload Options[Simple list]:该选项会根据Payload Sets的设置而改变

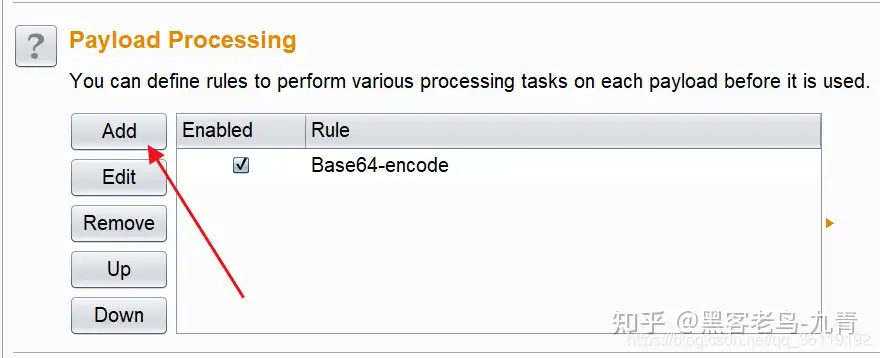
Payload Processing:对Payload进行编码、加密、截取等操作
如下:是我们对payload进行base64编码
Payload Encoding:burpsuite还会默认自动对我们payload中的一些字符进行URL编码,我们可以勾选也可以取消

Options模块
该模块是用来对请求头和请求过程以及请求结果的一些设置
然后我们点击 Options 选项卡,该选项卡包含了request headers,request engine,attack results ,grep match,grep_extrack,grep payloads和redirections。你可以在发动攻击之前,在主要Intruder的UI上编辑这些选项,大部分设置也可以在攻击时对已在运行的窗口进行修改。
Request Headers: 这些设置控制是否在Intruder是否更新配置请求头
如果选中Update Content-Length header,BurpSuite 会使用每个请求的 HTTP 主体长度的正确值,添加或更新这个请求里 HTTP 消息头的内容长度。这个功能对一些需要把可变长度的有效载荷插入到 HTTP 请求模板主体的攻击是很有必要的。这个 HTTP 规范和大多数 web 服务器一样,需要使用消息头内容长度来指定 HTTP 主体长度的正确值。如果没有指定正确值,目标服务器会返回一个错误,也可能返回一个未完成的请求,也可能无限期地等待接收请求里的进一步数据。
如果选中Set Connection: close框,则 BurpSuite 会添加或更新 HTTP 消息头的连接来请求在每个请求后已关闭的连接。在多数情况下,这个选项会让攻击执行得更快。

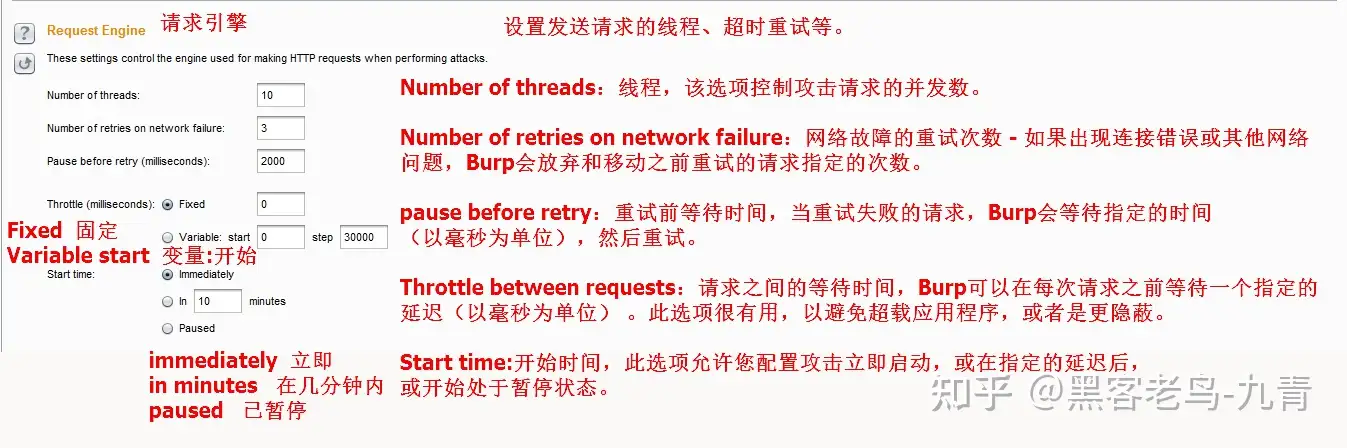
Request Engine:设置发送请求的线程、超时重试等
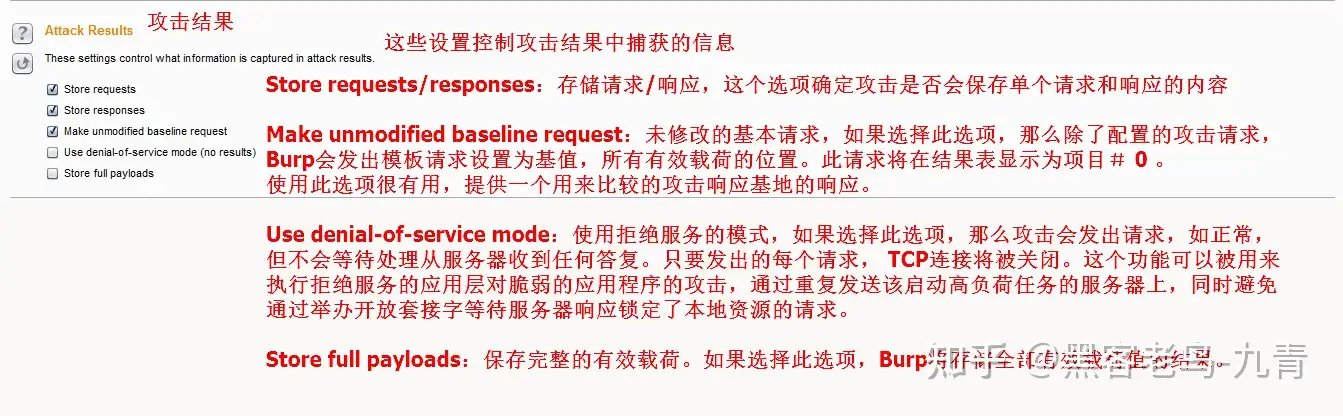
Attack Results: 设置攻击结果的显示
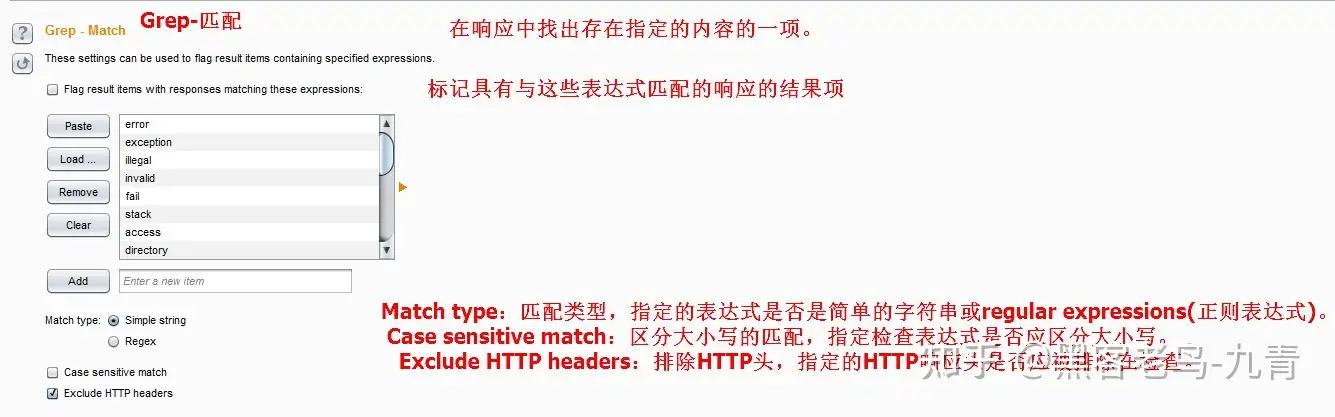
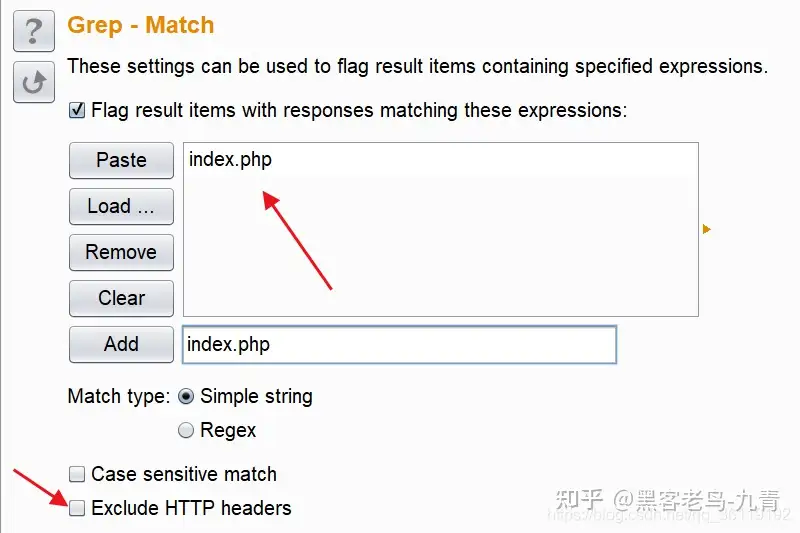
Grep - Match: 在响应中找出存在指定的内容的一项
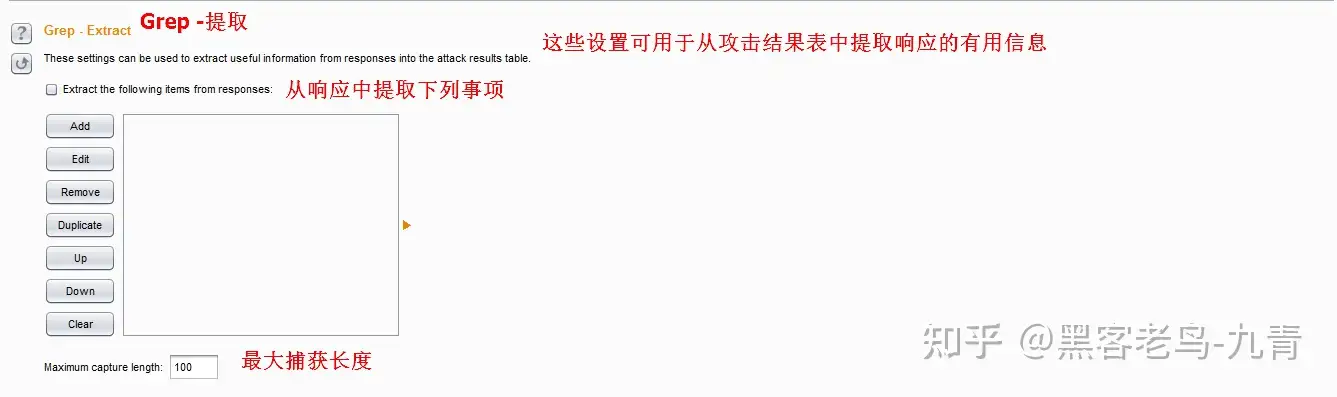
Grep - Extract: 通过正则提取返回信息中的内容
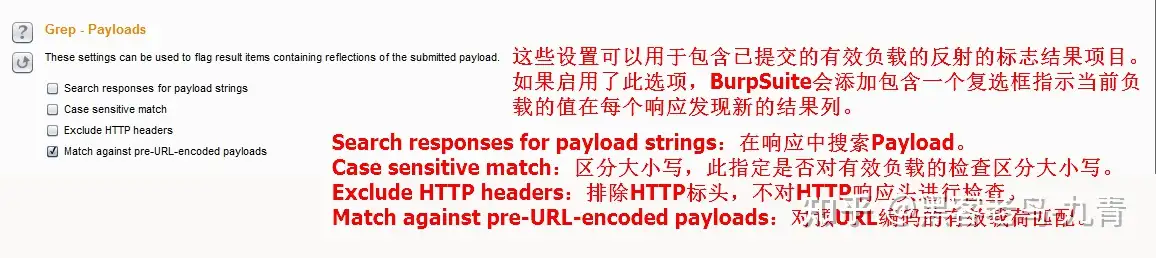
Grep - Payloads: 这些设置可以用于包含已提交的有效负载的反射的标志结果项目。如果启用了此选项,BurpSuite会添加包含一个复选框指示当前负载的值在每个响应发现新的结果列
Redirections: 重定向响应,控制Burp在进行攻击时如何处理重定向

一处爆破点
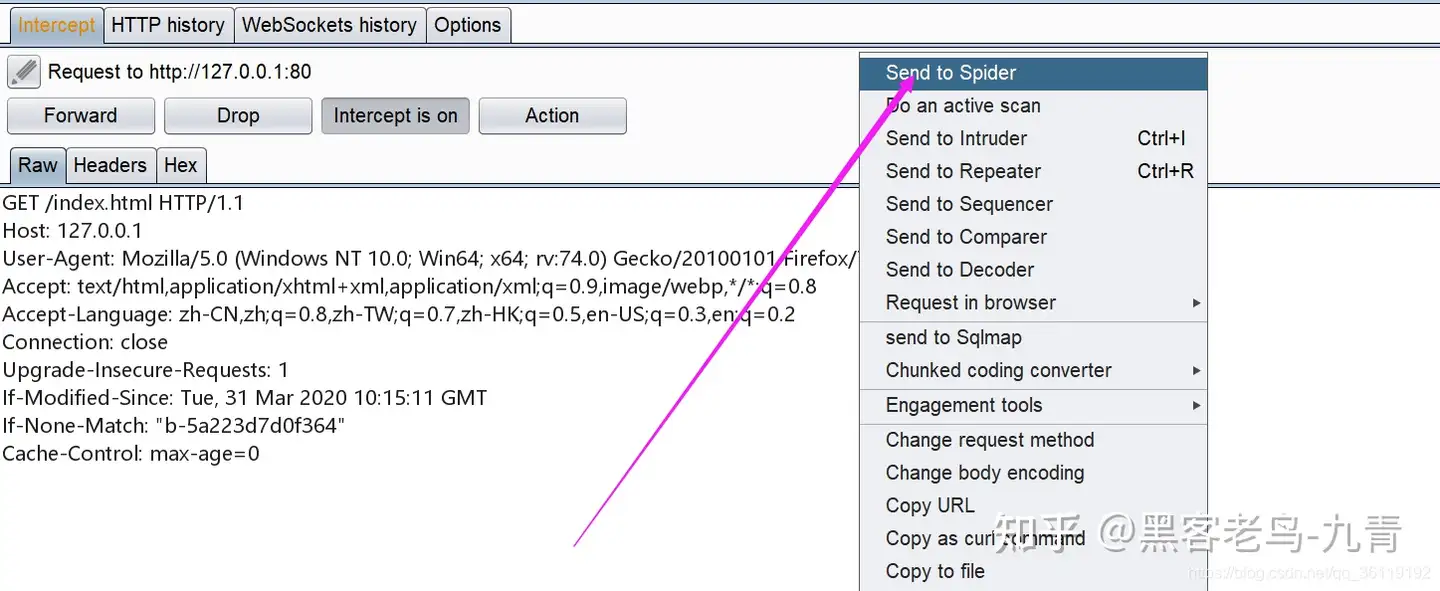
第一步,我们将抓取到的数据包发送到Intruder模块。右键->Send to Intruder

在 Intruder 模块下的 Positions,burpsuite会自动把可能是爆破的地方进行标记。我们可以点击右边的clear清除,然后选择我们自己要爆破的地方,点击 add
这里,我们的Attack-type选择默认的Sniper,我们这里只爆破 passwd 密码字段
然后我们点击 Payloads,去设置我们的字典密码
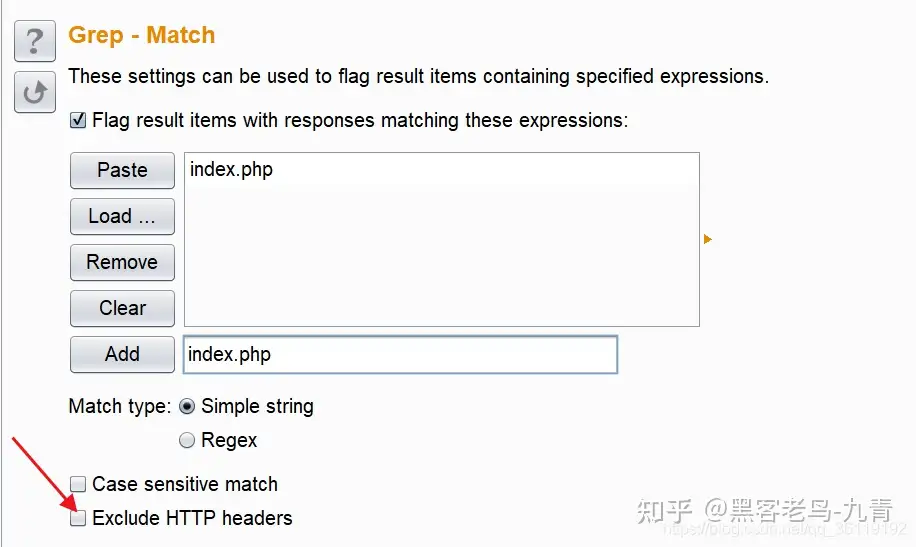
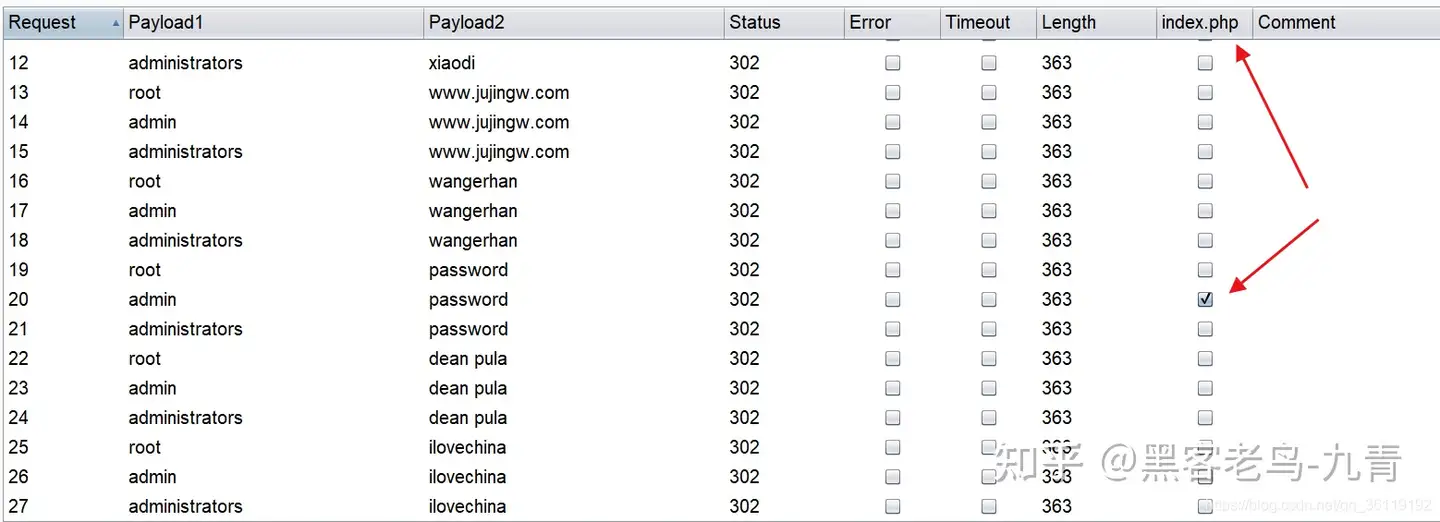
去Grep-match,这是对结果进行匹配的。也就是说对数据包返回的结果进行匹配,匹配规则我们自己设置。我们把Exclude HTTP headers 这里的勾选去掉,因为我们是根据返回头里面是否包含 index.php 来判断是否登录成功的!这就要我们分析登录成功和登录失败返回数据中哪里不同来判断是否登录成功
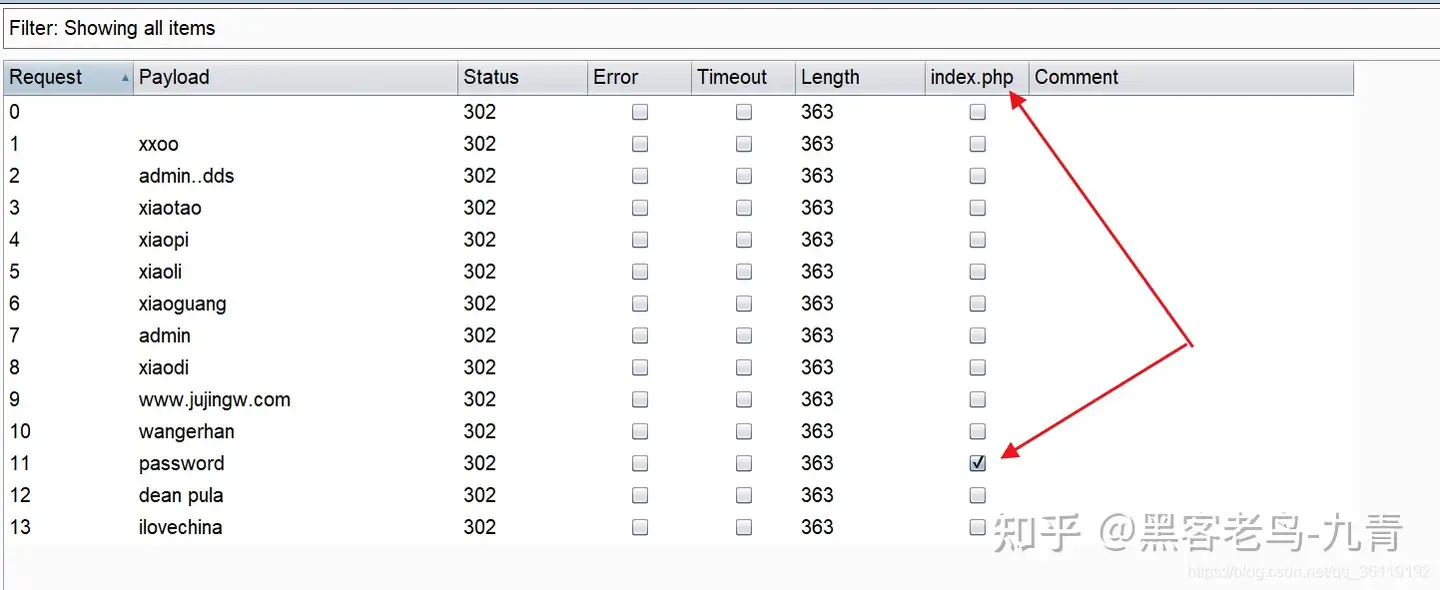
Start attack 开始攻击

这里对匹配到我们规则的项自动勾选上了,可得知,这就是我们正确的密码
多处爆破点
Attack-type攻击类型,这里我们选择 Cluster bomb ,这个模式下可以设置多处爆破点。这里我们设置username和password两处爆破点
然后去设置我们的payload了,因为爆破点有两处,所以,两处都得设置payload
对第一处爆破点设置payload
对第二处爆破点设置payload
设置对结果进行 Grep-match ,和上面一样
Attack攻击,查看结果
Spider模块(爬取网站目录)
该模块是根据网页中的链接进行爬取目录树结构,而不是利用爆破的方法进行爆破
开启我们的BurpSuite,拦截网站数据包,右键,Send to Spider
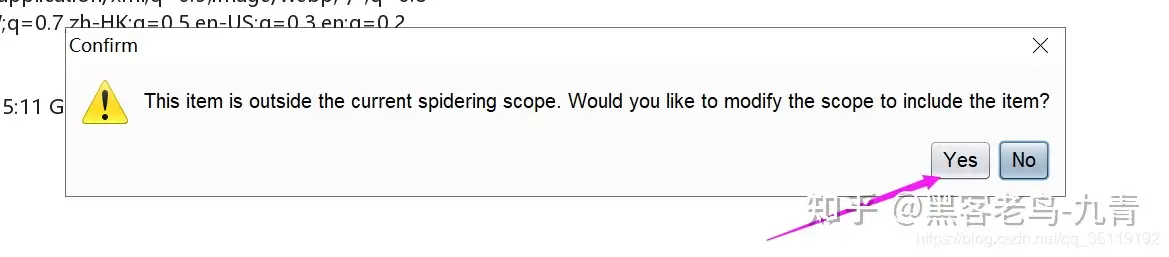
接下来会弹出一个警告弹窗提示:这个Item不在当前的作用域中,是否将这个网站添加到作用域中,我们点击 Yes
然后我们切换到 Spider 窗口,就会看到BurpSuite已经在爬目录了。
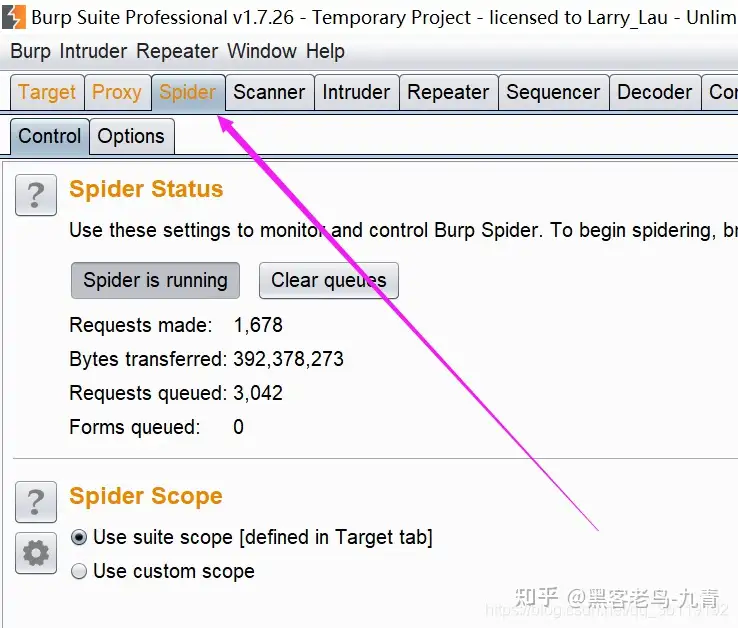
并且我们的scope中也有该网站了
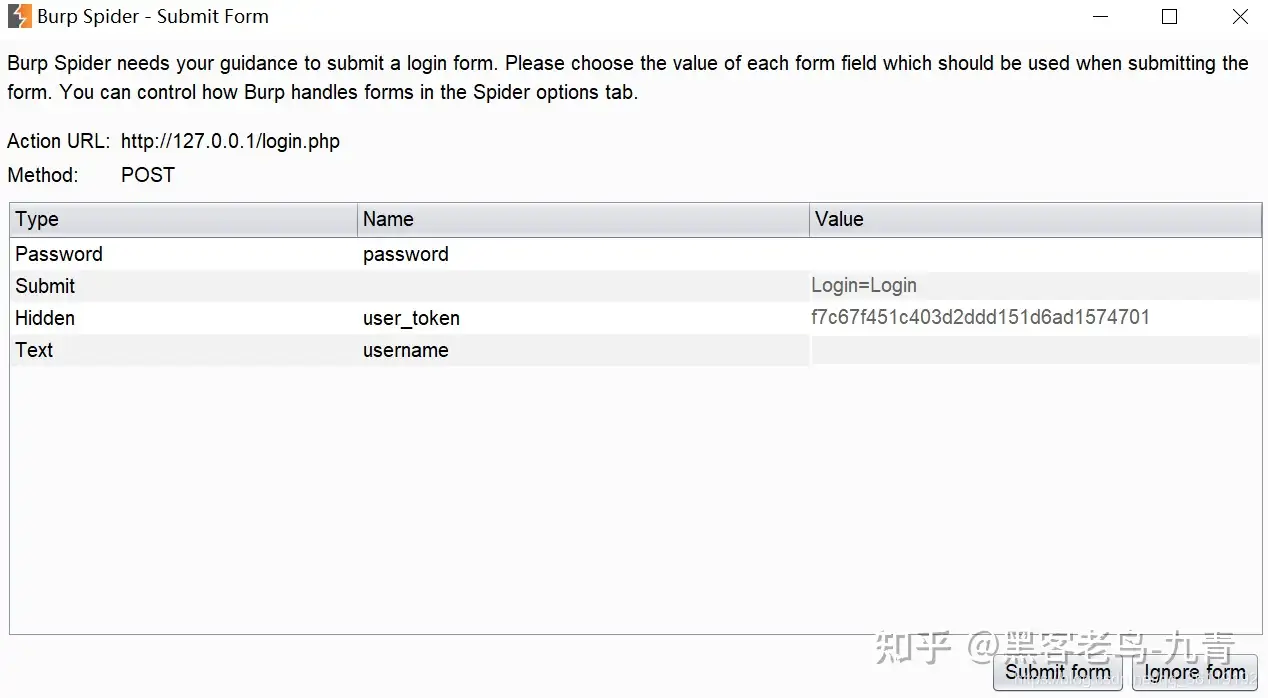
爬取到有些网页需要登录,会弹出页面叫你填表单。可以填好提交,也可以忽视它
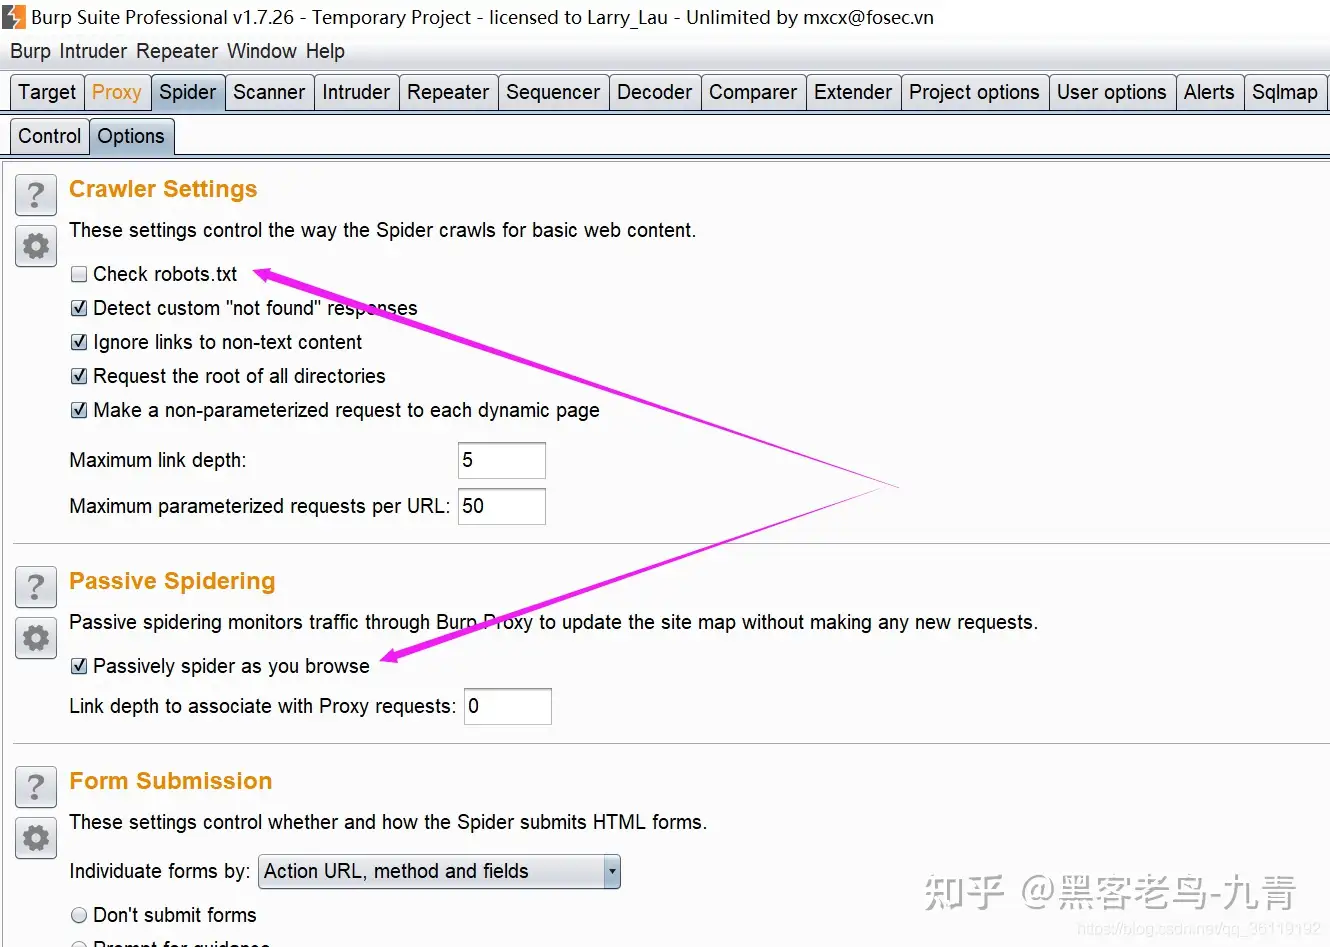
Spider 标签的 Options 标签是对爬虫的设置。我这里取消勾选了 Check robots.txt选项,这样BurpSuite就会爬取robots.txt不允许爬取的目录了。还有一个选项是”passively spider as you browse(被动蜘蛛浏览)”,Burp Spider可以以被动和主动模式运行。
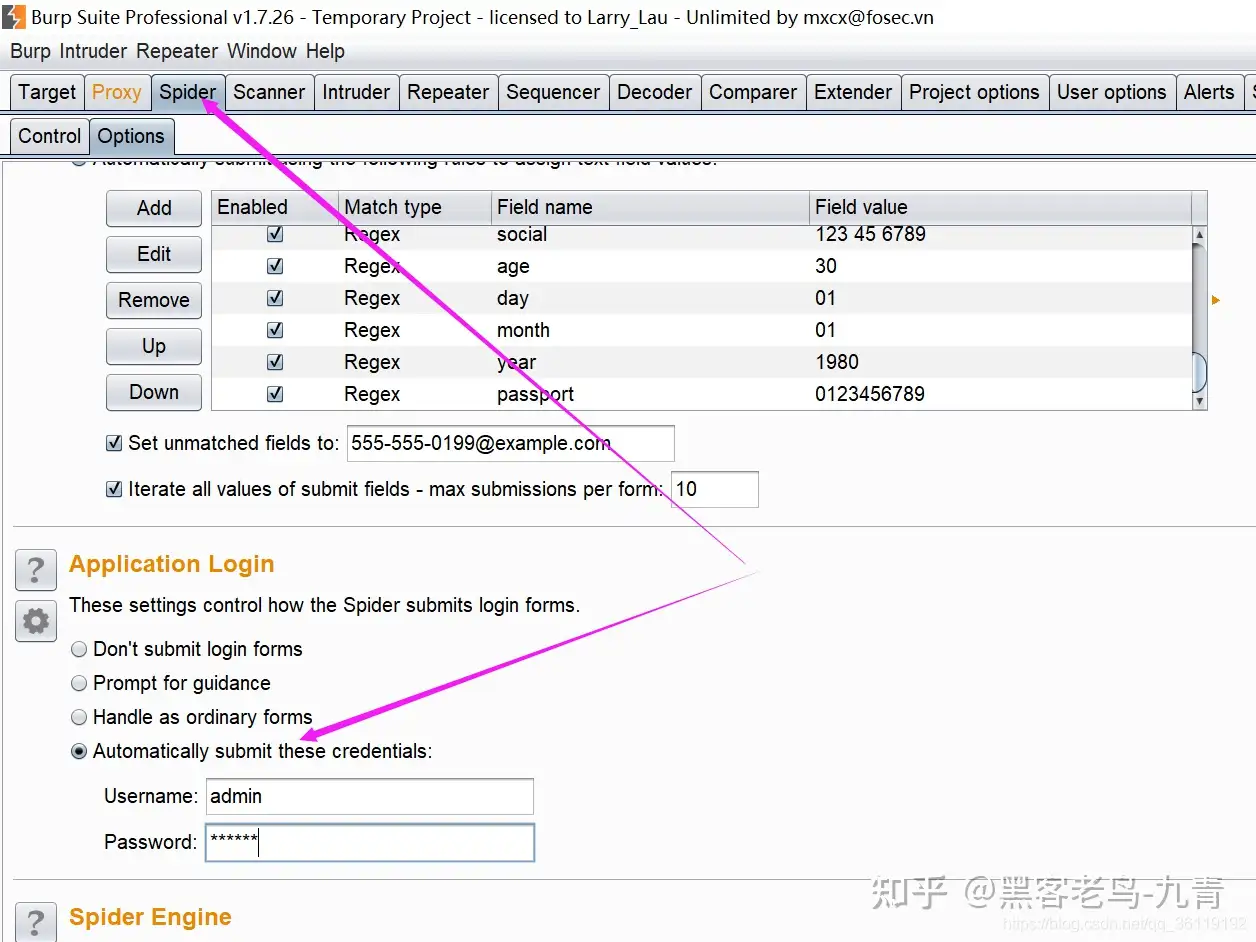
还有一个选项是Application Login,我们可以在这里设置默认的账号密码。如果bp爬取到需要登录的网页,就会填入我们输入的账号密码。
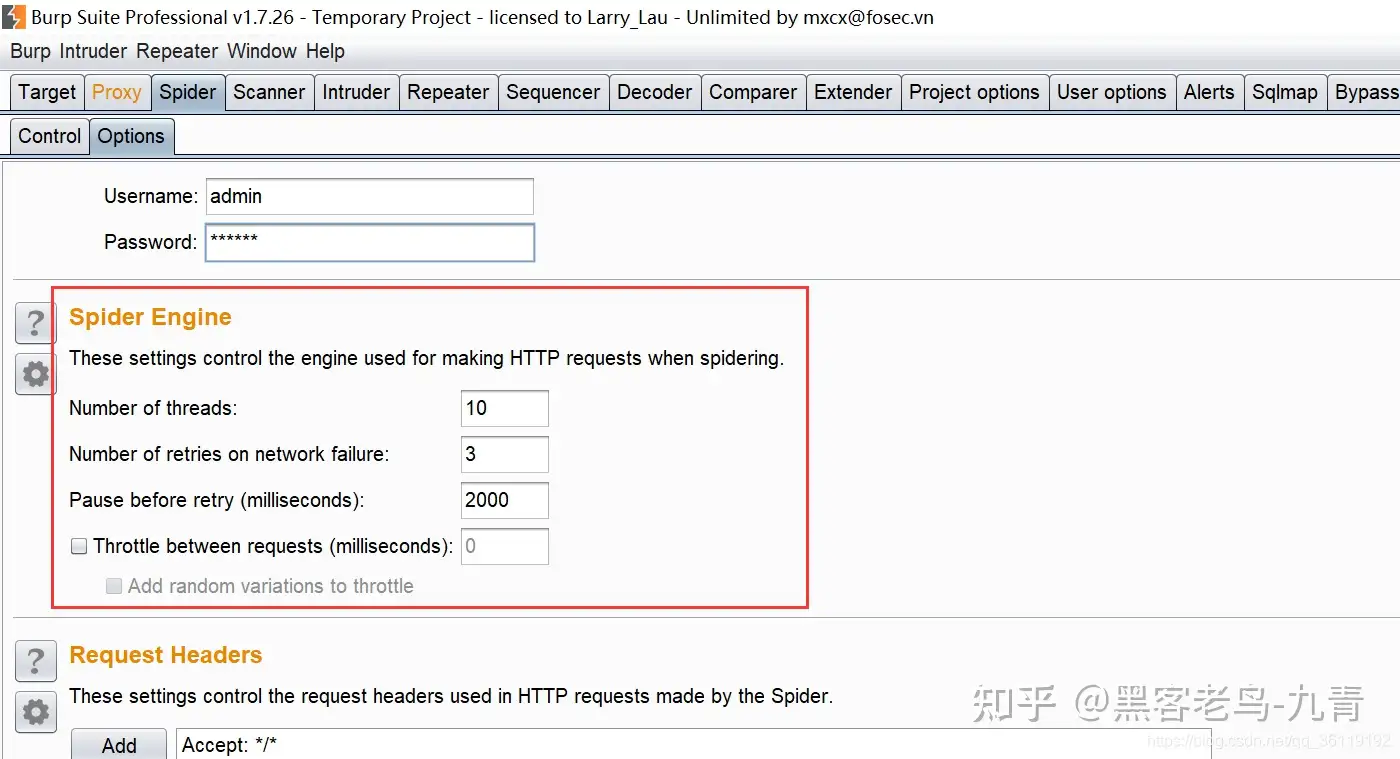
还有就是爬虫的线程数,我们可以在Spider Engine这里设置
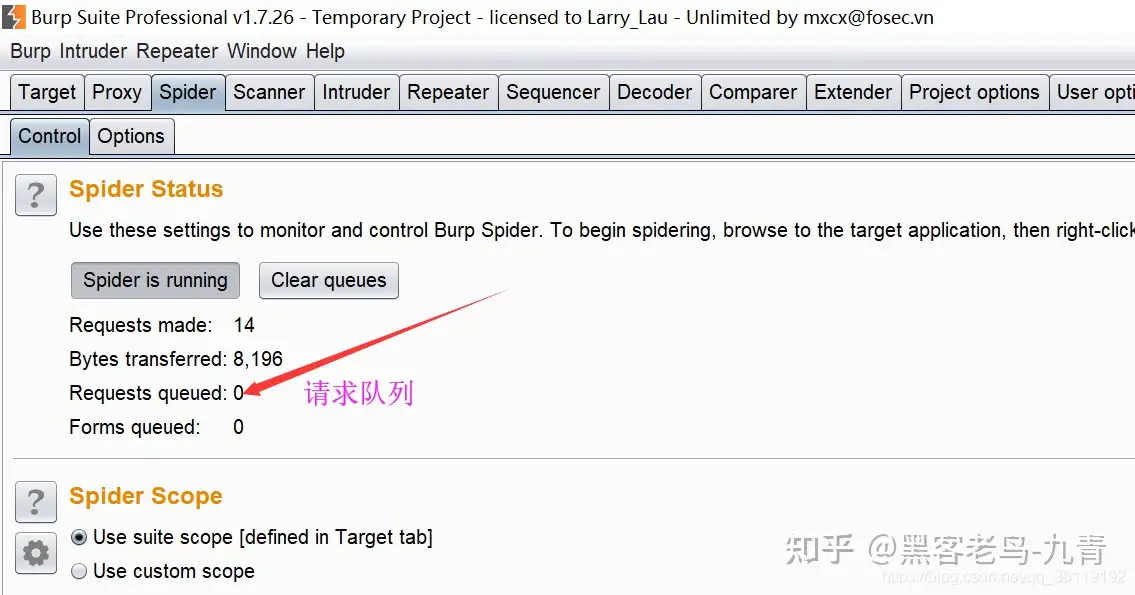
最后,如果Spider的Contro窗口,如果请求队列是0,并且爬取了一段时间,说明已经爬取完成
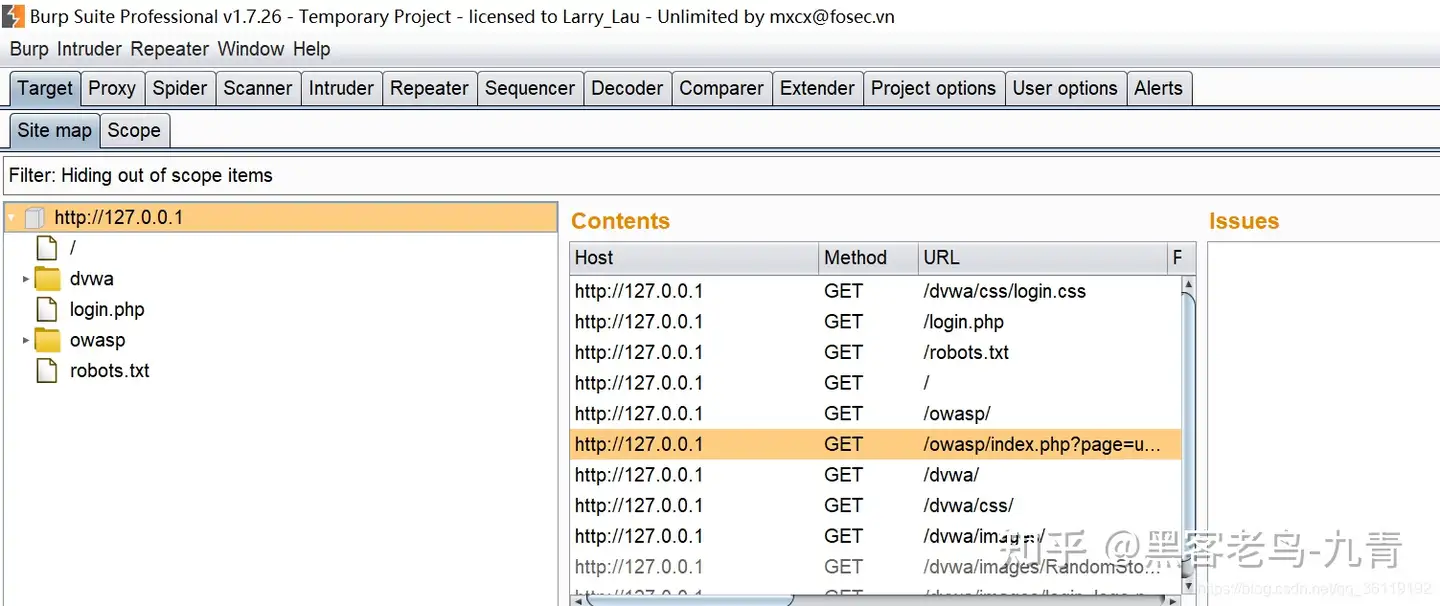
点击Target——>Site map,可以看到爬取网站的目录结构
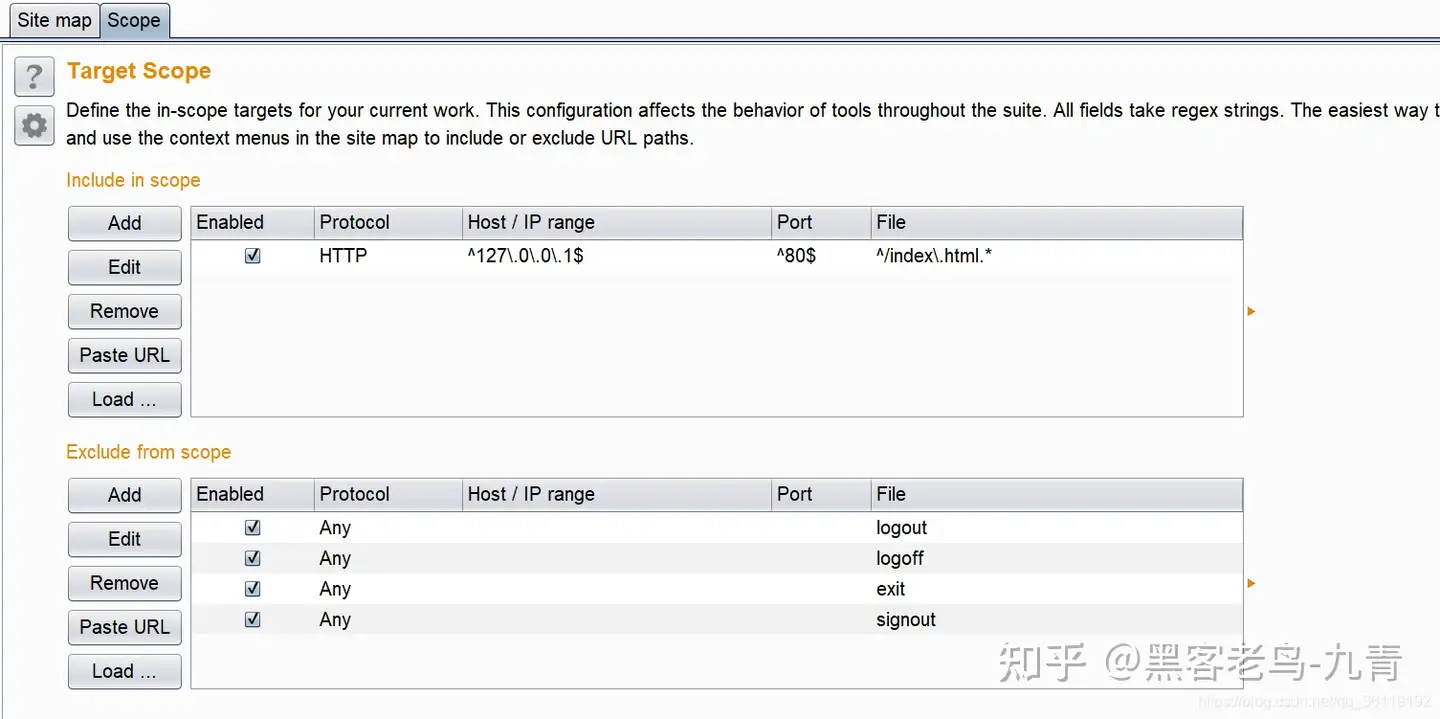
只拦截特定网站的数据包
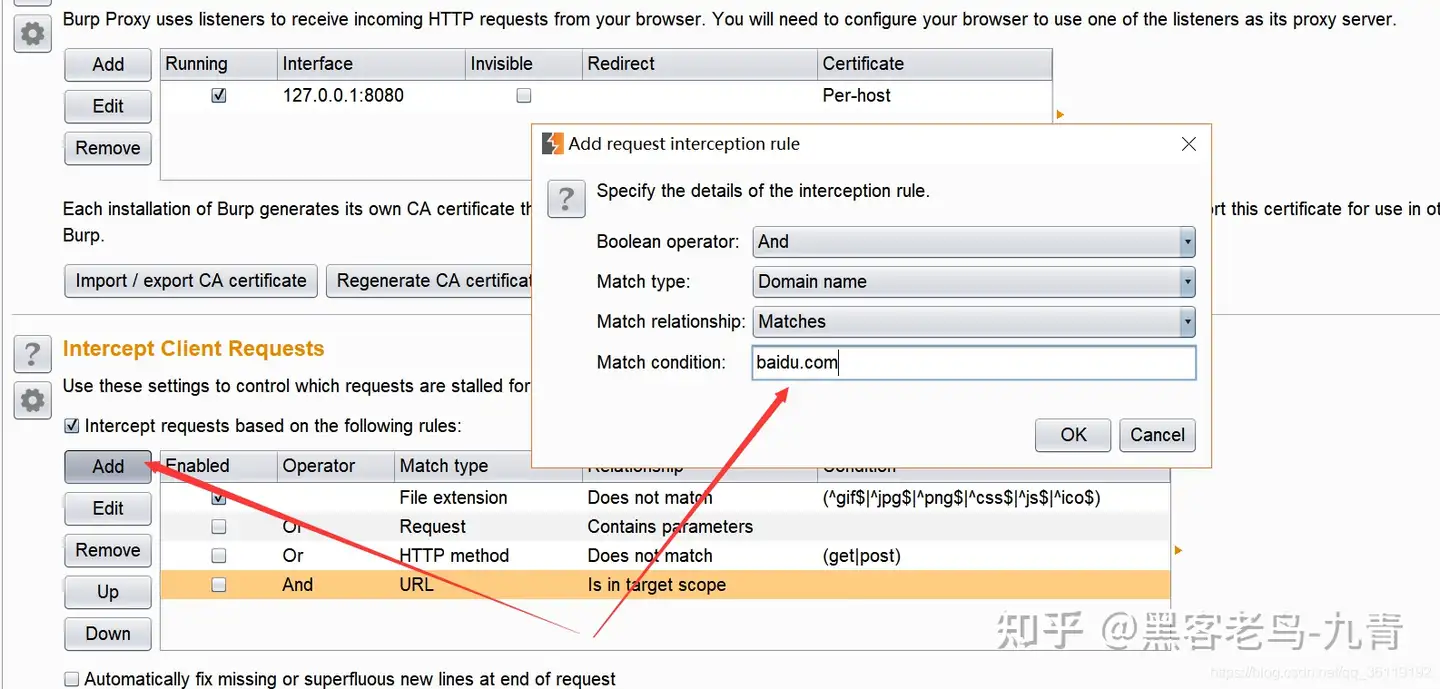
切换到proxy页面的options的 Intercept Client Requests
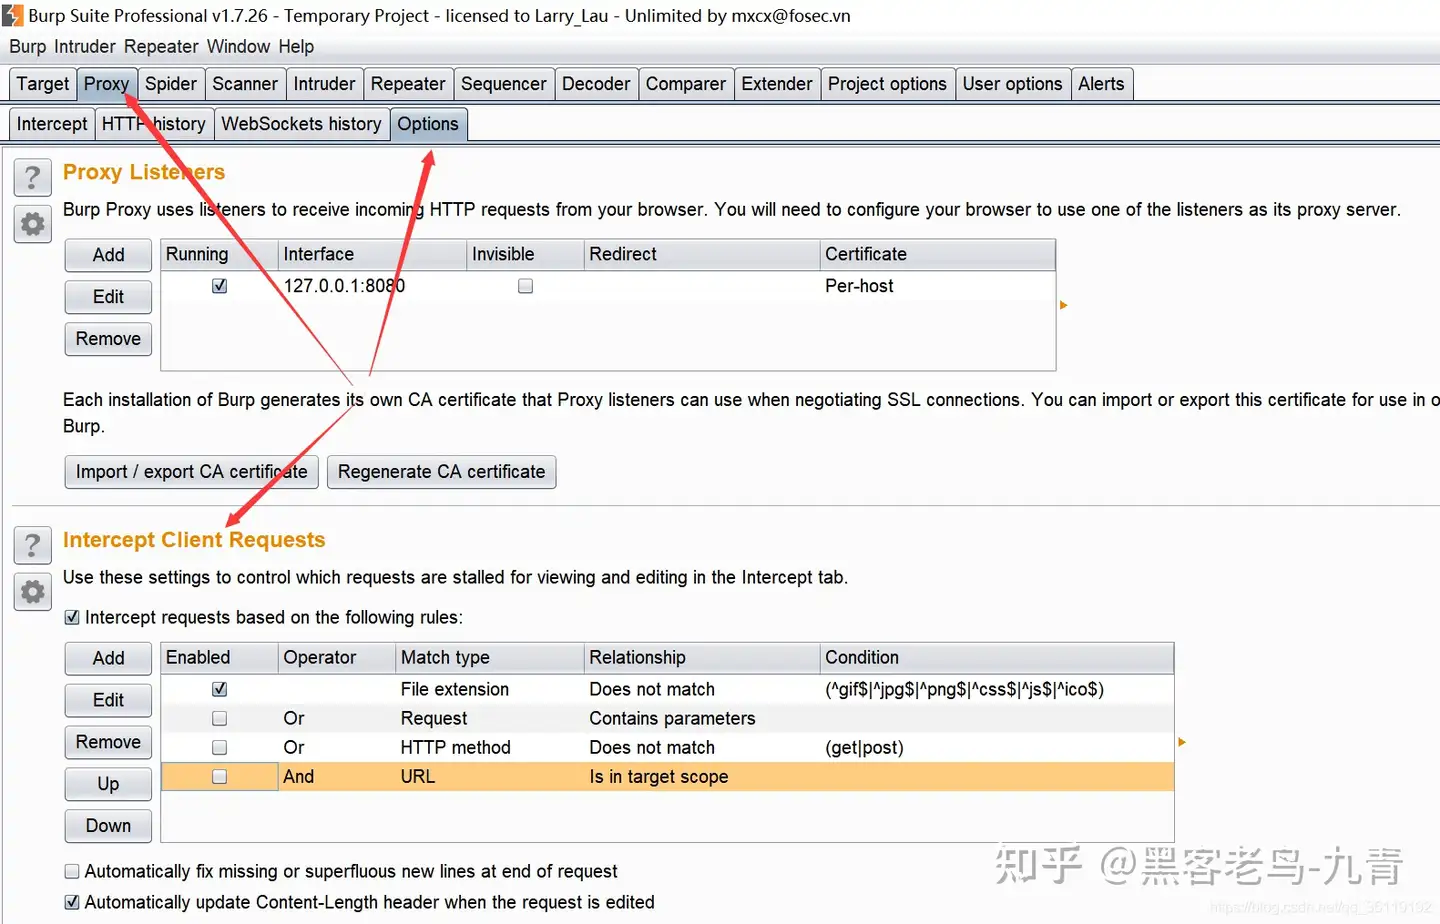
然后点击Add,比如我们只想拦截http://baidu.com域名下的所有子域名的数据包,我们可以如下。
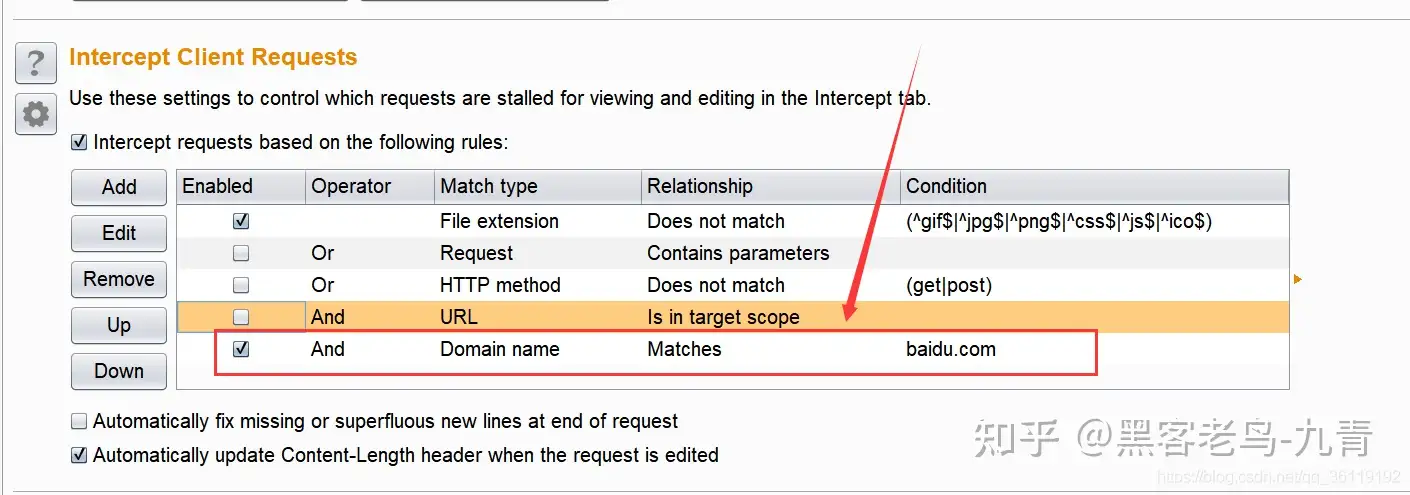
最后多了下面这一行,以后我们的burpsuite的拦截模式开启了,也只会拦截http://baidu.com域名下的数据包
Scanner扫描模块
Scanner模块主要用于自动检测Web系统的各种漏洞。Scanner扫描模块和其他扫描器不同的是,Scanner扫描是对BurpSuite当前历史记录中抓到的数据包进行扫描。也就是他不会进行自动化的对网站先爬虫然后扫描。所以进行Scanner扫描前,我们先将代理的Intercept模块设置为off,然后手动浏览网站的所有页面,在进行扫描。
主动扫描
当使用主动扫描时,BurpSuite会向应用发送新的请求并通过Pyaload验证漏洞,这种模型下的操作会产生大量的请求和应答数据。在生产情况下不建议使用主动扫描。
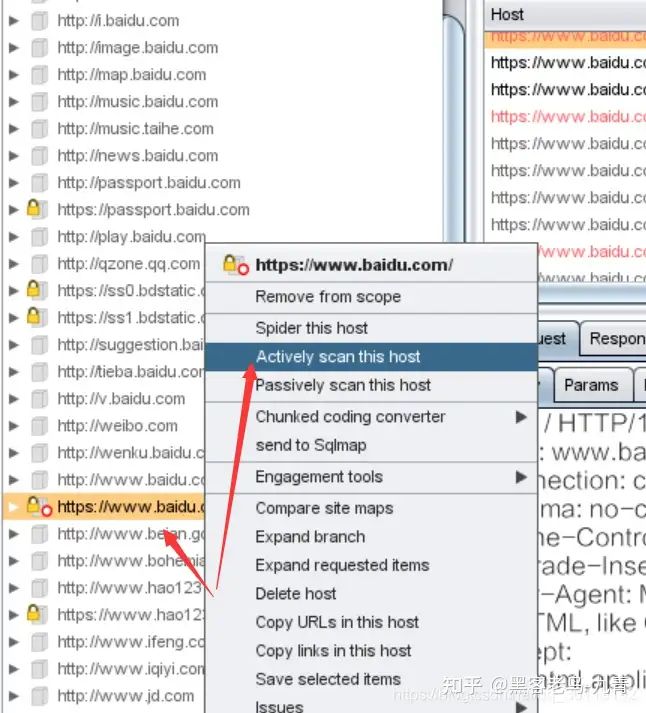
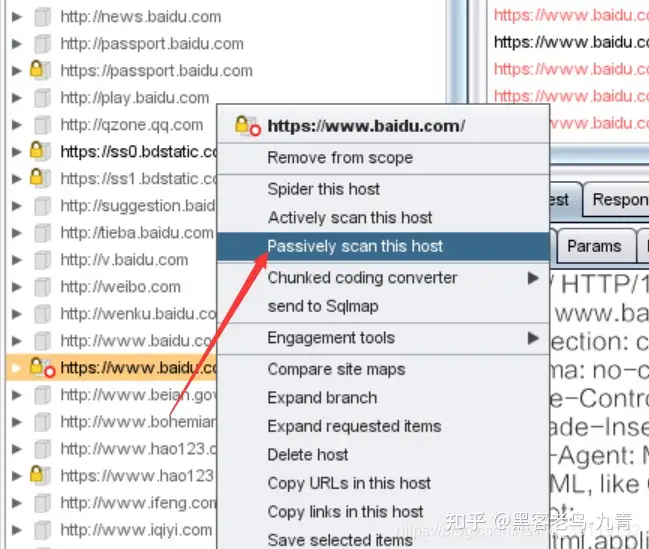
点击Target——>Site map,右键我们需要检测的网站——>Actively scan this host
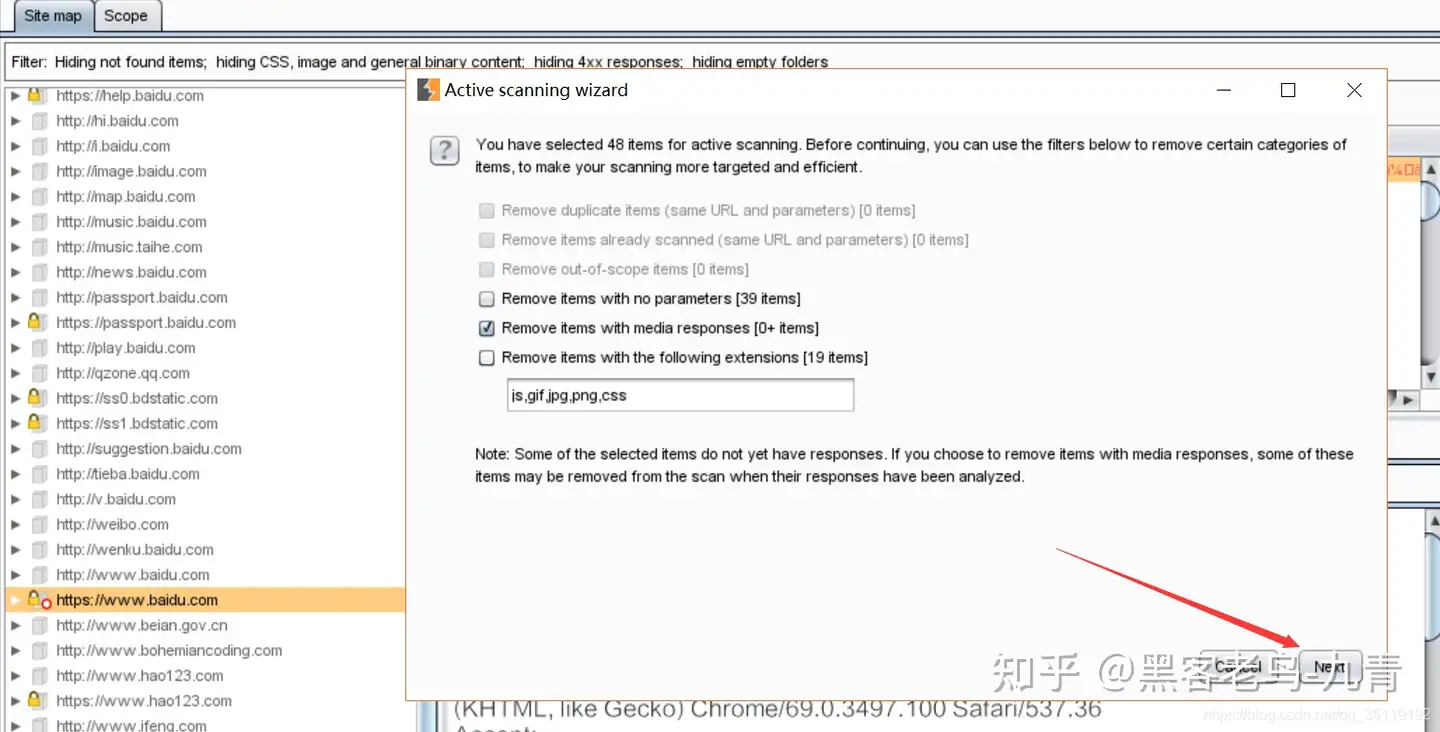
此时弹出过滤的设置,保持默认选项,Next——>Ok。即可扫描该网站。
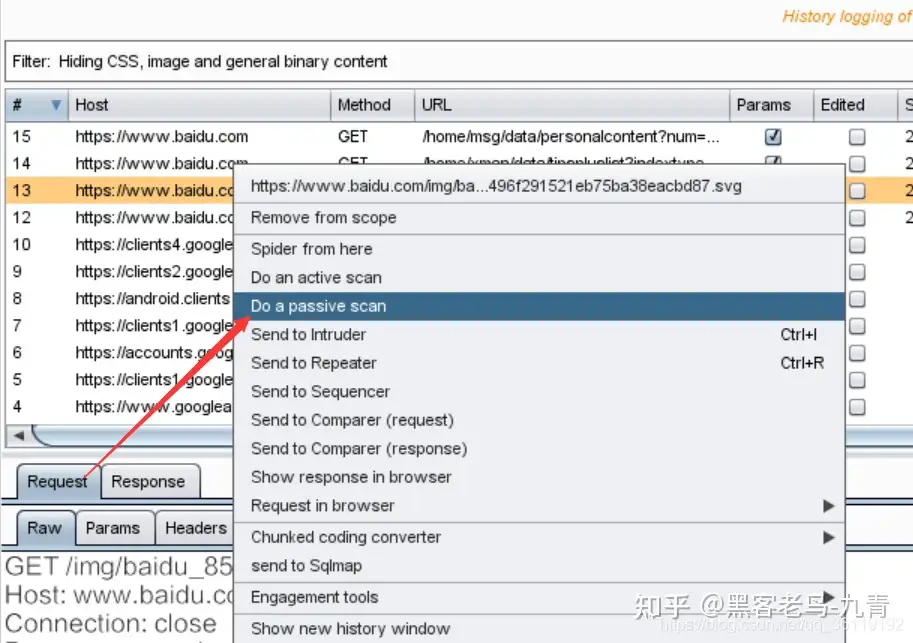
也可以在Proxy——>HTTP History,右键需要检测的网站——>Do an active scan。
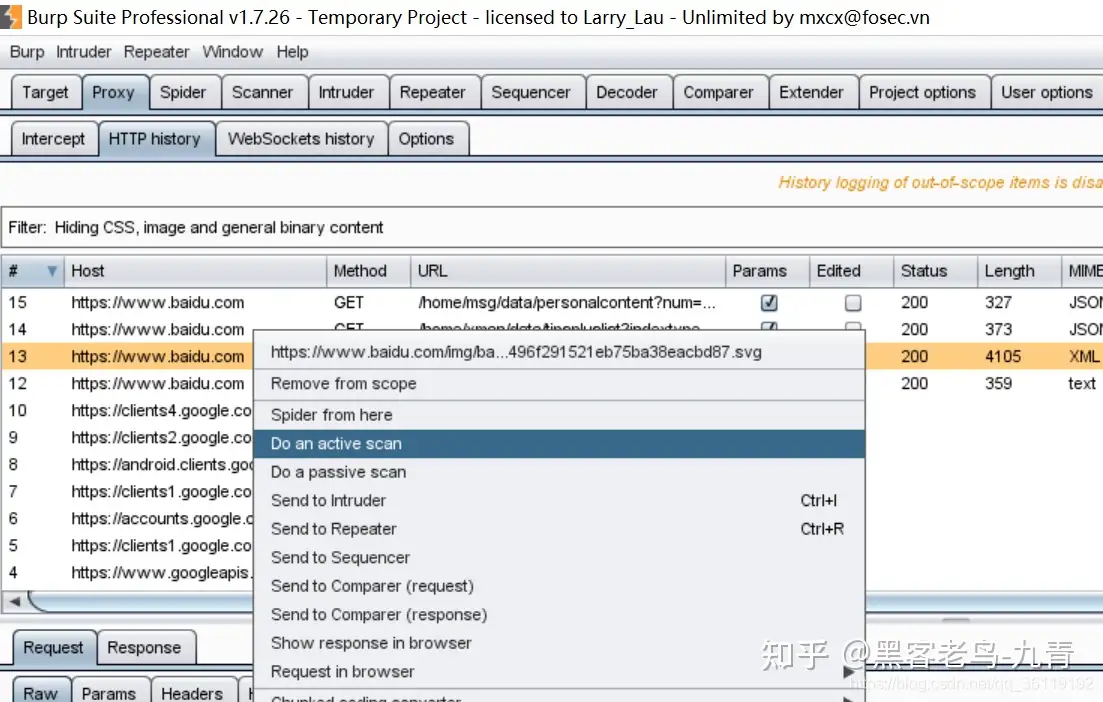
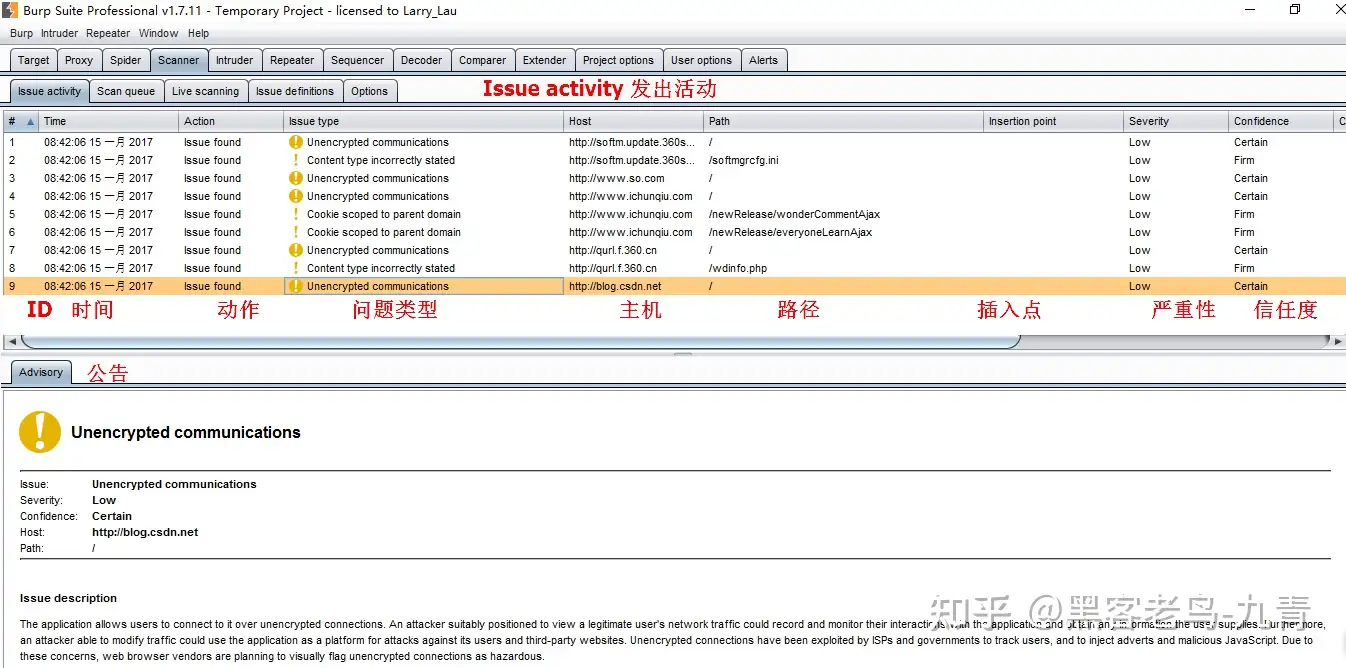
扫描结果可以在Scanner——>Issue activity下查看。
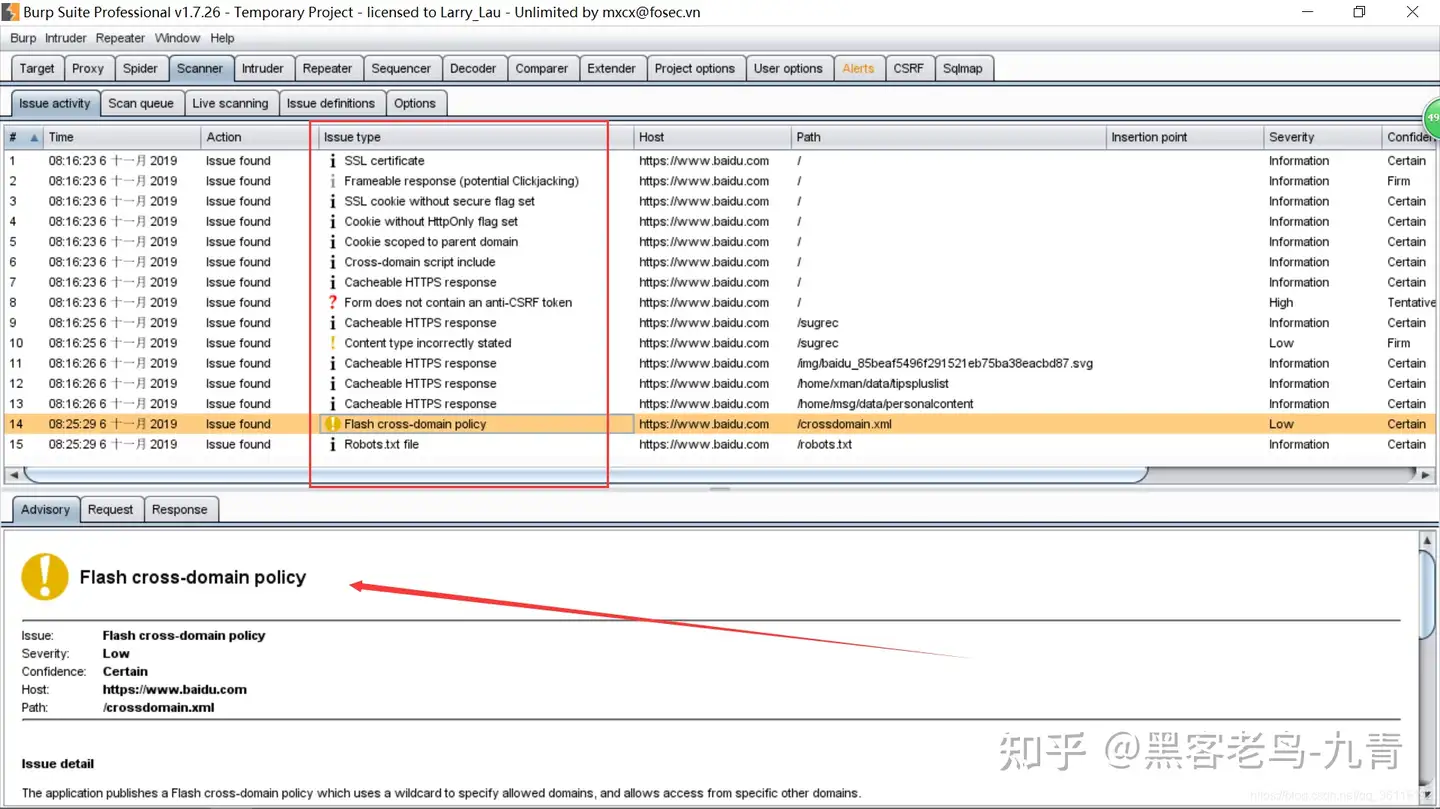
Issue activity标签
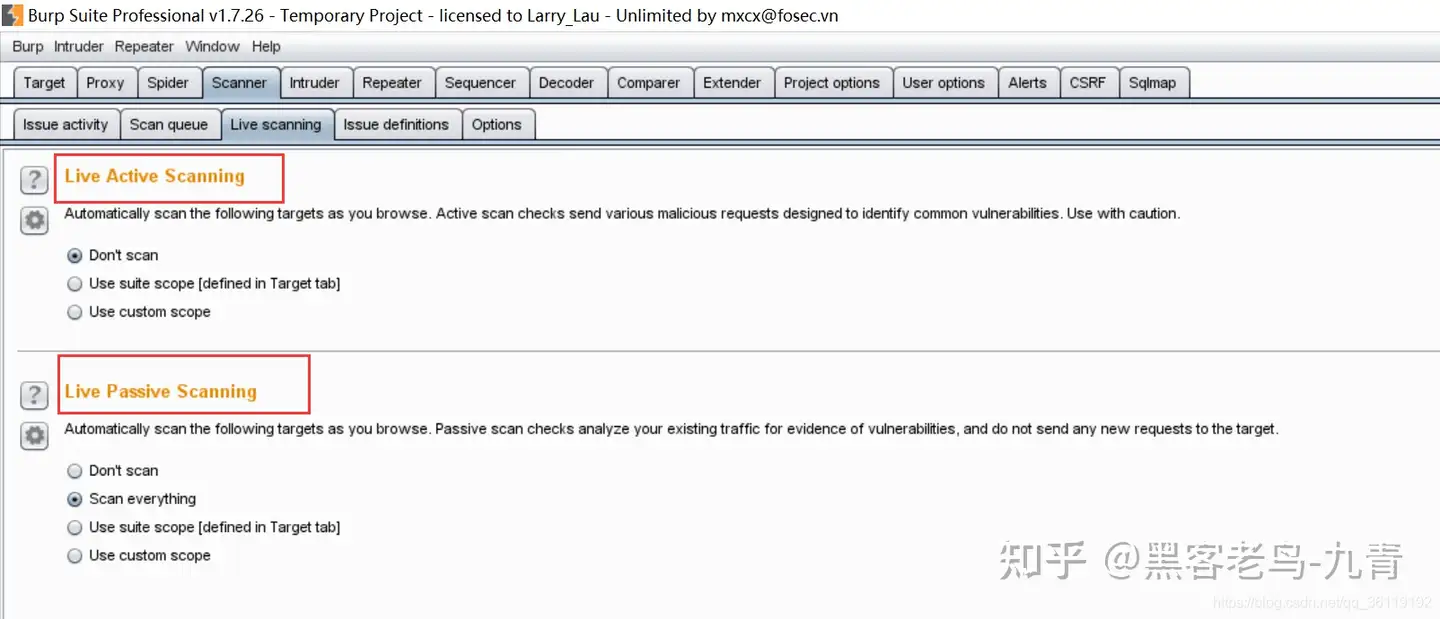
Live scanning
实时扫描可让您决定哪些内容通过使用浏览器的目标应用,通过BurpProxy服务器进行扫描。您可以实时主动扫描设定live active scanning(积极扫描)和live passive(被动扫描)两种扫描模式。
Live Active Scanning:积极扫描。当浏览时自动发送漏洞利用代码

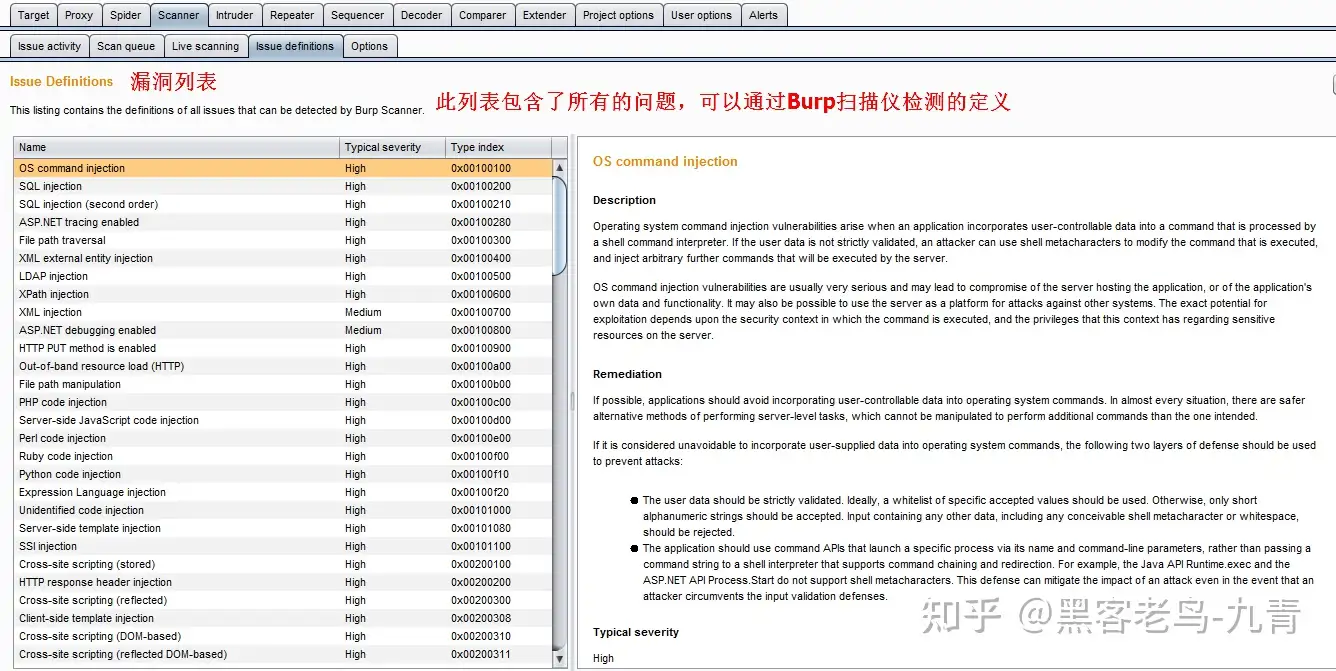
Issue Definitions 漏洞列表,列出了burp可以扫描到的漏洞详情
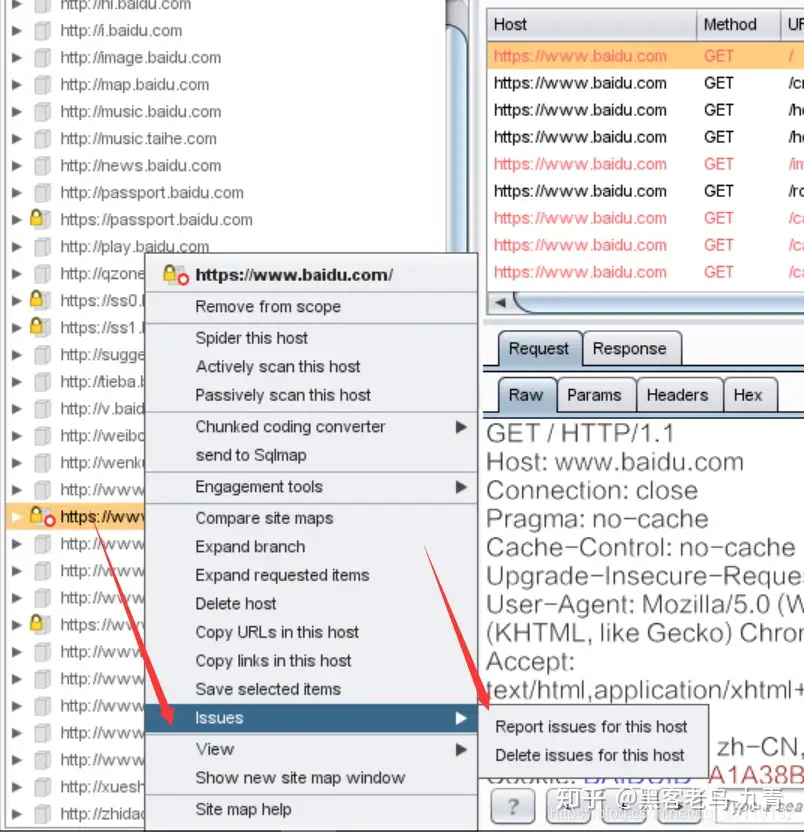
当扫描完成后,我们可以在Target标签的Site map下右键该网站,Issue——>Report issues for this host,来导出扫描报告
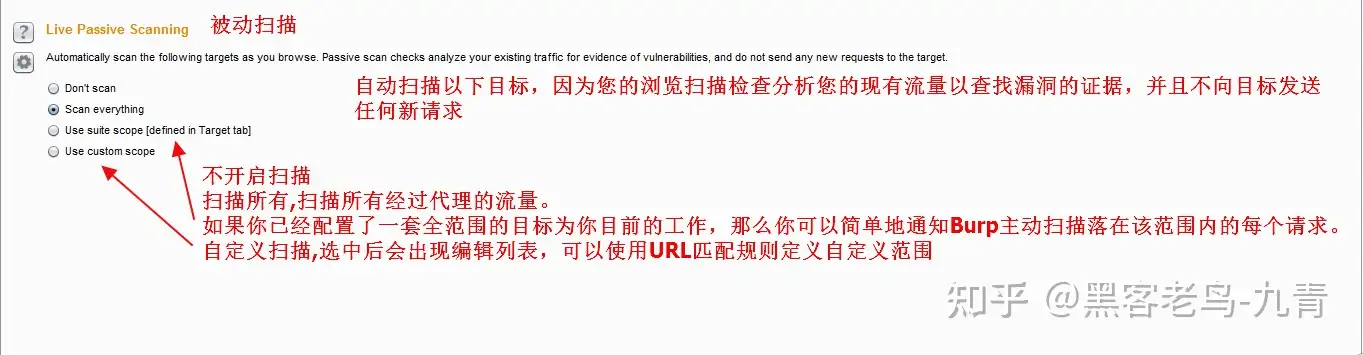
被动扫描
当使用被动扫描时,BurpSuite不会重新发送新的请求,只是对已经存在的请求和应答进行分析。
被动扫描的使用和主动扫描一样
Sequencer模块
该模块主要用来检查Web应用程序提供的会话令牌的随机性.并执行各种测试.
Comparer模块
该模块主要用来执行任意的两个请求,响应或任何其它形式的数据之间的比较
BurpSuite中好用的第三方插件
- sqlmap :这是直接在burpsuite中调用sqlmap的插件
- JSON Beautifier:这是对JSON数据进行美化的插件,直接Extender中有
- BurpCollector :这是收集BurpSuite中历史记录中的路径和参数的一款插件
- JSONandHTTPP :这是将JSON数据和HTTP互相转换的插件

 浙公网安备 33010602011771号