Toybrick TB-RV1126D_V11 开发板调试——修改烧录按键
新到的ToyBrick开发板
TB-RV1126D_V11 20210408

板子自带Debian系统,
根据官网信息
启动后使用toybrick用户及密码(同为toybrick)登录,切换root也一样
debian10 login: toybrick
Password:
Last login: Thu Feb 14 10:12:29 UTC 2019 on ttyFIQ0
Linux debian10.toybrick 4.19.172 #130 SMP PREEMPT Wed Jun 16 19:25:46 CST 2021 armv7l

The programs included with the Debian GNU/Linux system are free software;
the exact distribution terms for each program are described in the
individual files in /usr/share/doc/*/copyright.

Debian GNU/Linux comes with ABSOLUTELY NO WARRANTY, to the extent
permitted by applicable law.
toybrick@debian10:~$
toybrick@debian10:~$ sudo -s
[sudo] password for toybrick:
root@debian10:/home/toybrick#
root@debian10:/home/toybrick# cd ~
root@debian10:~#
SDK编译板级选择
BoardConfig-v10-v11.mk
liuxueneng@airfly-dev:~/workCode/rv1126$ ./build.sh lunch
processing board option: lunch
processing option: lunch

You're building on Linux
Lunch menu...pick a combo:

0. default BoardConfig.mk
1. BoardConfig-38x38-emmc.mk
2. BoardConfig-38x38-spi-nand-ab.mk
3. BoardConfig-38x38-spi-nand.mk
4. BoardConfig-ab-v13.mk
5. BoardConfig-battery-evb-v10.mk
6. BoardConfig-battery-evb.mk
7. BoardConfig-battery-ipc.mk
8. BoardConfig-cvr.mk
9. BoardConfig-dualcam-tb-v13.mk
10. BoardConfig-facial_gate.mk
11. BoardConfig-ramboot-uvc.mk
12. BoardConfig-robot.mk
13. BoardConfig-rv1126_rv1109-weston-qt.mk
14. BoardConfig-sl.mk
15. BoardConfig-slc-nand-v12.mk
16. BoardConfig-sllock.mk
17. BoardConfig-snapshot.mk
18. BoardConfig-spi-nand.mk
19. BoardConfig-spi-nor-tb-v13.mk
20. BoardConfig-spi-nor-v12.mk
21. BoardConfig-tb-v12.mk
22. BoardConfig-tb-v13.mk
23. BoardConfig-uvcc-spi-nand.mk
24. BoardConfig-uvcc-spi-nor-v12.mk
25. BoardConfig-uvcc.mk
26. BoardConfig-v10-v11.mk
27. BoardConfig-v12.mk
28. BoardConfig.mk
Which would you like? [0]:
根据官网提示按键REC进入烧录模式
TB-RV1126D: 按住开发板REC按键后,Type-C线连接主机端的USB Host接口和开发板的DP In接口,大约1秒后松开按键。
发现进的是Loader 烧录模式, 烧录之后,再使用REC按键无法进入Loader烧录模式, maskrom按键也无法进入,RST按键可正常复位。
查看图纸()发现maskrom按键只是将FLASH_D0/EMMC_D0 对地短路。
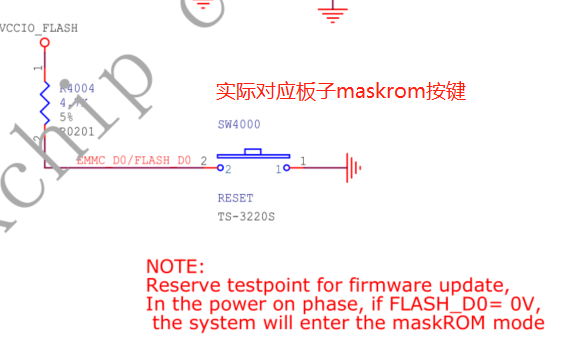
网上有用户研究发现需要短路maskrom 按键旁边的电容和电阻(将EMMC clk对GND短路)方可进入maskrom。
经过试验此方法确实可行。
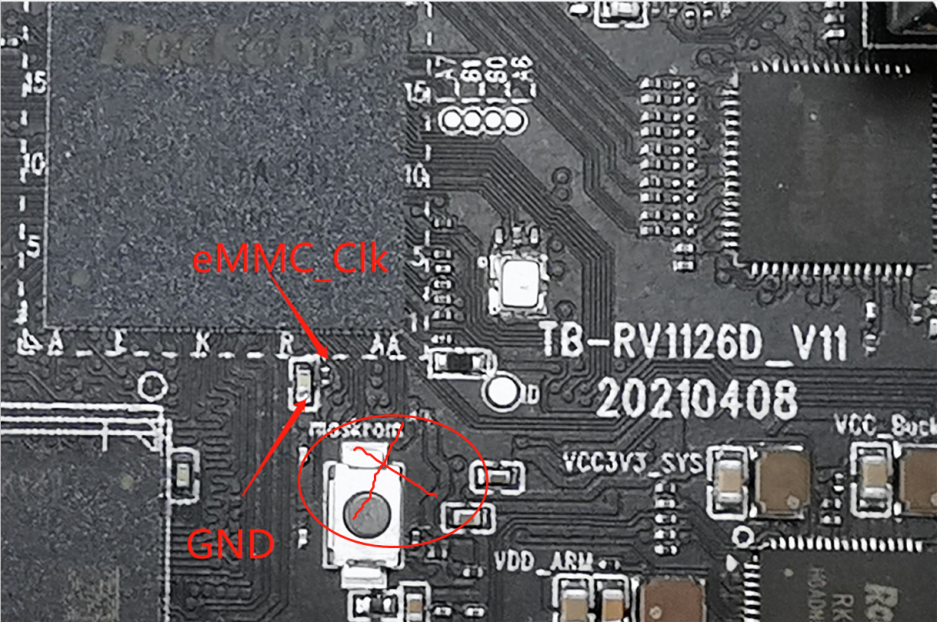
为方便后续调试,需要将maskrom按键飞线将EMMC_CLK对地短路。
修改后如下图
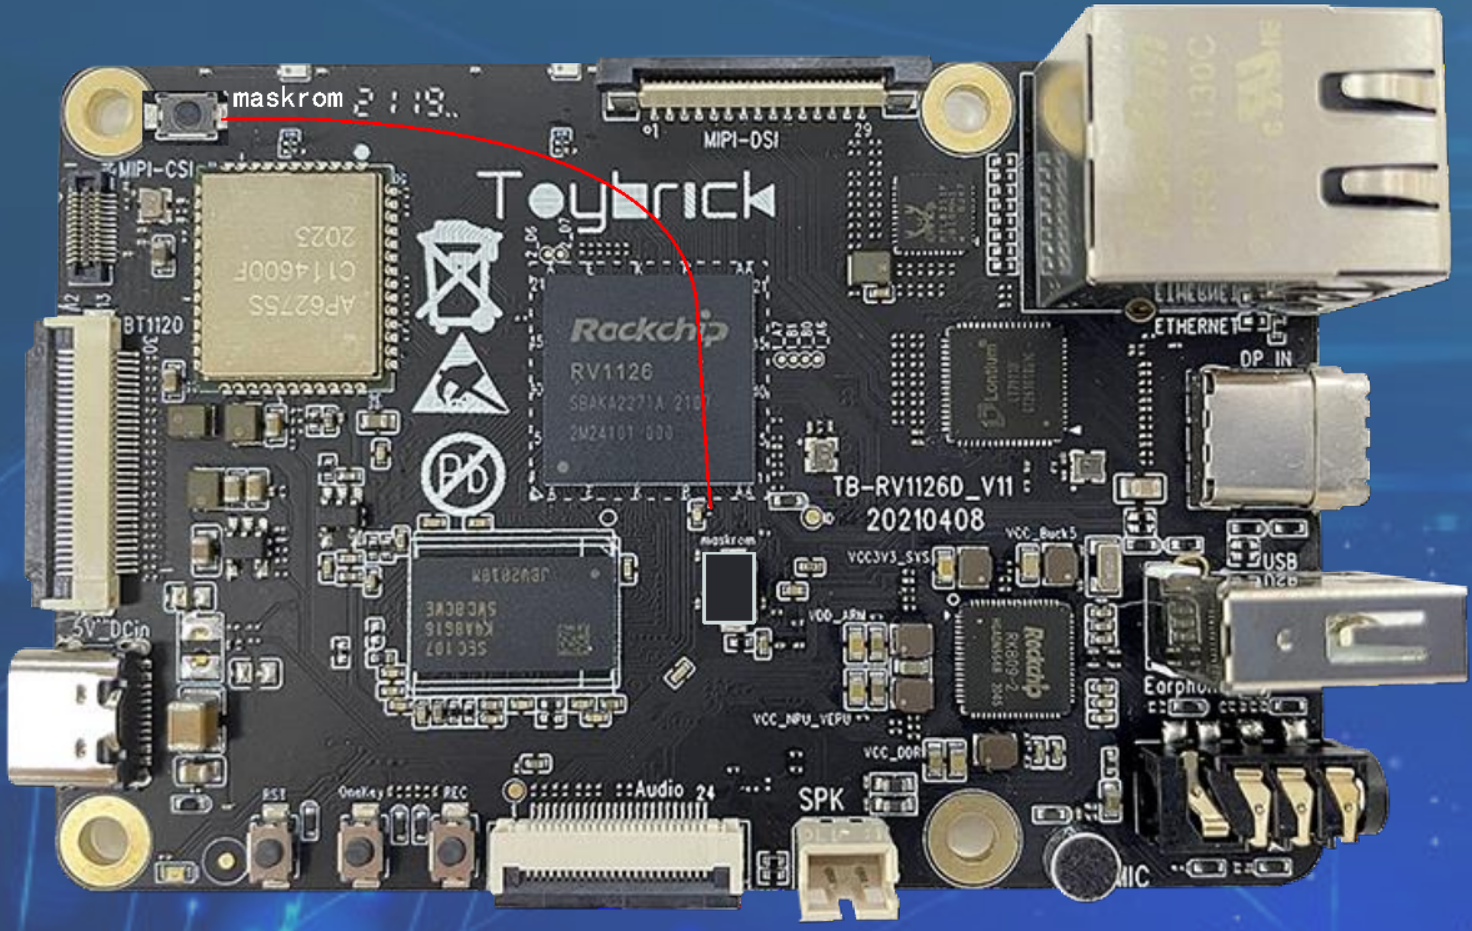
长按左上角maskrom按键后再上电或重启,板子即可进入maskrom烧录模式、
深圳宝安华美居

 浙公网安备 33010602011771号