

Linux下基于Docker搭建MySQL主从复制
Linux下基于Docker搭建MySQL主从复制
1 | docker pull mysql:5.7 |
1 2 3 | docker pull mysql:latestdocker imagesREPOSITORY TAG IMAGE ID CREATED SIZEmysql 5.7 f6509bac4980 4 days ago 373MB |

# Copyright (c) 2014, 2016, Oracle and/or its affiliates. All rights reserved.
#
# This program is free software; you can redistribute it and/or modify
# it under the terms of the GNU General Public License, version 2.0,
# as published by the Free Software Foundation.
#
# This program is also distributed with certain software (including
# but not limited to OpenSSL) that is licensed under separate terms,
# as designated in a particular file or component or in included license
# documentation.  The authors of MySQL hereby grant you an additional
# permission to link the program and your derivative works with the
# separately licensed software that they have included with MySQL.
#
# This program is distributed in the hope that it will be useful,
# but WITHOUT ANY WARRANTY; without even the implied warranty of
# MERCHANTABILITY or FITNESS FOR A PARTICULAR PURPOSE.  See the
# GNU General Public License, version 2.0, for more details.
#
# You should have received a copy of the GNU General Public License
# along with this program; if not, write to the Free Software
# Foundation, Inc., 51 Franklin St, Fifth Floor, Boston, MA  02110-1301 USA

#
# The MySQL  Server configuration file.
#
# For explanations see
# http://dev.mysql.com/doc/mysql/en/server-system-variables.html

[mysqld]
pid-file    = /var/run/mysqld/mysqld.pid
socket        = /var/run/mysqld/mysqld.sock
datadir        = /var/lib/mysql
#log-error    = /var/log/mysql/error.log
# By default we only accept connections from localhost
#bind-address    = 127.0.0.1
# Disabling symbolic-links is recommended to prevent assorted security risks
symbolic-links=0
log-bin=mysql-bin
server-id=2
slave1的mysqld.cnf文件 ,注意 server-id 不能相同
# Copyright (c) 2014, 2016, Oracle and/or its affiliates. All rights reserved.
#
# This program is free software; you can redistribute it and/or modify
# it under the terms of the GNU General Public License, version 2.0,
# as published by the Free Software Foundation.
#
# This program is also distributed with certain software (including
# but not limited to OpenSSL) that is licensed under separate terms,
# as designated in a particular file or component or in included license
# documentation.  The authors of MySQL hereby grant you an additional
# permission to link the program and your derivative works with the
# separately licensed software that they have included with MySQL.
#
# This program is distributed in the hope that it will be useful,
# but WITHOUT ANY WARRANTY; without even the implied warranty of
# MERCHANTABILITY or FITNESS FOR A PARTICULAR PURPOSE.  See the
# GNU General Public License, version 2.0, for more details.
#
# You should have received a copy of the GNU General Public License
# along with this progra
# Copyright (c) 2014, 2016, Oracle and/or its affiliates. All rights reserved.
#
# This program is free software; you can redistribute it and/or modify
# it under the terms of the GNU General Public License, version 2.0,
# as published by the Free Software Foundation.
#
# This program is also distributed with certain software (including
# but not limited to OpenSSL) that is licensed under separate terms,
# as designated in a particular file or component or in included license
# documentation.  The authors of MySQL hereby grant you an additional
# permission to link the program and your derivative works with the
# separately licensed software that they have included with MySQL.
#
# This program is distributed in the hope that it will be useful,
# but WITHOUT ANY WARRANTY; without even the implied warranty of
# MERCHANTABILITY or FITNESS FOR A PARTICULAR PURPOSE.  See the
# GNU General Public License, version 2.0, for more details.
#
# You should have received a copy of the GNU General Public License
# along with this program; if not, write to the Free Software
# Foundation, Inc., 51 Franklin St, Fifth Floor, Boston, MA  02110-1301 USA

#
# The MySQL  Server configuration file.
#
# For explanations see
# http://dev.mysql.com/doc/mysql/en/server-system-variables.html

[mysqld]
pid-file    = /var/run/mysqld/mysqld.pid
socket        = /var/run/mysqld/mysqld.sock
datadir        = /var/lib/mysql
#log-error    = /var/log/mysql/error.log
# By default we only accept connections from localhost
#bind-address    = 127.0.0.1
# Disabling symbolic-links is recommended to prevent assorted security risks
symbolic-links=0
server-id=41
default-storage-engine=MyISAM
m; if not, write to the Free Software
# Foundation, Inc., 51 Franklin St, Fifth Floor, Boston, MA  02110-1301 USA

#
# The MySQL  Server configuration file.
#
# For explanations see
# http://dev.mysql.com/doc/mysql/en/server-system-variables.html

[mysqld]
pid-file    = /var/run/mysqld/mysqld.pid
socket        = /var/run/mysqld/mysqld.sock
datadir        = /var/lib/mysql
#log-error    = /var/log/mysql/error.log
# By default we only accept connections from localhost
#bind-address    = 127.0.0.1
# Disabling symbolic-links is recommended to prevent assorted security risks
symbolic-links=0
server-id=3
default-storage-engine=MyISAM
slave2目录的 mysqld.cnf文件如下
1 2 | docker run --name mysql-master -p 3306:3306 -v /data/mysql/master:/etc/mysql/mysql.conf.d -e MYSQL_ROOT_PASSWORD=123456 -d mysql:5.7docker run --name mysql-slave1 -p 3307:3306 -v /data/mysql/slave1:/etc/mysql/mysql.conf.d -e MYSQL_ROOT_PASSWORD=123456 -d mysql:5.7docker run --name mysql-slave2 -p 3308:3306 -v /data/mysql/slave2:/etc/mysql/mysql.conf.d -e MYSQL_ROOT_PASSWORD=123456 -d mysql:5.7 |
这里我们分别使用了 3306 和 3307、3308 端口
docker run --name mysql-master -p 3307:3306 -v
mysql -u root -p123456
ALTER USER 'root'@'%' IDENTIFIED WITH mysql_native_password BY '123456';
1 2 | log-bin=mysql-bin //[必须]启用二进制日志server-id=2 //[必须]服务器标识ID,每台服务器唯一 |
cd /etc/mysql切换到/etc/mysql目录下,然后vi my.cnf对my.cnf进行编辑。此时会报出bash: vi: command not found,需要我们在docker容器内部自行安装vim。使用apt-get install vim命令安装vim
会出现如下问题:
Reading package lists... Done
Building dependency tree
Reading state information... Done
E: Unable to locate package vim执行apt-get update,然后再次执行apt-get install vim即可成功安装vim。然后我们就可以使用vim编辑my.cnf,在my.cnf中添加如下配置:
[mysqld]
## 同一局域网内注意要唯一
server-id=100
## 开启二进制日志功能,可以随便取(关键)
log-bin=mysql-bin配置完成之后,需要重启mysql服务使配置生效。使用service mysql restart完成重启。重启mysql服务时会使得docker容器停止,我们还需要docker start mysql-master启动容器。
1 | docker restart mysql-maser |
1 | docker exec -it mysql-master /bin/bash |
1 | mysql -u root -p123456 |
mysql> show master status;
docker exec -it mysql-slave1 /bin/bash
mysql -u root -p123456
ALTER USER 'root'@'%' IDENTIFIED WITH mysql_native_password BY '123456';
server-id=3
default-storage-engine=MyISAM # 修改引擎为MyISAM 【选择配置不是必须的,后面有说明】
change master to
master_host='192.168.2.130',
master_user='root',
master_log_file='mysql-bin.000004',
master_log_pos=154,
master_port=3306,
master_password='123456';
master_host :Master的地址,指的是容器的独立ip,可以通过docker inspect --format='{{.NetworkSettings.IPAddress}}' 容器名称|容器id查询容器的ip

master_port:Master的端口号,指的是容器的端口号
master_user:用于数据同步的用户
master_password:用于同步的用户的密码
master_log_file:指定 Slave 从哪个日志文件开始复制数据,即上文中提到的 File 字段的值
master_log_pos:从哪个 Position 开始读,即上文中提到的 Position 字段的值
master_connect_retry:如果连接失败,重试的时间间隔,单位是秒,默认是60秒
mysql>start slave;
show slave status \G;
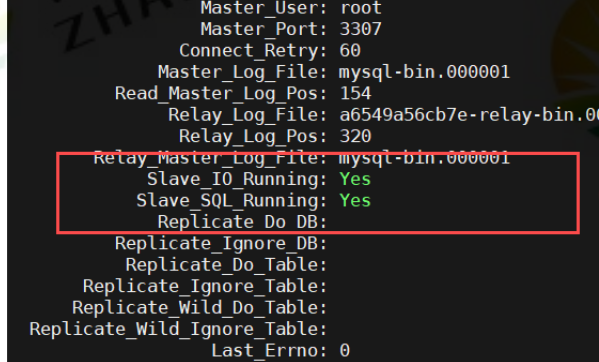
出现两个yes代表主从配置成功
Create Database TestUser;
Use TestUser;
mysql> CREATE TABLE `user` (
       `user_id` bigint(20) AUTO_INCREMENT,
       `username` varchar(30) NOT NULL,
       `password` varchar(30) DEFAULT NULL,
       PRIMARY KEY (`user_id`)
     ) ENGINE=InnoDB DEFAULT CHARSET=utf8;
mysql> show tables;
+----------------+
| Tables_in_test |
+----------------+
| user           |
+----------------+
1 row in set (0.00 sec)
mysql> insert into user(username, password) values ('feng',
'123456');
1 | docker stop $(docker ps -q) & docker rm $(docker ps -aq) |


【推荐】国内首个AI IDE,深度理解中文开发场景,立即下载体验Trae
【推荐】编程新体验,更懂你的AI,立即体验豆包MarsCode编程助手
【推荐】抖音旗下AI助手豆包,你的智能百科全书,全免费不限次数
【推荐】轻量又高性能的 SSH 工具 IShell:AI 加持,快人一步
· AI与.NET技术实操系列:基于图像分类模型对图像进行分类
· go语言实现终端里的倒计时
· 如何编写易于单元测试的代码
· 10年+ .NET Coder 心语,封装的思维:从隐藏、稳定开始理解其本质意义
· .NET Core 中如何实现缓存的预热?
· 分享一个免费、快速、无限量使用的满血 DeepSeek R1 模型,支持深度思考和联网搜索!
· 25岁的心里话
· 基于 Docker 搭建 FRP 内网穿透开源项目(很简单哒)
· ollama系列01:轻松3步本地部署deepseek,普通电脑可用
· 按钮权限的设计及实现