Asp.NetCore+Microsoft.AspNetCore.SignalR前后端分离
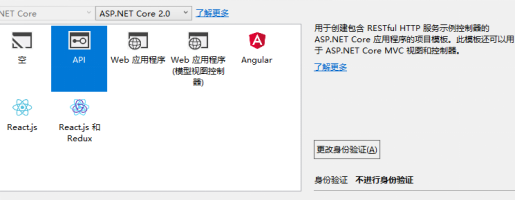
1、新建WebApi


2、安装Microsoft.AspNetCore.SignalR

3、新建一个集线器和消息类
using Microsoft.AspNetCore.SignalR;
using System.Threading.Tasks;

namespace WebApi.Chat
{
    public class ChatHub : Hub
    {
        //SendMsg用于前端调用
        public Task SendMsg(ChatMessageInfo info)
        {
            //在客户端实现此处的Show方法
            return Clients.All.SendAsync("Show", info.UserName + ":" + info.Message);
        }
    }
}
namespace WebApi.Chat
{
    public class ChatMessageInfo
    {
        public string UserName { get; set; }
        public string Message { get; set; }
    }
}
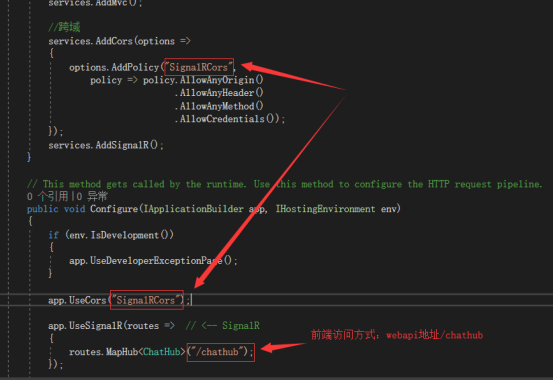
4、配置Startup
5、新建html,并发布到iis下
注:signalr.min.js不依赖jquery,此处只是方便编码,通过以下两个命令在node_modules\ @aspnet\signalr\dist\browser中获得signalr的js文件。
npm init  -y
npm install @aspnet/signalr
<!DOCTYPE html>
<html>
<head>
    <title></title>
</head>
<body>
<input type="text" id="userid" placeholder="Enter user name" />
<br>
<input type="text" id="message" placeholder="Enter sned message" />
<input type="button" id="btnSend" value="Send" />
<ul id="msglist"></ul>

<script type="text/javascript" src="jquery.min.js"></script>
<script type="text/javascript" src="signalr.min.js"></script>
<script>
    $(function () {
        //服务地址
        let hubUrl = 'http://localhost:50432/chathub';
        let httpConnection = new signalR.HttpConnection(hubUrl);
        let hubConnection = new signalR.HubConnection(httpConnection);

        $("#btnSend").click(function () {
            //新建对象
            let obj = new Object();
            obj.UserName = $('#userid').val();
            obj.Message = $('#message').val();
            //调用服务器方法
            hubConnection.invoke('SendMsg', obj);
        });

        //服务器回调方法
        hubConnection.on('Show', data => {
            $('#msglist').append($('<li>').text(data));
        });

        hubConnection.start();
    });
</script>
</body>
</html>
6、效果图

Github地址:https://github.com/zrkcode/SignalR.git


