RabbitMQ学习笔记
Mac download RabbitMQ:
brew update
brew install rabbitmq
将会下载rabbitmq的关键依赖:例如erlang和otp。
rabbitmq的脚本和CLI工具安装在/usr/local/Cellar/rabbitmq下的sbin文件夹下,可以通过/usr/local/Cellar/rabbitmq/sbin来访问,以防这个文件夹不在path中,建议添加:
export PATH=$PATH:/usr/local/opt/rabbitmq/sbin
然后可以使用 rabbitmq-server 启动服务器。在Homebrew中,节点和CLI工具将默认使用登录用户帐户。不需要使用sudo。
web console地址:http://localhost:15672
username:guest
password:guest
| Protocol | Bound to | Port |
|---|---|---|
| amqp | 127.0.0.1 | 5672 |
| clustering | :: | 25672 |
| http | :: | 15672 |
| mqtt | :: | 1883 |
| stomp | :: | 61613 |
可以在admin标签中创建用户和virtualhost。

一、简单消费队列

依赖:
     <dependency>
            <groupId>com.rabbitmq</groupId>
            <artifactId>amqp-client</artifactId>
            <version>5.7.3</version>
        </dependency>

        <dependency>
            <groupId>org.slf4j</groupId>
            <artifactId>slf4j-api</artifactId>
            <version>1.7.10</version>
        </dependency>
使用队列前先声明:
            Channel channel = connection.createChannel();

            channel.queueDeclare("test_queue", false, false, false, null);
生产者发送消息:
        ConnectionFactory factory = new ConnectionFactory();
        factory.setHost("localhost");//可以再设置端口,用户名密码,virtualhost
        try (Connection connection = factory.newConnection();
             Channel channel = connection.createChannel()) {
            channel.queueDeclare(QUEUE_NAME, false, false, false, null);
            String message = "Hello World!";
            channel.basicPublish("", QUEUE_NAME, null, message.getBytes(StandardCharsets.UTF_8));
            System.out.println(" [x] Sent '" + message + "'");
        }
消费者三种方式:
1. while循环
        Connection connection = ConnectionUtil.getConnection();
        Channel channel = connection.createChannel();
        QueueingConsumer consumer = new QueueingConsumer(channel);
        channel.basicConsume("test_queue", true, consumer);

        while (true) {
            QueueingConsumer.Delivery delivery = consumer.nextDelivery();
            String msg = new String(delivery.getBody());
            System.out.println("recv:" + msg);
        }
2. 重写DefaultConsumer的handleDelivery方法,监听consumer对象:
        Connection connection = ConnectionUtil.getConnection();
        Channel channel = connection.createChannel();
        channel.queueDeclare("test_queue", false, false, false, null);

        DefaultConsumer consumer = new DefaultConsumer(channel) {

            @Override
            public void handleDelivery(String consumerTag, Envelope envelope, AMQP.BasicProperties properties, byte[] body) throws IOException {
                String msg = new String(body, "UTF-8");
                System.out.println("new api" + msg);
            }
        };
        channel.basicConsume("test_queue", true, consumer);
3. 使用回调函数(官方推荐,低版本amqp-client依赖中没有DeliverCallback接口):
        ConnectionFactory factory = new ConnectionFactory();
        factory.setHost("localhost");
        Connection connection = factory.newConnection();
        Channel channel = connection.createChannel();

        channel.queueDeclare(QUEUE_NAME, false, false, false, null);
        System.out.println(" [*] Waiting for messages. To exit press CTRL+C");

        DeliverCallback deliverCallback = (consumerTag, delivery) -> {
            String message = new String(delivery.getBody(), "UTF-8");
            System.out.println(" [x] Received '" + message + "'");
        };
        channel.basicConsume(QUEUE_NAME, true, deliverCallback, consumerTag -> { });
二、Work queues

轮询模式:消费者消费的速度快与慢,都会获得相同的消息。(多几个简单消息队列的消费者)
公平分发(fair dispatch):每个消费者发送确认消息之前,不发送下一个消息,一次只处理一个消息。限制发送给同一个消费者不超过一条消息。这样处理消息快的消费者就可以多消费消息。
生产者:
channel.basicQos(1);
消费者:
使用basicQos 方法,将参数prefetchCount=1设置进去。这个告诉rabbitmq一次只分发一个消息给一个消费者,并且在消费者处理完成并确认前不要分发新的消息,相反,将消息发送给不是很忙的消费者。
int prefetchCount = 1;
channel.basicQos(prefetchCount);
关于队列大小:
如果所有消费者都很忙,那么你的队列就会被排满,你可以选择添加新的消费者或者更换其他策略。
Connection connection = ConnectionUtil.getConnection();
        Channel channel = connection.createChannel();
        channel.queueDeclare("test_queue", false, false, false, null);
        channel.basicQos(1);
        DefaultConsumer consumer = new DefaultConsumer(channel) {

            @Override
            public void handleDelivery(String consumerTag, Envelope envelope, AMQP.BasicProperties properties, byte[] body) throws IOException {
                String msg = new String(body, "UTF-8");
                System.out.println("new api2:" + msg);
                try {
                    Thread.sleep(2000);
                } catch (InterruptedException e) {
                    e.printStackTrace();
                }finally {
                    channel.basicAck(envelope.getDeliveryTag(),false);
                }
            }
        };
        //设置自动消息应答ack false
    boolean autoAck = false;
    channel.basicConsume("test_queue", autoAck, consumer);
或者(官方):
import com.rabbitmq.client.Channel;
import com.rabbitmq.client.Connection;
import com.rabbitmq.client.ConnectionFactory;
import com.rabbitmq.client.DeliverCallback;

public class Worker {

  private static final String TASK_QUEUE_NAME = "task_queue";

  public static void main(String[] argv) throws Exception {
    ConnectionFactory factory = new ConnectionFactory();
    factory.setHost("localhost");
    final Connection connection = factory.newConnection();
    final Channel channel = connection.createChannel();

    channel.queueDeclare(TASK_QUEUE_NAME, true, false, false, null);
    System.out.println(" [*] Waiting for messages. To exit press CTRL+C");

    channel.basicQos(1);

    DeliverCallback deliverCallback = (consumerTag, delivery) -> {
        String message = new String(delivery.getBody(), "UTF-8");

        System.out.println(" [x] Received '" + message + "'");
        try {
            doWork(message);
        } finally {
            System.out.println(" [x] Done");
            channel.basicAck(delivery.getEnvelope().getDeliveryTag(), false);
        }
    };
    channel.basicConsume(TASK_QUEUE_NAME, false, deliverCallback, consumerTag -> { });
  }

  private static void doWork(String task) {
    for (char ch : task.toCharArray()) {
        if (ch == '.') {
            try {
                Thread.sleep(1000);
            } catch (InterruptedException _ignored) {
                Thread.currentThread().interrupt();
            }
        }
    }
  }
}
boolean autoAck = true;(自动确认模式)一旦rabbitmq将消息分发给消费者,就会将消息在内存中删除。这种情况杀死正在处理消息的消费者,就会丢失消息。
boolean autoAck = false;(手动确认模式)如果有一个消费者挂掉,就会发送给其他消费者。消费者消费完消息就会告诉rabbitmq消费完成,rabbitmq会将消息在内存中删除。
rabbitmq消息持久化:
首先确保mq不丢失queue,将其声明为durable
            //第二个参数设置为true,为队列持久化
            boolean durable = true;
            channel.queueDeclare("test_queue", durable, false, false, null);
当队列已经声明的时候,此时修改消息持久化true/false都会失败,rabbitmq不允许重新定义(不同参数)一个已存在的队列。你可以选择删除这个队列或者重新声明一个新的队列。而且生产者和消费者代码要同时更改。
现在确保了rabbitmq重启后queue不会丢失,下面来实现消息的持久化:
通过设置MessageProperties(实现BasicProperties)的值为PERSISTENT_TEXT_PLAIN:
import com.rabbitmq.client.MessageProperties;

channel.basicPublish("", "task_queue",
            MessageProperties.PERSISTENT_TEXT_PLAIN,
            message.getBytes());
关于消息持久性的说明
将消息标记为持久性并不能完全保证消息不会丢失。虽然它告诉RabbitMQ将消息保存到磁盘,但是当RabbitMQ接受了一条消息并且还没有保存它时,仍然会有一个短时间窗口。此外,RabbitMQ不会对每条消息都执行fsync(2)——它可能只是保存到缓存中,而不是真正写到磁盘上。持久性保证并不强,但对于我们的简单任务队列来说已经足够了。如果您需要更强的保证,那么您可以使用publisher confirms。
三、订阅模式:

RabbitMQ消息传递模型的核心思想是,生产者从不直接向队列发送任何消息。实际上,通常生产者甚至不知道消息是否会被传递到任何队列。
相反,生产者只能将消息发送到交换器中,交换器是个十分简单的东西,一方面接收来自生产者的消息另一方面将消息推送给队列,交换器必须十分清楚的了解到接收消息后要做什么,添加到一个特定的队列?添加到很多队列?或者是丢弃消息。这个规则定义在交换器类型中。

有很多交换器类型可以使用:direct,topic,headers 和 fanout,下面用fanout来讲解。
声明交换器:
channel.exchangeDeclare("exchange_name", "fanout");
分发交换非常简单,顾名思义,将所有消息广播到它所知道的队列中。
交换器列表
要列出服务器上的交换器,可以使用rabbitmqctl:
sudo rabbitmqctl list_exchanges会列出一些 amq.*的交换器和默认的(未命名)的交换器,这些是默认创建的。
未命名的交换器:
在之前的部分中,我们对交换一无所知,但仍然能够将消息发送到队列。这是可能的,因为我们使用的是缺省交换,我们通过空字符串("")来标识它。
channel.basicPublish("", "hello", null, message.getBytes());第一个参数是交换器的名字,空字符串表示默认或者未命名的交换器,消息将使用routingKey指定的名称(如果存在的话)路由到队列。
现在用交换器名字来取代:
channel.basicPublish( "exchange_name", "", null, message.getBytes());
首先,每当我们连接到Rabbit时,我们需要一个新的空队列。为此,我们可以创建一个具有随机名称的队列,或者,更好的方法是让服务器为我们选择一个随机队列名称。
其次,一旦我们断开消费者,队列应该被自动删除。
在Java客户端中,当我们不向queueDeclare()提供参数时,我们创建一个非持久的、排他的自动删除队列,并生成一个名称:
String queueName = channel.queueDeclare().getQueue();
此时queueName包含一个随机到队列名,例如,它可能像:amq.gen-JzTY20BRgKO-HjmUJj0wLg
绑定:

我们现在有交换器和队列,现在我们需要告诉交换器将消息发送到队列,这个过程叫做绑定。
channel.queueBind(queueName, "exchang_name", "");
现在交换器将会发送消息给队列。
绑定列表:
你可以列出现有的绑定列表(可以通过--vhost 来指定具体那个vitrualhost):
rabbitmqctl list_bindings
- 一个生产者,多个消费者
- 每一个消费者都有自己的队列
- 生产者不是将消息发送到队列,而是交换器
- 每个队列都要绑定到交换器上
- 生产者发送到消息,经过交换器,到达队列,可以实现一个消息被多个消费者消费
eg:注册->email ->otp
官方:
生产者:
public class EmitLog {

  private static final String EXCHANGE_NAME = "logs";

  public static void main(String[] argv) throws Exception {
    ConnectionFactory factory = new ConnectionFactory();
    factory.setHost("localhost");
    try (Connection connection = factory.newConnection();
         Channel channel = connection.createChannel()) {
        channel.exchangeDeclare(EXCHANGE_NAME, "fanout");

        String message = argv.length < 1 ? "info: Hello World!" :
                            String.join(" ", argv);

        channel.basicPublish(EXCHANGE_NAME, "", null, message.getBytes("UTF-8"));
        System.out.println(" [x] Sent '" + message + "'");
    }
  }
}
消费者:
import com.rabbitmq.client.Channel;
import com.rabbitmq.client.Connection;
import com.rabbitmq.client.ConnectionFactory;
import com.rabbitmq.client.DeliverCallback;

public class ReceiveLogs {
  private static final String EXCHANGE_NAME = "logs";

  public static void main(String[] argv) throws Exception {
    ConnectionFactory factory = new ConnectionFactory();
    factory.setHost("localhost");
    Connection connection = factory.newConnection();
    Channel channel = connection.createChannel();

    channel.exchangeDeclare(EXCHANGE_NAME, "fanout");
    String queueName = channel.queueDeclare().getQueue();
    channel.queueBind(queueName, EXCHANGE_NAME, "");

    System.out.println(" [*] Waiting for messages. To exit press CTRL+C");

    DeliverCallback deliverCallback = (consumerTag, delivery) -> {
        String message = new String(delivery.getBody(), "UTF-8");
        System.out.println(" [x] Received '" + message + "'");
    };
    channel.basicConsume(queueName, true, deliverCallback, consumerTag -> { });
  }
}
自定义:
生产者:
package com.dz.rabbitmq.ps;

import com.dz.rabbitmq.ConnectionUtil;
import com.rabbitmq.client.Channel;
import com.rabbitmq.client.Connection;

import java.io.IOException;
import java.util.concurrent.TimeoutException;

public class Sender {
    public static void main(String[] args) throws IOException, TimeoutException {
        Connection connection = ConnectionUtil.getConnection();
        Channel channel = connection.createChannel();
        channel.exchangeDeclare("test_exchange", "fanout");

        String msg = "publish/subscribe";
        channel.basicPublish("test_exchange","",null,msg.getBytes());
        System.out.println("finish");

        channel.close();
        connection.close();
    }
}
订阅者:
package com.dz.rabbitmq.ps;

import com.dz.rabbitmq.ConnectionUtil;
import com.rabbitmq.client.*;

import java.io.IOException;
import java.util.concurrent.TimeoutException;

public class Recv1 {
    public static void main(String[] args) throws IOException, TimeoutException {
        Connection connection = ConnectionUtil.getConnection();
        Channel channel = connection.createChannel();

        channel.queueDeclare("exchange2", false, false, false, null);
        channel.queueBind("exchange2", "test_exchange", "");
        channel.basicQos(1);

        DefaultConsumer consumer = new DefaultConsumer(channel) {
            @Override
            public void handleDelivery(String consumerTag, Envelope envelope, AMQP.BasicProperties properties, byte[] body) throws IOException {
                String msg = new String(body, "utf-8");
                System.out.println("channel 2" + msg);
                channel.basicAck(envelope.getDeliveryTag(),false);
            }
        };
        channel.basicConsume("exchange2", false, consumer);


    }
}


package com.dz.rabbitmq.ps;

import com.dz.rabbitmq.ConnectionUtil;
import com.rabbitmq.client.*;

import java.io.IOException;
import java.util.concurrent.TimeoutException;

public class Recv {
    public static void main(String[] args) throws IOException, TimeoutException {
        Connection connection = ConnectionUtil.getConnection();
        Channel channel = connection.createChannel();
        channel.basicQos(1);
        channel.queueDeclare("exchange1", false, false, false, null);
        channel.queueBind("exchange1", "test_exchange", "");

        DefaultConsumer consumer = new DefaultConsumer(channel) {
            @Override
            public void handleDelivery(String consumerTag, Envelope envelope, AMQP.BasicProperties properties, byte[] body) throws IOException {
                String msg = new String(body, "utf-8");
                System.out.println("channel 1" + msg);
                channel.basicAck(envelope.getDeliveryTag(),false);
            }
        };

        channel.basicConsume("exchange1", false, consumer);


    }
}
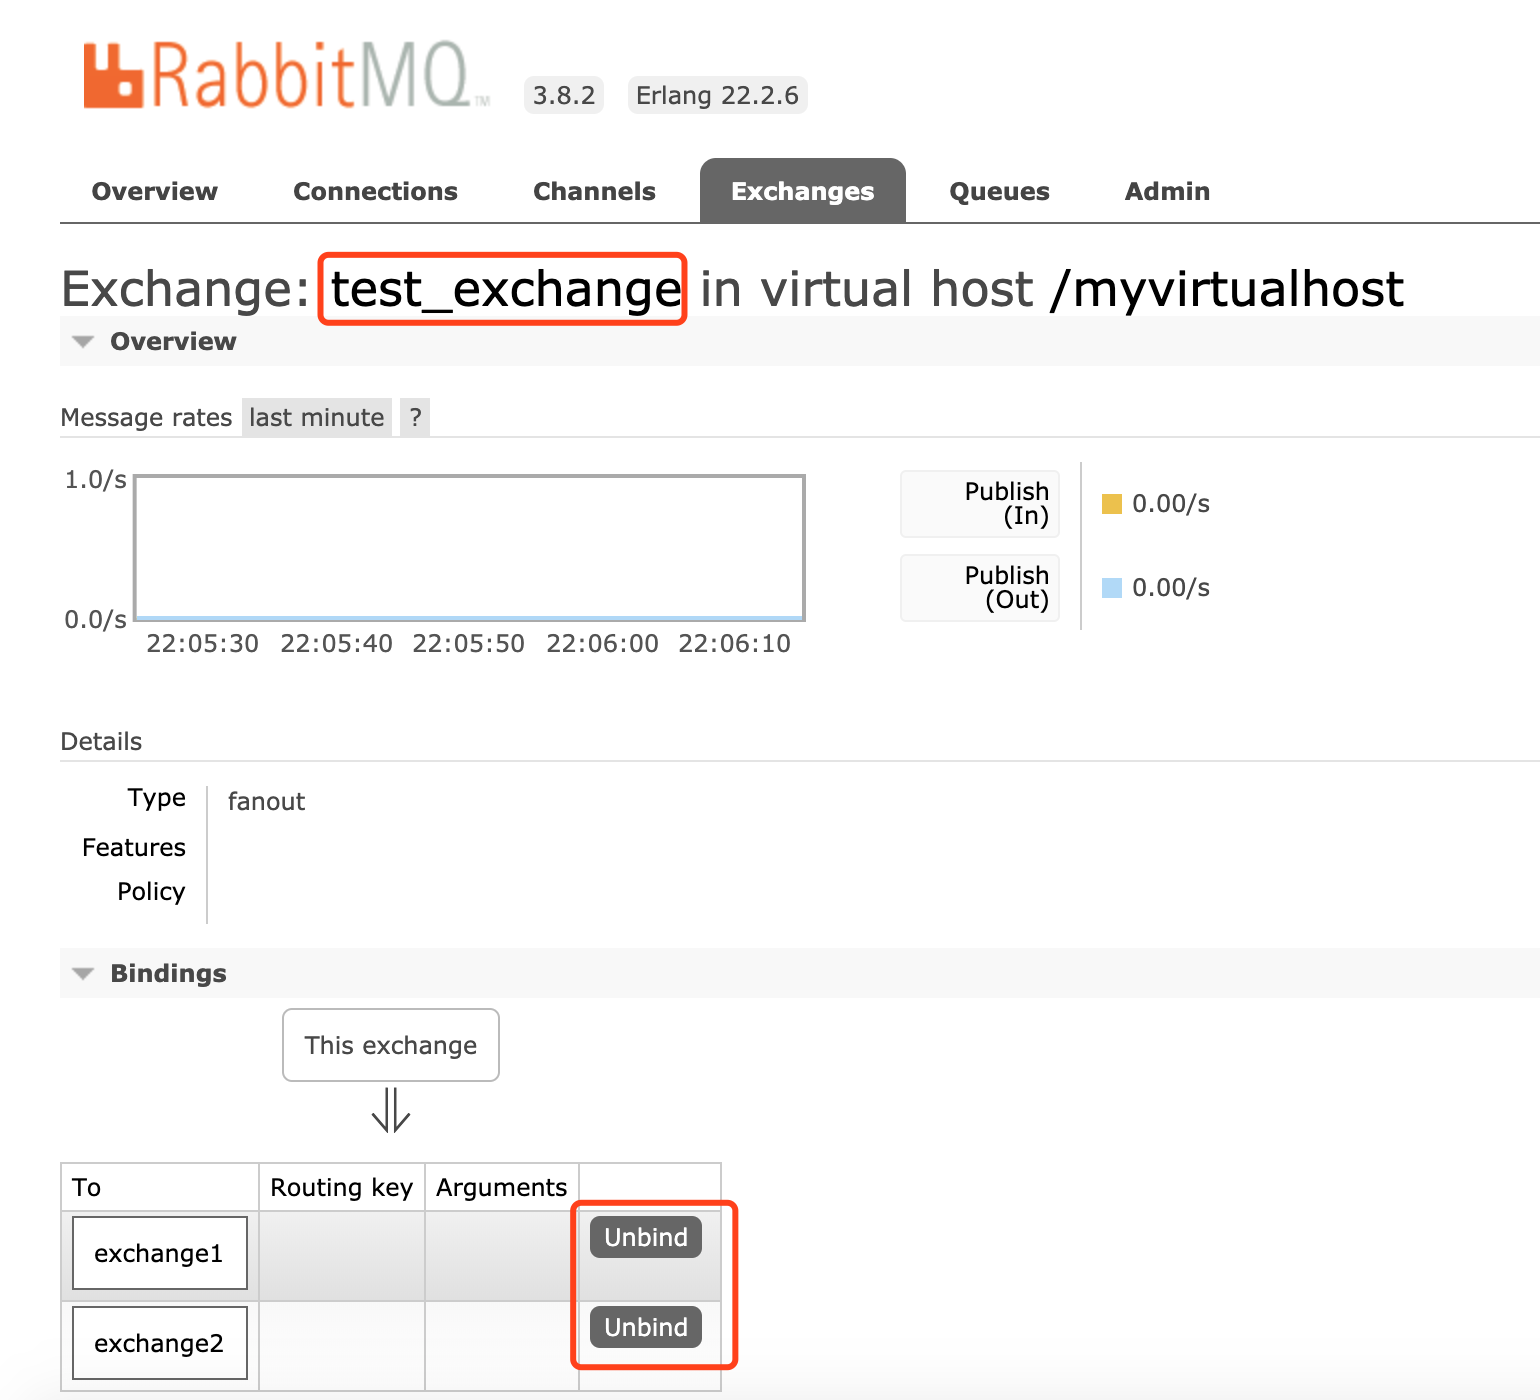
可以在控制台手动解绑queue或者绑定queue

四、路由模式

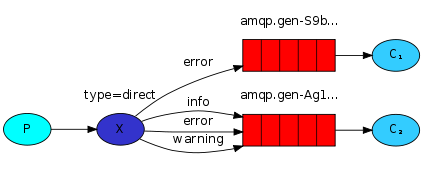
之前使用fanout广播给所有消费者,现在我们想将error输出到特定的消费者,而另一个消费者接受全部类型的消息。
Sender:

import com.dz.rabbitmq.ConnectionUtil;
import com.rabbitmq.client.Channel;
import com.rabbitmq.client.Connection;

import java.io.IOException;
import java.util.concurrent.TimeoutException;

public class Sender {
    public static void main(String[] args) throws IOException, TimeoutException {
        Connection connection = ConnectionUtil.getConnection();
        Channel channel = connection.createChannel();
        //设置交换器路由模式为direct
        channel.exchangeDeclare("test_exchange_direct", "direct");

        String msg = "sender msg";
        //设置当前消息为error
        String routingKey = "error";
        channel.basicPublish("test_exchange_direct", routingKey, null, msg.getBytes());
        System.out.println("send msg");

        channel.close();
        connection.close();
    }
}
Recv1:

import com.dz.rabbitmq.ConnectionUtil;
import com.rabbitmq.client.*;

import java.io.IOException;
import java.util.concurrent.TimeoutException;

public class Recv1 {
    public static void main(String[] args) throws IOException, TimeoutException {
        Connection connection = ConnectionUtil.getConnection();
        Channel channel = connection.createChannel();
        channel.queueDeclare("error_queue", false, false, false, null);

        //设置路由key为error,将队列和交换器绑定,并设置routingKey
        String routingKey = "error";
        channel.queueBind("error_queue", "test_exchange_direct", routingKey);
        channel.basicQos(1);

        DefaultConsumer consumer = new DefaultConsumer(channel) {

            @Override
            public void handleDelivery(String consumerTag, Envelope envelope, AMQP.BasicProperties properties, byte[] body) throws IOException {
                String msg = new String(body, "utf-8");
                System.out.println("recv1 " + msg);
                channel.basicAck(envelope.getDeliveryTag(), false);
            }
        };

        boolean autoAck = false;
        channel.basicConsume("error_queue", autoAck, consumer);
    }
}
Recv2:

import com.dz.rabbitmq.ConnectionUtil;
import com.rabbitmq.client.*;

import java.io.IOException;
import java.util.concurrent.TimeoutException;

public class Recv2 {
    public static void main(String[] args) throws IOException, TimeoutException {
        Connection connection = ConnectionUtil.getConnection();
        Channel channel = connection.createChannel();
        channel.queueDeclare("normal_queue", false, false, false, null);

        String routingKey1 = "info", routingKey2 = "warning",routingKey3="error";

        channel.queueBind("normal_queue", "test_exchange_direct", routingKey1);
        channel.queueBind("normal_queue", "test_exchange_direct", routingKey2);
        channel.queueBind("normal_queue", "test_exchange_direct", routingKey3);
        channel.basicQos(1);

        DefaultConsumer consumer = new DefaultConsumer(channel) {

            @Override
            public void handleDelivery(String consumerTag, Envelope envelope, AMQP.BasicProperties properties, byte[] body) throws IOException {
                String msg = new String(body, "utf-8");
                System.out.println("recv1 " + msg);
                channel.basicAck(envelope.getDeliveryTag(), false);
            }
        };

        boolean autoAck = false;
        channel.basicConsume("normal_queue", autoAck, consumer);
    }
}


