
yolox 整体结构和数据增强
yolox-整体结构和数据增强
概要
论文地址: [2107.08430] YOLOX: Exceeding YOLO Series in 2021 (arxiv.org)
YOLOX-L和YOLOv4-CSP、YOLOv5-L有差不多参数量的情况下,YOLOX-L在COCO上取得50.0%AP(比YOLOv5-L高出1.8%的AP),且YOLOX-L在单张Tesla V100上能达到68.9FPS。
主要结构
① 输入端: 两种数据增强方式
② BackBone主干网络:Darknet53。
③ Neck:FPN结构。
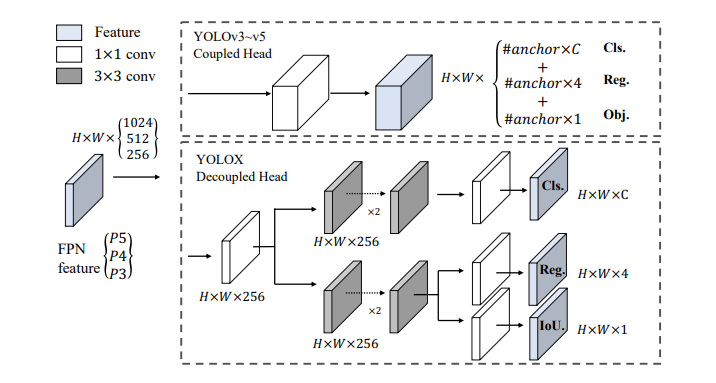
基础网络
以 YOLOv3+DarkNet53 作为基线
YOLOv3 baseline基线模型采用了DarkNet53骨干+SPP层(即所谓的YOLOv3-SPP
基线模型在COCO val上取得了38.5%AP指标
数据增强
强大的数据增强: 使用Mosaic和Mixup来提高YoloX的表现,Mosaic是Yolov3变体提出的一种有效的增强策略,广泛的被使用在yolov4,yoloV5和其他检测器中,MixUp通常被使用在图片分类任务中,但是被BOF算法使用在检测训练中,yolox采用MiXUp和Mosaic功能在我们的模型中,并且在最后15个epoch进行关闭,论文中的经验,如果我们从头到尾都开这两个数据增强,性能反而提升不大。
输入端:Strong augmentation数据增强
在网络的输入端,Yolox主要采用了Mosaic、Mixup两种数据增强方法。
通过随机缩放、随机裁剪、随机排布的方式进行拼接,对于小目标的检测效果提升,还是很不错的。而且在Yolov4、Yolov5算法中,也得到了广泛的应用。是一种非常有效的增强方式。
MixUp是在Mosaic基础上,增加的一种额外的增强策略。
Mosaic数据增强
代码位置: yolox/data/datasets/mosaicdetection.py

核心代码:
def get_mosaic_coordinate(mosaic_image, mosaic_index, xc, yc, w, h, input_h, input_w):
    # TODO update doc
    # index0 to top left part of image
    if mosaic_index == 0:
        x1, y1, x2, y2 = max(xc - w, 0), max(yc - h, 0), xc, yc
        small_coord = w - (x2 - x1), h - (y2 - y1), w, h
    # index1 to top right part of image
    elif mosaic_index == 1:
        x1, y1, x2, y2 = xc, max(yc - h, 0), min(xc + w, input_w * 2), yc
        small_coord = 0, h - (y2 - y1), min(w, x2 - x1), h
    # index2 to bottom left part of image
    elif mosaic_index == 2:
        x1, y1, x2, y2 = max(xc - w, 0), yc, xc, min(input_h * 2, yc + h)
        small_coord = w - (x2 - x1), 0, w, min(y2 - y1, h)
    # index2 to bottom right part of image
    elif mosaic_index == 3:
        x1, y1, x2, y2 = xc, yc, min(xc + w, input_w * 2), min(input_h * 2, yc + h)  # noqa
        small_coord = 0, 0, min(w, x2 - x1), min(y2 - y1, h)
    return (x1, y1, x2, y2), small_coord
与之配套执行代码 类 MosaicDetection(Dataset)
            #  随机中心点
            yc = int(random.uniform(0.5 * input_h, 1.5 * input_h))
            xc = int(random.uniform(0.5 * input_w, 1.5 * input_w))

            # 3 additional image indices
            # 随机抽取的4张图片
            indices = [idx] + [random.randint(0, len(self._dataset) - 1) for _ in range(3)]

            for i_mosaic, index in enumerate(indices):
                img, _labels, _, _ = self._dataset.pull_item(index)
                h0, w0 = img.shape[:2]  # orig hw
                scale = min(1. * input_h / h0, 1. * input_w / w0)
                img = cv2.resize(
                    img, (int(w0 * scale), int(h0 * scale)), interpolation=cv2.INTER_LINEAR
                )

                # generate output mosaic image
                (h, w, c) = img.shape[:3]
                if i_mosaic == 0:
                    mosaic_img = np.full((input_h * 2, input_w * 2, c), 114, dtype=np.uint8)

                # suffix l means large image, while s means small image in mosaic aug.
                (l_x1, l_y1, l_x2, l_y2), (s_x1, s_y1, s_x2, s_y2) = get_mosaic_coordinate(
                    mosaic_img, i_mosaic, xc, yc, w, h, input_h, input_w
                )
                #
                # 拼接四张图片
                mosaic_img[l_y1:l_y2, l_x1:l_x2] = img[s_y1:s_y2, s_x1:s_x2]
                padw, padh = l_x1 - s_x1, l_y1 - s_y1

                labels = _labels.copy()
                # Normalized xywh to pixel xyxy format
                if _labels.size > 0:
                    labels[:, 0] = scale * _labels[:, 0] + padw
                    labels[:, 1] = scale * _labels[:, 1] + padh
                    labels[:, 2] = scale * _labels[:, 2] + padw
                    labels[:, 3] = scale * _labels[:, 3] + padh
                mosaic_labels.append(labels)

            # 标签拼接
            if len(mosaic_labels):
                mosaic_labels = np.concatenate(mosaic_labels, 0)
                np.clip(mosaic_labels[:, 0], 0, 2 * input_w, out=mosaic_labels[:, 0])
                np.clip(mosaic_labels[:, 1], 0, 2 * input_h, out=mosaic_labels[:, 1])
                np.clip(mosaic_labels[:, 2], 0, 2 * input_w, out=mosaic_labels[:, 2])
                np.clip(mosaic_labels[:, 3], 0, 2 * input_h, out=mosaic_labels[:, 3])

            # 随机旋转角度,标签
            mosaic_img, mosaic_labels = random_perspective(
                mosaic_img,
                mosaic_labels,
                degrees=self.degrees,
                translate=self.translate,
                scale=self.scale,
                shear=self.shear,
                perspective=self.perspective,
                border=[-input_h // 2, -input_w // 2],
            )  # border to remove

            if (
                    self.enable_mixup
                    and not len(mosaic_labels) == 0
                    and random.random() < self.mixup_prob
            ):
                ## maxup 图像拼接增强
                mosaic_img, mosaic_labels = self.mixup(mosaic_img, mosaic_labels, self.input_dim)
MixUp数据增强
MixUp数据增强是在Mosaic基础上,额外的一种增强策略。
数据增原理来源论文: https://arxiv.org/pdf/2012.07177.pdf
博客解释: https://zhuanlan.zhihu.com/p/397993315
主要想法和步骤 将数据复制粘贴实现训练阶段的数据增广
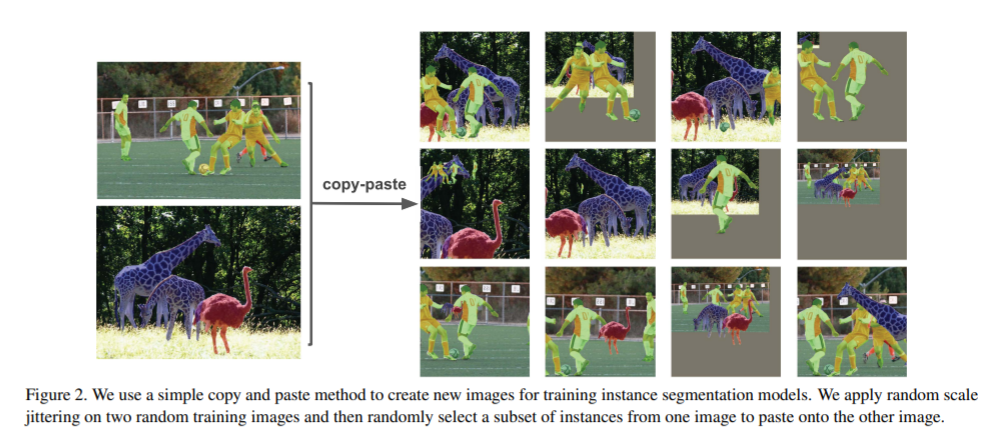
主要步骤
- 先读取一张图片,图片两侧填充,缩放的640x640里面,存在一个检测框
- 再随机选取一张图片,图片上下填充,缩放的640x640里面,也存在一个检测框
- 之后设置一个融合系数,将两个图片融合,得到新图片和两个检测框
self.mixup
    def mixup(self, origin_img, origin_labels, input_dim):
        jit_factor = random.uniform(*self.mixup_scale)
        FLIP = random.uniform(0, 1) > 0.5
        cp_labels = []
        while len(cp_labels) == 0:
            cp_index = random.randint(0, self.__len__() - 1)
            cp_labels = self._dataset.load_anno(cp_index)
        img, cp_labels, _, _ = self._dataset.pull_item(cp_index)

        if len(img.shape) == 3:
            cp_img = np.ones((input_dim[0], input_dim[1], 3), dtype=np.uint8) * 114
        else:
            cp_img = np.ones(input_dim, dtype=np.uint8) * 114

        cp_scale_ratio = min(input_dim[0] / img.shape[0], input_dim[1] / img.shape[1])

        resized_img = cv2.resize(img,
                                 (int(img.shape[1] * cp_scale_ratio), int(img.shape[0] * cp_scale_ratio)),
                                 interpolation=cv2.INTER_LINEAR, )

        cp_img[: int(img.shape[0] * cp_scale_ratio), : int(img.shape[1] * cp_scale_ratio)] = resized_img

        cp_img = cv2.resize(cp_img, (int(cp_img.shape[1] * jit_factor), int(cp_img.shape[0] * jit_factor)), )
        cp_scale_ratio *= jit_factor

        if FLIP:
            cp_img = cp_img[:, ::-1, :]

        origin_h, origin_w = cp_img.shape[:2]
        target_h, target_w = origin_img.shape[:2]
        padded_img = np.zeros((max(origin_h, target_h), max(origin_w, target_w), 3), dtype=np.uint8)
        padded_img[:origin_h, :origin_w] = cp_img

        x_offset, y_offset = 0, 0
        if padded_img.shape[0] > target_h:
            y_offset = random.randint(0, padded_img.shape[0] - target_h - 1)
        if padded_img.shape[1] > target_w:
            x_offset = random.randint(0, padded_img.shape[1] - target_w - 1)
        padded_cropped_img = padded_img[y_offset: y_offset + target_h, x_offset: x_offset + target_w]

        cp_bboxes_origin_np = adjust_box_anns(cp_labels[:, :4].copy(), cp_scale_ratio, 0, 0, origin_w, origin_h)

        if FLIP:
            cp_bboxes_origin_np[:, 0::2] = (origin_w - cp_bboxes_origin_np[:, 0::2][:, ::-1])
        cp_bboxes_transformed_np = cp_bboxes_origin_np.copy()
        cp_bboxes_transformed_np[:, 0::2] = np.clip(cp_bboxes_transformed_np[:, 0::2] - x_offset, 0, target_w)
        cp_bboxes_transformed_np[:, 1::2] = np.clip(cp_bboxes_transformed_np[:, 1::2] - y_offset, 0, target_h)
        keep_list = box_candidates(cp_bboxes_origin_np.T, cp_bboxes_transformed_np.T, 5)

        if keep_list.sum() >= 1.0:
            cls_labels = cp_labels[keep_list, 4:5].copy()
            box_labels = cp_bboxes_transformed_np[keep_list]
            labels = np.hstack((box_labels, cls_labels))
            origin_labels = np.vstack((origin_labels, labels))
            origin_img = origin_img.astype(np.float32)
            origin_img = 0.5 * origin_img + 0.5 * padded_cropped_img.astype(np.float32)

        return origin_img.astype(np.uint8), origin_labels
论文中标注了2点
(1)在训练的最后15个epoch,这两个数据增强会被关闭掉。
而在此之前,Mosaic和Mixup数据增强,都是打开的,这个细节需要注意。
(2)由于采取了更强的数据增强方式,作者在研究中发现,ImageNet预训练将毫无意义,因此,所有的模型,均是从头开始训练的。
针对代码这里的理解并不是很清晰,先分析其他的内容
