Asp.Net Core SignalR的使用
一、SignalR并非是Asp.Net Core 所独有,它还可以基于.Net Framework4.0以上的Asp.Net Web 应用程序的使用。
简介:Asp.Net Core SignalR是一个开源库,它简化 了应用程序添加实时web功能过程。实时Web功能是指当Web应用程序所连接的客户端变得可用时,服务器端代码可立即将内容推送到客户端,而不是让服务器等待客户请求新的数据。
Asp.Net Core SigNalR 的实时通信传输方式:
①、WebSocket 传输方式。
②、基于服务器发送的事件(Server Sent Events)传输的方式
③、长轮询(Long Polling)传输方式
WebSocket仅支持比较现代的浏览器,Web服务器也不能太过时,而Server Sent Event情况可能好一点,但也是存在同样的问题。SignalR采用了回落机制,且有能力去调整支持的传输类型。
WebSocket------Server Sent Events-------Long Polling
新的浏览器和Web服务器<--------------------->旧的浏览器和服务器
使用:
1、创建项目-->添加SignalR客户端
添加客户端库 选择 unpkg 输入@microsoft/signalr@latest 选择browser文件夹的几个js文件
2创建SignalR集成器
在项目中创建Hubs文件夹
在Hubs文件夹中创建ChatHub.cs文件
public class ChatHub:Hub
    {
        static List<string> IDs = new List<string>();
        //向所有连接发送消息
        public Task SendMessageAll(string user,string message)
        {
            //触发前端连接的ReceiveMessage事件,并将user和message传递过去
            return Clients.All.SendAsync("ReceiveMessage", user, message);
        }

        //向指定用户id发送消息
        public Task SendMessageToID(string connID,string user, string message)
        {

            //触发前端连接的ReceiveMessage事件,并将user和message传递过去
            List<string> toIDs = new List<string>() {
                connID,   //接收消息的连接id
                Context.ConnectionId  //当前发送消息者的连接id
            };
            return Clients.Clients(toIDs).SendAsync("ReceiveMessage", user, message);
        }

        //接收连接创建后的id
        public Task SendConnID(string connid)
        {
            //保存到静态集合中
            IDs.Add(connid);
            //将所有的id以json数据的方式输出
            return Clients.All.SendAsync("ReceiveIDs",JsonConvert.SerializeObject(IDs));

        }
        //发送指定下单信息
        public Task SendGoodsMsg(string goodsId,string GoodsName, string GoodsPrice, string Number)
        {
            Goods goods = new Goods()
            {
                GoodsId = int.Parse(goodsId),
                GoodsName = GoodsName,
                GoodsPrice = decimal.Parse(GoodsPrice),
                Number = int.Parse(Number)
            };
            //保存到数据库
            //*****
            //出发前端连接的ReceiveGoodsInfoMation事件
            return Clients.All.SendAsync("ReceiveGoodsInfoMation", goods);
        }
    }
二、配置项目启用SignalR服务器
打开Startup.cs文件来配置
using SignalRDemo.Hubs;

namespace SignalRDemo
{
    public class Startup
    {
        public Startup(IConfiguration configuration)
        {
            Configuration = configuration;
        }

        public IConfiguration Configuration { get; }

        // This method gets called by the runtime. Use this method to add services to the container.
        public void ConfigureServices(IServiceCollection services)
        {
       //注册SignalR服务依赖
            services.AddSignalR();
            services.AddControllersWithViews();
        }

        // This method gets called by the runtime. Use this method to configure the HTTP request pipeline.
        public void Configure(IApplicationBuilder app, IWebHostEnvironment env)
        {
            if (env.IsDevelopment())
            {
                app.UseDeveloperExceptionPage();
            }
            else
            {
                app.UseExceptionHandler("/Home/Error");
                // The default HSTS value is 30 days. You may want to change this for production scenarios, see https://aka.ms/aspnetcore-hsts.
                app.UseHsts();
            }
            app.UseHttpsRedirection();
            app.UseStaticFiles();

            app.UseRouting();

            app.UseAuthorization();

            app.UseEndpoints(endpoints =>
            {
                endpoints.MapControllerRoute(
                    name: "default",
                    pattern: "{controller=Home}/{action=GetOrderBy}/{id?}");
          //添加SignalR服务路由映射
                endpoints.MapHub<ChatHub>("/chathub");
            });
        }
    }
}
三、添加客户端代码
<div id="msgs">

</div>
<div>
    <input type="text" id="txt_user" value="" placeholder="请输入用户名" />
    <input type="text" id="txt_msg" value="" placeholder="请输入要发送的消息" />
    <input type="button" id="btn_send" value="发送" />
</div>
<div id="ids">

</div>
<script src="~/lib/microsoft/signalr/dist/browser/signalr.js"></script>
<script>
    //创建连接
    var connection = new signalR.HubConnectionBuilder().withUrl("/chathub").build();
    //启动连接
    connection.start().then(function () {
        //将当前连接对象的id发送给服务器
        //console.log(connection.connectionId);
        connection.invoke("SendConnID", connection.connectionId);
    })


    //接收消息
    connection.on("ReceiveMessage", function (user, message) {
        //显示消息
        var pTag = document.createElement("p");
        pTag.innerHTML = `<label class="user">${user}:</label><span class="msg">${message}</span>`;
        //添加到msgs中
        document.getElementById("msgs").appendChild(pTag);
    });

    //接收所有的id
    connection.on("ReceiveIDs", function (ids) {
        var jsonArr = JSON.parse(ids);
        //清空ids
        document.getElementById("ids").innerHTML = "";
        //遍历json数组,将数组中的所有连接id拿出来,显示在页面中
        for (var i = 0; i < jsonArr.length; i++) {
            var p = document.createElement("p");
            p.innerHTML = `<label>${jsonArr[i]}</label><input type="button" onclick="sendToID('${jsonArr[i]}')"  value="发送消息给该连接" />`;
            document.getElementById("ids").appendChild(p);
        }
    })

    //发送消息
    document.getElementById("btn_send").addEventListener("click", function () {
        var user = document.getElementById("txt_user").value;
        var message = document.getElementById("txt_msg").value;
        if (toID != "") {
            connection.invoke("SendMessageToID", toID, user, message); //发消息给指定用户,toID的值不为空
        }
        else {
            connection.invoke("SendMessageAll", user, message);  ///发送消息给所有用户
        }

    })

    var toID = "";
    function sendToID(id) {
        toID = id;
    }

</script>
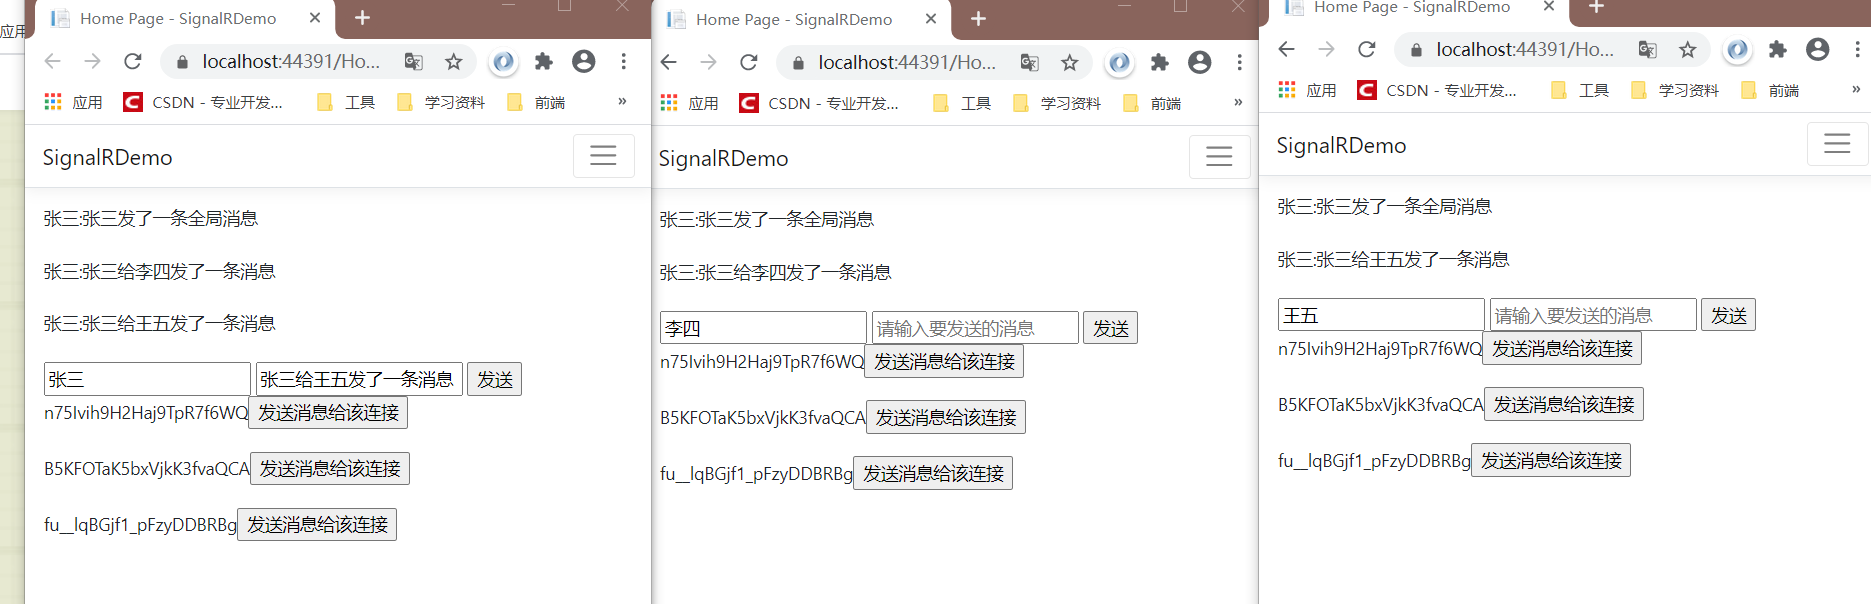
运行: