【Linux】【maven】maven及maven私服安装
前言
系统环境:Centos7、jdk1.8
私服是一种特殊的远程仓库,它是架设在局域网内的仓库服务,私服代理广域网上的远程仓库,供局域网内的用户使用。当Maven需要下载构件的时候,它从私服请求,如果 私服上不存在该构件,则从外部远程仓库下载,缓存在私服上之后,再为Maven的下载请求提供服务。
安装
一、安装maven 3.6.1
1. 下载maven
 1 # wget下载maven3.6.1
 2 [root@localhost home]#wget http://mirrors.tuna.tsinghua.edu.cn/apache/maven/maven-3/3.6.1/binaries/apache-maven-3.6.1-bin.tar.gz20
21 # 解压maven
22 [root@localhost home]# tar -zxvf apache-maven-3.6.1-bin.tar.gz 27
28 # 重命名maven
29 [root@localhost home]# mv apache-maven-3.6.1 maven
2.设置maven环境变量
1 # 修改环境变量增加maven
2 [root@localhost home]# vi /etc/profile
3
4     export MAVEN_HOME=/home/maven
5     export PATH=$MAVEN_HOME/bin:$PATH
6
7 # 重载生效
8 [root@localhost home]# source /etc/profile
3.验证maven
1 [root@localhost home]# mvn -v
2 Apache Maven 3.6.1 (d66c9c0b3152b2e69ee9bac180bb8fcc8e6af555; 2019-04-05T03:00:29+08:00)
3 Maven home: /home/maven
4 Java version: 1.8.0_221, vendor: Oracle Corporation, runtime: /home/jdk/jre
5 Default locale: zh_CN, platform encoding: UTF-8
6 OS name: "linux", version: "3.10.0-957.27.2.el7.x86_64", arch: "amd64", family: "unix"
二、安装Nexus3.11.0 maven私服
1.下载
1 # wget下载nexus的tar包
2 [root@localhost home]# wget http://sonatype-download.global.ssl.fastly.net/nexus/3/nexus-3.6.0-02-unix.tar.gz
3
4 # 解压
5 [root@localhost home]# tar -C nexus -zxvf nexus-3.6.0-02-unix.tar.gz
1 [root@localhost home]# cd nexus
2 [root@localhost nexus]# ls
3 nexus-3.6.0-02  sonatype-work
4 [root@localhost nexus]# mv nexus-3.6.0-02/ nexus
5
6 [root@localhost nexus]# ls -l
7 总用量 0
8 drwxr-xr-x. 9 root root 136 9月  19 13:11 nexus
9 drwxr-xr-x. 3 root root  20 9月  19 13:11 sonatype-work
2.修改nexus端口号
修改etc目录下nexus-default.properties文件

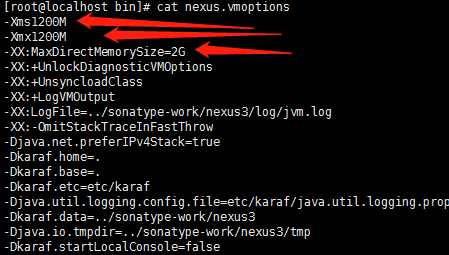
3.修改maven运行jvm
修改bin目录下的nexus.vmoptions文件

4.启动私服
1 [root@localhost bin]# pwd
2 /home/nexus/nexus/bin
3 [root@localhost bin]# ./nexus start
4 WARNING: ************************************************************
5 WARNING: Detected execution as "root" user.  This is NOT recommended!
6 WARNING: ************************************************************
7 Starting nexus
此处警告:可以useradd nexus,然后chown -R nexus:nexus /home/nexus 然后重启nexus解决
nexus start|stop|status|restart
5.浏览器打开http://192.168.8.10:8002/访问,默认密码admin/admin123。nexus启动很慢,耐心等待。


登录发现警告“System Requirement: max file descriptors [4096] likely too low, increase to at least [65536].”
解决: vi /etc/security/limits.conf
在文件末尾增加
* soft nofile 65536
* hard nofile 65536
* soft nproc 4096
* hard nproc 4096
重启nexus解决。
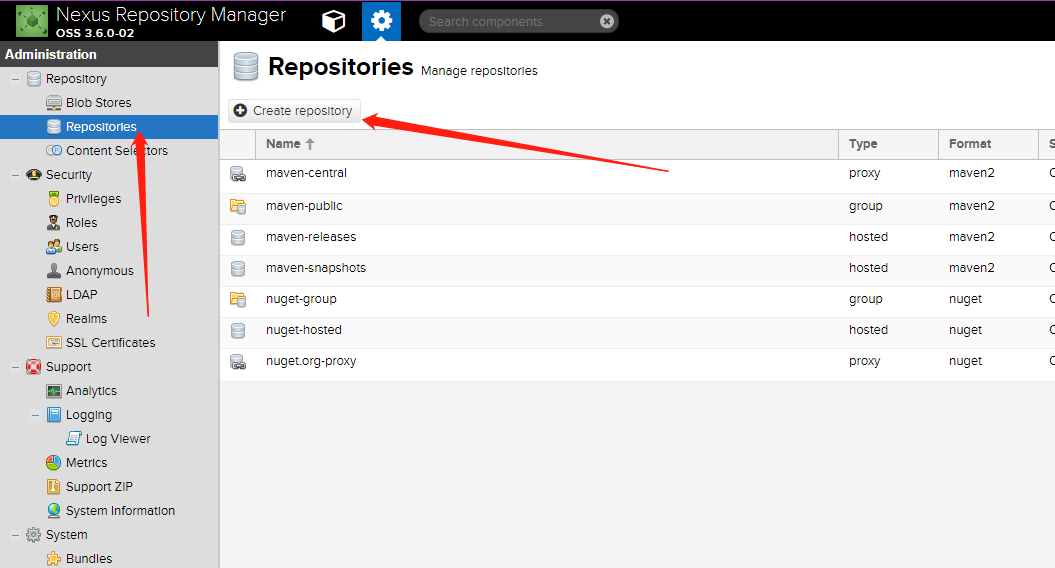
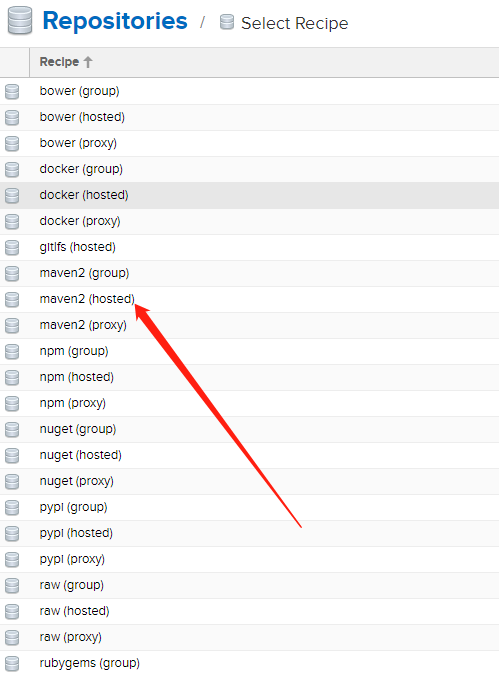
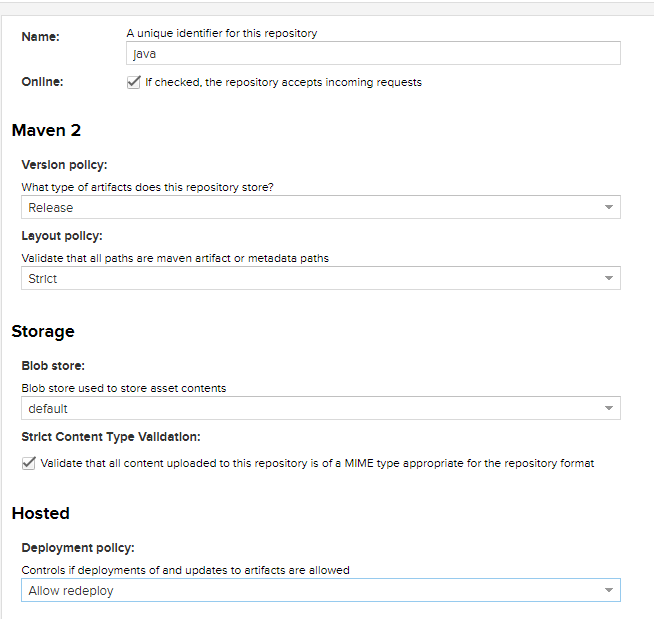
6.创建java仓库


这里选择 maven2(hosted)

maven配置:修改maven的settings.xml配置文件
  <!--nexus服务器-->
  <servers>
    <server>
        <id>releases</id>
        <username>admin</username>
        <password>admin123</password>
    </server>
    <server>
        <id>Snapshots</id>
        <username>admin</username>
        <password>admin123</password>
    </server>
  </servers>
  <!--组资源库的url地址  id和name自定义,mirrorOf的值设置为central,写死的-->
  <mirrors>
  <!--
   #后续测试增加maven私服的配置后,无法拉取官方的jar包,注释掉解决问题
    <mirror>
        <id>nexus</id>
        <name>java</name>
        <url>http://192.168.8.10:8002/repository/java/</url>
        <mirrorOf>central</mirrorOf>
    </mirror>
   -->
   <mirror>
        <id>alimaven</id>
        <name>aliyun maven</name>
        <url>http://maven.aliyun.com/nexus/content/groups/public/</url>
        <mirrorOf>central</mirrorOf>
    </mirror>
</mirrors>
<profiles>
  <profile>
   <id>jdk-1.8</id>
           <activation>
               <activeByDefault>true</activeByDefault>
               <jdk>1.8</jdk>
           </activation>
           <properties>
               <maven.compiler.source>1.8</maven.compiler.source>
               <maven.compiler.target>1.8</maven.compiler.target>
               <maven.compiler.compilerVersion>1.8</maven.compiler.compilerVersion>
           </properties>
   </profile>

   <profile>
     <id>nexus-java</id>
      <!-- 远程仓库列表 -->
    <repositories>
     <repository>
      <id>java</id>
      <name>Nexus Central</name>
     <!-- 虚拟的URL形式,指向镜像的URL-->
      <url>http://192.168.8.10:8002/repository/java/</url>
      <layout>default</layout>
     <!-- 表示可以从这个仓库下载releases版本的构件-->
      <releases>
        <enabled>true</enabled>
      </releases>
     <!-- 表示可以从这个仓库下载snapshot版本的构件 -->
      <snapshots>
        <enabled>true</enabled>
      </snapshots>
    </repository>
  </repositories>
 <!-- 插件仓库列表 -->
  <pluginRepositories>
    <pluginRepository>
      <id>java</id>
      <name>Nexus Central</name>
      <url>http://192.168.8.10:8002/repository/java/</url>
      <layout>default</layout>
      <snapshots>
        <enabled>true</enabled>
      </snapshots>
      <releases>
         <enabled>true</enabled>
      </releases>
    </pluginRepository>
  </pluginRepositories>
   </profile>
  </profiles>

  <activeProfiles>
     <!--需要激活 <profile>中的ID才生效-->
    <activeProfile>nexus-java</activeProfile>
    <activeProfile>jdk-1.8</activeProfile>
  </activeProfiles>

  <!-- activeProfiles
   | List of profiles that are active for all builds.
   |
  <activeProfiles>
    <activeProfile>alwaysActiveProfile</activeProfile>
    <activeProfile>anotherAlwaysActiveProfile</activeProfile>
  </activeProfiles>
maven私服其他仓库建立及调用过程请参考:https://www.cnblogs.com/kongweifeng/p/9369936.html
常见错误问题:
1.未认证或认证失败:错误码401
[ERROR] Failed to execute goal org.apache.maven.plugins:maven-deploy-plugin:2.8.2:deploy (default-deploy) on project mingbytesiteapi: Failed to deploy artifacts: Could not transfer artifact cc.mrbird:mingbytesiteapi:jar:1.0.0 from/to releases (http://192.168.8.101:8002/repository/java/): Failed to transfer file http://192.168.8.10:8002/repository/java/cc/mrbird/mingbytesiteapi/1.0.0/mingbytesiteapi-1.0.0.jar with status code 401 -> [Help 1]
[ERROR]
[ERROR] To see the full stack trace of the errors, re-run Maven with the -e switch.
[ERROR] Re-run Maven using the -X switch to enable full debug logging.
[ERROR]
[ERROR] For more information about the errors and possible solutions, please read the following articles:
[ERROR] [Help 1] http://cwiki.apache.org/confluence/display/MAVEN/MojoExecutionException1
解决:maven的setting.xml配置文件中的server username和password未配置或者配置不正确
 <server>
        <id>releases</id>
        <username>admin</username>
        <password>admin123</password>
    </server>
    <server>
        <id>Snapshots</id>
        <username>admin</username>
        <password>admin123</password>
    </server>


 浙公网安备 33010602011771号