
《Windows Azure Platform 系列文章目录》
1.说明
(1)本文介绍在Azure新加坡数据中心,部署Dedicated HSM服务。
2.前提要求
(1)我们需要开一个微软支持工单,启用Azure Dedicate HSM服务。具体步骤略。
(2)微软支持团队确认后,我们需要安装PowerShell,具体步骤:https://learn.microsoft.com/zh-cn/powershell/azure/install-azure-powershell?view=azps-13.0.0
(3)目前Azure支持Dedicate HSM服务的数据中心有
- East US
- East US 2
- West US
- West US 2
- Canada East
- Canada Central
- South Central US
- Southeast Asia
- India Central
- India South
- Japan East
- Japan West
- North Europe
- West Europe
- UK South
- UK West
- Australia East
- Australia Southeast
- Switzerland North
- Switzerland West
- US Gov Virginia
- US Gov Texas
其他支持的Azure数据中心区域,可以参考:https://learn.microsoft.com/en-us/azure/dedicated-hsm/faq#which-azure-regions-is-dedicated-hsm-available-in-
2-1.在订阅里,注册专用HSM服务
(1)通过下面的命令,登录Azure
add-azaccount -TenantID '你的租户ID'
(2)确认HSM服务已注册
Get-AzProviderFeature -ProviderNamespace Microsoft.HardwareSecurityModules -FeatureName AzureDedicatedHsm
(3)返回的结果必须是Registered。截图略
2-2.在订阅里注册Baremetal Server服务
(1)通过下面的命令,登录Azure
add-azaccount -TenantID 'ea1b2f97-423f-4ab3-bf6d-45a36c09ce34'
(2)确认Baremental Server服务已注册
Get-AzProviderFeature -ProviderNamespace Microsoft.Network -FeatureName AllowBaremetalServers
(3)如果返回的值是NotRegistered。则通过下面的命令注册:
Register-AzProviderFeature -ProviderNamespace Microsoft.HardwareSecurityModules -FeatureName AzureDedicatedHsm
(4)注册后,执行下面的命令,查看注册状态
Get-AzProviderFeature -ProviderNamespace Microsoft.Network -FeatureName AllowBaremetalServers
(5)如果注册完毕了,返回的结果是Registered。截图略
2-3.使用Azure PowerShell创建虚拟网络
请注意:
1. 如果通过Azure管理页面创建了HSM的虚拟网络,需要删除该虚拟网络
2. Azure HSM使用的虚拟网络,必须通过Azure PowerShell创建
1.通过Azure管理界面,删除已有的虚拟网络。步骤略
2.安装Azure PowerShell
3.通过下面的脚本,创建新的虚拟网络
add-azaccount -TenantID '你的租户ID'

#设置子网托管
$delegation = New-AzDelegation -Name "myDelegation" -ServiceName "Microsoft.HardwareSecurityModules/dedicatedHSMs"
#新建hsm子网,CIDR为:21.88.224.0/24
$hsmsubnet = New-AzVirtualNetworkSubnetConfig -Name hsmsubnet -AddressPrefix 21.88.224.0/24 -Delegation $delegation

#新建网关子网,CIDR为:21.88.225.0/26
$gatewaySubnet  = New-AzVirtualNetworkSubnetConfig -Name GatewaySubnet  -AddressPrefix "21.88.225.0/26"

#新建新的虚拟网络
#名称为HSM-VNet,区域在Azure新加坡
New-AzVirtualNetwork -Name HSM-VNet -ResourceGroupName defaultrg-ap -Location southeastasia -AddressPrefix "21.88.224.0/20" -Subnet $hsmSubnet,$gatewaySubnet
2-4.部署说明(非常重要)
1.Dedicated HSM服务,需要单独的Virtual Network,不能与既有virtual network集成
(1)Dedicated HSM服务,需要单独的子网,该子网需要被HSM独占使用
(2)Dedicated HSM服务,会单独创建Virtual Network Gatewa网关服务,且该网关无法与专线互联。这个网关服务,是单独为Dedicated HSM提供服务
2-5.注意事项
1.在Azure 新加坡数据中心使用Dedicated HSM,建议优先使用可用区1和可用区2
3.部署架构
1.如果我们采用的是Hub-Spoke网络拓扑,总体架构请参考下图:
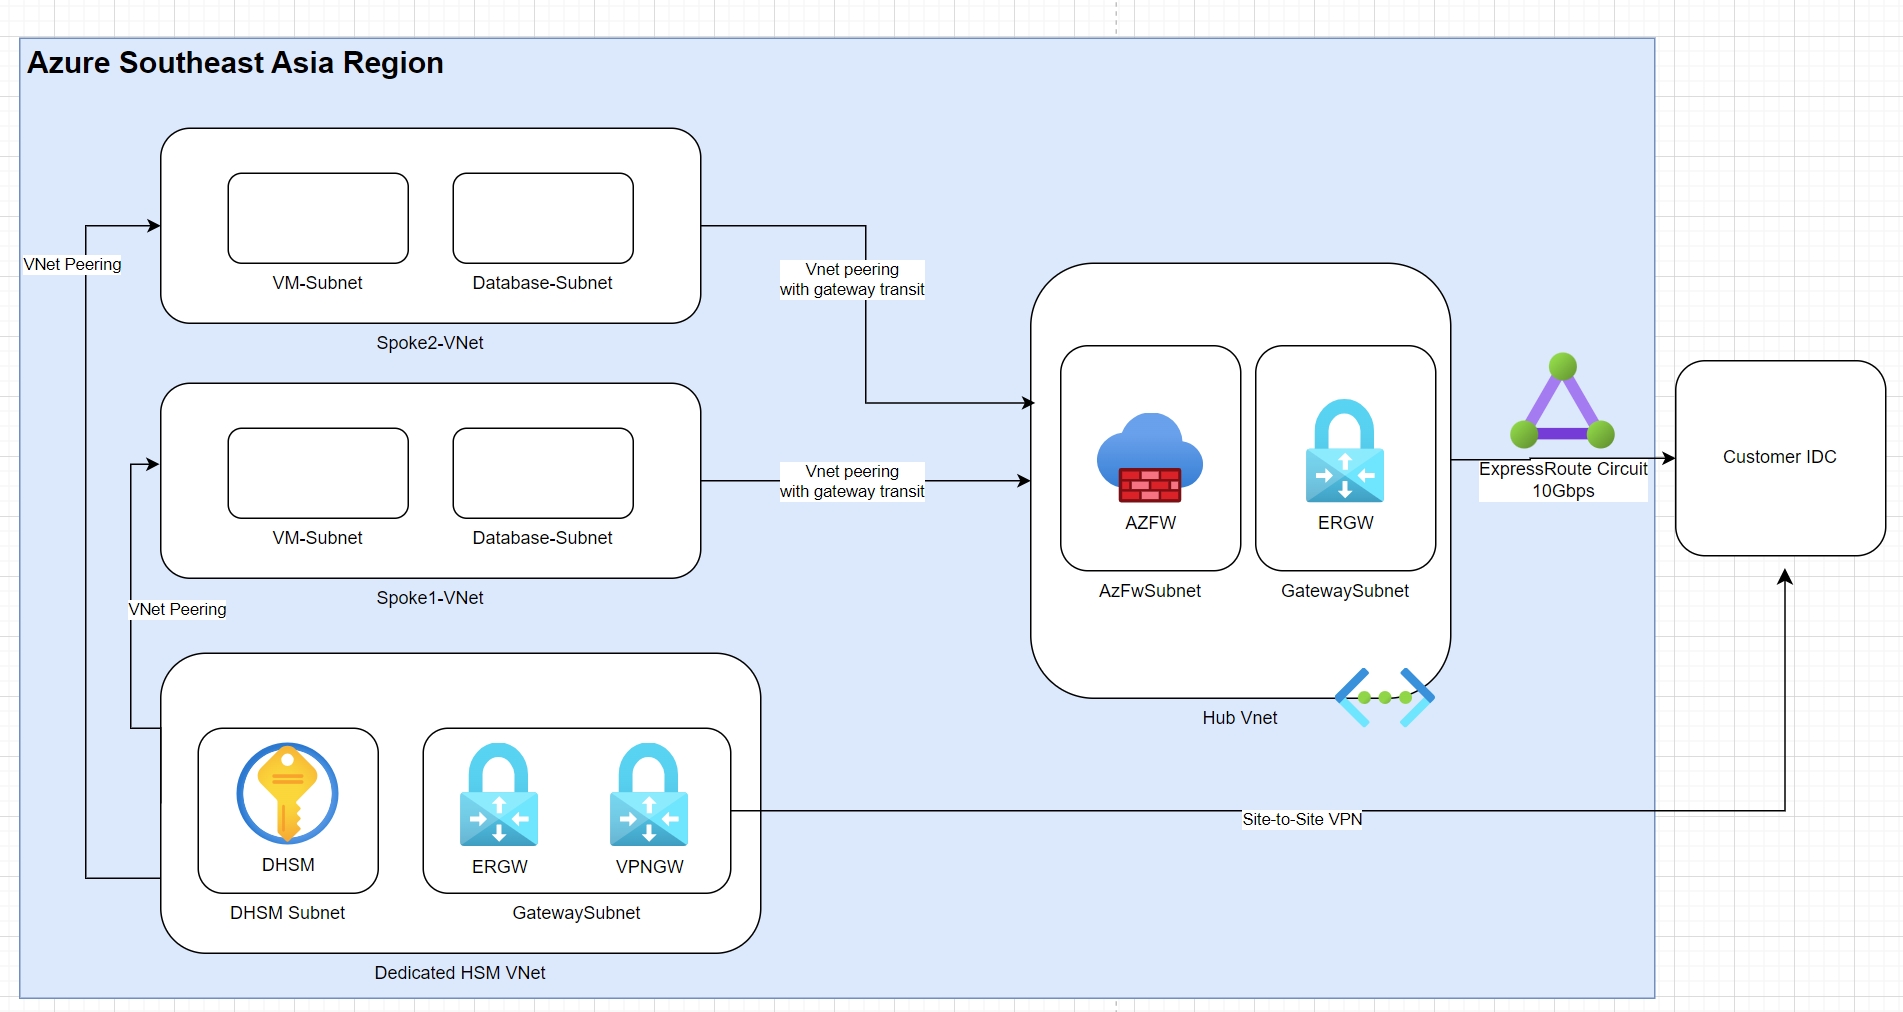
2.上图的架构说明
(1)Dedicate HSM需要单独的Virtual Network
(2)Dedicate HSM会使用专门的子网
(3)Dedicated HSM服务,会单独创建Virtual Network Gateway网关服务,且该网关无法与专线互联
3.Dedicated HSM与其他Virtual Network互联
(1)Dedicated HSM如果需要与其他Virtual Network,需要通过VNet Peering对等互联的方式,与Prod Virtual Network与Ops Virtual Network互联
(2)Dedicated HSM如果需要与客户的IDC互联,可以在Gateway Subnet,创建VPN Gateway,通过Site-to-Site VPN方式,与客户IDC互联
4.部署Azure Dedicated HSM服务
4-1.准备模版文件
1.我们新建文件:我们新建文件:Deploy-HSM-toVNET-Template-v1.3.json
2.文件内容如下,创建的HSM服务,部署在可用区1
{
    "$schema": "https://schema.management.azure.com/schemas/2015-01-01/deploymentTemplate.json#",
    "contentVersion": "1.0.0.0",
    "metadata": {
        "comment1": "Deploys 1 HSMs to an existing VNet with subnets for ERGW and HSMs",
        "comment2": "ERGW subnet must be of type 'GatewaySubnet'",
        "comment3": "HSM subnet must have delegation set for 'Microsoft.HardwareSecurityModules/dedicatedHSMs'",
        "comment4": "HSMs set to stamp1 and stamp2 - keep balanced across stamps for HA"
    },
    "parameters": {
        "ResourcePrefix": {
            "type": "string"
        },
        "ExistingVNetName": {
            "type": "string"
        },
        "ExistingHSMSubnetName": {
            "type": "string"
        },
        "HSMResourceName1": {
            "type": "string"
        }
    },
    "variables": {
        "namingPrefix": "[concat(parameters('ResourcePrefix'),'-')]",
        "networkApiVersion": "2018-07-01",
        "ERGatewayName": "[concat(variables('namingPrefix'), 'ergw')]",
        "ERGatewayPublicIPAddressName": "[concat(variables('namingPrefix'), 'ergwpip')]",
        "vnetID": "[resourceId('Microsoft.Network/virtualNetworks', parameters('ExistingVNetName'))]",
        "ERGatewaySubnetID": "[concat(variables('vnetID'),'/subnets/GatewaySubnet')]",
        "hsmSubnetID": "[concat(variables('vnetID'),'/subnets/', parameters('ExistingHSMSubnetName'))]"
    },
    "resources": [
        {
            "apiVersion": "[variables('networkApiVersion')]",
            "type": "Microsoft.Network/publicIPAddresses",
            "name": "[variables('ERGatewayPublicIPAddressName')]",
            "location": "[resourceGroup().location]",
            "properties": {
                "publicIPAllocationMethod": "Static"
            },
            "sku": {
                "name": "Standard"
            }
        },
        {
            "apiVersion": "[variables('networkApiVersion')]",
            "type": "Microsoft.Network/virtualNetworkGateways",
            "name": "[variables('ERGatewayName')]",
            "location": "[resourceGroup().location]",
            "dependsOn": [
                "[concat('Microsoft.Network/publicIPAddresses/', variables('ERGatewayPublicIPAddressName'))]"
            ],
            "properties": {
                "ipConfigurations": [{
                        "properties": {
                            "privateIPAllocationMethod": "Dynamic",
                            "subnet": {
                                "id": "[variables('ERGatewaySubnetID')]"
                            },
                            "publicIPAddress": {
                                "id": "[resourceId('Microsoft.Network/publicIPAddresses',variables('ERGatewayPublicIPAddressName'))]"
                            }
                        },
                        "name": "[concat(variables('ERGatewayName'),'-ipconfig', '0')]"
                    }
                ],
                "sku": {
                    "name": "Standard",
                    "tier": "Standard",
                    "capacity": 1
                },
                "gatewayType": "ExpressRoute"
            }
        },
        {
            "type": "Microsoft.HardwareSecurityModules/dedicatedHSMs",
            "name": "[parameters('HSMResourceName1')]",
            "location": "[resourceGroup().location]",
            "dependsOn": [
                "[concat('Microsoft.Network/virtualNetworkGateways/', variables('ERGatewayName'))]"
            ],
            "apiVersion": "2018-10-31-preview",
            "tags": {
                //"ServiceInstance": "rd-sg-stg",
                "ServiceInstance": "rd-sg-stg"
            },
            "Zones": ["1"],
            "Sku": {
                "Name": "SafeNet Luna Network HSM A790"
            },
            "properties": {
                "NetworkProfile": {
                    "Subnet": {
                        "id": "[variables('hsmSubnetID')]"
                    },
                    //"StampId": "stamp1",
                }

            }
        }
    ]
}
4-2.准备参数文件
1.我们新建Deploy-HSM-toVNET-Params-v1.3.json
2.文件内容如下:
{
    "$schema": "https://schema.management.azure.com/schemas/2015-01-01/deploymentTemplate.json",
    "contentVersion": "1.0.0.0",
    "parameters": {
        "ResourcePrefix": {
            "value": "hsm"
        },
        //现有的虚拟网络名称
        "ExistingVNetName": {
            "value": "HSM-VNet"
        },
        //现有的HSM子网名称
        "ExistingHSMSubnetName": {
            "value": "hsmsubnet"
        },
        "HSMResourceName1": {
            "value": "my-hsm1"
        }
    }
}
3.注意上面的内容:
(1)ExistingVNetName,就是我们准备的现有HSM服务需要的虚拟网络名称
(2)ExistingHSMSubnetName,就是我们准备的,HSM子网
4-3.部署HSM
1.我们先在本地打开Azure Powershell,通过下面的命令登录:
add-azaccount -TenantID '你的租户ID'
2.在PowerShell里部署HSM资源。首先我们要指定资源组
$rgname= "defaultrg-ap"
3.新建HSM服务
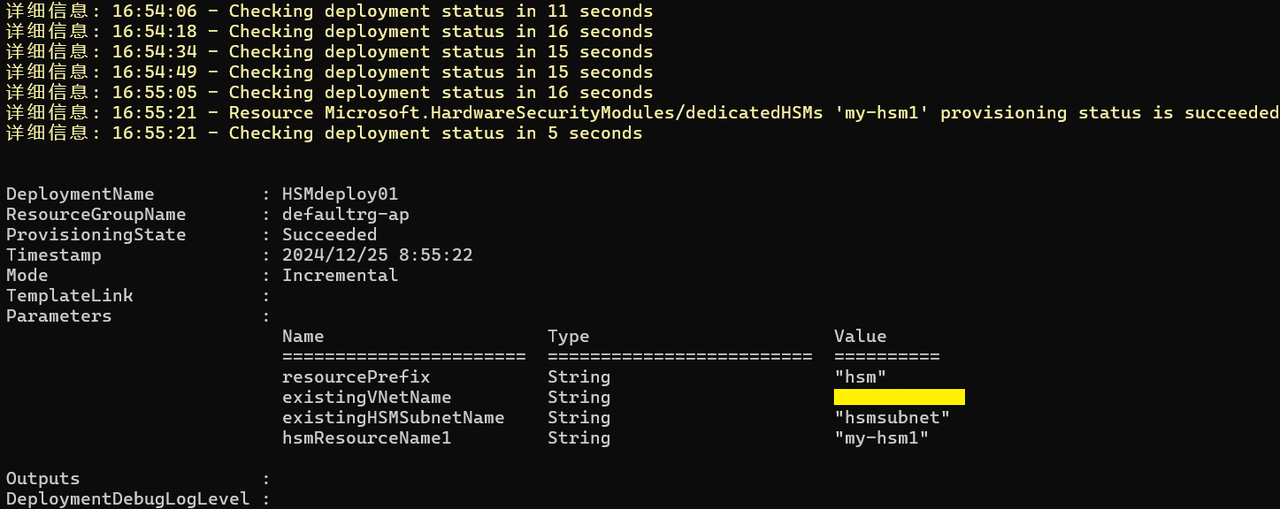
New-AzResourceGroupDeployment -ResourceGroupName $rgname -TemplateFile Deploy-HSM-toVNET-Template-v1.3.json -TemplateParameterFile Deploy-HSM-toVNET-Params-v1.3.json -Name HSMdeploy01 -Verbose
4.可以查看到下面的命令,说明部署已经开始
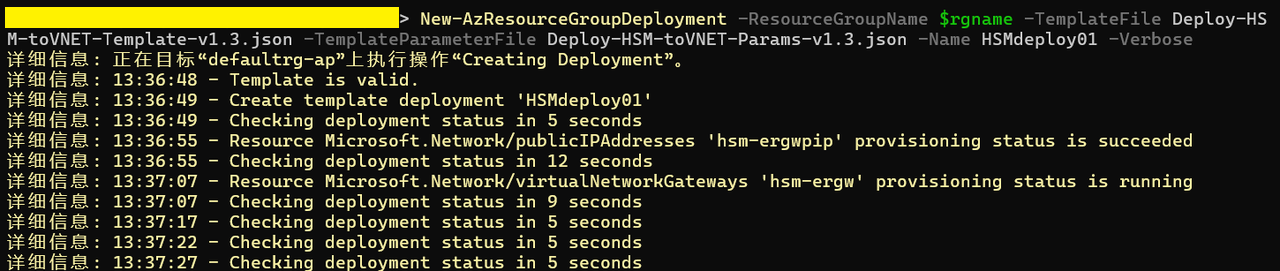
5.整体部署大概需要花费30分钟
6.部署成功后,信息如下:
4-4.检查部署结果
4-4-1.通过Azure界面检查
1.我们登录https://portal.azure.com,找到虚拟网络HSM-VNet
2.查看这个虚拟网络里的Connected Devices。可以查看到下面的信息。
(1)hsm-ergw是HSM服务需要的Express Route Gateway网关服务
(2)my-hsm1_HSMnic,是HSM服务依赖的网卡资源
(3)截图略
4-4-2.通过Azure PowerShell检查
1.需要打开Azure PowerShell,安装Az模块
Install-Module -Name Az.DedicatedHsm
2.会显示下面的内容,我们输入Y,确认安装
Untrusted repository
You are installing the modules from an untrusted repository. If you trust this repository, change its
InstallationPolicy value by running the Set-PSRepository cmdlet. Are you sure you want to install the modules
from 'PSGallery'?
[Y] 是(Y)  [A] 全是(A)  [N] 否(N)  [L] 全否(L)  [S] 暂停(S)  [?] 帮助 (默认值为“N”): Y
3.执行下面的命令
Get-AzDedicatedHsm -Name my-hsm1 -ResourceGroupName defaultrg-ap
4.可以看到执行状态为Succeeded。截图略
5.其他步骤
5-1.打通到其他虚拟网络的连接
1.我们可以打通Azure新加坡虚拟网络HSM-VNet,到虚拟网络Spoke1-VNet,和Spoke2-VNet的对等互联 (Peering)
2.具体步骤略
6.删除Dedicated HSM服务
1.如果我们需要删除HSM,可以通过PowerShell执行下面的命令:
#先登录
add-azaccount -TenantID '你的租户ID'

#删除HSM服务
Remove-AzDedicatedHsm -Name my-hsm1 -ResourceGroupName defaultrg-ap

 浙公网安备 33010602011771号