
《Windows Azure Platform 系列文章目录》
最近有1个客户需求,在这里记录一下。
客户提出需要使用Azure负载均衡器(四层负载均衡器),实现主备模式。
场景是负载均衡器后有2台虚拟机
- 平时100%的流量都发送到第一台虚拟机
- 如果第一台虚拟机发生宕机了,则100%的流量都发送到第二台虚拟机
- 如果第一台虚拟机恢复正常,则100%的流量重新发送到第一台虚拟机上。
首先说明一下:
1.Azure四层负载均衡器的规则,有三种:
(1)无。指定来自同一客户端的连续请求可由任意虚拟机处理
(2)客户端IP。制定来自同一客户端 IP 地址的连续请求,将发送到同一个虚拟机处理
(3)客户端IP和协议。指定来自同一客户端 IP 地址和协议组合的连续请求,将发送到同一个虚拟机处理、
2.我们这里主要通过在虚拟机里部署HAProxy的方式,在HAProxy部署主备。
准备环境:
1.我们先创建1个新的虚拟网络,名称为:testing-vnet,设置IP Range为:10.0.0.0/16
2.在这个虚拟网络里,创建2个子网:
- 第一个子网名称为:haproxyvm-subnet,IP Range为10.0.0.0/24
- 第二个子网名称为:nginxvm-subnet,IP Range为10.0.1.0/24
3.创建4台虚拟机,具体配置如下:
| 虚拟机名称 | 虚拟机大小 | 操作系统 | 虚拟网络 | 子网 | 公网IP | 内网IP |
| haproxyvm-01 | 2Core/4GB | CentOS 8.2 | testing-vnet | haproxyvm-subnet | 略 | 10.0.0.4 |
| haproxyvm-02 | 2Core/4GB | CentOS 8.2 | testing-vnet | haproxyvm-subnet | 略 | 10.0.0.5 |
| nginxvm-01 | 2Core/4GB | CentOS 8.2 | testing-vnet | nginxvm-subnet | 略 | 10.0.1.4 |
| nginxvm-02 | 2Core/4GB | CentOS 8.2 | testing-vnet | nginxvm-subnet | 略 | 10.0.1.5 |
准备安装Nginx虚拟机
1.我们先登录nginxvm-01这台虚拟机,先切换到root身份
sudo su -
2.通过yum安装nginx
yum install nginx -y
3.进入到nginx的html页面
cd /usr/share/nginx/html
4.备份默认的html页面
cp index.html index.html.bak
5.修改默认的html页面,显示为当前的虚拟机名称
echo "This is nginxvm-01" > index.html
6.启动nginx服务
systemctl start nginx
7.设置nginx开机启动
systemctl enable nginx
8.测试当前的nginx页面
[root@nginxvm-01 html]# curl localhost
This is nginxvm-01
9.最后我们在nginxvm-02这台虚拟机上,执行上面的步骤1-4。同时修改默认的html页面,
echo "This is nginxvm-02" > index.html
10.在nginxvm-02上,执行上面的步骤6-8
准备安装HAProxy
1.我们先登录haproxyvm-01这台虚拟机,先切换到root身份
sudo su -
2.安装haproxy
yum install haproxy -y
3.进入haproxy配置路径
cd /etc/haproxy
4.备份haproxy配置信息
cp haproxy.cfg haproxy.cfg.bak
5.编辑haproxy.cfg,主要修改的内容我用中文备注了
#---------------------------------------------------------------------
# Example configuration for a possible web application.  See the
# full configuration options online.
#
#   https://www.haproxy.org/download/1.8/doc/configuration.txt
#
#---------------------------------------------------------------------

#---------------------------------------------------------------------
# Global settings
#---------------------------------------------------------------------
global
    # to have these messages end up in /var/log/haproxy.log you will
    # need to:
    #
    # 1) configure syslog to accept network log events.  This is done
    #    by adding the '-r' option to the SYSLOGD_OPTIONS in
    #    /etc/sysconfig/syslog
    #
    # 2) configure local2 events to go to the /var/log/haproxy.log
    #   file. A line like the following can be added to
    #   /etc/sysconfig/syslog
    #
    #    local2.*                       /var/log/haproxy.log
    #
    log         127.0.0.1 local2

    chroot      /var/lib/haproxy
    pidfile     /var/run/haproxy.pid
    maxconn     4000
    user        haproxy
    group       haproxy
    daemon

    # turn on stats unix socket
    stats socket /var/lib/haproxy/stats

    # utilize system-wide crypto-policies
    ssl-default-bind-ciphers PROFILE=SYSTEM
    ssl-default-server-ciphers PROFILE=SYSTEM

#---------------------------------------------------------------------
# common defaults that all the 'listen' and 'backend' sections will
# use if not designated in their block
#---------------------------------------------------------------------
defaults
    mode                    http
    log                     global
    option                  httplog
    option                  dontlognull
    option http-server-close
    option forwardfor       except 127.0.0.0/8
    option                  redispatch
    retries                 1                            #1次链接失败就认为服务器不可用
    timeout http-request    10s
    timeout queue           1m
    timeout connect         10s
    timeout client          1m
    timeout server          1m
    timeout http-keep-alive 10s
    timeout check           10s
    maxconn                 3000

#---------------------------------------------------------------------
# main frontend which proxys to the backends
#---------------------------------------------------------------------
frontend main
    bind *:5000                               #设置监听端口为5000
    acl url_static       path_beg       -i /static /images /javascript /stylesheets
    acl url_static       path_end       -i .jpg .gif .png .css .js

    use_backend static          if url_static
    default_backend             app

#---------------------------------------------------------------------
# static backend for serving up images, stylesheets and such
#---------------------------------------------------------------------
backend static
    balance     roundrobin
    server      static 127.0.0.1:4331 check

#---------------------------------------------------------------------
# round robin balancing between the various backends
#---------------------------------------------------------------------
backend app
    balance     roundrobin
    server  app1 10.0.1.4:80 check               #这里的10.0.1.4是nginxvm-01虚拟机的内网IP地址,check表示是主节点
    server  app2 10.0.1.5:80 backup              #这里的10.0.1.5是nginxvm-02虚拟机的内网IP地址,backup表示是备份节点
6.主要修改的内容如下:
retries                 1                            #1次链接失败就认为服务器不可用

frontend main
    bind *:5000                               #设置监听端口为5000

    server  app1 10.0.1.4:80 check               #这里的10.0.1.4是nginxvm-01虚拟机的内网IP地址,80端口是Nginx使用,check表示是主节点
    server  app2 10.0.1.5:80 backup              #这里的10.0.1.5是nginxvm-02虚拟机的内网IP地址,80端口是Nginx使用,backup表示是备份节点
上面的frontend main里面bind,表示请求haproxyvm前端的5000端口,会转发到nginxvm的80端口
7.启动haproxy
systemctl start haproxy
8.设置开机启动
systemctl enable haproxy
9.请记得登录haproxyvm-02,设置把上面的步骤1-8再设置一次,并且配置haproxy.cfg的信息和haproxyvm-01完全一致
最后,我们创建1个公网负载均衡器(内网负载均衡器也可以,这里笔者为了演示方便)
1.创建公网负载均衡器步骤略。公网负载均衡器的IP地址为:48.218.194.204
2.负载均衡器的后端池,我们选择haproxyvm-01和haproxyvm-02的内网网卡:IP分别是10.0.0.4和10.0.0.5。截图略
3.负载均衡器的监听,名称为probe5000,我们设置监听端口为5000,协议为TCP

4.设置负载均衡器规则:
- Port为80,这里的port是指internet到负载均衡器的端口
- Backend Port为5000,这里的backendport是指负载均衡器,到后端haproxyvm的端口
- Health Probe选择之前创建的监听:probe5000
- Session persistence设置为None
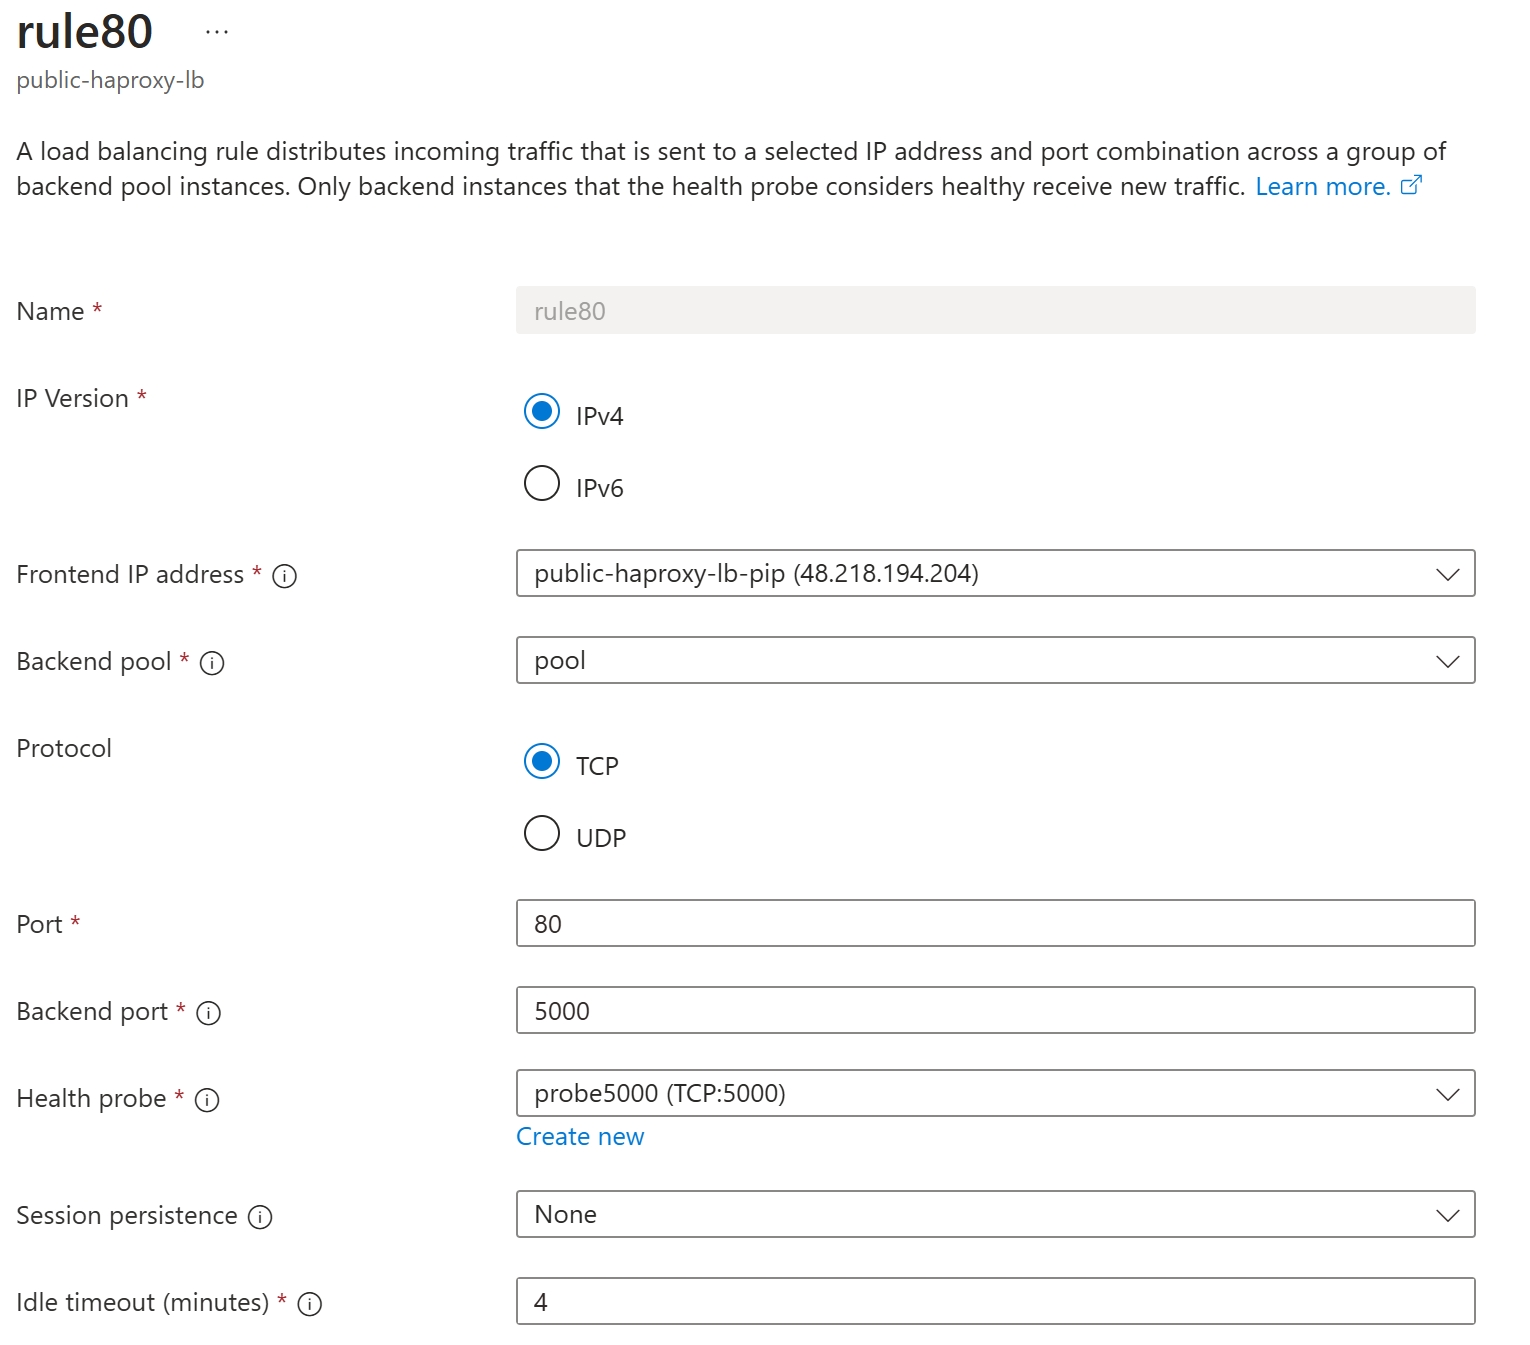
5.最后请记得在haproxyvm-01和haproxyvm-02的安全组上,打开端口5000的Inbound访问
测试
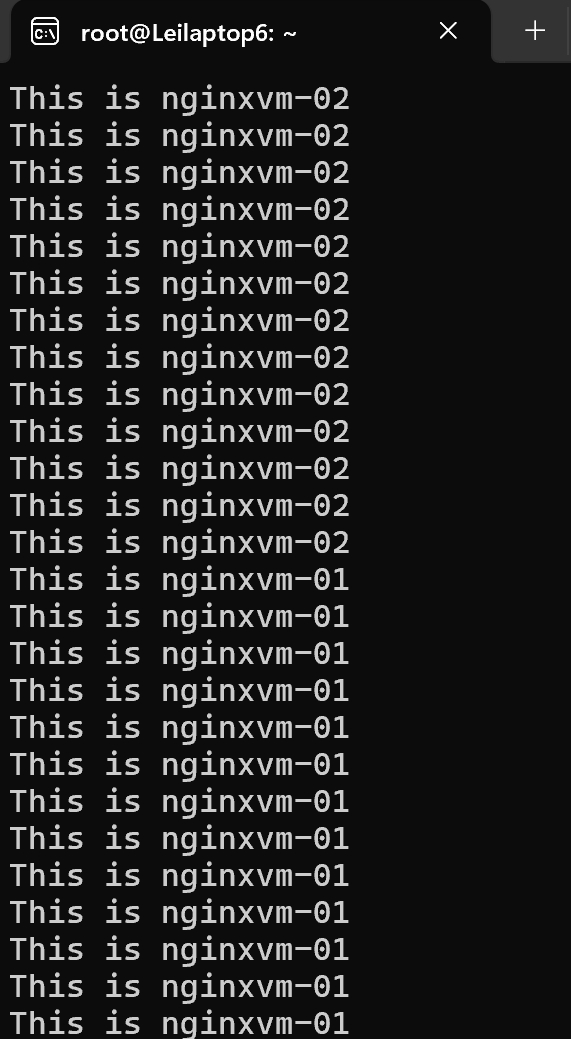
1.我们在本地笔记本上,执行命令。下面的48.218.194.204,是我的负载均衡器的公网IP地址
while true; do curl http://48.218.194.204; sleep 1; done
2.可以观察到,所有的请求经过2台Haproxy虚拟机,都发送到nginxvm-01上,如下图:
root@Leilaptop6:~# while true; do curl http://48.218.194.204; sleep 1; done
This is nginxvm-01
This is nginxvm-01
This is nginxvm-01
This is nginxvm-01
This is nginxvm-01
This is nginxvm-01
This is nginxvm-01
This is nginxvm-01
This is nginxvm-01
This is nginxvm-01
This is nginxvm-01
This is nginxvm-01
This is nginxvm-01
3.然后我们ssh到nginxvm-01上,关闭nginx服务
[root@nginxvm-01 html]# systemctl stop nginx
4.观察curl结果:
root@Leilaptop6:~# while true; do curl http://48.218.194.204; sleep 1; done
This is nginxvm-01
This is nginxvm-01
This is nginxvm-01
This is nginxvm-01
This is nginxvm-01
This is nginxvm-01
This is nginxvm-02
This is nginxvm-02
This is nginxvm-02
This is nginxvm-02
This is nginxvm-02
5.然后我们在nginxvm-01上,重新启动nginx服务
[root@nginxvm-01 html]# systemctl start nginx
6.观察curl结果:
This is nginxvm-02
This is nginxvm-02
This is nginxvm-02
This is nginxvm-02
This is nginxvm-02
This is nginxvm-02
This is nginxvm-02
This is nginxvm-01
This is nginxvm-01
This is nginxvm-01
This is nginxvm-01
This is nginxvm-01
This is nginxvm-01
This is nginxvm-01
This is nginxvm-01
This is nginxvm-01
截图如下:
可以看到当nginxvm-01恢复服务后,100%流量又重新发送到nginxvm-01了。
参考文档:https://blog.csdn.net/qq_41124528/article/details/129571483

 浙公网安备 33010602011771号