《Windows Azure Platform 系列文章目录》
如果读者使用的是国内由世纪互联运维的Azure China服务,请参考笔者的博文Azure China (4) 管理Azure China Storage Account
如果需要参考Azure China使用SAS Token的Sample Code,请参考笔者的博文:Azure China (10) 使用Azure China SAS Token
本章我们会介绍如何在本地模拟器使用Blob Storage存储图片。
关于Blob Storage的概念,请参考 Windows Azure Platform (七) Windows Azure Storage Service存储服务 。
在开始介绍之前,请确保您已经下载了最新的Windows Azure开发工具,我使用的是1.6版本。本次介绍使用Visual Studio 2010作为开发工具。
Azure Container属性有三种
- Private:不允许匿名用户读取该容器中的Blob;
- Public Container:匿名用户可以读取该Container,并且可以列出Container所有Blob内容;
- Blob:匿名用户只能读取Blob,即只能根据Blob的URL来读取Blob,无法列出Container下所有的Blob。
1.新建Azure Project
以管理员身份运行Visual Studio 2010,并新建一个Windows Azure Project,我命名为AzureBlobStorage
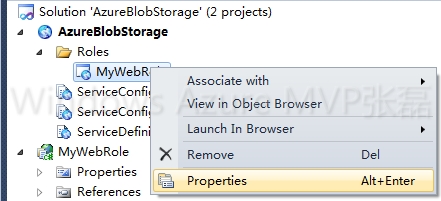
然后选择WebRole-->右键-->属性
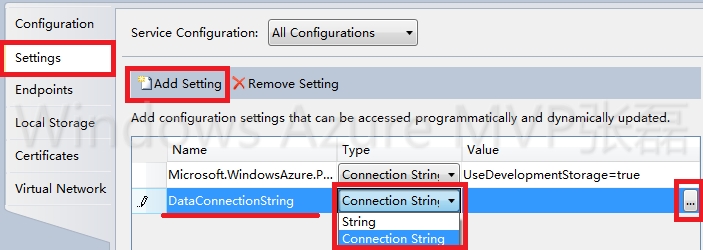
在Settings页面,Add Setting,类型选择Connection String,并且按最右边的"..."按钮
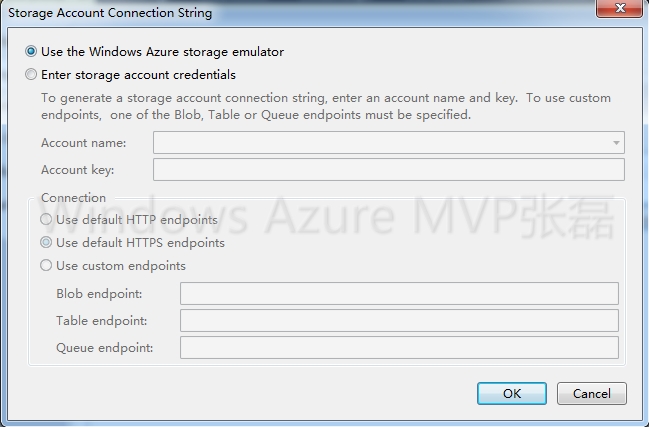
选择"Use the Windows Azure storage emulator",然后选择"OK"
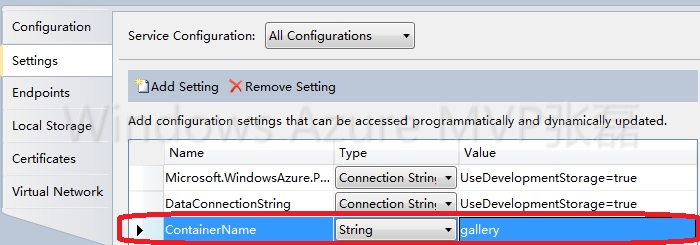
然后添加另外一个Setting(设置),叫做ContainerName并且把它的Type改成"String",值设置成gallery
注意:
Container和Blob的命名规则!
2.打开Default.aspx.cs
添加引用命名空间
using Microsoft.WindowsAzure.StorageClient;
using Microsoft.WindowsAzure;
using Microsoft.WindowsAzure.ServiceRuntime;
using System.Collections.Specialized;
using Microsoft.WindowsAzure.StorageClient.Protocol;
前端的ASPX添加如下控件:

然后添加代码内容:
namespace MyWebRole
{
    public partial class _Default : System.Web.UI.Page
    {
        protected void Page_Load(object sender, EventArgs e)
        {
            if (!IsPostBack)
            {
                this.EnsureContainerExists();
            }
        }

        private void EnsureContainerExists()
        {
            var container = GetContainer();

            // 检查container是否被创建,如果没有,创建container
            container.CreateIfNotExist();

            var permissions = container.GetPermissions();
            //对Storage的访问权限是可以浏览Container
            permissions.PublicAccess = BlobContainerPublicAccessType.Container;

            container.SetPermissions(permissions);
        }

        private CloudBlobContainer GetContainer()
        {
            //获取ServiceConfiguration.cscfg配置文件的信息
            var account = CloudStorageAccount.FromConfigurationSetting("DataConnectionString");
            var client = account.CreateCloudBlobClient();
            //获得BlobContainer对象
            return client.GetContainerReference(RoleEnvironment.GetConfigurationSettingValue("ContainerName"));
        }

        protected void upload_Click(object sender, EventArgs e)
        {
            if (imageFile.HasFile)
            {
                //输出图片文件的信息
                status.Text = "Inserted [" + imageFile.FileName + "] - Content Type [" + imageFile.PostedFile.ContentType + "] - Length [" + imageFile.PostedFile.ContentLength + "]";

                this.SaveImage(imageFile.FileName,imageFile.PostedFile.ContentType,imageFile.FileBytes);
            }
            else
                status.Text = "No image file";
        }


        private void SaveImage(string fileName, string contentType, byte[] data)
        {
            //获得BlobContainer对象并把文件上传到这个Container
            var blob = this.GetContainer().GetBlobReference(fileName);
            blob.Properties.ContentType = contentType;

            // 创建元数据信息
            var metadata = new NameValueCollection();
            metadata["Name"] = fileName;

            // 上传图片
            blob.Metadata.Add(metadata);
            blob.UploadByteArray(data);
        }

    //发现Azure Storage升级到2.0后API变了
      private void SaveImage(string fileName, string contentType, byte[] data)
        {
            //获得BlobContainer对象并把文件上传到这个Container
            var blob = this.GetContainer().GetBlockBlobReference(fileName);
            blob.Properties.ContentType = contentType;

            using (var ms = new MemoryStream(data, false))
            {
                blob.UploadFromStream(ms);
            }
        }
    }
3.打开Global.asax.cs文件,添加如下代码
 void Application_Start(object sender, EventArgs e)
        {
            // This code sets up a handler to update CloudStorageAccount instances when their corresponding
            // configuration settings change in the service configuration file.
            CloudStorageAccount.SetConfigurationSettingPublisher((configName, configSetter) =>
            {
                // Provide the configSetter with the initial value
                configSetter(RoleEnvironment.GetConfigurationSettingValue(configName));
            });
        }
4.运行应用程序,使用FileUpload查找本地图片,然后点击"Upload Image",图片就能上传到本地Storage Emulator的Blob里了。

6.打开Visual Studio,展开左侧的Server Explorer列表,依次展开Windows Azure Storage-->Development-->Blob-->gallery

其中Developement表示我使用的是本地的模拟器
gallery就是我前面设置的Blob Container
我们选中Azure.jpg,右键属性,可以看使用Storage Emluator后在本地的URL
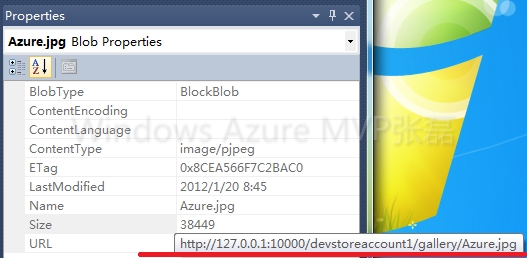
我们可以通过打开本地的浏览器来查看。
5.下载我的工程文件:AzureBlobStorage.rar


【推荐】国内首个AI IDE,深度理解中文开发场景,立即下载体验Trae
【推荐】编程新体验,更懂你的AI,立即体验豆包MarsCode编程助手
【推荐】抖音旗下AI助手豆包,你的智能百科全书,全免费不限次数
【推荐】轻量又高性能的 SSH 工具 IShell:AI 加持,快人一步
· .NET Core 中如何实现缓存的预热?
· 从 HTTP 原因短语缺失研究 HTTP/2 和 HTTP/3 的设计差异
· AI与.NET技术实操系列:向量存储与相似性搜索在 .NET 中的实现
· 基于Microsoft.Extensions.AI核心库实现RAG应用
· Linux系列:如何用heaptrack跟踪.NET程序的非托管内存泄露
· TypeScript + Deepseek 打造卜卦网站:技术与玄学的结合
· 阿里巴巴 QwQ-32B真的超越了 DeepSeek R-1吗?
· 【译】Visual Studio 中新的强大生产力特性
· 10年+ .NET Coder 心语 ── 封装的思维:从隐藏、稳定开始理解其本质意义
· 【设计模式】告别冗长if-else语句:使用策略模式优化代码结构