python:Asyncio模块处理“事件循环”中的异步进程和并发执行任务
python模块Asynico提供了管理事件、携程、任务和线程的功能已经编写并发代码的同步原语。
组成模块:
事件循,Asyncio 每个进程都有一个事件循环。
协程,子例程概念的泛化,可以暂停任务,等待哇爱不处理程序完成再从暂停之处返回。
Futures:定义了futures对象。
任务tasks:是Asyncio的一个子类,用于封装并管理并行模式下的协程。
管理事件循环的方法:
loop = asyncio.get_event_loop()  获得当前上下文事件循环
loop.call_later(time_delay,caallback,argument) 在给定时间time_delay秒后,调用某个回调对象。
loop.call_soon(callback,argument) 该方法马上安排一个被调用的回调对象。
loop.time()  以浮点数形式返回根据事件循环的内部时钟确定的当前时间。
asyncio.set_event_loop()  将当前上下文的时间循环设置为3给定循环。
asyncio.new_event_loop()  根据此函数的规则创建并返回一个新的时间循环对象。
loop.run_forever() 一直执行知道调用stop()为止。

异步调用子例程
import asyncio

def fun_1(end_time,loop):
    print("fun1__callback")

    if (loop.time() + 1.0) < end_time:
        loop.call_later(1,fun_2,end_time,loop)
        print("fun1print")
    else:
        loop.stop()


def fun_2(end_time, loop):
    print("fun2__callback")

    if (loop.time() + 1.0) < end_time:
        loop.call_later(1, fun_3, end_time, loop)

    else:
        loop.stop()


def fun_3(end_time, loop):
    print("fun3__callback")

    if (loop.time() + 1.0) < end_time:
        loop.call_later(1, fun_1, end_time, loop)

    else:
        loop.stop()


loop = asyncio.get_event_loop()

end_loop = loop.time() + 9.0

loop.call_soon(fun_1,end_loop,loop)

loop.run_forever()

loop.close()


结果:
fun1__callback
fun1print
fun2__callback
fun3__callback
fun1__callback
fun1print
fun2__callback
fun3__callback
fun1__callback
fun1print
fun2__callback
fun3__callback
从输出结果上我们可以看到这个任务调用是完全异步的,开始loop.call_soon(fun_1,end_loop,loop) 立刻调用fun_1 当if条件成立时延迟一秒执行fun_2 但是fun_1的下一句print依然直接输出。但是我后来又测试他实际上还是要等fun_1里的其他语句执行完才会切换到fun_2。
总结:只是在fun_1 1S后调用fun_2期间他会执行fun_1中的其他语句,但是如果需要的时间过长就会等待fun_1所有语句执行完毕才会切换到fun_2不仅仅等一秒。
使用Asyncio处理协程
与子例程相似但是不存在用于协调结果的主程序,协程之间可以相互连接形成一个管道,不需要任何监督函数来按顺序调用协程。谢承忠可以暂停执行,同时保存干预时的本地状态,便于后续继续执行任务。有了协程池,协程计算就能够相互交错。
特点:
协程支持多个进入点,可以多次生成。
协程能够将执行转移至任意其他协程。
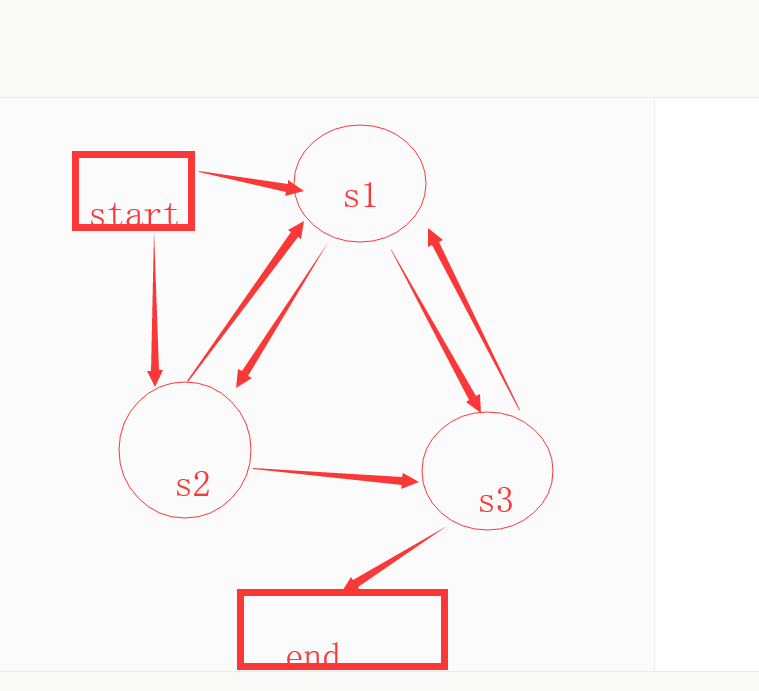
下方实现了一个有限状态机。
如图:系统有5个状态 ,start 、s1、s2、s3、end
这里s1-s3是自动循环切换。开始通过start进入状态机从end退出状态机。
实现代码如下
import asyncio
import time
from random import randint

@asyncio.coroutine
def StartState():
    print("start state call \n")
    input_value = randint(0,1)
    time.sleep(1)
    if (input_value == 0):
        result = yield from start1(input_value)
    else:
        result = yield from start2(input_value)
    print("start + " + result)
    return result
@asyncio.coroutine
def start1(value):
    v = str(value)
    input_value = randint(0,1)
    if input_value == 0:
        result = yield from start2(input_value)
    else:
        result = yield from start3(input_value)

    print("1 end +" + result)
    return v

@asyncio.coroutine
def start2(value):
    v = str(value)
    input_value = randint(0, 1)
    if input_value == 0:
        result = yield from start1(input_value)
    else:
        result = yield from start3(input_value)

    print("2 end +"  + result)
    return v

@asyncio.coroutine
def start3(value):
    v = str(value)
    input_value = randint(0, 1)
    if input_value == 0:
        result = yield from endy(input_value)
    else:
        result = yield from start1(input_value)

    print("3 end +"+ result)
    return v

@asyncio.coroutine
def endy(value):
    v = str(value)
    print("end +" +v )
    return v
if __name__ == "__main__":

    print("开始")
    loop = asyncio.get_event_loop()
    loop.run_until_complete(StartState())
是否切换下一个状态由input_value决定,而他是由python的random模块中的randint(0,1)函数定义的。该函数随机返回值0或1.通过这种方法,可以随机决定有限状态机被传递哪个状态。
利用Asyncio 并发协程
Asyncio提供了一个处理任务计算的方法,asynico.Task(coroutine).该方法用于调度协程的执行,任务负责执行时间循环中的协程对象。一个事件循环只执行一个任务,也就是添加进Task中的每个任务都通过线程并发处理。
import asyncio


@asyncio.coroutine
def task1(number):
    f = 0
    for i in range(number):
        f += i
        print("task1 + %d" % i)
        yield from asyncio.sleep(1)
    print("task1 the end number =%d" % f)

@asyncio.coroutine
def task2(number):
    f = 0
    for i in  range(number):
        f *= i
        print("task2 * %d" % i)
        yield from asyncio.sleep(1)

    print("task2 the end number = %d" % f)

@asyncio.coroutine
def task3(number):
    f = 0
    for i in range(number):
        f -= i
        print("task2 - %d" % i)
        yield from asyncio.sleep(1)

    print("task2 the end number = %d" % f)

if __name__ == "__main__":
    tasks = [asyncio.Task(task1(10)),
             asyncio.Task(task2(10)),
             asyncio.Task(task3(10))
             ]
    loop = asyncio.get_event_loop()
    loop.run_until_complete(asyncio.wait(tasks))  #wait 等协程结束后返回
    loop.close()


输出结果:
task1 + 0
task2 * 0
task2 - 0
task1 + 1
task2 * 1
task2 - 1
task1 + 2
task2 * 2
task2 - 2
task1 + 3
task2 * 3
task2 - 3
task1 + 4
task2 * 4
task2 - 4
task1 + 5
task2 * 5
task2 - 5
task1 + 6
task2 * 6
task2 - 6
task1 + 7
task2 * 7
task2 - 7
task1 + 8
task2 * 8
task2 - 8
task1 + 9
task2 * 9
task2 - 9
task1 the end number =45
task2 the end number = 0
task2 the end number = -45
使用Asyncio和Futures
future = asyncio.Future()
future.cancel() 取消future,并安排回调函数。
future.result() 返回future锁代表的结果
future.exception() 返回fture上设置的异常
future.add_done_callback() 添加一个在future执行时运行的回调函数
future.remove_done_callback() 从借宿后调用列表中溢出一个回调对象的所有实例
future.set_result() 将future标记为已完成并设置其结果
future.set_exception() 将future标记为已完成,并设置一个异常
import asyncio


@asyncio.coroutine
def firest_coroutine(future):
    count = 0
    for i in range(10):
        count += i

    yield from asyncio.sleep(4)
    future.set_result("first corountine sum %d" % count)

@asyncio.coroutine
def second_coroutine(future):
    count = 1
    for i in range(1,10):
        count *= i

    yield from asyncio.sleep(3)
    future.set_result("second corountine sum %d" % count)

def callback_result(future):
    print(future.result())

if __name__ == "__main__":
    loop = asyncio.get_event_loop()
    future1 = asyncio.Future()
    future2 = asyncio.Future()

    tasks = [
        firest_coroutine(future1),
        second_coroutine(future2)
    ]

    future1.add_done_callback(callback_result)
    future2.add_done_callback(callback_result)

    loop.run_until_complete(asyncio.wait(tasks))
    loop.close()
总结一下:主要就是通过线程和协程 实现的事件编程,通过不同事件不同状态的调用,最后这段代码主要是添加了事件中可回调对象的操作。


 浙公网安备 33010602011771号