
Docker与Kubernetes 安装部署教程【教学环境:Oracle Linux8/ CentOS7/8/9】
Docker安装配置
Docker常用命令案例
Docker-compose 安装配置(Linux)
Linux 安装 Docker Compose
Compose 官网安装
docker/compose · GitHub 下载地址
docker compose 官网
Docker Compose是Docker编排服务的一部分,Compose可以让用户在集群中部署分布式应用。
Docker Compose是一个属于“应用层”的服务,用户可以定义哪个容器组运行哪个应用,它支持动态改变应用,并在需要时扩展。
Compose 通过一个配置文件来管理多个Docker容器,
Compose 是用于定义和运行多容器 Docker 应用程序的工具
Compose 有2个重要的概念
项目(Project):由一组关联的应用容器组成的一个完整业务单元,在 docker-compose.yml 文件中定义。
服务(Service):一个应用的容器,实际上可以包括若干运行相同镜像的容器实例。
对于Mac和Windows安装好Docker以后,就已经安装好Docker Compose,不需要手动安装
对于Linux CentOS,需要手动安装
docker-compose 使用 YAML 的配置文件对容器进行管理,YAML 的配置文件后缀可以使用 .yml 或 .yaml 作为文件扩展名(docker-compose.yml)
YAML 基本语法,文件格式
1、大小写敏感
2、使用缩进表示层级关系,通常开头缩进2个空格,字符后缩进1个空格
3、缩进不允许使用 tab 缩进,只允许空格
4、缩进空格数不重要,只要相同层级的元素左对齐即可
5、 '#' 表示注释
6、由冒号分隔的键值对表示对象;一组连词线开头的行,构成一个数组;字符串默认不使用引号
1、下载
官方地址,可能比较慢【不推荐】
下载路径是【/usr/local/bin/】下载完之后可以看下【/usr/local/bin】这个目录有没有【docker-compose】文件
# 下载路径是【/usr/local/bin/】下载完之后可以看下【/usr/local/bin】这个目录有没有【docker-compose】文件
sudo curl -L "https://github.com/docker/compose/releases/download/1.29.1/docker-compose-$(uname -s)-$(uname -m)" -o /usr/local/bin/docker-compose
国内镜像地址【推荐】
# 下载路径是【/usr/local/bin/】下载完之后可以看下【/usr/local/bin】这个目录有没有【docker-compose】文件
curl -L https://get.daocloud.io/docker/compose/releases/download/1.29.1/docker-compose-`uname -s`-`uname -m` > /usr/local/bin/docker-compose
2、授权
# 给docker compose 目录授权
sudo chmod +x /usr/local/bin/docker-compose
3、测试是否安装成功
docker-compose version
docker-compose --version
4、帮助命令
docker-compose -h
docker-compose --help
doker-compose help
5、命令
Commands:
  build              Build or rebuild services
  config             Validate and view the Compose file
  create             Create services
  down               Stop and remove resources
  events             Receive real time events from containers
  exec               Execute a command in a running container
  help               Get help on a command
  images             List images
  kill               Kill containers
  logs               View output from containers
  pause              Pause services
  port               Print the public port for a port binding
  ps                 List containers
  pull               Pull service images
  push               Push service images
  restart            Restart services
  rm                 Remove stopped containers
  run                Run a one-off command
  scale              Set number of containers for a service
  start              Start services
  stop               Stop services
  top                Display the running processes
  unpause            Unpause services
  up                 Create and start containers
  version            Show version information and quit
6、运行
# 启动所有服务
docker-compose up

# 以守护进程模式运行
docker-compose up -d

# -f 指定使用的Compose模板文件,默认为docker-compose.yml,可以多次指定
docker-compose -f docker-compose.yml up -d
7、查看,日志,停止,重启,删除
# 查看 Compose 服务
docker-compose ps

# 查看正在运行的项目
docker-compose ls

# 查看正在运行的项目,同时显示已停止的项目
docker-compose ls -a

# 查看 Compose 日志
docker-compose logs web
docker-compose logs redis

# 启动服务
docker compose start

# 停止服务
docker-compose stop

# 重启 Compose 服务
docker-compose restart

# 杀死 Compose 服务
docker-compose kill

# 删除 Compose 服务
docker-compose rm
8、容器的构建、重建、停止、删除等操作
# 构建或重建服务
docker compose build

# 列出创建的容器使用的图像
docker compose images

# 为服务创建容器
docker compose create

# 停止并删除容器、网络
docker-compose down

# 暂停服务
docker compose pause

#
docker compose unpause

# 在正在运行的容器中执行命令
docker compose exec
K8s 安装配置
官方安装配置向导
Install and Set Up kubectl on Linux(官方指南)
建于官方指导排版使用多标签页,不易编排,请直接参考官方指南链接,英语有困难的使用页面翻译很容易搞定
https://kubernetes.io/docs/tasks/tools/install-kubectl-linux/#install-using-native-package-management
以下部署实施教程直接上案例,主要来源于国外技术论坛,实证修正
How to Install Kubernetes (k8s) Cluster on RHEL 8
Last Updated: March 4, 2023 by Pradeep Kumar
Also known as k8s, Kubernetes is an opensource, and portable container orchestration platform for automating the deployment and management of containerized applications. Kubernetes was originally created by Google in the Go programming language. Currently, it is maintained by Cloud Native Computing Foundation.
In this guide, we will walk you step-by-step on how you can install a Kubernetes cluster on RHEL 8. We will demonstrate this using one Master and one worker node which we will add to our cluster.
Lab setup
- Master node: master-node-k8 10.128.15.228
- Worker node: worker-node-1-k8 10.128.15.230
NOTE: Steps 1 to 6 should be applied to both the Master and the worker node.
Step 1) Disable swap space
For best performance, Kubernetes requires that swap is disabled on the host system. This is because memory swapping can significantly lead to instability and performance degradation.
To disable swap space, run the command:
$ sudo swapoff -a
To make the changes persistent, edit the /etc/fstab file and remove or comment out the line with the swap entry and save the changes.
Step 2) Disable SELinux
Additionally, we need to disable SELinux and set it to ‘permissive’ in order to allow smooth communication between the nodes and the pods.
To achieve this, open the SELinux configuration file.
$ sudo vi /etc/selinux/config
Change the SELINUX value from enforcing to permissive.
SELINUX=permissive
Alternatively, you use the sed command as follows.
$ sudo sed -i 's/^SELINUX=enforcing$/SELINUX=permissive/' /etc/selinux/config
Step 3) Configure networking in master and worker node
Some additional network configuration is required for your master and worker nodes to communicate effectively. On each node, edit the /etc/hosts file.
$ sudo vi /etc/hosts
Next, update the entries as shown
10.128.15.228 master-node-k8          // For the Master node
10.128.15.230 worker-node-1-k8       //  For the Worker node
Save and exit the configuration file. Next, install the traffic control utility package:
$ sudo dnf install -y iproute-tc
Step 4) Allow firewall rules for k8s
For seamless communication between the Master and worker node, you need to configure the firewall and allow some pertinent ports and services as outlined below.
On Master node, allow following ports,
$ sudo firewall-cmd --permanent --add-port=6443/tcp
$ sudo firewall-cmd --permanent --add-port=2379-2380/tcp
$ sudo firewall-cmd --permanent --add-port=10250/tcp
$ sudo firewall-cmd --permanent --add-port=10251/tcp
$ sudo firewall-cmd --permanent --add-port=10252/tcp
$ sudo firewall-cmd --reload
On Worker node, allow following ports,
$ sudo firewall-cmd --permanent --add-port=10250/tcp
$ sudo firewall-cmd --permanent --add-port=30000-32767/tcp
$ sudo firewall-cmd --reload
Step 5) Install CRI-O container runtime
Kubernetes requires a container runtime for pods to run. Kubernetes 1.23 and later versions require that you install a container runtime that confirms with the Container Runtime Interface.
A Container Runtime is an application that supports running containers. Kubernetes supports the following Container Runtime:
- Containerd
- CRI-O
- Docker Engine
- Mirantis Container Runtime
In this guide, we will install CRI-O which is a high-level container runtime. To do so, we need to enable two crucial kernel modules – overlay and br_netfilter modules.
To achieve this, we need to configure the prerequisites as follows:
First, create a modules configuration file for Kubernetes.
$ sudo vi /etc/modules-load.d/k8s.conf
Add these lines and save the changes
overlay
br_netfilter
Then load both modules using the modprobe command.
$ sudo modprobe overlay
$ sudo modprobe br_netfilter
Next, configure the required sysctl parameters as follows
$ sudo vi /etc/sysctl.d/k8s.conf
Add the following lines:
net.bridge.bridge-nf-call-iptables  = 1
net.ipv4.ip_forward                 = 1
net.bridge.bridge-nf-call-ip6tables = 1
Save the changes and exit. To confirm the changes have been applied, run the command:
$ sudo sysctl --system
To install CRI-O, set the $VERSION environment variable to match your CRI-O version. For instance, to install CRI-O version 1.26 set the $VERSION as shown:
$ export VERSION=1.26
Next, run the following commands:
$ sudo curl -L -o /etc/yum.repos.d/devel:kubic:libcontainers:stable.repo https://download.opensuse.org/repositories/devel:/kubic:/libcontainers:/stable/CentOS_8/devel:kubic:libcontainers:stable.repo
$ sudo curl -L -o /etc/yum.repos.d/devel:kubic:libcontainers:stable:cri-o:$VERSION.repo https://download.opensuse.org/repositories/devel:kubic:libcontainers:stable:cri-o:$VERSION/CentOS_8/devel:kubic:libcontainers:stable:cri-o:$VERSION.repo
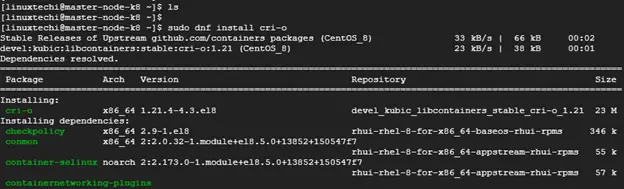
Then use the DNF package manager to install CRI-O:
$ sudo dnf install cri-o
Next, enable CRI-O on boot time and start it:
$ sudo systemctl enable crio
$ sudo systemctl start crio
Step 6) Install Kubernetes Packages
With everything required for Kubernetes to work installed, let us go ahead and install Kubernetes packages like kubelet, kubeadm and kubectl. Create a Kubernetes repository file.
$ sudo vi /etc/yum.repos.d/kubernetes.repo
And add the following lines.
[kubernetes]
name=Kubernetes
baseurl=https://packages.cloud.google.com/yum/repos/kubernetes-el7-x86_64
enabled=1
gpgcheck=1
repo_gpgcheck=1
gpgkey=https://packages.cloud.google.com/yum/doc/yum-key.gpg https://packages.cloud.google.com/yum/doc/rpm-package-key.gpg
exclude=kubelet kubeadm kubectl
Save the changes and exit. Finally, install k8s package as follows. At time of writing this guide, Kubernetes version 1.26.1 is available.
$ sudo dnf install -y kubelet-1.26.1 kubeadm-1.26.1 kubectl-1.26.1 --disableexcludes=kubernetes
Once installed, be sure to enable and start Kubelet service.
$ sudo systemctl enable kubelet
$ sudo systemctl start kubelet
At this juncture, we are all set to install Kubernetes cluster.
Step 7) Create a Kubernetes cluster
We are going to initialize a Kubernetes cluster using the kubeadm command as follows. This initializes a control plane in the master node.
$ sudo kubeadm init --pod-network-cidr=192.168.10.0/16
Once the control plane is created, you will be required to carry out some additional commands to start using the cluster.
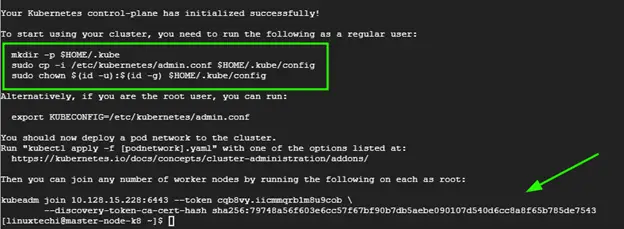
Therefore, run the commands, sequentially.
$ mkdir -p $HOME/.kube
$ sudo cp -i /etc/kubernetes/admin.conf $HOME/.kube/config
$ sudo chown $(id -u):$(id -g) $HOME/.kube/config
At the very end of the output, you will be given the command to run on worker nodes to join the cluster. We will come to that later in the next step.
Also, be sure to remove taints from the master node:
$ kubectl taint nodes --all node-role.kubernetes.io/master-
Step 8) Install Calico Pod Network Add-on
The next step is to install Calico CNI (Container Network Interface). It is an opensource project used to provide container networking and security. After Installing Calico CNI, nodes state will change to Ready state, DNS service inside the cluster would be functional and containers can start communicating with each other.
Calico provides scalability, high performance, and interoperability with existing Kubernetes workloads. It can be deployed on-premises and on popular cloud technologies such as Google Cloud, AWS and Azure.
To install Calico CNI, run the following command from the master node
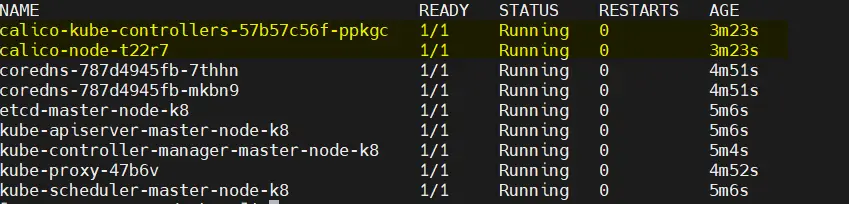
$ kubectl apply -f https://raw.githubusercontent.com/projectcalico/calico/v3.25.0/manifests/calico.yaml
To confirm if the pods have started, run the command:
$ kubectl get pods -n kube-system
You should see that each pod is ‘READY’ and has the ‘RUNNING’ status as shown in the third column.
To verify the master node’s availability in the cluster, run the command:
$ kubectl get nodes
NAME           STATUS   ROLES         AGE    VERSION
master-node-k8 Ready    control-plane 8m44s  v1.26.1
$
In addition, you can retrieve more information using the -o wide options.
$ kubectl get nodes -o wide

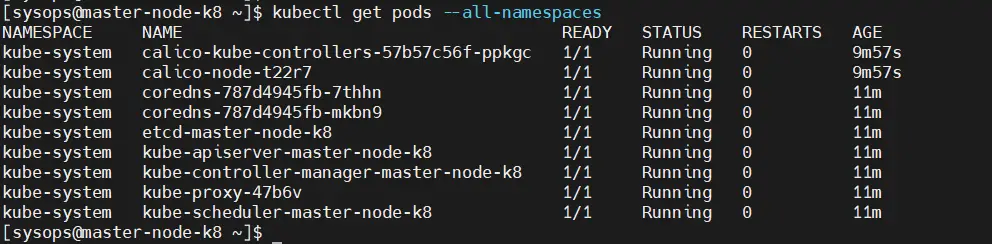
The above output confirms that the master node is ready. Additionally, you can check the pod namespaces:
$ kubectl get pods --all-namespaces
Step 9) Adding worker node to the cluster
To add the worker node to the Kubernetes cluster, follow step 1 up until Step 6. Once you are done, run the command generated by the master node for joining a worker node to the cluster. In our case, this will be:
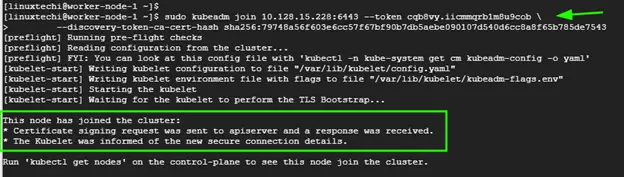
$ sudo kubeadm join 10.128.15.228:6443 --token cqb8vy.iicmmqrb1m8u9cob --discovery-token-ca-cert-hash sha256:79748a56f603e6cc57f67bf90b7db5aebe090107d540d6cc8a8f65b785de7543
If all goes well, you should get the notification that the node has joined the cluster. Repeat the same procedure for other nodes in case you have multiple worker nodes
Now, head back to the master node and, once again, verify the nodes in your cluster. This time around, the worker node will appear in the list on nodes in the cluster,
$ kubectl get nodes

Conclusion
That was a walk through of how you can install a Kubernetes Cluster on RHEL 8. Your feedback on this guide is welcome.
Also Read: How to Install and Access Kubernetes Dashboard Step-by-Step
21 thoughts on “How to Install Kubernetes (k8s) Cluster on RHEL 8”
Kubenetes (K8s) 常用命令总结
# 初始化k8s集群
kubeadm init --apiserver-advertise-address=192.168.88.163 --image-repository registry.aliyuncs.com/google_containers --kubernetes-version v1.23.6 --service-cidr=10.96.0.0/12 --pod-network-cidr=10.244.0.0/16
kubeadm reset #重新初始化
 kubeadm token list   #查看初始化master后的token
 openssl x509 -pubkey -in /etc/kubernetes/pki/ca.crt | openssl rsa -pubin -outform der 2> /dev/null |openssl dgst -sha256 -hex|sed 's/^.* //'   #生成密钥
 # 在从节点执行加入master
 kubeadm join 192.168.88.161:6443 --token 9hvyrf.4zn7tn1vi00uee70 --discovery-token-ca-cert-hash sha256:24f64ffbffe57948e4f412c3903769d8358ef76a261758268f4173fe8a69f307
 kubectl get nodes #查看节点状态
 kubectl get pods -n kube-system -o wide
 set paste #vim中设置缩进
 # 创建一个nginx镜像
 kubectl create deployment nginx --image nginx
 # 暴露80端口
 kubectl expose deployment nginx --port=80 --type=NodePort
 # 查看80端口对外访问的端口是多少
 kubectl get pod,svc
 # 进入容器命令
 kubectl exec -it -n default nginx-85b98978db-m6vsb bash
 #查看容器启动日志
 kubectl logs calico-node-dcc8p -n kube-system
 kubectl delete pod pod名    # 根据pod名删除pod
 kubectl delete -f nginx-pod.yml   # 根据yml删除pod
 kubectl logs -f # pod名称 -c 容器名称   查看pod中指定容器的日志
 kubectl scale deployment --replicas=4 cyh # 对已经存在的deploy进行扩容pod数量
 kubectl get deploy cyh -o yaml # 将配置输出成yaml形式
 kubectl create -f nginx-demo.yaml # 通过文件形式创建pod
 route -n # 查看路由
 kubectl edit svc kube-dns -n kube-system # 编辑配置文件
kubectl get po -w    # -w类似watch监听的效果
kubectl get po --show-labels # 查看设置的label标签
kubectl label po nginx-demo author=cyh # 通过命令增加label
kubectl label po nginx-demo author=wqh  --overwrite # 通过命令修改label
kubectl get po -A -l type=app # 根据标签进行匹配
kubectl get po -l 'test in (1.0.0,1.1.1)'   # 标签是1.0,0和1.1.1
kubectl get po -l type!=app,author=wqh   # 标签不是app且是wqh
kubectl rollout status deployment nginx-deploy # 查看滚动更新的信息
kubectl rollout history deployment nginx-deploy  # 查看部署版本历史,用于回退版本
kubectl rollout history deployment nginx-deploy --revision=1 # 查看详细信息
kubectl rollout undo deployment nginx-deploy  --to-revision=1 # 回退到指定版本
kubectl scale --replicas=6 deployment nginx-deploy # 进行扩容操作
kubectl rollout pause deployment  nginx-deploy  # 对修改的deploy进行暂停,不立马去更新部署deploy,因为可能涉及多次修改配置
kubectl rollout resume deployment nginx-deploy  # 总体修改完deploy后,进行更新操作
kubectl get sts # 查看有状态服务statefulset
kubectl get pvc # 查看挂载卷信息
kubectl run -it --image busybox dns-test --restart=Never --rm /bin/sh  # 退出容器就会删除掉,临时使用
kubectl scale sts web --replicas=5 # 对有状态服务进行扩容
# 对于有状态服务更新镜像的方式(滚动更新)
kubectl patch sts web --type='json' -p='[{"op":"replace","path":"/spec/template/spec/containers/0/image","value":"nginx:1.9.1"}]'
kubectl rollout history statefulset web
kubectl rollout history statefulset web  --revision=2
kubectl rollout status statefulset web
kubectl delete sts web # 会级联删除,把sts,pod都删除
kubectl delete sts web --cascade=false # 不会级联删除
kubectl label no k1 type=microservices # 给k1节点加标签
kubectl get po -l app=logging # 基于标签搜索pod
# 创建HPA,对deploy进行自动扩缩容,当达到资源限制后,就会扩容
kubectl autoscale deployment nginx-deploy --cpu-percent=20 --min=2 --max=5
# 使用以下命令需要安装metrics-server容器服务,直接在gitlab下载yaml文件
wget https://github.com/kubernetes-sigs/metrics-server/releases/latest/download/components.yaml -O metrics-server-components.yaml
kubectl top -h  # 查看内存,cpu使用情况
kubectl top po  # 查看内存,cpu使用情况
kubectl get ep  # 查看端点endpoint

```[Compose 官网安装](https://docs.docker.com/compose/install/ "Compose 官网安装")