K8S 无状态应用程序和示例
无状态应用是不将数据或应用状态存储到集群或永久性存储空间的应用。相反,该应用将数据和应用状态保留在客户端,从而使无状态应用更具可伸缩性。例如,前端应用是无状态应用:您可以部署多个副本以提高其可用性,在需求较低时可以减少副本,并且副本无需具有唯一标识。
一、向外公开 IP 地址
1 准备工作
官方文档中的准备工作要求有一个云供应商提供的 Kubernetes 集群,因为示例中使用的是一个外部负载均衡器。
但对于开发环境,在阿里云、华为云或腾讯云特意创建一个 Kubernetes 集群是没有必要的,所以还是以本地集群为例。
2 教程目标
- 运行 5 个 Hello World 的应用实例
- 创建一个公开外部 IP 地址的 Service 对象
- 使用 Service 对象访问正在运行的应用程序
3 为有 5 个实例的应用程序创建服务
3.1 在集群中运行 Hello World 应用程序
使用配置文件创建,service/load-balancer-example.yaml :
apiVersion: apps/v1
kind: Deployment
metadata:
  labels:
    app.kubernetes.io/name: load-balancer-example
  name: hello-world
spec:
  replicas: 5
  selector:
    matchLabels:
      app.kubernetes.io/name: load-balancer-example
  template:
    metadata:
      labels:
        app.kubernetes.io/name: load-balancer-example
    spec:
      containers:
      # 我从谷歌仓库中拉的镜像源
      - image: registry.cn-hangzhou.aliyuncs.com/google_samples_thepoy/node-hello:1.0
        name: hello-world
        ports:
        - containerPort: 8080
应用配置文件(本地配置文件或远程配置文件皆可):
kubectl apply -f load-balancer-example.yaml
# 或
kubectl apply -f https://k8s.io/examples/service/load-balancer-example.yaml
这个命令会创建一个 Deployment 对象和一个关联的 ReplicaSet 对象。其中 ReplicaSet 对象有 5 个 Pods,每个 Pod 都运行 Hello World 应用程序。
3.2 显示 Deployment 的详细信息
kubectl get deployments hello-world
kubectl describe deployments hello-world
3.3 显示 ReplicaSet 对象的详细信息
kubectl get replicasets
kubectl describe replicasets
3.4 创建公开 Deployment 的 Service 对象
如果你用的是云服务商提供的 k8s 集群,type 应设置为LoadBalancer,如果用的是本地集群,应设置为NodePort,本例用的本地集群,所以设置为NodePort:
kubectl expose deployment hello-world --type=NodePort --name=my-service
3.5 显示 Service 的详细信息
kubectl describe services my-service
输出类似于
Name:                     my-service
Namespace:                default
Labels:                   app.kubernetes.io/name=load-balancer-example
Annotations:              <none>
Selector:                 app.kubernetes.io/name=load-balancer-example
Type:                     NodePort
IP Family Policy:         SingleStack
IP Families:              IPv4
IP:                       10.101.118.215
IPs:                      10.101.118.215
Port:                     <unset>  8080/TCP
TargetPort:               8080/TCP
NodePort:                 <unset>  32359/TCP
Endpoints:                10.244.1.6:8080,10.244.1.7:8080,10.244.2.10:8080 + 2 more...
Session Affinity:         None
External Traffic Policy:  Cluster
Events:                   <none>
如果你用的是云服务商,那么输出结果中就会有一个LoadBalancer Ingress: xxx.xxx.xxx.xxx,后面即是公网或对外暴露的 IP 地址。
3.6 使用外部 IP 访问 Hello World 应用程序
curl http://<external-ip>:<port>
如果你使用的LoadBalancer,外部 IP 就是LoadBalancer Ingress,端口就是Port。
如果你用的是NodePort,外部 IP 可以是三个节点的任意一个 IP 地址,端口是NodePort后的端口。
响应:
Hello Kubernetes!
4 删除服务
kubectl delete services my-service
kubectl delete deployment hello-world
二、使用 MongoDB 部署 PHP 留言板应用程序
本实例由以下组件组成:
- 单实例 MongoDB 以保存留言板条目
- 多个 web 前端实例
1 目标
- 启动 Mongo 数据库。
- 启动留言板前端。
- 公开并查看前端服务。
- 清理。
2 准备
你要有一个 Kubernetes 集群,参考 用 kubeadm 在 Debian 或 Ubuntu 中创建 k8s 集群。
3 启动 Mongo 数据库
留言板应用程序使用 MongoDB 数据库存储数据。
3.1 创建 MongoDB 的 Deployment
mongo-deployment.yaml
apiVersion: apps/v1
kind: Deployment
metadata:
  name: mongo
  labels:
    app.kubernetes.io/name: mongo
    app.kubernetes.io/component: backend
spec:
  selector:
    matchLabels:
      app.kubernetes.io/name: mongo
      app.kubernetes.io/component: backend
  replicas: 1
  template:
    metadata:
      labels:
        app.kubernetes.io/name: mongo
        app.kubernetes.io/component: backend
    spec:
      containers:
      - name: mongo
        image: mongo:4.2
        args:
          - --bind_ip
          - 0.0.0.0
        resources:
          requests:
            cpu: 100m
            memory: 100Mi
        ports:
        - containerPort: 27017
kubectl apply -f ./mongo-deployment.yaml
运行以下命令查看 MongoDB Deployment 中的日志:
kubectl logs -f deployment/mongo
3.2 创建 MongoDB 服务
留言板应用程序需要往 MongoDB 中写数据。因此,需要创建 Service 来代理 MongoDB Pod 的流量。Service 定义了访问 Pod 的策略。
mongo-service.yaml
apiVersion: v1
kind: Service
metadata:
  name: mongo
  labels:
    app.kubernetes.io/name: mongo
    app.kubernetes.io/component: backend
spec:
  ports:
  - port: 27017
    targetPort: 27017
  selector:
    app.kubernetes.io/name: mongo
    app.kubernetes.io/component: backend
创建:
kubectl apply -f ./mongo-service.yaml
查看服务是否正在运行:
kubectl get service
结果类似:
NAME         TYPE        CLUSTER-IP       EXTERNAL-IP   PORT(S)     AGE
kubernetes   ClusterIP   10.96.0.1        <none>        443/TCP     7h31m
mongo        ClusterIP   10.100.165.210   <none>        27017/TCP   26s
4 设置并公开留言板前端
留言板应用程序有一个 web 前端,服务于用 PHP 编写的 HTTP 请求。 它被配置为连接到 mongo 服务以存储留言版条目。
4.1 创建留言板前端 Deployment
frontend-deployment.yaml
apiVersion: apps/v1
kind: Deployment
metadata:
  name: frontend
  labels:
    app.kubernetes.io/name: guestbook
    app.kubernetes.io/component: frontend
spec:
  selector:
    matchLabels:
      app.kubernetes.io/name: guestbook
      app.kubernetes.io/component: frontend
  replicas: 3
  template:
    metadata:
      labels:
        app.kubernetes.io/name: guestbook
        app.kubernetes.io/component: frontend
    spec:
      containers:
      - name: guestbook
        image: paulczar/gb-frontend:v5
        resources:
          requests:
            cpu: 100m
            memory: 100Mi
        env:
        - name: GET_HOSTS_FROM
          value: dns
        ports:
        - containerPort: 80
创建:
kubectl apply -f ./frontend-deployment.yaml
查询 Pod 列表,验证三个前端副本是否正在运行:
kubectl get pods -l app.kubernetes.io/name=guestbook -l app.kubernetes.io/component=frontend
结果类似:
NAME                       READY   STATUS    RESTARTS   AGE
frontend-848d88c7c-8fmgp   1/1     Running   0          65s
frontend-848d88c7c-bjhg5   1/1     Running   0          65s
frontend-848d88c7c-p7mv2   1/1     Running   0          65s
4.2 创建前端服务
应用的 mongo 服务只能在 Kubernetes 集群中访问,因为服务的默认类型是 ClusterIP。 ClusterIP 为服务指向的 Pod 集提供一个 IP 地址。这个 IP 地址只能在集群中访问。
如果您希望访客能够访问您的留言板,您必须将前端服务配置为外部可见的,以便客户端可以从 Kubernetes 集群之外请求服务。然而即便使用了 ClusterIP Kubernets 用户仍可以通过 kubectl port-forwart 访问服务。
frontend-service.yaml
apiVersion: v1
kind: Service
metadata:
  name: frontend
  labels:
    app.kubernetes.io/name: guestbook
    app.kubernetes.io/component: frontend
spec:
  # if your cluster supports it, uncomment the following to automatically create
  # an external load-balanced IP for the frontend service.
  # type: LoadBalancer
  ports:  # 暴露两个端口,一个显示主页,一个显示评论页
  - port: 80
    name: index
  - port: 8080
    name: comments
  selector:
    app.kubernetes.io/name: guestbook
    app.kubernetes.io/component: frontend
创建服务:
kubectl apply -f ./frontend-service.yaml
查询服务列表以验证前端服务正在运行:
kubectl get services
结果类似:
NAME         TYPE        CLUSTER-IP       EXTERNAL-IP   PORT(S)           AGE
frontend     ClusterIP   10.108.101.50    <none>        80/TCP,8080/TCP   7s
kubernetes   ClusterIP   10.96.0.1        <none>        443/TCP           9h
mongo        ClusterIP   10.100.165.210   <none>        27017/TCP         107m
4.3 通过 kubectl port-forward 查看前端服务
运行以下命令将本机的 8080 端口转发到服务的 80 端口。
kubectl port-forward svc/frontend --address 0.0.0.0 8080:80
响应类似:
Forwarding from 127.0.0.1:8080 -> 80
Forwarding from [::1]:8080 -> 80
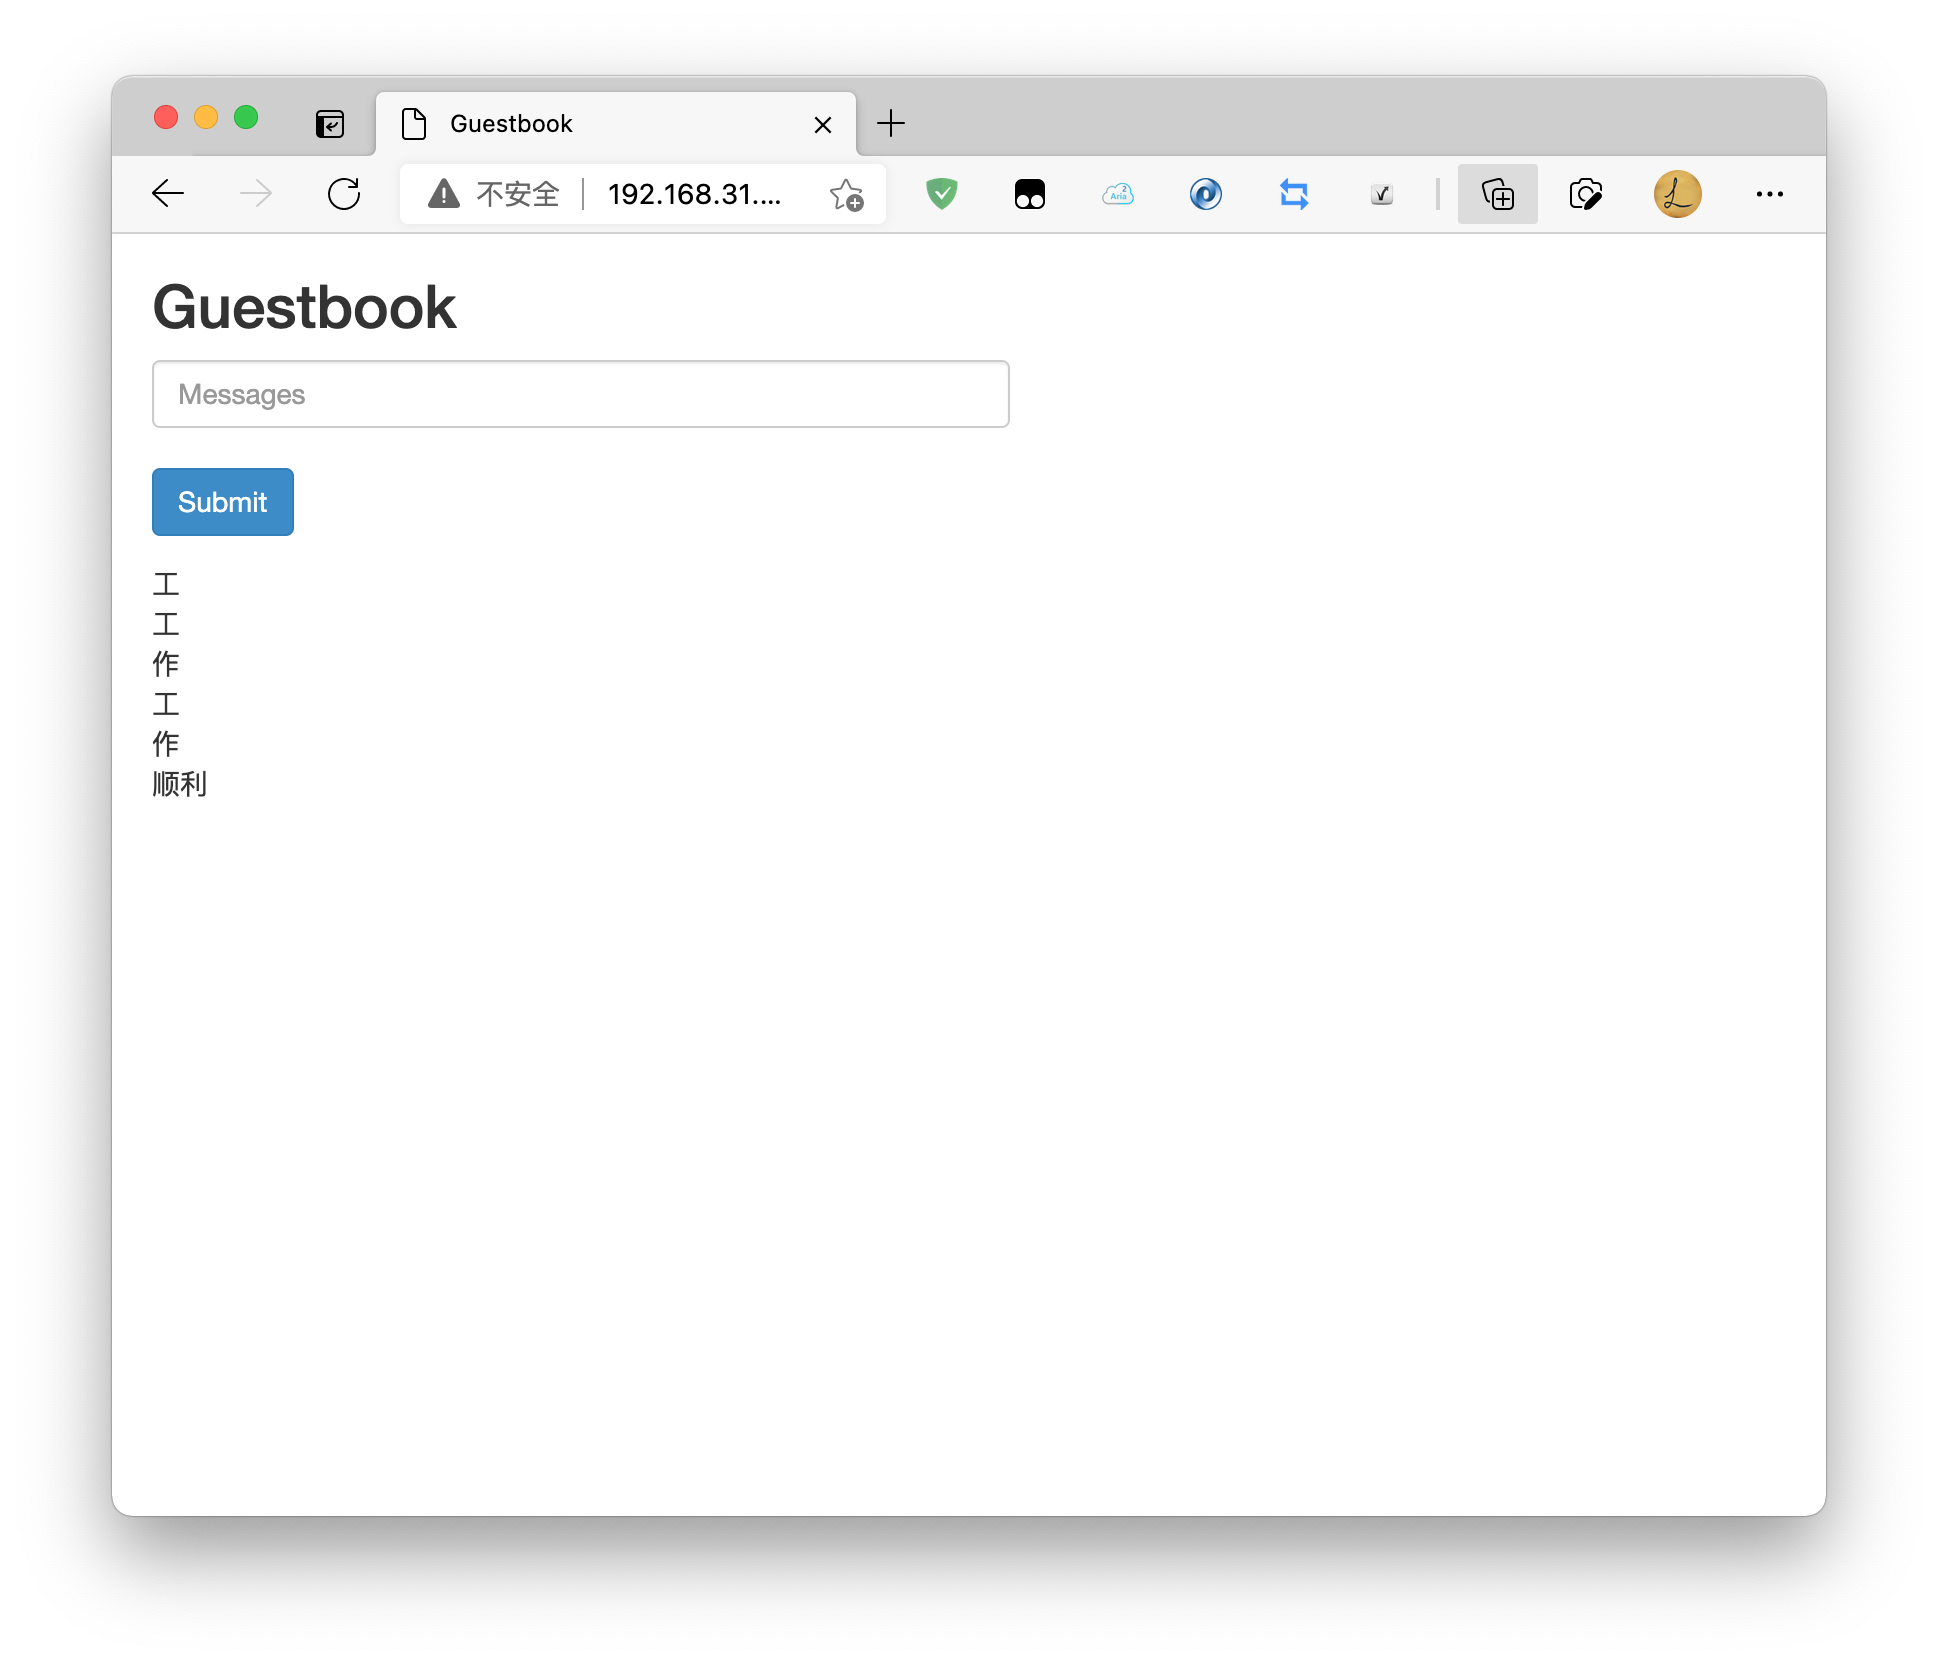
然后在浏览器中打开 http://主节点ip:8080 查看留言板页面,本例中打开 http://192.168.31.221:8080/ 。
界面如下:
5 扩展和压缩实例数量
扩展
kubectl scale deployment frontend --replicas=5
压缩
kubectl scale deployment frontend --replicas=2
6 删除部署的应用
使的标签删除多个资源
kubectl delete deployment -l app.kubernetes.io/name=mongo
kubectl delete service -l app.kubernetes.io/name=mongo
kubectl delete deployment -l app.kubernetes.io/name=guestbook
kubectl delete service -l app.kubernetes.io/name=guestbook
结果:
deployment.apps "mongo" deleted
service "mongo" deleted
deployment.apps "frontend" deleted
service "frontend" deleted
查询 Pod 列表,确认没有 Pod 在运行:
kubectl get pods
No resources found in default namespace.

 浙公网安备 33010602011771号