构建你自己的IDE或工具
本指南将教您如何构建自己的基于 Theia 的应用程序。该指南将演示如何配置您自己的由现有或新的 Theia 扩展组成的应用程序,以及您希望默认捆绑在应用程序中的任何 VS Code 扩展。 如果您还没有熟悉 Theia 的扩展机制,请先熟悉一下。 本指南描述了构建基于 Theia 的产品的手动步骤,有两种方法可以避免这种手动设置:
Theia Extension Yeoman 生成器:生成基于 Theia 的产品同时包含了示例扩展。(https://github.com/eclipse-theia/generator-theia-extension)
Theia Blueprint:用于创建基于 Theia 的可安装桌面应用程序的模板工具。(https://theia-ide.org/docs/blueprint_download/)
我们仍然建议您先阅读手册指南,它可以让您了解基于 Theia 的项目的结构。
前置条件
对运行环境的要求,在这里:https://github.com/eclipse-theia/theia/blob/master/doc/Developing.md#prerequisites
配置
1 新建一个目录,并进入这个目录:
mkdir my-app
cd my-app
2 目录下创建一个文件 package.json
{
  "private": true,
  "dependencies": {
    "@theia/callhierarchy": "next",
    "@theia/file-search": "next",
    "@theia/git": "next",
    "@theia/markers": "next",
    "@theia/messages": "next",
    "@theia/mini-browser": "next",
    "@theia/navigator": "next",
    "@theia/outline-view": "next",
    "@theia/plugin-ext-vscode": "next",
    "@theia/preferences": "next",
    "@theia/preview": "next",
    "@theia/search-in-workspace": "next",
    "@theia/terminal": "next"
  },
  "devDependencies": {
    "@theia/cli": "next"
  }
}
简而言之,Theia 应用程序和扩展是 Node.js 包。 每个包都有一个 package.json 文件,该文件显示包元数据,如名称、版本、其运行时和构建时间依赖项等。
让我们看一下创建的这个文件:
- 省略了它的名称和版本,因为我们不打算将它用作依赖项,并且它被标记为私有,因为它不会单独作为 Node.js 包发布。
- 我们已将所需的扩展列为运行时依赖项,例如 @theia/navigator。
- 一些扩展需要安装额外的工具,例如,@theia/python 需要安装 Python 语言服务器。 在这种情况下,请查阅相应的扩展文档。
- 此链接(https://www.npmjs.com/search?q=keywords:theia-extension)可以查看到所有已发布的扩展。
- 我们已将 @theia/cli 列为构建时依赖项。 它提供脚本来构建和运行应用程序。
使用 VS code 扩展
作为应用程序的一部分,还可以使用(和打包)VS Code 扩展。 Theia 存储库(https://github.com/eclipse-theia/theia/wiki/Consuming-Builtin-and-External-VS-Code-Extensions)包含有关如何将此类扩展作为应用程序 package.json 的一部分包含在内的指南。
示例 package.json:
{
  "private": true,
  "dependencies": {
    "@theia/callhierarchy": "next",
    "@theia/file-search": "next",
    "@theia/git": "next",
    "@theia/markers": "next",
    "@theia/messages": "next",
    "@theia/navigator": "next",
    "@theia/outline-view": "next",
    "@theia/plugin-ext-vscode": "next",
    "@theia/preferences": "next",
    "@theia/preview": "next",
    "@theia/search-in-workspace": "next",
    "@theia/terminal": "next",
    "@theia/vsx-registry": "next"
  },
  "devDependencies": {
    "@theia/cli": "next"
  },
  "scripts": {
    "prepare": "yarn run clean && yarn build && yarn run download:plugins",
    "clean": "theia clean",
    "build": "theia build --mode development",
    "start": "theia start --plugins=local-dir:plugins",
    "download:plugins": "theia download:plugins"
  },
  "theiaPluginsDir": "plugins",
  "theiaPlugins": {
    "vscode-builtin-extensions-pack": "https://open-vsx.org/api/eclipse-theia/builtin-extension-pack/1.50.1/file/eclipse-theia.builtin-extension-pack-1.50.1.vsix"
  },
  "theiaPluginsExcludeIds": [
    "vscode.extension-editing",
    "vscode.git",
    "vscode.git-ui",
    "vscode.github",
    "vscode.markdown-language-features",
    "vscode.microsoft-authentication"
  ]
}
以下属性用于使用内置插件(捆绑扩展):
theiaPluginsDir:部署插件的相对路径
theiaPlugins:要下载的插件集合(单个插件或扩展包) - 可以指向任何有效的下载 URL(例如:Open VSX、Github Releases 等)
theiaPluginsExcludeIds:解析扩展包时要排除的插件 ID 列表
构建
首先安装依赖
yarn
然后,使用theia 命令行构建:
yarn theia build
yarn 在我们的应用程序上下文中查找@theia/cli 提供的theia 可执行文件,然后使用theia 执行build命令。 这可能需要一段时间,因为默认情况下应用程序是在生产模式下构建的,即经过混淆和压缩。
运行
构建完成后,我们可以启动应用程序:
yarn theia start --plugins=local-dir:plugins
或者依赖 package.json 中的启动脚本:
yarn start
您可以提供工作区路径作为第一个参数,以及 --hostname、--port 选项以将应用程序部署在特定的网络接口和端口上,例如 在所有接口和端口 8080 上打开 /my-workspace:
yarn start /my-workspace --hostname 0.0.0.0 --port 8080

或者
yarn theia start /my-workspace --hostname 0.0.0.0 --port 8080
在终端中,您应该看到 Theia 应用程序已启动并正在侦听端口:

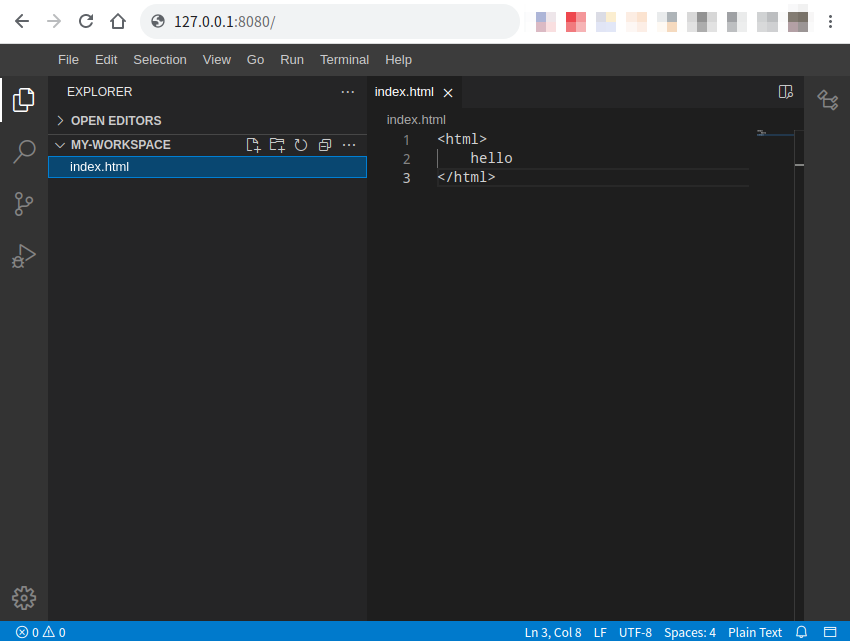
此时通过浏览器访问控制台提示的地址,即可以在浏览器看到打开的IDE,Ide的工程根目录就是刚才参数中指定的my-workspace:

一个部署在Web上的IDE就做好了。
故障排查
1. 插件没有出现
如果正在运行的 Theia 实例中没有可用的插件,则可能需要告诉 Theia 在哪里可以找到下载的插件。上面的示例在启动命令中设置了 --plugins 开关,这应该足够了。但是,如果直接运行 theia start,您也可以设置一个环境变量来实现相同的目的:
export THEIA_DEFAULT_PLUGINS=local-dir:plugins
2. 在代理后面构建本机依赖项
如果您在代理后面运行 yarn 命令,您可能会在构建的最后部分遇到构建本地依赖项(如 oniguruma)的问题,并带有以下错误堆栈:
[4/4] Building fresh packages...
[1/9]  XXXXX
[2/9]  XXXXX
[3/9]  XXXXX
[4/9]  XXXXX
error /theiaide/node_modules/XXXXX: Command failed.
Exit code: 1
Command: node-gyp rebuild
Arguments:
Directory: /theiaide/node_modules/XXXXX
Output:
gyp info it worked if it ends with ok
gyp info using node-gyp@3.8.0
gyp info using node@8.15.0 | linux | x64
gyp http GET https://nodejs.org/download/release/v8.15.0/node-v8.15.0-headers.tar.gz
gyp WARN install got an error, rolling back install
gyp ERR! configure error
gyp ERR! stack Error: read ECONNRESET
gyp ERR! stack at TLSWrap.onread (net.js:622:25)
gyp ERR! System Linux 3.10.0-862.11.6.el7.x86_64
gyp ERR! command "/usr/bin/node" "/usr/lib/node_modules/npm/node_modules/node-gyp/bin/node-gyp.js" "rebuild"
gyp ERR! cwd /theiaide/node_modules/XXXXX
gyp ERR! node -v v8.15.0
这是因为 node-gyp 不依赖系统/NPM 代理设置。在这种情况下,使用错误堆栈中提供的链接下载 node-headers 文件(如上面的示例中的 https://nodejs.org/download/release/v8.15.0/node-v8.15.0-headers.tar.gz ) 并使用以下命令运行构建:
npm_config_tarball=/path/to/node-v8.15.0-headers.tar.gz yarn install
这么解决的核心原因是,node-gyp 没有用代理,所以下载依赖失败,我们只能手动使用代理下载到文件后,再手动构建
3.
Failed to resolve module: socket.io
Failed to resolve module: luxon
Failed to resolve module: filenamify
这个只是告警信息,不影响使用
4. 浏览器访问异常:Failed to start the frontend application; Error: Cannot apply @injectable decorator multiple times. 这可能是inversify版本冲突,删除本机已安装的inversify即可,如下:
npm uninstall inversify reflect-metadata


