基于Springboot框架——LeftwingCommunity项目开发文档
 本项目所开发文库致力于左翼进步文化的推广,刊载哲学社科类社评文章、国内外左翼运动报导与其他文体;收录有当今各主流学派的学术观点与经典著作。网站仍在测试阶段,积极依照《网络安全法》《网络安全管理条例》相关法律条例进行运营,若存在黄赌毒、政治敏感言论请向网站管理员举报,谢谢配合。
LeftwingCommunity开发文档
——基于Springboot框架的JavaWEB项目开发日志与总结
本文档已过时弃用!新版本请移步至Aphrora Letters项目开发文档——2023-10-14
我在很早就有一个想法——开发一个致力于左翼进步文化推广的纯粹公益的Web应用;一个用于刊载哲学社科类社评文章、国内外左翼运动报导与其他文体,并用数据库收录当今各主流学派的学术观点与经典著作的文库平台。
在大一下学期陆续自学完部分 JavaWeb 后端技术栈并简单学习了前端三件套(HTML、CSS、JavaScript)与BootStrap组件技术栈后,终于在大二中叶开始着手进行项目的前期准备与开发。令人兴奋的,我用了一个月的课余时间便使整体初见雏形。而后我又陆续改进页面结构、优化业务代码、增加模块功能,力图使应用变得更加可用、好用。
现如今,网站已经部署在阿里云服务器上,但由于未在工信部进行网站备案,仅能用公网 ip 访问。
一.需求分析
Ⅰ、技术选型与开源组件说明
显然,如果将JavaEE作为服务器开发语言,选用 Springboot 框架是公认最优方案。数据库操作在选用 MyBatis 的同时,使用 MyBatis-Plus 对单表操作进行API封装可以极大得提高CRUD的一般业务逻辑的开发效率。而 Tomcat 服务器作为免费开源的Java应用服务器,尽管并发量比不上 Nginx,但无疑是此时最好的选择。
另外,前端界面设计选用 BootStrap5 组件进行简单二次开发,可使得页面简洁的同时让其十分优美且现代化。其他使用到的js库也在下文标注了。
- 后端语言:Java
- 后端框架:SpringBoot
- 项目构建管理工具:Apache Maven
- 应用服务器:Apache Tomcat
- 数据库:MySql
- 数据库框架:MyBatis、MybatisPlus
- 数据库连接池:Alibaba Druid
- 前端组件库:Bootstrap5
- 后台组件:AdminLTE-3.1.0
- 页面模板引擎:Thymeleaf
- MD2HTML工具:Flexmark
- PDF插件:PDF.js
- 接口文档工具:Swagger2
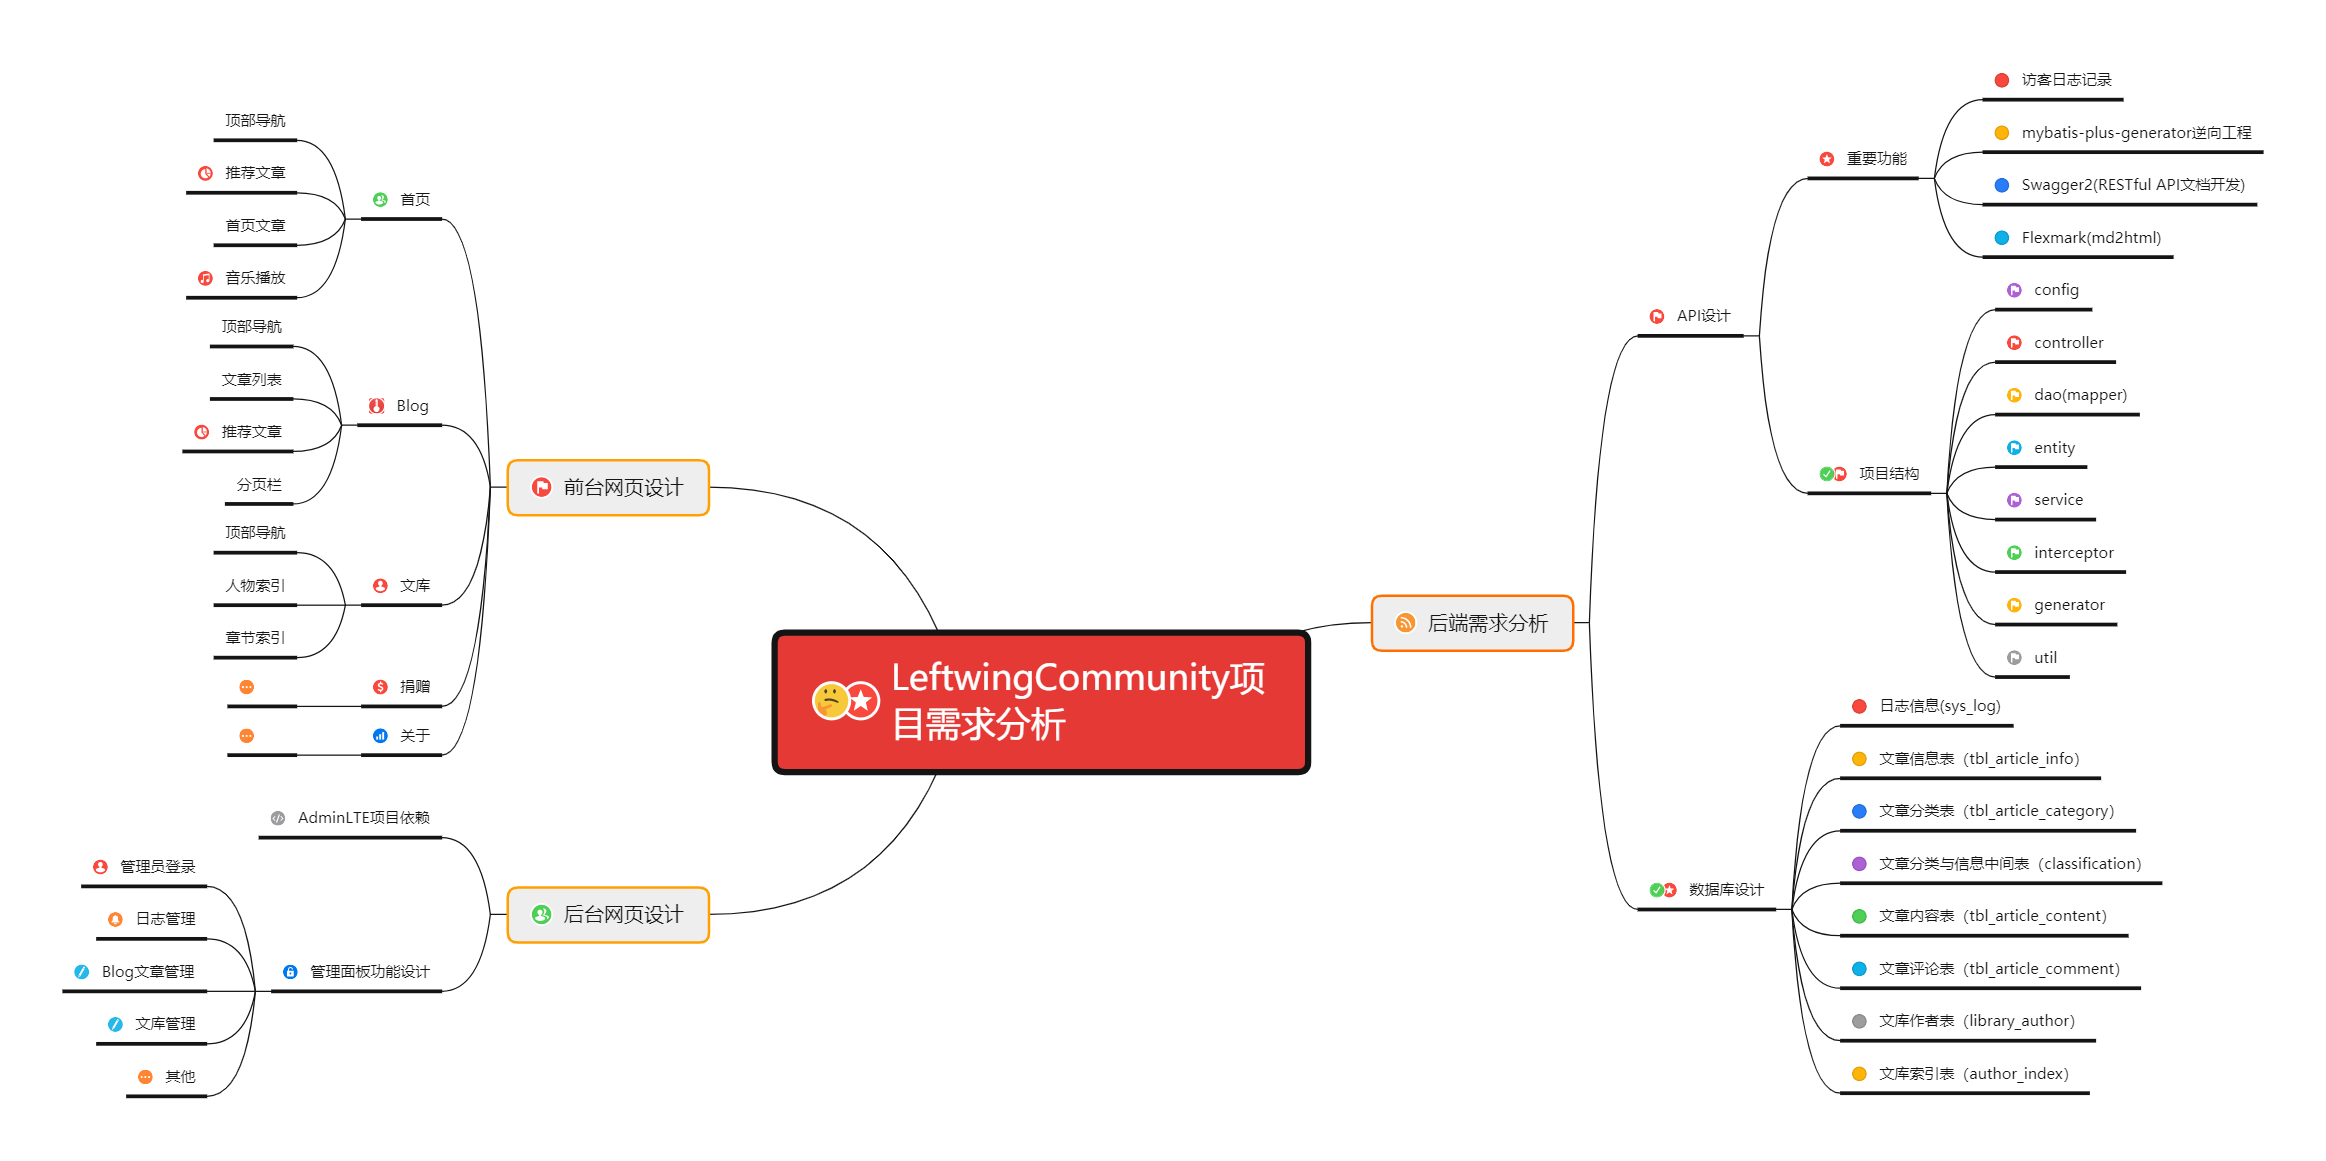
Ⅱ、项目开发需求分析
前文略,以下为 XMind 思维导图:
二.数据库设计
Ⅰ、DB表设计
前文略,以下为数据库表设计的 E-R图 (表的具体功能见上图):
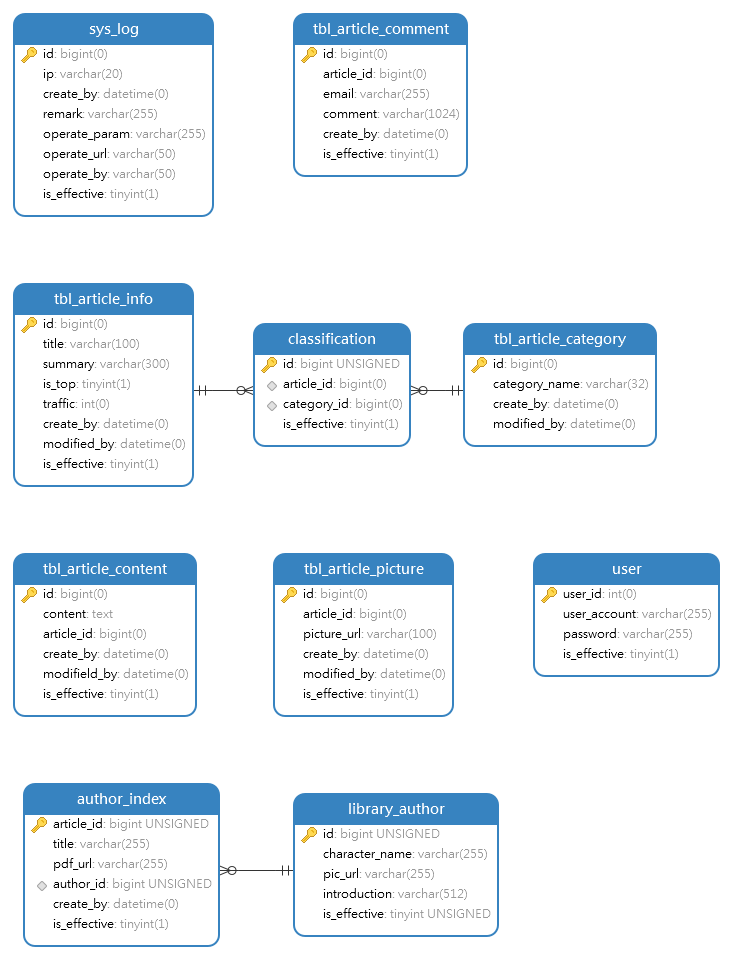
值得注意的是,tbl_article_info、tbl_article_content、tbl_article_picture三个表应当是关联表,且主键id严格对应。但不得不说在项目开发初期所进行的数据库 table 设计简直是“依托答辩”,对三个表的CRUD操作经常出现bug,让我不禁想问:既然三个表完全一对一,为什么不放在一张表去呢?等我意识到这个问题已经晚了,代码变成“*山”了(悲)。
中后期的library_author和author_index一对多的关系与tbl_article_info、tbl_article_category、中间表classification多对多关系设计是较为合理的。
Ⅱ、JDBC操作
Mybatis-Plus提供了一个封装良好的数据库与JDBC操作之间的逆向工程——mybatis-plus-generator(3.5.3版本),其提供的AutoGenerator类加载配置对象后可直接生成符合 Springboot 与 MyBatis 项目结构的数据库操作代码。以减少重复冗余的数据库DAO类的创建与初始化。为了使用这个插件我们需要先将 mybatis-plus-generator 和 velocity 导入到 pom 依赖当中;
<!--mybatis-plus-generator-->
<dependency>
    <groupId>com.baomidou</groupId>
    <artifactId>mybatis-plus-generator</artifactId>
    <version>3.5.3</version>
</dependency>

<!--模板引擎-->
<dependency>
    <groupId>org.apache.velocity</groupId>
    <artifactId>velocity-engine-core</artifactId>
    <version>2.3</version>
</dependency>
以下提供一个可行的生成器方法:
/**
 * MyBatisPlus逆向工程
 * MyBatisPlus代码生成器:3.5.3版本
 */
public class CodeGenerator {

    public static void main(String[] args) {
        // 数据源配置
        DataSourceConfig.Builder dataSourceConfigBuilder = new DataSourceConfig
                .Builder(
                "jdbc:mysql://localhost:3306/marxism_blog",
                "root",
                "123456");//内部会自行判断数据库类型

        // 全局配置
        GlobalConfig.Builder globalConfigBuilder = new GlobalConfig.Builder();
        // 代码生成目录
        String projectPath = System.getProperty("user.dir");
        String outputDir = projectPath + "/src/main/java";
        System.out.println(outputDir);
        globalConfigBuilder.outputDir(outputDir);
        // Author
        globalConfigBuilder.author("@MatikaneSpartakusbund");
        // 结束时不打开文件夹
        //globalConfigBuilder.disableOpenDir();
        // 是否覆盖旧的文件
        globalConfigBuilder.fileOverride();
        // 实体属性Swagger2注解
        globalConfigBuilder.enableSwagger();

        // 包配置,如模块名、实体、mapper、service、controller等
        PackageConfig.Builder packageConfigBuilder = new PackageConfig.Builder();
        //packageConfigBuilder.moduleName("");//模块名称
        packageConfigBuilder.parent("com.marxist.leftwing_community");//设置父包
        packageConfigBuilder.entity("entity");//自定义实体包名(不同的模块自己手动修改)
        packageConfigBuilder.mapper("dao");//自定义mapper包名(不同的模块自己手动修改)
        packageConfigBuilder.xml("dao.mapper");//自定义mapper.xml包名(不同的模块自己手动修改)
        packageConfigBuilder.service("service");//自定义service包名(不同的模块自己手动修改)
        packageConfigBuilder.serviceImpl("service.impl");//自定义serviceImpl包名(不同的模块自己手动修改)
        packageConfigBuilder.controller("controller");//自定义controller包名(不同的模块自己手动修改)

        // 策略配置
        StrategyConfig.Builder strategyConfigBuilder = new StrategyConfig.Builder();
        // 设置需要映射的表名
//        strategyConfigBuilder.addInclude("sys_log", "tbl_article_category", "tbl_article_comment", "tbl_article_info", "tbl_article_content", "tbl_article_picture");
//        strategyConfigBuilder.addInclude("user");
//        strategyConfigBuilder.addInclude("library_author", "author_index");
        strategyConfigBuilder.addInclude("classification");//字符串数组,可以生成多个表

        // 下划线转驼峰
        strategyConfigBuilder.entityBuilder().naming(NamingStrategy.underline_to_camel);
        strategyConfigBuilder.entityBuilder().columnNaming(NamingStrategy.underline_to_camel);
        // 添加前缀"t_"
        //strategyConfigBuilder.addTablePrefix("t_");

        // entity的Lombok
        strategyConfigBuilder.entityBuilder().enableLombok();

        // 逻辑删除
        strategyConfigBuilder.entityBuilder().logicDeleteColumnName("isEffective");
        strategyConfigBuilder.entityBuilder().logicDeletePropertyName("isEffective");

        // 创建时间
        IFill gmtCreate = new Column("create_time", FieldFill.INSERT);
        // 更新时间
        IFill gmtModified = new Column("update_time", FieldFill.INSERT_UPDATE);
        strategyConfigBuilder.entityBuilder().addTableFills(gmtCreate, gmtModified);
        // 乐观锁
        //strategyConfigBuilder.entityBuilder().enableSerialVersionUID();
        //strategyConfigBuilder.entityBuilder().versionColumnName("version");
        //strategyConfigBuilder.entityBuilder().versionPropertyName("version");

        // 使用Restful风格的Controller
        strategyConfigBuilder.controllerBuilder().enableRestStyle();

        // 将请求地址转换为驼峰命名,如 http://localhost:8080/hello_id_2
        strategyConfigBuilder.controllerBuilder().enableHyphenStyle();

        // 创建代码生成器对象,加载配置
        AutoGenerator autoGenerator = new AutoGenerator(dataSourceConfigBuilder.build());
        autoGenerator.global(globalConfigBuilder.build());
        autoGenerator.packageInfo(packageConfigBuilder.build());
        autoGenerator.strategy(strategyConfigBuilder.build());

        // 执行
        autoGenerator.execute();
    }

}
MyBatisPlus还提供了好用的逻辑删除插件,即不会真正删除数据库字段,而是将一条属性如is_effective标记字段是否被删除。如标记了逻辑删除字段的表的查询操作 mybatis-plus 会自动在查询语句末尾加上WHERE is_effective = 1,此时被删除的字段将不会被查找到;而调用删除方法实际上则是update is_effective = 0。
使用 mybatis-plus 的逻辑删除插件需要在数据库添加一个标识逻辑删除的字段(如 is_effective`),并在配置文件(如 application.properties)声明代表逻辑删除子段的名称:
# 逻辑删除
mybatis-plus.global-config.db-config.logic-delete-field=isEffective
mybatis-plus.global-config.db-config.logic-delete-value=0
mybatis-plus.global-config.db-config.logic-not-delete-value=1
三.Coding...
Ⅰ、项目结构
前文略,下面的树状图为项目的文件结构。
LeftwingCommunity-Springboot:
├───.mvn
│   └───wrapper
├───src  # java源程序
│   ├───main
│   │   ├───java  # 代码层
│   │   │   └───com
│   │   │       └───marxist
│   │   │           └───leftwing_community
│   │   │               ├───config  # 各配置类
│   │   │               ├───controller  # 前端控制器
│   │   │               ├───dao  # 数据持久层Mapper接口
│   │   │               ├───entity  # 实体类
│   │   │               ├───generator  # 生成器
│   │   │               ├───interceptor # 拦截器
│   │   │               ├───service  # Web服务层接口
│   │   │               │   └───impl  # 实现类
│   │   │               └───util  #工具类
│   │   └───resources  # 资源文件
│   │       ├───mappers  # 存放mybatis映射文件
│   │       ├───static  # 存放静态资源文件
│   │       │   ├───adminLTE  # adminLTE资源文件(存放AdminLTE-3.1.0-rc/dist与/plugins下的资源文件)
│   │       │   │   ├───dist
│   │       │   │   └───plugins
│   │       │   ├───bootstrap-5.1.3-dist  # bootstrap组件库
│   │       │   │   ├───css
│   │       │   │   └───js
│   │       │   ├───css
│   │       │   ├───img  # 存放项目图片资源
│   │       │   ├───js
│   │       │   ├───md  # 存放markdown资源文件
│   │       │   ├───page  # 存放静态博客页面
│   │       │   ├───pdf  # 存放文库阅读所需的pdf文件
│   │       │   └───pdfjs  # 存放开源插件pdf.js
│   │       │       ├───bulid
│   │       │       └───web
│   │       └───templates  # 存放thymeleaf模板文件
│   │           └───adminLTE  # thymeleaf后台页面
│   └───test  # 测试类
│       ├───java
│       │   └───com
│       │       └───marxist
│       │           └───leftwing_community
│       └───resources
└───pom.xml  # Maven的pom文件
Ⅱ、前端代码实现
既然是个人项目便未优先考虑前后端分离架构,而是选用 Thymeleaf 这类 Java 模板引擎进行前端开发与数据渲染。相比于JSP之类的模板引擎选用 thymeleaf 的优点其一是不用开启服务器便可方便调试,其二在于 thymeleaf 是 springboot 官方推荐的模板引擎。每个具体的页面开发细节是无需赘述的,需要提及的是响应式布局的问题。
Bootstap 为使用者提供了一个良好的栅格系统解决方案,提高了页面布局的开发效率。另外,在小屏幕的移动端方面,一些 js 的 DOM 操作能更好的适用桌面端到移动端的适配:
<div class="row">
    <!-- 头像 -->
    <div class="col-2 mt-2 displayNone">
        <img class="img-thumbnail img-fluid mx-auto d-block"
            style="max-width: 88px;max-height: 120px" src="../static/img/portrait/10.jpg"
            alt="头像" th:src="${portraitList.get(status.index)}">
    </div>
    <!-- 评论内容 -->
    <div class="col-10 mt-1">
        <p class="h5" style="overflow: hidden;white-space:nowrap;text-overflow: ellipsis;"
        th:text="${'游客[' + articleComment.getEmail() + ']说'}">
            游客[1391301@aspotgmail.org]说:</p>
        <p class="lead" style="text-indent: 2em"><small
                th:text="${articleComment.getComment()}">一些演示文本.一些演示文本.一些演示文本.一些演示文本.一些演示文本.一些演示文本.一些演示文本.一些演示文本.一些演示文本.一些演示文本.</small>
        </p>
        <p class="h6 text-end text-muted"
        th:text="${'发布时间:' + articleComment.getCreateBy()}">发布时间:2022/10/1
            下午6:08</p>
    </div>
</div>
以下函数使得当用户的屏幕 < 768 时,让头像隐藏并让文本占据大小为 col-12(铺满) 的栅格。
//当设备为小型设备时隐藏评论头像
let hid = function () {
    let array = document.querySelectorAll('.displayNone')
    for (let a of array) {
        a.style.display = document.documentElement.clientWidth > 768 ? 'block' : 'none'
        if (document.documentElement.clientWidth < 768) {
            a.nextElementSibling.className = "col-12 mt-1"
        }

    }
}
window.onresize = hid()
window.addEventListener("beforeunload", hid())
除 DOM 操作以外,媒体查询也能很好地完成不同大小设备的适配工作。
一个需求是,背景依据不同大小的媒体设备更改为大小很为合适的图片。以下 css 样式能很好的完成这个需求以及其他需求:
/*大型屏幕设备 桌面*/
@media (min-width: 1200px) {
    /*设置自适应背景图*/
    body {
        background-image: url("../img/CCCP03.jpg");
        background-position: center 0;
        background-repeat: no-repeat;
        background-attachment: fixed;
        background-size: cover;
        -webkit-background-size: cover;
        -o-background-size: cover;
        -moz-background-size: cover;
        -ms-background-size: cover;
    }
    /*移动端文章推荐的显示与隐藏*/
    .rightIsShow{
        display: none;
    }
}

/*小屏幕设备 平板*/
@media (min-width: 768px) and (max-width: 1200px) {
    body {

        ...
    }
    .rightIsShow{
        display: block;
    }
}

/*超小屏幕设备 手机*/
@media (max-width: 768px) {
    body {
        background-image: url("../img/20221030141215.jpg");

        ...
    }
    .rightIsShow{
        display: block;
    }
}

Ⅲ、后端代码实现
篇幅有限,这里试图列举本项目实现过程中的部分有趣而重要的后端代码细节。
Markdown2HTMl实现
在实际地业务中,每篇博客都直接使用 html 书写是极不现实地,为了很好地编辑和上传博客,markdown 这样的文本标记格式即好学又好用,可谓是当前博客编辑的主流实现方式(事实上,您看到的这篇博客也是 markdown 语法书写的)。
在上传 markdown 格式文件作为博客的过程中,我们自然而然就会发现:我们需要一个 md 语法转 html 语法的包装器。好在,Flexmark 就是这样一个 md2html 的开源库。通过在 maven pom 以下添加以下依赖导入 flexmark 库。
<!-- markdown转html -->
<!-- https://mvnrepository.com/artifact/com.vladsch.flexmark/flexmark -->
<dependency>
    <groupId>com.vladsch.flexmark</groupId>
    <artifactId>flexmark</artifactId>
    <version>0.34.18</version>
</dependency>
<!-- https://mvnrepository.com/artifact/com.vladsch.flexmark/flexmark-util -->
<dependency>
    <groupId>com.vladsch.flexmark</groupId>
    <artifactId>flexmark-util</artifactId>
    <version>0.34.18</version>
</dependency>
以下工具类封装了 flexmark 的转换操作,通过调用MarkDown2HtmlWrapper.ofContent()方法可以使传入的符合 md 语法的 String 返回一个符合 html 语法的 String。
/**
 * Markdown转Html包装器
 *
 * @Author:MatikaneSpartakusbund
 */
public class MarkDown2HtmlWrapper {

    private static String MD_CSS = null;

    static {
        try {
            MD_CSS = FileReadUtil.readAll("D:\\Projects\\LeftwingCommunity-Springboot\\src\\main\\resources\\static\\css\\markdown.css");
            MD_CSS = "<style type=\"text/css\">\n" + MD_CSS + "\n</style>\n";
        } catch (Exception e) {
            MD_CSS = "";
        }
    }


    /**
     * 将本地的markdown文件,转为html文档输出
     *
     * @param path 相对地址or绝对地址 ("/" 开头)
     * @return
     * @throws IOException
     */
    public static MarkdownEntity ofFile(String path) throws IOException {
        return ofStream(FileReadUtil.getStreamByFileName(path));
    }


    /**
     * 将网络的markdown文件,转为html文档输出
     *
     * @param url http开头的url格式
     * @return
     * @throws IOException
     */
    public static MarkdownEntity ofUrl(String url) throws IOException {
        return ofStream(FileReadUtil.getStreamByFileName(url));
    }


    /**
     * 将流转为html文档输出
     *
     * @param stream
     * @return
     */
    public static MarkdownEntity ofStream(InputStream stream) {
        BufferedReader bufferedReader = new BufferedReader(
                new InputStreamReader(stream, Charset.forName("UTF-8")));
        List<String> lines = bufferedReader.lines().collect(Collectors.toList());
        String content = Joiner.on("\n").join(lines);
        return ofContent(content);
    }


    /**
     * 直接将markdown语义的文本转为html格式输出
     *
     * @param content markdown语义文本
     * @return
     */
    public static MarkdownEntity ofContent(String content) {
        String html = parse(content);
        MarkdownEntity entity = new MarkdownEntity();
        entity.setCss(MD_CSS);
        entity.setHtml(html);
        entity.addDivStyle("class", "markdown-body ");
        return entity;
    }


    /**
     * markdown to image
     *
     * @param content markdown contents
     * @return parse html contents
     */
    public static String parse(String content) {
        MutableDataSet options = new MutableDataSet();
        options.setFrom(ParserEmulationProfile.MARKDOWN);

        // enable table parse!
        options.set(Parser.EXTENSIONS, Collections.singletonList(TablesExtension.create()));


        Parser parser = Parser.builder(options).build();
        HtmlRenderer renderer = HtmlRenderer.builder(options).build();

        Node document = parser.parse(content);
        return renderer.render(document);
    }

    //FileReadUtil内部工具类
    private static class FileReadUtil {
        public static String readAll(String fileName) throws IOException {
            BufferedReader reader = createLineRead(fileName);
            List<String> lines = reader.lines().collect(Collectors.toList());
            return Joiner.on("\n").join(lines);
        }

        /**
         * 以行为单位读取文件,常用于读面向行的格式化文件
         *
         * @param fileName 文件名
         */
        public static BufferedReader createLineRead(String fileName) throws IOException {
            return new BufferedReader(new InputStreamReader(getStreamByFileName(fileName), StandardCharsets.UTF_8));
        }

        private static InputStream getStreamByFileName(String fileName) throws IOException {
            return Files.newInputStream(Paths.get(fileName));
        }

    }
}
访客日志记录
为了对网站的访客行为进行监控,我们需要记录下所有访客操作时的 IP、操作请求名称、请求参数、请求的URL地址、访问的时间 等,一遍对不良访问记录进行合乎时宜的拦截;为了达到这个目的,AOP(面向切面编程) 操作是最为合适的记录方式。
- 在开发前,我们需要先引入 AOP 与 fastjson 依赖。
<!-- AOP依赖 -->
<dependency>
    <groupId>org.springframework.boot</groupId>
    <artifactId>spring-boot-starter-aop</artifactId>
</dependency>
<!-- JSON依赖:https://mvnrepository.com/artifact/com.alibaba/fastjson -->
<dependency>
    <groupId>com.alibaba</groupId>
    <artifactId>fastjson</artifactId>
    <version>1.2.41</version>
</dependency>
-
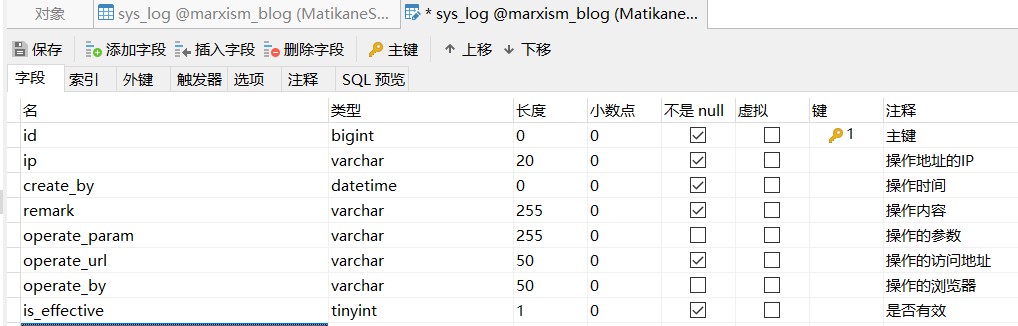
设计
sys_log表,创建对应的实体类SysLog.java。
-
自定义用户操作注解。
/**
 * 注解类:操作日志
 */
@Target(ElementType.METHOD) //注解放置的目标位置,METHOD是可注解在方法级别上
@Retention(RetentionPolicy.RUNTIME) //注解在哪个阶段执行
@Documented
public @interface OperateLog {
    String operateDesc() default "";  // 操作说明
}
- 自定义用户操作日志切面,并创建处理客户端请求的工具类
RequestUtils。
/**
 * AOP实现操作访客日志
 */
@Aspect
@Component
@Slf4j
public class OperateLogAspect {
    @Autowired
    private ISysLogService sysLogService;

    /**
     * 操作日志切入点
     */
    @Pointcut("@annotation(com.marxist.leftwing_community.util.OperateLog)")
    public void operateLogPointCut() {
    }

    /**
     * 拦截用户操作日志
     *
     * @param joinPoint 切入点
     * @param keys      返回结果
     */
    @AfterReturning(value = "operateLogPointCut()", returning = "keys")
    public void saveOperateLog(JoinPoint joinPoint, Object keys) {
        // 获取RequestAttributes
        RequestAttributes requestAttributes = RequestContextHolder.getRequestAttributes();
        // 从获取RequestAttributes中获取HttpServletRequest的信息
        assert requestAttributes != null;
        HttpServletRequest request = (HttpServletRequest) requestAttributes.resolveReference(RequestAttributes.REFERENCE_REQUEST);
        String requestIp = RequestUtils.getRemoteIp(request);

        // 本机访问的不记录日志
        if (!"0:0:0:0:0:0:0:1".equals(requestIp) && !"127.0.0.1".equals(requestIp)) {
            SysLog operateLog = new SysLog();
            try {
                // 从切面织入点处通过反射机制获取织入点处的方法
                MethodSignature signature = (MethodSignature) joinPoint.getSignature();
                // 获取切入点所在的方法
                Method method = signature.getMethod();
                // 获取操作的类型
                OperateLog opLog = method.getAnnotation(OperateLog.class);
                if (opLog != null) {
                    String operateDesc = opLog.operateDesc();
                    operateLog.setRemark(operateDesc); // 操作描述
                }
                // 请求IP
                operateLog.setIp(RequestUtils.getRemoteIp(request));
                // 请求的参数
                assert request != null;
                Map<String, String> rtnMap = converMap(request.getParameterMap());
                String params = JSON.toJSONString(rtnMap);// 将参数所在的数组转换成json
                operateLog.setOperateParam(params);
                // 请求URI
                operateLog.setOperateUrl(request.getRequestURI());
                // 请求的浏览器标识
                operateLog.setOperateBy(RequestUtils.getOsAndBrowserInfo(request));

                //保存至数据库
                sysLogService.save(operateLog);
            } catch (Exception e) {
                e.printStackTrace();
            }
        }

    }

    /**
     * 转换request 请求参数
     *
     * @param paramMap request获取的参数数组
     */
    public Map<String, String> converMap(Map<String, String[]> paramMap) {
        Map<String, String> rtnMap = new HashMap<String, String>();
        for (String key : paramMap.keySet()) {
            rtnMap.put(key, paramMap.get(key)[0]);
        }
        return rtnMap;
    }
}
/**
 * 工具类:处理客户端请求
 */
public class RequestUtils {
    private static final String UNKNOWN = "unknown";
    private static final String LOCALHOST_IP = "127.0.0.1";
    // 客户端与服务器同为一台机器,获取的 ip 有时候是 ipv6 格式
    private static final String LOCALHOST_IPV6 = "0:0:0:0:0:0:0:1";
    private static final String SEPARATOR = ",";

    /**
     * 访客IP工具方法
     * @param request
     * @return ip
     */
    public static String getRemoteIp(HttpServletRequest request) {
        if (request == null) {
            return "unknown";
        }
        String ip = request.getHeader("x-forwarded-for");
        if (ip == null || ip.length() == 0 || UNKNOWN.equalsIgnoreCase(ip)) {
            ip = request.getHeader("Proxy-Client-IP");
        }
        if (ip == null || ip.length() == 0 || UNKNOWN.equalsIgnoreCase(ip)) {
            ip = request.getHeader("X-Forwarded-For");
        }
        if (ip == null || ip.length() == 0 || UNKNOWN.equalsIgnoreCase(ip)) {
            ip = request.getHeader("WL-Proxy-Client-IP");
        }
        if (ip == null || ip.length() == 0 || UNKNOWN.equalsIgnoreCase(ip)) {
            ip = request.getHeader("X-Real-IP");
        }
        if (ip == null || ip.length() == 0 || UNKNOWN.equalsIgnoreCase(ip)) {
            ip = request.getRemoteAddr();
            if (LOCALHOST_IP.equalsIgnoreCase(ip) || LOCALHOST_IPV6.equalsIgnoreCase(ip)) {
                // 根据网卡取本机配置的IP地址:用于将0:0:0:0:0:0:0:1转变为正常的本地IPV4
                /* 当需要记录本机操作时启用 */
                InetAddress iNet = null;
                try {
                    iNet = InetAddress.getLocalHost();
                } catch (UnknownHostException e) {
                    e.printStackTrace();
                }
                if (iNet != null)
                    ip = iNet.getHostAddress();
            }
        }
        // 对于通过多个代理的情况,分割出第一个 IP
        if (ip != null && ip.length() > 15) {
            if (ip.indexOf(SEPARATOR) > 0) {
                ip = ip.substring(0, ip.indexOf(SEPARATOR));
            }
        }
        return LOCALHOST_IPV6.equals(ip) ? LOCALHOST_IP : ip;
    }

    /**
     * 获取操作系统,浏览器及浏览器版本信息
     * @param request
     * @return
     */
    public static String getOsAndBrowserInfo(HttpServletRequest request){
        String  browserDetails  =   request.getHeader("User-Agent");
        String  userAgent       =   browserDetails;
        String  user            =   userAgent.toLowerCase();

        String os = "";
        String browser = "";

        //=================OS Info=======================
        if (userAgent.toLowerCase().indexOf("windows") >= 0 )
        {
            os = "Windows";
        } else if(userAgent.toLowerCase().indexOf("mac") >= 0)
        {
            os = "Mac";
        } else if(userAgent.toLowerCase().indexOf("x11") >= 0)
        {
            os = "Unix";
        } else if(userAgent.toLowerCase().indexOf("android") >= 0)
        {
            os = "Android";
        } else if(userAgent.toLowerCase().indexOf("iphone") >= 0)
        {
            os = "IPhone";
        }else{
            os = "UnKnown, More-Info: "+userAgent;
        }
        //===============Browser===========================
        if (user.contains("edge"))
        {
            browser=(userAgent.substring(userAgent.indexOf("Edge")).split(" ")[0]).replace("/", "-");
        } else if (user.contains("msie"))
        {
            String substring=userAgent.substring(userAgent.indexOf("MSIE")).split(";")[0];
            browser=substring.split(" ")[0].replace("MSIE", "IE")+"-"+substring.split(" ")[1];
        } else if (user.contains("safari") && user.contains("version"))
        {
            browser=(userAgent.substring(userAgent.indexOf("Safari")).split(" ")[0]).split("/")[0]
                    + "-" +(userAgent.substring(userAgent.indexOf("Version")).split(" ")[0]).split("/")[1];
        } else if ( user.contains("opr") || user.contains("opera"))
        {
            if(user.contains("opera")){
                browser=(userAgent.substring(userAgent.indexOf("Opera")).split(" ")[0]).split("/")[0]
                        +"-"+(userAgent.substring(userAgent.indexOf("Version")).split(" ")[0]).split("/")[1];
            }else if(user.contains("opr")){
                browser=((userAgent.substring(userAgent.indexOf("OPR")).split(" ")[0]).replace("/", "-"))
                        .replace("OPR", "Opera");
            }

        } else if (user.contains("chrome"))
        {
            browser=(userAgent.substring(userAgent.indexOf("Chrome")).split(" ")[0]).replace("/", "-");
        } else if ((user.indexOf("mozilla/7.0") > -1) || (user.indexOf("netscape6") != -1)  ||
                (user.indexOf("mozilla/4.7") != -1) || (user.indexOf("mozilla/4.78") != -1) ||
                (user.indexOf("mozilla/4.08") != -1) || (user.indexOf("mozilla/3") != -1) )
        {
            browser = "Netscape-?";

        } else if (user.contains("firefox"))
        {
            browser=(userAgent.substring(userAgent.indexOf("Firefox")).split(" ")[0]).replace("/", "-");
        } else if(user.contains("rv"))
        {
            String IEVersion = (userAgent.substring(userAgent.indexOf("rv")).split(" ")[0]).replace("rv:", "-");
            browser="IE" + IEVersion.substring(0,IEVersion.length() - 1);
        } else
        {
            browser = "UnKnown, More-Info: "+userAgent;
        }

        return os +" --- "+ browser ;
    }
}
- 对 Controller 类对应的方法使用注解标记,添加操作描述。
//访问首页
@OperateLog(operateDesc = "访问首页")
@RequestMapping("/home")
public String home(Model model) {
    List<TblArticleInfo> recommendArticles = articleInfoService.getRecommendArticle();
    model.addAttribute("recommendArticles", recommendArticles);

    return "home";
}
随后便可以在数据库中看见对应的操作日志字段:

最大请求次数限制
由于个人服务器的并发量不高,为了减轻服务器负载,也为了预防访客的不良访问行为(如爬虫,DOS攻击),我需要对同一 IP 标识的用户进行单位时间最大访问限制。
现在,我们可以通过拦截器HandlerInterceptor对所有前台访问请求操作进行拦截判断,记录他在单位时间发出请求的次数,从而在合乎时宜的时机拦截它的请求。
- 一个缓存工具类
CacheUtil.java可以用于记录用户的访问次数。
/**
 * 缓存处理工具类
 */
public class CacheUtils {

    // 键值对集合
    private final static Map<String, Entity> map = new ConcurrentHashMap<>();
    // 定时器线程池, 用于清除过期缓存
    private final static ScheduledExecutorService executor = Executors.newSingleThreadScheduledExecutor();

    /**
     * 添加缓存
     */
    public synchronized static void put(String key, Object data) {
        CacheUtils.put(key, data, 0);
    }

    /**
     * 添加缓存
     * 过期时间: 单位毫秒, 0表示无限长
     */
    public synchronized static void put(String key, Object data, long expire) {
        // 清除原键值对
        CacheUtils.remove(key);
        // 设置过期时间
        if (expire > 0) {
            Future future = executor.schedule(() -> {
                // 过期后清除该键值对
                synchronized (CacheUtils.class) {
                    map.remove(key);
                }
            }, expire, TimeUnit.MILLISECONDS);
            map.put(key, new Entity(data, future));
        } else {
            // 不设置过期时间
            map.put(key, new Entity(data, null));
        }
    }

    /**
     * 读取缓存
     */
    public synchronized static Object get(String key) {
        Entity entity = map.get(key);
        return entity == null ? null : entity.getValue();
    }

    /**
     * 读取缓存
     * clazz 值类型
     */
    public synchronized static <T> T get(String key, Class<T> clazz) {
        return clazz.cast(CacheUtils.get(key));
    }

    /**
     * 清除指定缓存
     * 返回值为指定key的value
     */
    public synchronized static Object remove(String key) {
        // 清除指定缓存数据
        Entity entity = map.remove(key);
        if (entity == null)
            return null;
        // 清除指定键值对定时器
        Future future = entity.getFuture();
        if (future != null)
            future.cancel(true);
        return entity.getValue();
    }

    /**
     * 清除所有缓存
     */
    public synchronized static void removeAll() {
        map.clear();
    }

    /**
     * 查询当前缓存的键值对数量
     */
    public synchronized static int size() {
        return map.size();
    }

    /**
     * 缓存实体类
     */
    private static class Entity {
        // 键值对的value
        private Object value;
        // 定时器的future
        private Future future;

        /**
         * 创建实体类
         */
        public Entity(Object value, Future future) {
            this.value = value;
            this.future = future;
        }

        /**
         * 获取value值
         */
        public Object getValue() {
            return value;
        }

        /**
         * 获取future对象
         */
        public Future getFuture() {
            return future;
        }
    }

}
- 随后,我们需要创建一个
VisitLimitInterceptor拦截所有前台页面的请求,并判断。若一分钟内超过25次请求,则拦截并跳转至警告页面。
@Slf4j
@Component
public class VisitLimitInterceptor implements HandlerInterceptor {

    /**
     * 拦截器:限制ip对应的用户的单位时间最大访问次数
     *
     * @param httpServletRequest
     * @param httpServletResponse
     * @param object
     * @return
     */
    @Override
    public boolean preHandle(@NotNull HttpServletRequest httpServletRequest, @NotNull HttpServletResponse httpServletResponse, @NotNull Object object) throws IOException {

        try {
            int limit_count = 25;//最大访问次数
            int limit_time = 60 * 1000;//访问限制的单位时间(1min)

            String ip = RequestUtil.getRemoteIp(httpServletRequest);
            String url = httpServletRequest.getRequestURL().toString();
//            String key = "req_limit_".concat(url).concat(ip);
            String key = "req_limit_".concat(ip);//不检查访问的url是否一致

            String cache = (String) CacheUtil.get(key);
            if (null == cache) {
                String value = "1_" + System.currentTimeMillis();
                CacheUtil.put(key, value, limit_time);
            } else {
                String value = (String) cache;
                String[] s = value.split("_");
                int count = Integer.parseInt(s[0]);

                if (count > limit_count) {
                    log.error("用户IP[{}], 访问地址[{}], 超过了限定的次数[{}]", ip, url, limit_count);
                    throw new Exception("当前ip单位时间访问请求次数超过限制!");
                }

                value = (count + 1) + "_" + s[1];
                long last = limit_time - (System.currentTimeMillis() - Long.parseLong(s[1]));
                if (last > 0) {
                    CacheUtil.put(key, value, limit_time);
                }
            }

        } catch (Exception e) {
            //跳转至警告页面
            httpServletResponse.setContentType("text/html; charset=utf-8");
            httpServletResponse.getWriter().write("<h3 align='center'>访问次数异常!请稍后再试...</h3><script>setTimeout(function(){window.history.go(-1);},5000);</script>");

            return false;//拦截请求
        }

        return true;//放行
    }

}
- 我们需要在继承自
WebMvcConfigurer的类中注册拦截器,这使得拦截器得以生效。评论最大次数限制也同理。
/**
 * 注册限制请求次数拦截器
 */
@Configuration
public class RequestLimitConfig implements WebMvcConfigurer {

    /**
     * 添加限制请求拦截器
     *
     * @param registry
     */
    @Override
    public void addInterceptors(InterceptorRegistry registry) {
        //添加访问拦截器
        InterceptorRegistration visitRegistration = registry.addInterceptor(new VisitLimitInterceptor());
        visitRegistration.addPathPatterns("/home", "/article_list", "/article", "library", "/author_index", "/literature");//拦截前台功能请求
        visitRegistration.excludePathPatterns("/error");

        //添加评论拦截器
        InterceptorRegistration commentRegistration = registry.addInterceptor(new CommentLimitInterceptor());
        commentRegistration.addPathPatterns("/article/insert");//拦截添加评论请求
    }

}
文库 PDF 在线浏览
为了实现对文库内容的存储,我选择了直接保存典籍的 pdf 文件,并在网站上实现在线浏览。对于 PDF 在浏览器中浏览的支持,而pdf.js插件无疑是最好的选择,它在桌面端乃至移动端均有不错的的适配。以下是一个 thymeleaf 情形下的示例:
<!-- 使用PDF.js插件跨域实现pdf展示 -->
<div>
    <iframe th:src="${'/pdfjs/web/viewer.html?file=' + url}" src="../static/pdfjs/web/viewer.html" style="width: 100%;height: 100%;position: absolute;"></iframe>
</div>
静态资源路径/pdfjs/web/viewer.html是一个官方的样式,官方提供了一个直接调用其的方法,即在路径后添加参数?url=*。以下是一个上述 html 的一个示例:
http://8.130.39.9:8080/literature?url=http://8.130.39.9:8080/pdf/【马尔库塞文集第二卷】走向社会批判理论.pdf
iframe 最终会调用 http://8.130.39.9:8080/pdfjs/web/viewer.html?file=http://8.130.39.9:8080/pdf/【马尔库塞文集第二卷】走向社会批判理论.pdf,使其显示在网站嵌套页面上。

事实上,上述代码的使用将会导致跨域问题:
请求url的协议、域名、端口三者有任意一个不同即为跨域。跨域问题是因为浏览器的同源策略的限制而产生的。
1.同源:请求url的协议、域名、端口三者都相同即为同源(同一个域)。
2.同源策略:同源策略(Sameoriginpolicy)是一种约定,他是浏览器最核心也最基本的安全功能。同源策略会阻止非同源(同一个域)的内容进行交互。
Spring 提供了解决跨域问题的策略,以下提供一个代码样例:
//跨域配置类
@Configuration
public class CorsConfig {

    /**
     * 配置过滤器CorsFilter
     * 解决PDF.js跨域无法访问
     *
     * @return CorsFilter
     */
    @Bean
    CorsFilter corsFilter() {
        //1.添加CORS配置信息
        CorsConfiguration configuration = new CorsConfiguration();
        configuration.setAllowedOrigins(Collections.singletonList("http://8.130.39.9:8080/"));
        configuration.setAllowedOrigins(Collections.singletonList("*"));//允许的域,写*时cookie可能无法使用了
        configuration.setAllowedMethods(Collections.singletonList("*"));//允许的请求方式
        configuration.setAllowedHeaders(Collections.singletonList("*"));//允许的头信息
        configuration.setAllowCredentials(true);//是否允许请求带有验证信息

        //2.添加映射路径,拦截一切请求
        UrlBasedCorsConfigurationSource source = new UrlBasedCorsConfigurationSource();
        source.registerCorsConfiguration("/**", configuration);

        return new CorsFilter(source);
    }
}
四.项目部署
开发基本结束后,还需要将其部署在合适的服务器上。值得一说的,阿里云对学生有俩个月加十四天的免费云服务器,可以为经验不足的人提供贴合实际开发环境的实验平台。虽然是国内的服务器,上线网站需要备案,但作为测试还是不亏的。
Ⅰ、环境配置
在多种 Linux 系统中,我最终选择使用 Ubuntu20.4,没什么特殊原因,爱选啥选啥。环境安装和配置的过程中可能产生各种各样的、千奇百怪的问题,但善用百度花费时间皆可解决,我在此不赘述。
- JDK11
- MySql8
- ufw 防火墙(放开 8080 等端口)
- Docker(可选)

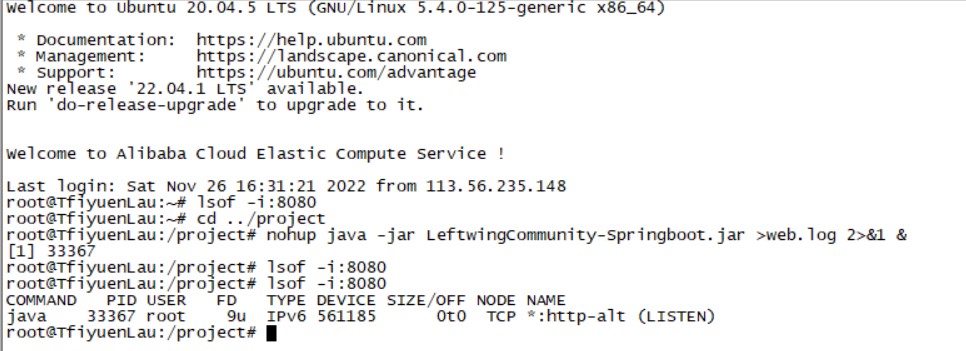
Ⅱ、远程启动项目
通常情况下,我使用 SecureCRT 进行 ssh 远程连接,使用 FileZilla 进行 ftp 文件传输。在将项目的 jar 包传输至云服务器指定位置后,使用cd ../project/命令进入项目文件夹。随后输入nohup java -jar LeftwingCommunity-Springboot.jar >web.log 2>&1 &命令启动 Springboot 项目。这条命令可以将日志信息打印至当前文件夹的 web.log 文件中。
Ⅲ、静态资源映射
在博客的后台管理面板实现了许多上传文件的方法,但由于 springboot 在打 jar 包的策略,上传的文件无法正常直接放置于 jar 包中,而是放置于同级的file:/project/LeftwingCommunity-Springboot.jar!/BOOT-INF/classes!/static/文件夹中。为了获取到这些上传的静态资源文件,我们可以使用 Springboot 为我们提供的配置静态资源映射的类和方法——addResourceHandlers(ResourceHandlerRegistry registry)。
其中,addResourceLocations(/project/file:/project/LeftwingCommunity-Springboot.jar!/BOOT-INF/classes!/static/img)是我们的文件上传绝对路径,注意要加 file: ;addResourceHandler(/img/*.jpg)是我们的映射地址,即上传到 ResourceLocations 的图片能用 /img/xxx.jpg 取到。下文是项目的部分静态资源映射地址。
/**
 * WebMvcConfigurer配置类
 */
@Configuration
public class MvcConfig implements WebMvcConfigurer {

    @Override
    public void addResourceHandlers(ResourceHandlerRegistry registry) {
        //标识为静态资源的请求不拦截
        registry.addResourceHandler("/static/**")
                .addResourceLocations("classpath:/static/");

        //文件上传映射地址:addResourceLocations是我们的文件上传绝对路径,注意要加file:
        //项目静态资源md映射路径/project/file:/project/LeftwingCommunity-Springboot.jar!/BOOT-INF/classes!/static/
        registry.addResourceHandler("/md/**")
                .addResourceLocations("file:/project/file:/project/LeftwingCommunity-Springboot.jar!/BOOT-INF/classes!/static/md/");
        registry.addResourceHandler("/page/**")
                .addResourceLocations("file:/project/file:/project/LeftwingCommunity-Springboot.jar!/BOOT-INF/classes!/static/page/");
        registry.addResourceHandler("/img/**")
                .addResourceLocations("file:/project/file:/project/LeftwingCommunity-Springboot.jar!/BOOT-INF/classes!/static/img/");
        registry.addResourceHandler("/pdf/**")
                .addResourceLocations("file:/project/file:/project/LeftwingCommunity-Springboot.jar!/BOOT-INF/classes!/static/pdf/");
    }

}
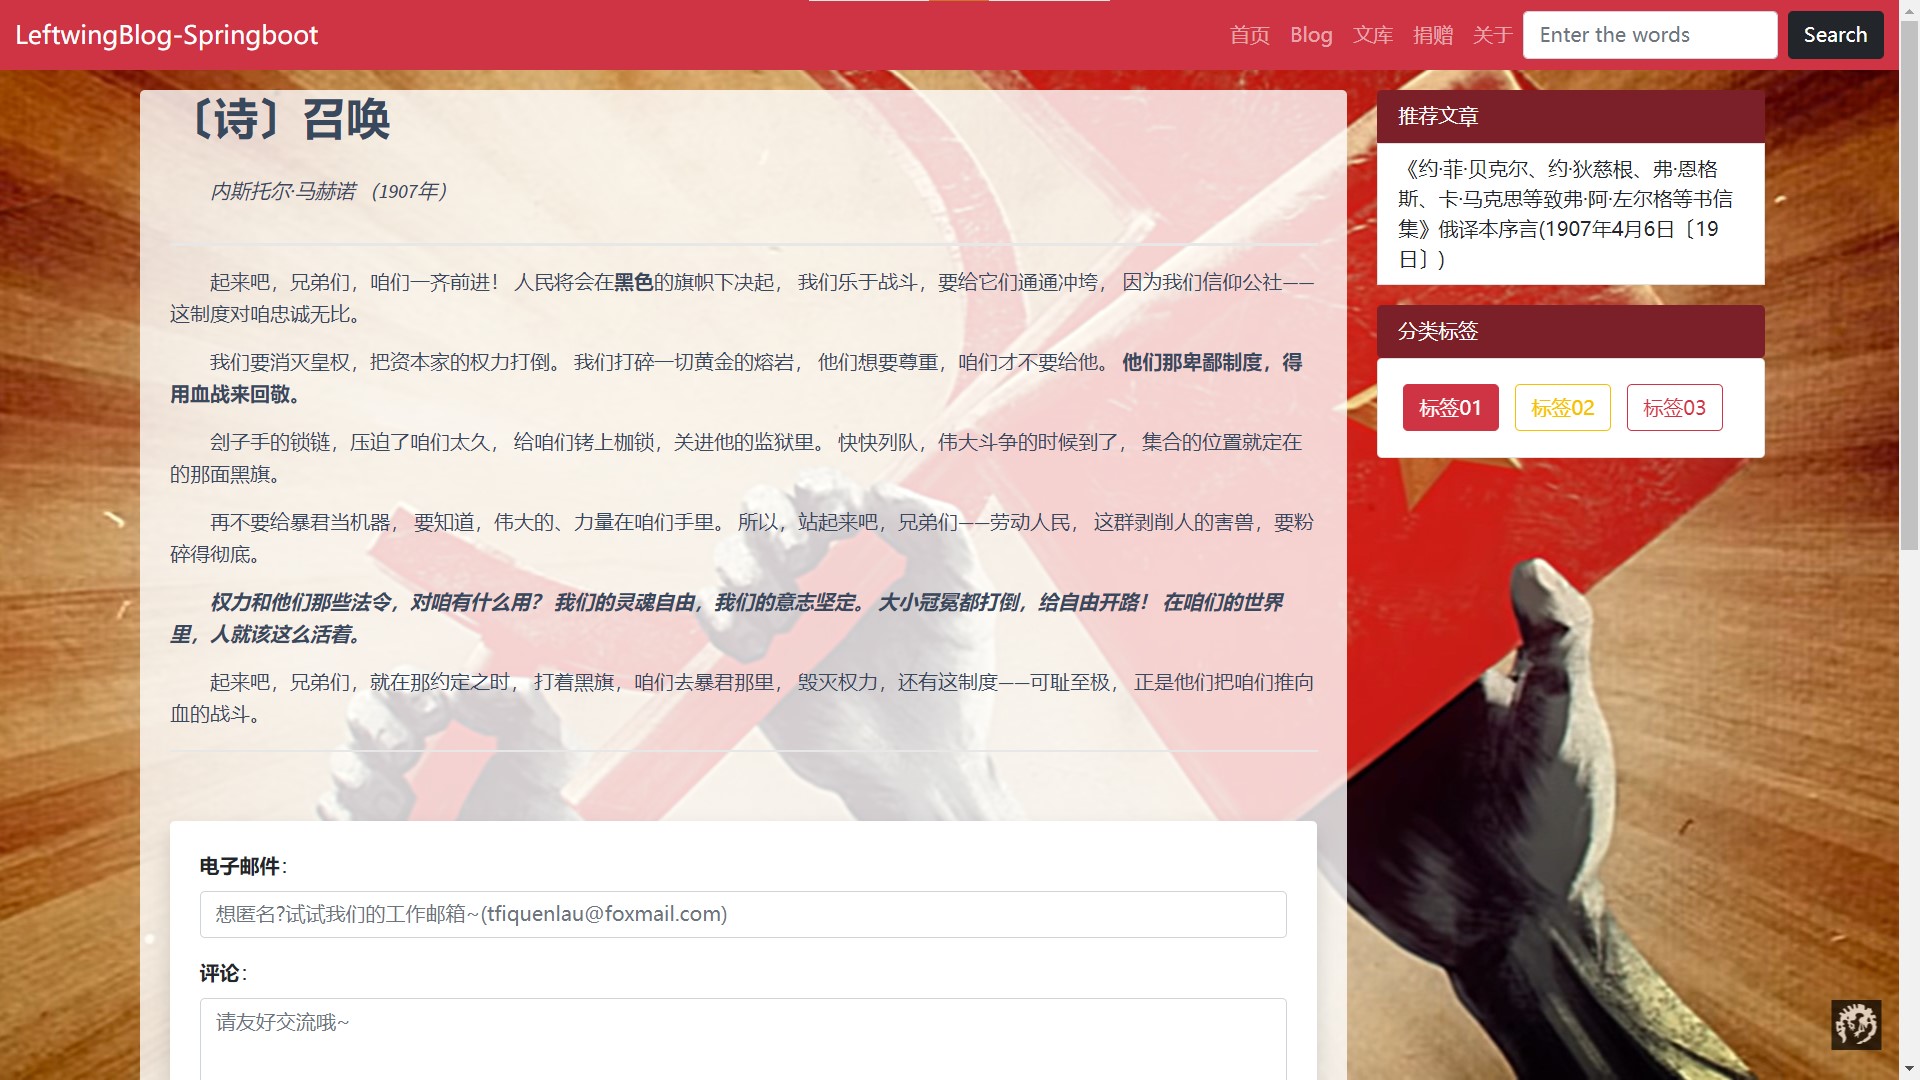
五.延伸阅读
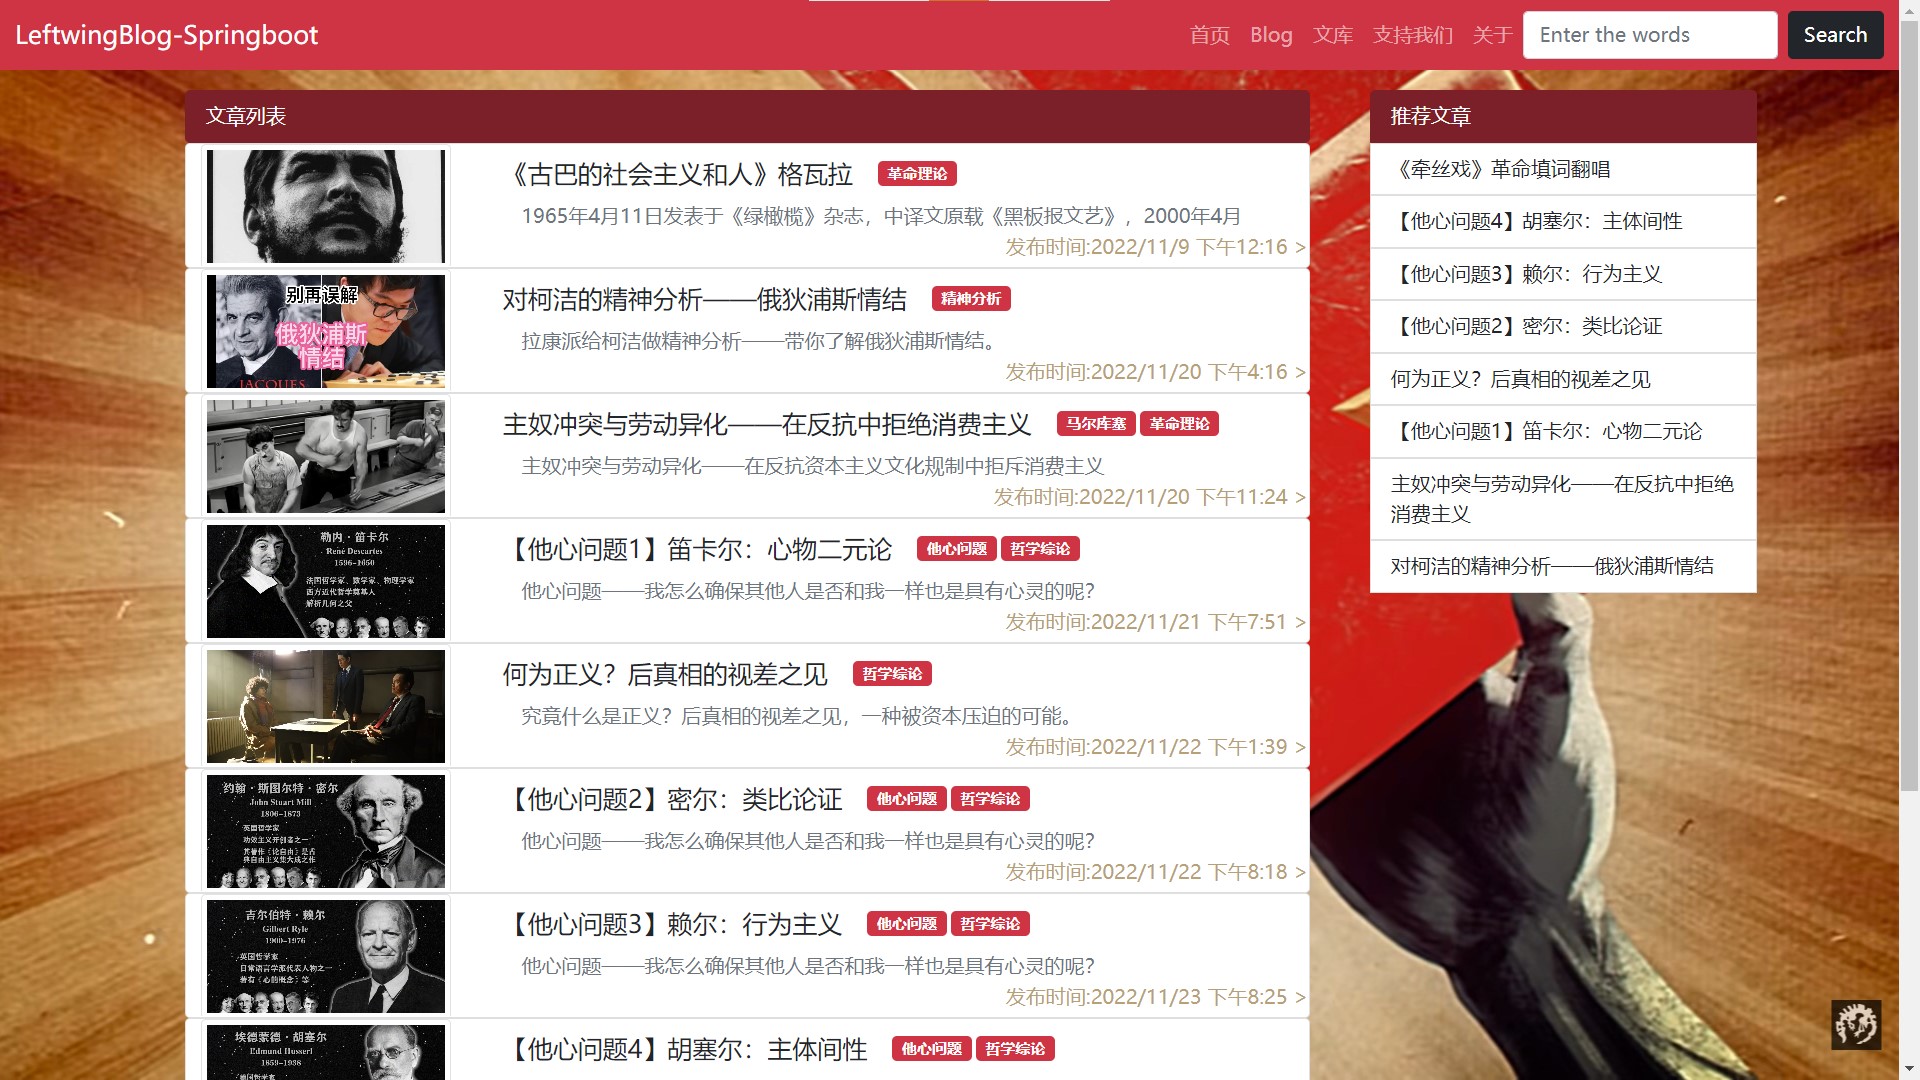
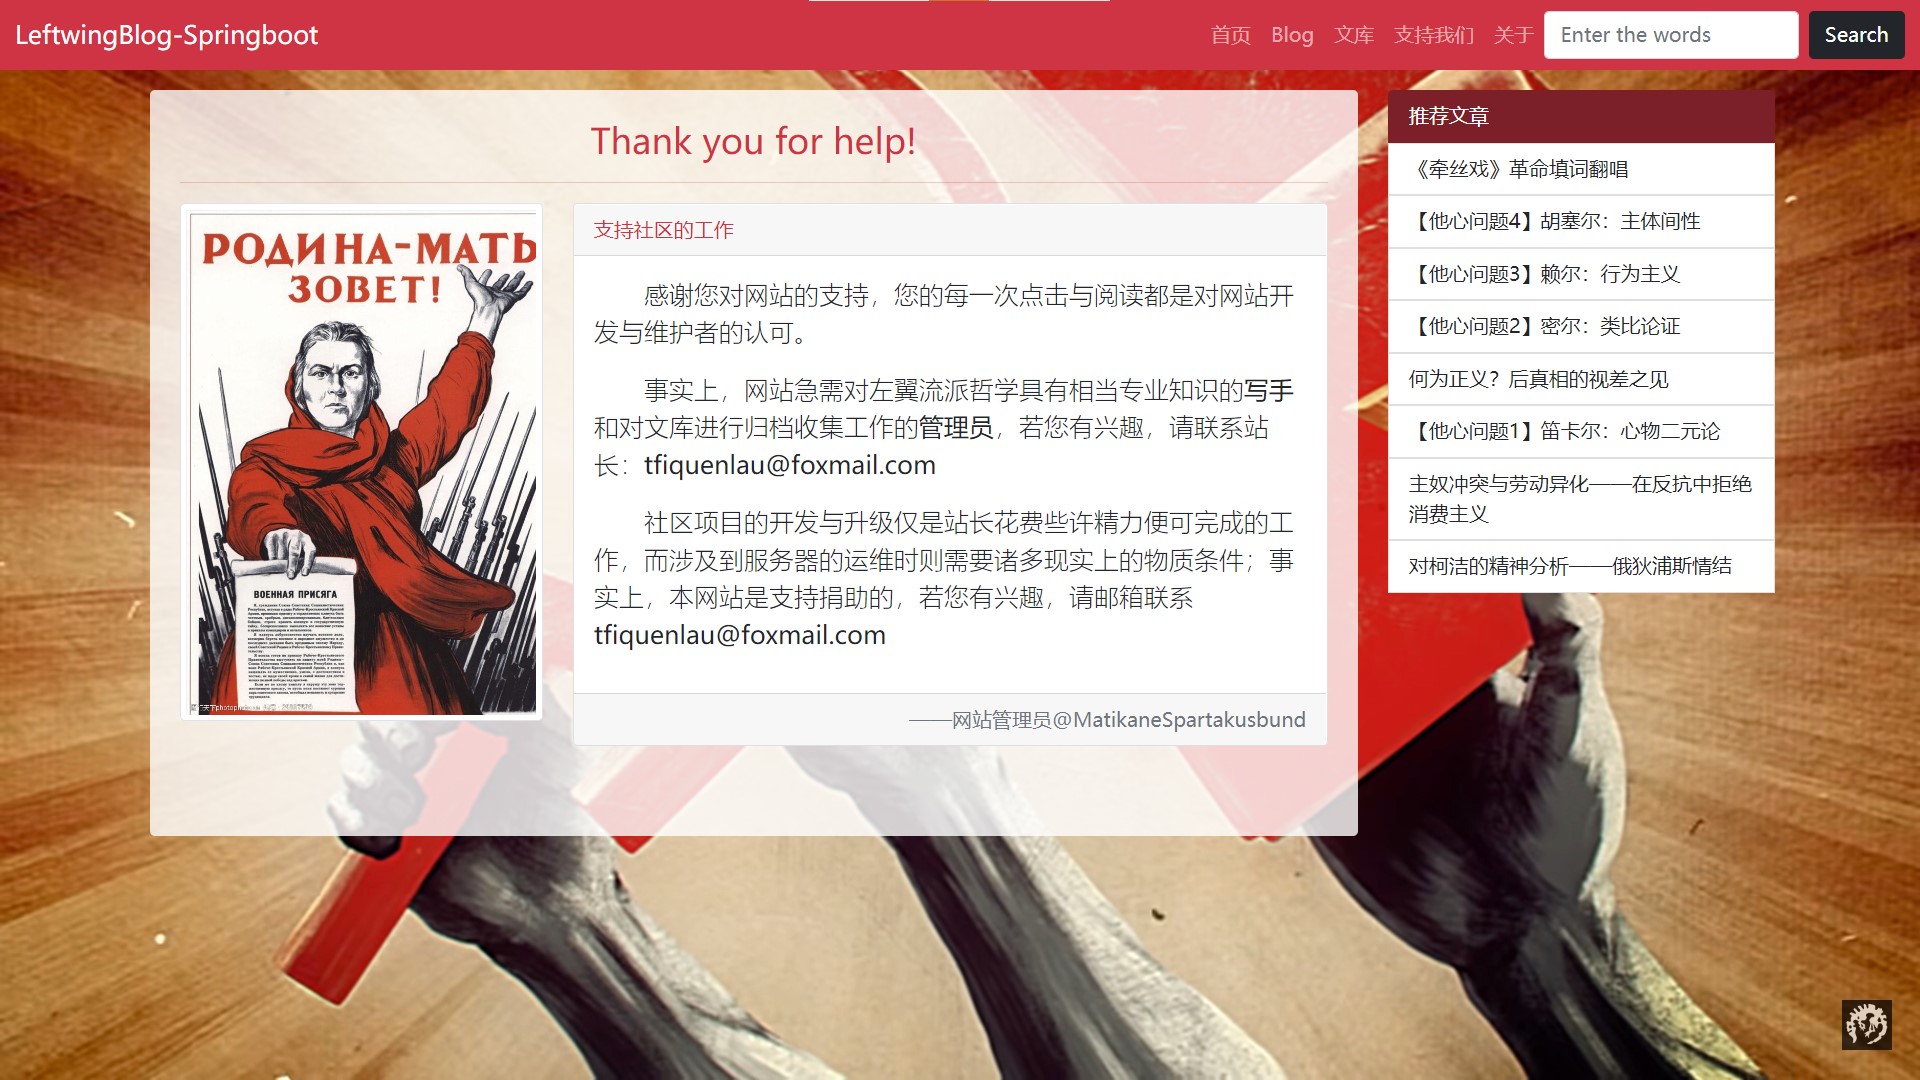
项目地址:点我进入
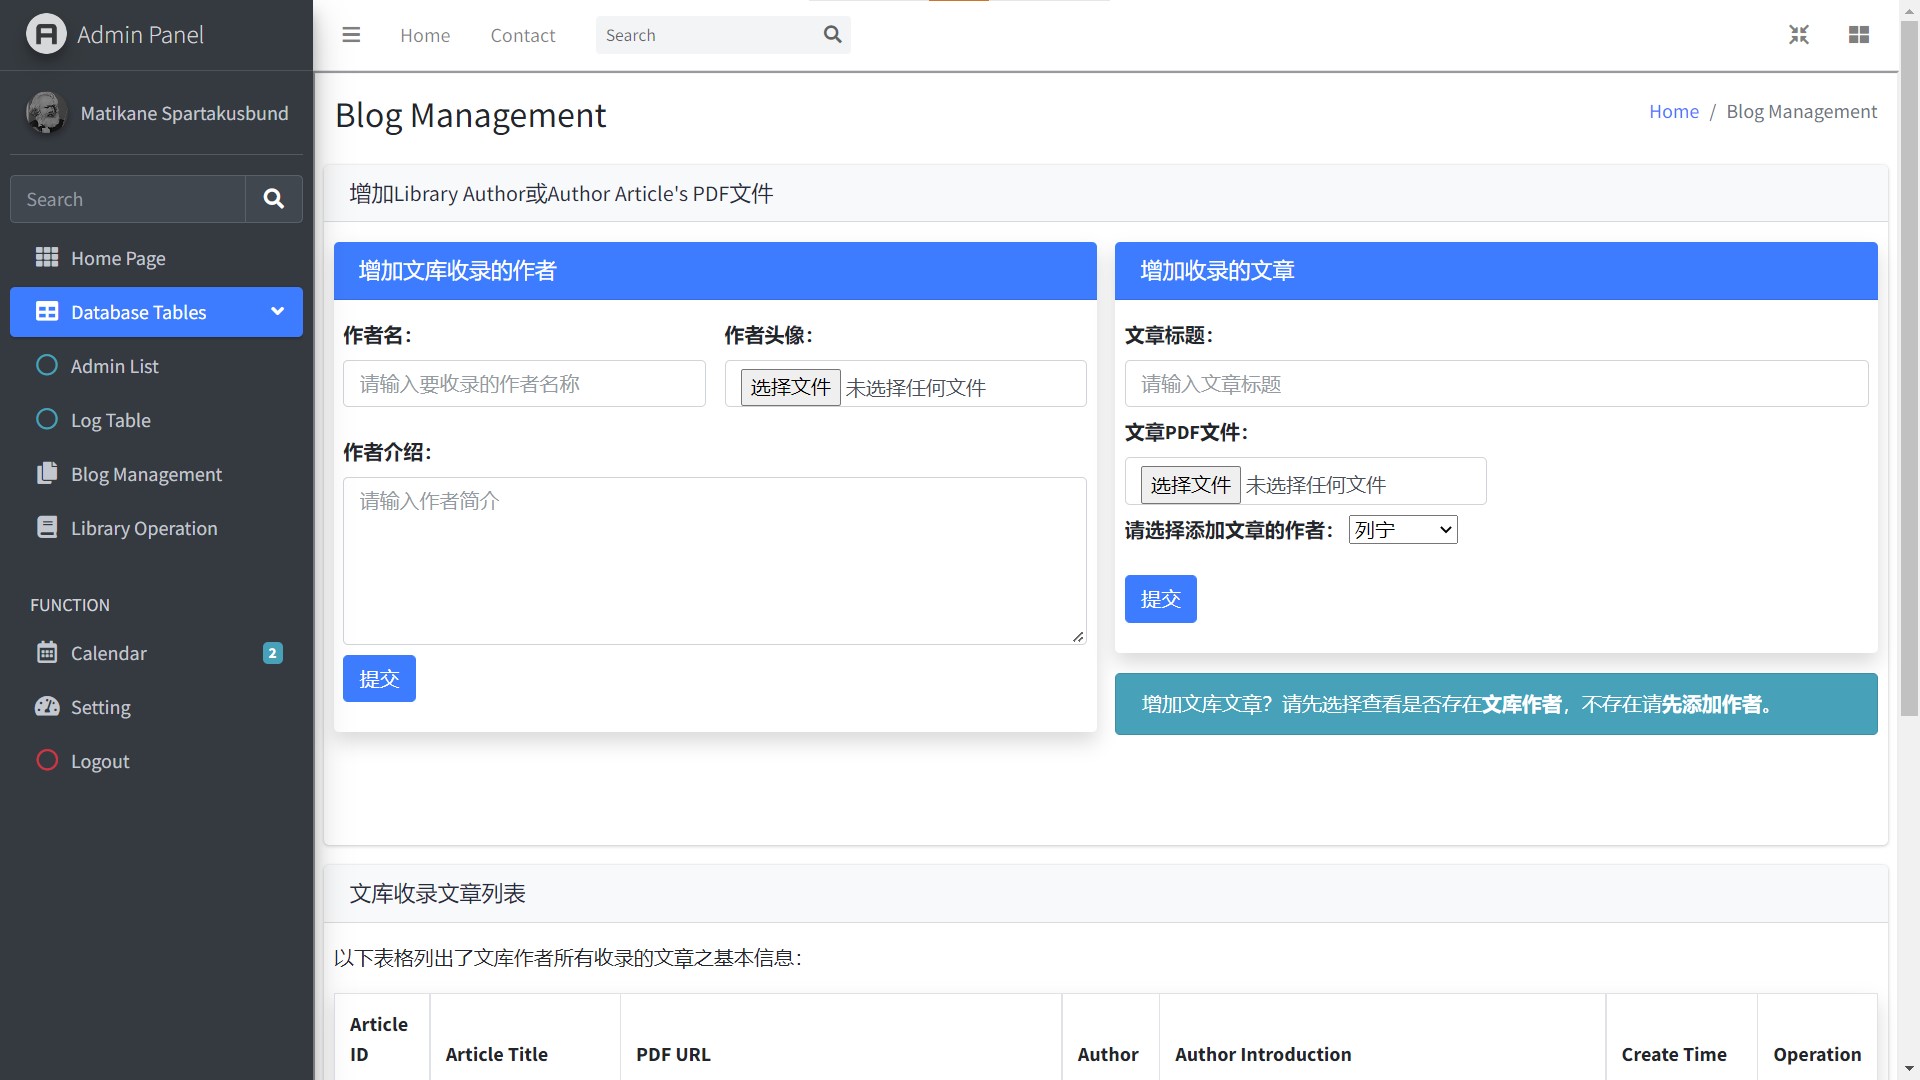
后台地址:点我进入
GitHub 库:点我进入
项目截图:
本文来自博客园,作者:TfiyuenLau,转载请注明原文链接:https://www.cnblogs.com/tfiyuenlau/articles/16927271.html
