
Centos7上安装docker
Docker从1.13版本之后采用时间线的方式作为版本号,分为社区版CE和企业版EE。
社区版是免费提供给个人开发者和小型团体使用的,企业版会提供额外的收费服务,比如经过官方测试认证过的基础设施、容器、插件等。
社区版按照stable和edge两种方式发布,每个季度更新stable版本,如17.06,17.09;每个月份更新edge版本,如17.09,17.10。
一、安装docker
1、Docker 要求 CentOS 系统的内核版本高于 3.10 ,查看本页面的前提条件来验证你的CentOS 版本是否支持 Docker 。
通过 uname -r 命令查看你当前的内核版本
$ uname -r
2、使用 root 权限登录 Centos。确保 yum 包更新到最新。
$ sudo yum update
3、卸载旧版本(如果安装过旧版本的话)
$ sudo yum remove docker docker-common docker-selinux docker-engine
4、安装需要的软件包, yum-util 提供yum-config-manager功能,另外两个是devicemapper驱动依赖的
$ sudo yum install -y yum-utils device-mapper-persistent-data lvm2
5、设置yum源
$ sudo yum-config-manager --add-repo https://download.docker.com/linux/centos/docker-ce.repo

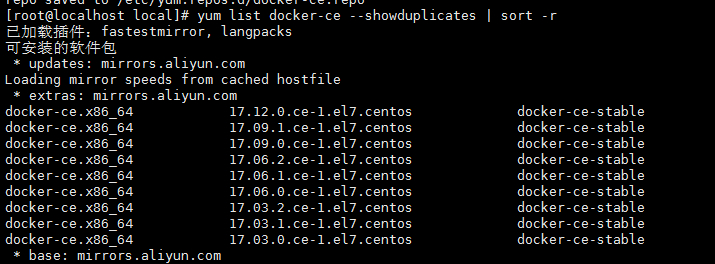
6、可以查看所有仓库中所有docker版本,并选择特定版本安装
$ yum list docker-ce --showduplicates | sort -r
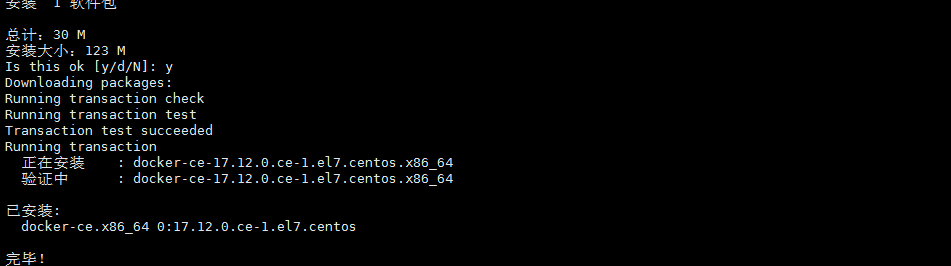
7、安装docker
$ sudo yum install docker-ce #由于repo中默认只开启stable仓库,故这里安装的是最新稳定版17.12.0 $ sudo yum install # 例如:sudo yum install docker-ce-17.12.0.ce
8、启动并加入开机启动
$ sudo systemctl start docker
$ sudo systemctl enable docker
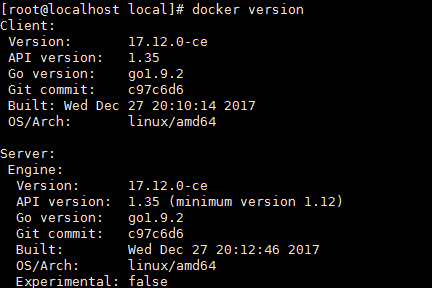
9、验证安装是否成功(有client和service两部分表示docker安装启动都成功了)
$ docker version
二、问题
1、因为之前已经安装过旧版本的docker,在安装的时候报错如下:

Transaction check error: file /usr/bin/docker from install of docker-ce-17.12.0.ce-1.el7.centos.x86_64 conflicts with file from package docker-common-2:1.12.6-68.gitec8512b.el7.centos.x86_64 file /usr/bin/docker-containerd from install of docker-ce-17.12.0.ce-1.el7.centos.x86_64 conflicts with file from package docker-common-2:1.12.6-68.gitec8512b.el7.centos.x86_64 file /usr/bin/docker-containerd-shim from install of docker-ce-17.12.0.ce-1.el7.centos.x86_64 conflicts with file from package docker-common-2:1.12.6-68.gitec8512b.el7.centos.x86_64 file /usr/bin/dockerd from install of docker-ce-17.12.0.ce-1.el7.centos.x86_64 conflicts with file from package docker-common-2:1.12.6-68.gitec8512b.el7.centos.x86_64
2、卸载旧版本的包
$ sudo yum erase docker-common-2:1.12.6-68.gitec8512b.el7.centos.x86_64

3、再次安装docker
$ sudo yum install docker-ce
----------------------------------------------------------------------------------------------------------------------------
一,Docker简介
百科说:Docker 是一个开源的应用容器引擎,让开发者可以打包他们的应用以及依赖包到一个可移植的容器中,然后发布到任何流行的Linux机器上,也可以实现虚拟化,容器是完全使用沙箱机制,相互之间不会有任何接口。
看起来有点雾,用过虚拟机的应该对虚拟化技术有点印象,不知道也没关系,就把它当成轻量级的虚拟机吧(虽然一个是完全虚拟化,一个是操作系统层虚拟化),这个解释到位:https://www.cnblogs.com/kex1n/p/6933039.html
百科又说:Docker 使用客户端-服务器 (C/S) 架构模式 使用远程API来管理和创建Docker容器。Docker 容器(Container)通过 Docker 镜像(Image)来创建,二者之间的关系类似于面向对象编程中的对象与类
那Docker由什么组成呢, 包括三个基本概念:
- 仓库(Repository)
- 镜像(Image)
- 容器(Container)
打个比方:你如果想玩英雄联盟中骚气的亚索,你首先得有这个英雄(Docker的镜像),然后你得花金币去英雄商店(Docker的仓库)买,接着进游戏就会看到一个半蹲的发型飘逸的剑客(Docker的容器),所以:
1,其中Registry是Docker用于存放镜像文件的仓库,Docker 仓库的概念跟Git 类似(就像商店存放所有的英雄,只是更改英雄的权限在某些非程序员手里)。
2,所谓镜像就是构建容器的源代码,是一个只读的模板,由一层一层的文件系统组成的,类似于虚拟机的镜像(英雄也是只读的,有自己的技能被动,你也不能进行操作)。
3,那么容器就是由Docker镜像创建的运行实例,类似于虚拟机,容器之间是相互隔离的,包含特定的应用及其所需的依赖文件(好比每个英雄都是隔离的,都有自己的皮肤,技能以及走的路线)。
注:Docker Hub是Docker公司提供的一个注册服务器(Register)来保存多个仓库,每个仓库又可以包含多个具备不同tag的镜像
二,安装Docker
我是虚拟机装的Centos7,linux 3.10 内核,docker官方说至少3.8以上,建议3.10以上(ubuntu下要linux内核3.8以上, RHEL/Centos 的内核修补过, centos6.5的版本就可以——这个可以试试)
1,root账户登录,查看内核版本如下
[root@localhost ~]# uname -a Linux localhost.qgc 3.10.0-862.11.6.el7.x86_64 #1 SMP Tue Aug 14 21:49:04 UTC 2018 x86_64 x86_64 x86_64 GNU/Linux
2,把yum包更新到最新(很多朋友说更新yum有问题,可以不更新试试,来自笔者的备注—2019年10月30日)
[root@localhost ~]# yum update 已加载插件:fastestmirror, langpacks Loading mirror speeds from cached hostfile * base: centos.ustc.edu.cn * extras: mirrors.aliyun.com * updates: centos.ustc.edu.cn 正在解决依赖关系 --> 正在检查事务 ---> 软件包 bind-libs.x86_64.32.9.9.4-61.el7 将被 升级 ---> 软件包 bind-libs.x86_64.32.9.9.4-61.el7_5.1 将被 更新 ---> 软件包 bind-libs-lite.x86_64.32.9.9.4-61.el7 将被 升级 ---> 软件包 bind-libs-lite.x86_64.32.9.9.4-61.el7_5.1 将被 更新 ---> 软件包 bind-license.noarch.32.9.9.4-61.el7 将被 升级 ---> 软件包 bind-license.noarch.32.9.9.4-61.el7_5.1 将被 更新
...
...
验证中 : 32:bind-license-9.9.4-61.el7.noarch 8/8
更新完毕:
bind-libs.x86_64 32:9.9.4-61.el7_5.1
bind-libs-lite.x86_64 32:9.9.4-61.el7_5.1
bind-license.noarch 32:9.9.4-61.el7_5.1
bind-utils.x86_64 32:9.9.4-61.el7_5.1
完毕!
[root@localhost ~]#
3,安装需要的软件包, yum-util 提供yum-config-manager功能,另外两个是devicemapper驱动依赖的
[root@localhost ~]# yum install -y yum-utils device-mapper-persistent-data lvm2 已加载插件:fastestmirror, langpacks Loading mirror speeds from cached hostfile * base: centos.ustc.edu.cn * extras: mirrors.aliyun.com * updates: centos.ustc.edu.cn ...
4,设置yum源
[root@localhost ~]# yum-config-manager --add-repo https://download.docker.com/linux/centos/docker-ce.repo 已加载插件:fastestmirror, langpacks adding repo from: https://download.docker.com/linux/centos/docker-ce.repo grabbing file https://download.docker.com/linux/centos/docker-ce.repo to /etc/yum.repos.d/docker-ce.repo repo saved to /etc/yum.repos.d/docker-ce.repo
5,可以查看所有仓库中所有docker版本,并选择特定版本安装
[root@localhost ~]# yum list docker-ce --showduplicates | sort -r 已加载插件:fastestmirror, langpacks 可安装的软件包 * updates: centos.ustc.edu.cn Loading mirror speeds from cached hostfile * extras: mirrors.aliyun.com docker-ce.x86_64 18.06.1.ce-3.el7 docker-ce-stable docker-ce.x86_64 18.06.0.ce-3.el7 docker-ce-stable docker-ce.x86_64 18.03.1.ce-1.el7.centos docker-ce-stable docker-ce.x86_64 18.03.0.ce-1.el7.centos docker-ce-stable docker-ce.x86_64 17.12.1.ce-1.el7.centos docker-ce-stable docker-ce.x86_64 17.12.0.ce-1.el7.centos docker-ce-stable ...
6,安装Docker,命令:yum install docker-ce-版本号,我选的是17.12.1.ce,如下
[root@localhost ~]# yum install docker-ce-17.12.1.ce 已加载插件:fastestmirror, langpacks Loading mirror speeds from cached hostfile * base: centos.ustc.edu.cn * extras: mirrors.aliyun.com * updates: centos.ustc.edu.cn base | 3.6 kB 00:00 docker-ce-stable | 2.9 kB 00:00 extras | 3.4 kB 00:00 updates | 3.4 kB 00:00 正在解决依赖关系 --> 正在检查事务 ---> 软件包 docker-ce.x86_64.0.17.12.1.ce-1.el7.centos 将被 安装 --> 正在处理依赖关系 container-selinux >= 2.9,它被软件包 docker-ce-17.12.1.ce-1.el7.centos.x86_64 需要
...
7, 启动Docker,命令:systemctl start docker,然后加入开机启动,如下
[root@localhost ~]# systemctl start docker [root@localhost ~]# systemctl enable docker Created symlink from /etc/systemd/system/multi-user.target.wants/docker.service to /usr/lib/systemd/system/docker.service.
8,验证安装是否成功(有client和service两部分表示docker安装启动都成功了)
[root@localhost ~]# docker version Client: Version: 17.12.1-ce API version: 1.35 Go version: go1.9.4 Git commit: 7390fc6 Built: Tue Feb 27 22:15:20 2018 OS/Arch: linux/amd64
Server: Engine: Version: 17.12.1-ce API version: 1.35 (minimum version 1.12) Go version: go1.9.4 Git commit: 7390fc6 Built: Tue Feb 27 22:17:54 2018 OS/Arch: linux/amd64 Experimental: false

 浙公网安备 33010602011771号