第五章 Flink 流处理Api

1 Environment
getExecutionEnvironment
创建一个执行环境,表示当前执行程序的上下文。 如果程序是独立调用的,则此方法返回本地执行环境;如果从命令行客户端调用程序以提交到集群,则此方法返回此集群的执行环境,也就是说,getExecutionEnvironment会根据查询运行的方式决定返回什么样的运行环境,是最常用的一种创建执行环境的方式。
val env: ExecutionEnvironment = ExecutionEnvironment.getExecutionEnvironment
如果没有设置并行度,会以flink-conf.yaml中的配置为准,默认是1

createLocalEnvironment
返回本地执行环境,需要在调用时指定默认的并行度。
val env = StreamExecutionEnvironment.createLocalEnvironment(1)
createRemoteEnvironment
返回集群执行环境,将Jar提交到远程服务器。需要在调用时指定JobManager的IP和端口号,并指定要在集群中运行的Jar包。
val env = ExecutionEnvironment.createRemoteEnvironment("jobmanager-hostname", 6123,"C://jar//flink//wordcount.jar")
2 Source
创建kafka工具类
object MyKafkaUtil {

  val prop = new Properties()

  prop.setProperty("bootstrap.servers","hadoop1:9092")
  prop.setProperty("group.id","gmall")

  def getConsumer(topic:String ):FlinkKafkaConsumer011[String]= {
      val myKafkaConsumer:FlinkKafkaConsumer011[String] = new FlinkKafkaConsumer011[String](topic, new SimpleStringSchema(), prop)
     myKafkaConsumer
  }
}
增加业务主类 StartupApp
object StartupApp {
def main(args: Array[String]): Unit = {
          val environment: StreamExecutionEnvironment = StreamExecutionEnvironment.getExecutionEnvironment

         val kafkaConsumer  =MyKafkaUtil.getConsumer("GMALL_STARTUP")

         val dstream: DataStream[String] = environment.addSource(kafkaConsumer)

          dstream.print()

          environment.execute()
}
}
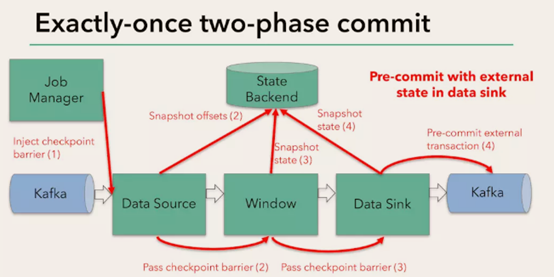
Flink+kafka是如何实现exactly-once语义的
Flink通过checkpoint来保存数据是否处理完成的状态
由JobManager协调各个TaskManager进行checkpoint存储,checkpoint保存在 StateBackend中,默认StateBackend是内存级的,也可以改为文件级的进行持久化保存。
执行过程实际上是一个两段式提交,每个算子执行完成,会进行“预提交”,直到执行完sink操作,会发起“确认提交”,如果执行失败,预提交会放弃掉。
如果宕机需要通过StateBackend进行恢复,只能恢复所有确认提交的操作。
3 Transform
转换算子
3.1 map
val streamMap = stream.map { x => x * 2 }
3.2 flatMap
val streamFlatMap = stream.flatMap{
    x => x.split(" ")
}
3.3 Filter
val streamFilter = stream.filter{
    x => x == 1
}
3.4 KeyBy
DataStream → KeyedStream:输入必须是Tuple类型,逻辑地将一个流拆分成不相交的分区,每个分区包含具有相同key的元素,在内部以hash的形式实现的。
3.5 Reduce
KeyedStream → DataStream:一个分组数据流的聚合操作,合并当前的元素和上次聚合的结果,产生一个新的值,返回的流中包含每一次聚合的结果,而不是只返回最后一次聚合的最终结果。
//求各个渠道的累计个数
val startUplogDstream: DataStream[StartUpLog] = dstream.map{ JSON.parseObject(_,classOf[StartUpLog])}
val keyedStream: KeyedStream[(String, Int), Tuple] = startUplogDstream.map(startuplog=>(startuplog.ch,1)).keyBy(0)
//reduce //sum
keyedStream.reduce{  (ch1,ch2)=>
  (ch1._1,ch1._2+ch2._2)
} .print().setParallelism(1)
flink是如何保存累计值的,
flink是一种有状态的流计算框架,其中说的状态包括两个层面:
1) operator state 主要是保存数据在流程中的处理状态,用于确保语义的exactly-once。
2) keyed state 主要是保存数据在计算过程中的累计值。
这两种状态都是通过checkpoint机制保存在StateBackend中,StateBackend可以选择保存在内存中(默认使用)或者保存在磁盘文件中。
3.6 Split 和 Select
Split

DataStream → SplitStream:根据某些特征把一个DataStream拆分成两个或者多个DataStream。
Select
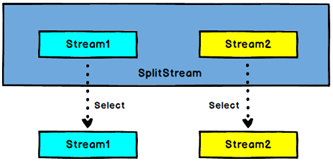
SplitStream→DataStream:从一个SplitStream中获取一个或者多个DataStream。
需求:把appstore和其他的渠道的数据单独拆分出来,做成两个流
     // 将appstore与其他渠道拆分拆分出来  成为两个独立的流
val splitStream: SplitStream[StartUpLog] = startUplogDstream.split { startUplog =>
  var flags:List[String] =  null
  if ("appstore" == startUplog.ch) {
    flags = List(startUplog.ch)
  } else {
    flags = List("other" )
  }
  flags
}
val appStoreStream: DataStream[StartUpLog] = splitStream.select("appstore")
appStoreStream.print("apple:").setParallelism(1)
val otherStream: DataStream[StartUpLog] = splitStream.select("other")
otherStream.print("other:").setParallelism(1)
3.7 Connect和 CoMap
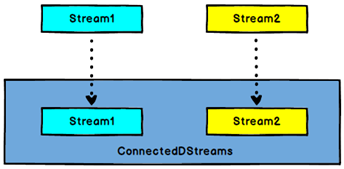
图 Connect算子
DataStream,DataStream → ConnectedStreams:连接两个保持他们类型的数据流,两个数据流被Connect之后,只是被放在了一个同一个流中,内部依然保持各自的数据和形式不发生任何变化,两个流相互独立。
CoMap,CoFlatMap
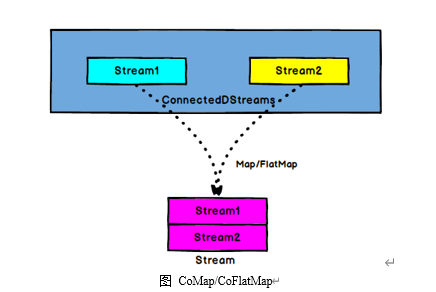
ConnectedStreams → DataStream:作用于ConnectedStreams上,功能与map和flatMap一样,对ConnectedStreams中的每一个Stream分别进行map和flatMap处理。
//合并以后打印
val connStream: ConnectedStreams[StartUpLog, StartUpLog] = appStoreStream.connect(otherStream)
val allStream: DataStream[String] = connStream.map(
  (log1: StartUpLog) => log1.ch,
  (log2: StartUpLog) => log2.ch
)
allStream.print("connect::")
3.8 Union

DataStream → DataStream:对两个或者两个以上的DataStream进行union操作,产生一个包含所有DataStream元素的新DataStream。注意:如果你将一个DataStream跟它自己做union操作,在新的DataStream中,你将看到每一个元素都出现两次。
//合并以后打印
val unionStream: DataStream[StartUpLog] = appStoreStream.union(otherStream)
unionStream.print("union:::")
Connect与 Union 区别:
1 、 Union之前两个流的类型必须是一样,Connect可以不一样,在之后的coMap中再去调整成为一样的。
2 Connect只能操作两个流,Union可以操作多个
4 Sink
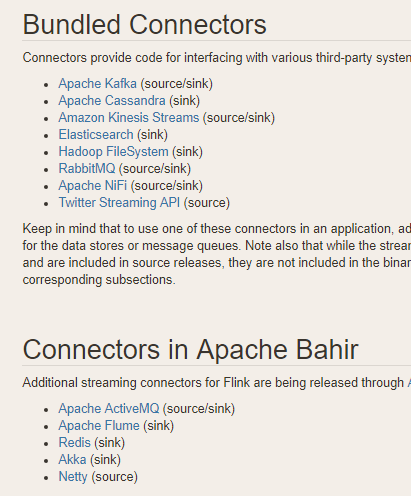
Flink没有类似于spark中foreach方法,让用户进行迭代的操作。虽有对外的输出操作都要利用Sink完成。最后通过类似如下方式完成整个任务最终输出操作。
myDstream.addSink(new MySink(xxxx))
官方提供了一部分的框架的sink。除此以外,需要用户自定义实现sink
4.1 Kafka
pom.xml
<!-- https://mvnrepository.com/artifact/org.apache.flink/flink-connector-kafka-0.11 -->
<dependency>
    <groupId>org.apache.flink</groupId>
    <artifactId>flink-connector-kafka-0.11_2.11</artifactId>
    <version>1.7.0</version>
</dependency>
mykafkaUtil中增加方法
def getProducer(topic:String): FlinkKafkaProducer011[String] ={
  new FlinkKafkaProducer011[String](brokerList,topic,
new SimpleStringSchema())
}
主函数中添加sink
val myKafkaProducer: FlinkKafkaProducer011[String] = MyKafkaUtil.getProducer("channel_sum")

sumDstream.map( chCount=>chCount._1+":"+chCount._2 ).addSink(myKafkaProducer)
4.2 Redis
<!-- https://mvnrepository.com/artifact/org.apache.bahir/flink-connector-redis -->
<dependency>
    <groupId>org.apache.bahir</groupId>
    <artifactId>flink-connector-redis_2.11</artifactId>
    <version>1.0</version>
</dependency>
object MyRedisUtil {


  val conf = new FlinkJedisPoolConfig.Builder().setHost("hadoop1").setPort(6379).build()

  def getRedisSink(): RedisSink[(String,String)] ={
    new RedisSink[(String,String)](conf,new MyRedisMapper)
  }

  class MyRedisMapper extends RedisMapper[(String,String)]{
    override def getCommandDescription: RedisCommandDescription = {
      new RedisCommandDescription(RedisCommand.HSET, "channel_count")
     // new RedisCommandDescription(RedisCommand.SET  )
    }

    override def getValueFromData(t: (String, String)): String = t._2

    override def getKeyFromData(t: (String, String)): String = t._1
  }

}
在主函数中调用
sumDstream.map( chCount=>(chCount._1,chCount._2+"" )).addSink(MyRedisUtil.getRedisSink())
4.3 Elasticsearch
pom.xml
<dependency>
    <groupId>org.apache.flink</groupId>
    <artifactId>flink-connector-elasticsearch6_2.11</artifactId>
    <version>1.7.0</version>
</dependency>

<dependency>
    <groupId>org.apache.httpcomponents</groupId>
    <artifactId>httpclient</artifactId>
    <version>4.5.3</version>
</dependency>
添加MyEsUtil
import java.util

import com.alibaba.fastjson.{JSON, JSONObject}
import org.apache.flink.api.common.functions.RuntimeContext
import org.apache.flink.streaming.connectors.elasticsearch.{ElasticsearchSinkFunction, RequestIndexer}
import org.apache.flink.streaming.connectors.elasticsearch6.ElasticsearchSink
import org.apache.http.HttpHost
import org.elasticsearch.action.index.IndexRequest
import org.elasticsearch.client.Requests

object MyEsUtil {


  val httpHosts = new util.ArrayList[HttpHost]
  httpHosts.add(new HttpHost("hadoop1",9200,"http"))
   httpHosts.add(new HttpHost("hadoop2",9200,"http"))
   httpHosts.add(new HttpHost("hadoop3",9200,"http"))


  def  getElasticSearchSink(indexName:String):  ElasticsearchSink[String]  ={
    val esFunc = new ElasticsearchSinkFunction[String] {
      override def process(element: String, ctx: RuntimeContext, indexer: RequestIndexer): Unit = {
        println("试图保存:"+element)
        val jsonObj: JSONObject = JSON.parseObject(element)
        val indexRequest: IndexRequest = Requests.indexRequest().index(indexName).`type`("_doc").source(jsonObj)
        indexer.add(indexRequest)
        println("保存1条")
      }
    }

    val sinkBuilder = new ElasticsearchSink.Builder[String](httpHosts, esFunc)

    //刷新前缓冲的最大动作量
    sinkBuilder.setBulkFlushMaxActions(10)


     sinkBuilder.build()
  }

}
在main方法中调用
// 明细发送到es 中
 val esSink: ElasticsearchSink[String] = MyEsUtil.getElasticSearchSink("gmall0503_startup")


  dstream.addSink(esSink)
4.4 JDBC 自定义sink
<!-- https://mvnrepository.com/artifact/mysql/mysql-connector-java -->
<dependency>
    <groupId>mysql</groupId>
    <artifactId>mysql-connector-java</artifactId>
    <version>5.1.44</version>
</dependency>

<dependency>
    <groupId>com.alibaba</groupId>
    <artifactId>druid</artifactId>
    <version>1.1.10</version>
</dependency>
添加MyJdbcSink
class MyJdbcSink(sql:String ) extends  RichSinkFunction[Array[Any]] {

  val driver="com.mysql.jdbc.Driver"

  val url="jdbc:mysql://hadoop2:3306/gmall2019?useSSL=false"

  val username="root"

  val password="123123"

  val maxActive="20"

  var connection:Connection=null;

  //创建连接
  override def open(parameters: Configuration): Unit = {
    val properties = new Properties()
    properties.put("driverClassName",driver)
    properties.put("url",url)
    properties.put("username",username)
    properties.put("password",password)
    properties.put("maxActive",maxActive)


    val dataSource: DataSource = DruidDataSourceFactory.createDataSource(properties)
    connection = dataSource.getConnection()
  }

//反复调用
  override def invoke(values: Array[Any]): Unit = {
    val ps: PreparedStatement = connection.prepareStatement(sql )
    println(values.mkString(","))
    for (i <- 0 until values.length) {
      ps.setObject(i + 1, values(i))
    }
    ps.executeUpdate()


  }

  override def close(): Unit = {

    if(connection!=null){
      connection.close()
    }

  }

}
在main方法中增加
把明细保存到mysql中
    val startUplogDstream: DataStream[StartUpLog] = dstream.map{ JSON.parseObject(_,classOf[StartUpLog])}

val jdbcSink = new MyJdbcSink("insert into z_startup values(?,?,?,?,?)")
startUplogDstream.map(startuplog=>Array(startuplog.mid,startuplog.uid,startuplog.ch,startuplog.area,  startuplog.ts)).addSink(jdbcSink)


