Hive 7、Hive 的内表、外表、分区
1、Hive的内表
Hive 的内表,就是正常创建的表,在 http://www.cnblogs.com/raphael5200/p/5208437.html 中已经提到;
2、Hive的外表
创建Hive 的外表,需要使用关键字 External:
CREATE EXTERNAL TABLE [IF NOT EXISTS] [db_name.]table_name
  [(col_name data_type [COMMENT col_comment], ...)]
  [COMMENT table_comment]
  [PARTITIONED BY (col_name data_type [COMMENT col_comment], ...)]
  [CLUSTERED BY (col_name, col_name, ...) [SORTED BY (col_name [ASC|DESC], ...)] INTO num_buckets BUCKETS]
  [SKEWED BY (col_name, col_name, ...)
     ON ((col_value, col_value, ...), (col_value, col_value, ...), ...)
     [STORED AS DIRECTORIES]
  [
   [ROW FORMAT row_format]
下面看一个例子:
create External table food_ex
(
id int,
name string,
category string,
price double
)
 ROW FORMAT DELIMITED
 FIELDS TERMINATED BY '\t'
 lines terminated by '\n';
-- 加载数据
load data local inpath '/opt/food.txt' overwrite into table food_ex;
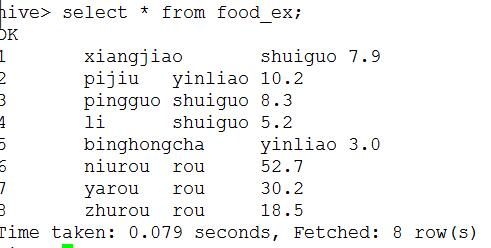
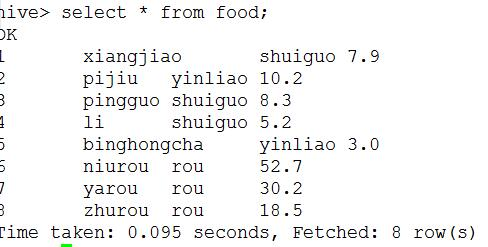
select * from food_ex;


这两个,左边是外表,右边是内表从大体上看似乎没什么区别,但是他的主要区别在于删除操作上:
内表删除表或者分区元数据和数据都删了
外表删除表元数据删除,数据保留
下面分别执行两条语句:
 drop table food;
 drop table food_ex;
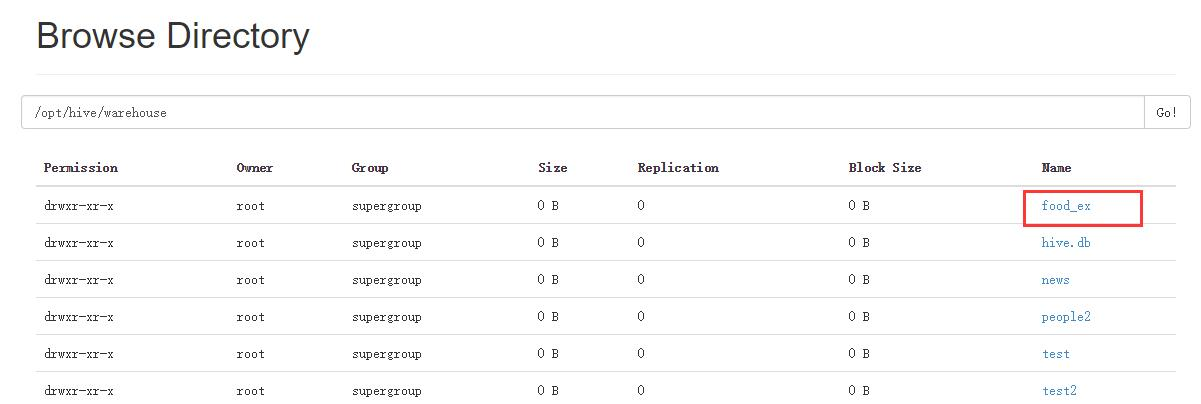
执行这两条语句以后,两个表都删除了,但是结果却不一样,访问NameNode的50070端口:


可以看到,虽然都执行了表删除语句,内表删除后是把元数据和数据都删除了,而外表却只删除了元数据(表的信息)但真实数据却保留了下来;
3、Hive的分区partition
必须在表定义时创建partition
a、单分区建表语句:
create table day_table (id int, content string)
partitioned by (dt string);
单分区表,按天分区,在表结构中存在id,content,dt三列。 以dt为文件夹区分
例:
create table log_info
 (
 ip string
 )
 PARTITIONED BY(times string)
 ROW FORMAT DELIMITED
 FIELDS TERMINATED BY '\t'
 lines terminated by '\n';
# 下面是log_info 的表结构信息,分区已经创建
hive> desc log_info;
OK
ip                      string
times                   string

# Partition Information
# col_name                data_type               comment

times                   string
Time taken: 0.077 seconds, Fetched: 7 row(s)
b、 双分区建表语句
create table day_hour_table (id int, content string)
partitioned by (dt string, hour string);
双分区表,按天和小时分区,在表结构中新增加了dt和hour两列。 先以dt为文件夹,再以hour子文件夹区分
create table log_info2
 (
 ip string
 )
 PARTITIONED BY(days string,hours string)
 ROW FORMAT DELIMITED
 FIELDS TERMINATED BY '\t'
 lines terminated by '\n';
# 下面是log_info2 的表结构信息,分区已经创建
hive> desc log_info2;
OK
ip                      string
days                    string
hours                   string

# Partition Information
# col_name                data_type               comment

days                    string
hours                   string
Time taken: 0.08 seconds, Fetched: 9 row(s)
c、Hive添加分区表语法 (表已创建,在此基础上添加分区):
ALTER TABLE table_name ADD partition_spec [ LOCATION 'location1' ] partition_spec [ LOCATION 'location2' ] ... ALTER TABLE day_table ADD PARTITION (dt='2008-08-08', hour='08') location '/path/pv1.txt'
d、Hive删除分区语法:
ALTER TABLE table_name DROP PARTITION partition_spec, partition_spec,...
用户可以用 ALTER TABLE DROP PARTITION 来删除分区。分区的元数据和数据将被一并删除。
ALTER TABLE day_hour_table DROP PARTITION (dt='2008-08-08', hour='09');
alter table log_info drop partition (times='20160222');
e、Hive数据加载进分区表中语法:
LOAD DATA [LOCAL] INPATH 'filepath' [OVERWRITE] INTO TABLE tablename [PARTITION (partcol1=val1, partcol2=val2 ...)]
例:
单分区数据加载
 load data local inpath '/opt/log' overwrite into table  log_info partition(times='20160223');
 load data local inpath '/opt/log2' overwrite into table log_info partition(times='20160222');
hive> select * from log_info;
OK
23.45.66.77	20160222
45.66.11.8	20160222
2.3.4.5	20160223
4.56.77.31	20160223
34.55.6.77	20160223
34.66.11.6	20160223
Time taken: 0.125 seconds, Fetched: 6 row(s)
在Hive中会根据分区的名称新建两个分区目录

双分区数据加载
load data local inpath '/opt/log3' overwrite into table log_info2 partition(days='23',hours='12');
hive> select * from log_info2;
OK
12.3.33.66    23    12
23.44.56.6    23    12
12.22.33.4    23    12
8.78.99.4    23    12
233.23.211.2    23    12
Time taken: 0.069 seconds, Fetched: 5 row(s)

当数据被加载至表中时,不会对数据进行任何转换。Load操作只是将数据复制至Hive表对应的位置。数据加载时在表下自动创建一个目录 基于分区的查询的语句:
SELECT day_table.* FROM day_table WHERE day_table.dt>= '2008-08-08';
f、Hive查看分区语句:
hive> show partitions day_hour_table;
OK
dt=2008-08-08/hour=08
dt=2008-08-08/hour=09
dt=2008-08-09/hour=09
hive> show partitions log_info;
OK
times=20160222
times=20160223
Time taken: 0.06 seconds, Fetched: 2 row(s)
-----
第3章 Hive数据类型
3.1 基本数据类型
表6-1
|
Hive数据类型 |
Java数据类型 |
长度 |
例子 |
|
TINYINT |
byte |
1byte有符号整数 |
20 |
|
SMALINT |
short |
2byte有符号整数 |
20 |
|
INT |
int |
4byte有符号整数 |
20 |
|
BIGINT |
long |
8byte有符号整数 |
20 |
|
BOOLEAN |
boolean |
布尔类型,true或者false |
TRUE FALSE |
|
FLOAT |
float |
单精度浮点数 |
3.14159 |
|
DOUBLE |
double |
双精度浮点数 |
3.14159 |
|
STRING |
string |
字符系列。可以指定字符集。可以使用单引号或者双引号。 |
‘now is the time’ “for all good men” |
|
TIMESTAMP |
|
时间类型 |
|
|
BINARY |
|
字节数组 |
|
对于Hive的String类型相当于数据库的varchar类型,该类型是一个可变的字符串,不过它不能声明其中最多能存储多少个字符,理论上它可以存储2GB的字符数。
3.2 集合数据类型
表6-2
|
数据类型 |
描述 |
语法示例 |
|
STRUCT |
和c语言中的struct类似,都可以通过“点”符号访问元素内容。例如,如果某个列的数据类型是STRUCT{first STRING, last STRING},那么第1个元素可以通过字段.first来引用。 |
struct() |
|
MAP |
MAP是一组键-值对元组集合,使用数组表示法可以访问数据。例如,如果某个列的数据类型是MAP,其中键->值对是’first’->’John’和’last’->’Doe’,那么可以通过字段名[‘last’]获取最后一个元素 |
map() |
|
ARRAY |
数组是一组具有相同类型和名称的变量的集合。这些变量称为数组的元素,每个数组元素都有一个编号,编号从零开始。例如,数组值为[‘John’, ‘Doe’],那么第2个元素可以通过数组名[1]进行引用。 |
Array() |
Hive有三种复杂数据类型ARRAY、MAP 和 STRUCT。ARRAY和MAP与Java中的Array和Map类似,而STRUCT与C语言中的Struct类似,它封装了一个命名字段集合,复杂数据类型允许任意层次的嵌套。
案例实操
1) 假设某表有如下一行,我们用JSON格式来表示其数据结构。在Hive下访问的格式为
|
{ "name": "songsong", "friends": ["bingbing" , "lili"] , //列表Array, "children": { //键值Map, "xiao song": 18 , "xiaoxiao song": 19 } "address": { //结构Struct, "street": "hui long guan" , "city": "beijing" } } |
2)基于上述数据结构,我们在Hive里创建对应的表,并导入数据。
创建本地测试文件test.txt
|
songsong,bingbing_lili,xiao song:18_xiaoxiao song:19,hui long guan_beijing yangyang,caicai_susu,xiao yang:18_xiaoxiao yang:19,chao yang_beijing |
注意:MAP,STRUCT和ARRAY里的元素间关系都可以用同一个字符表示,这里用“_”。
3)Hive上创建测试表test
|
create table test( name string, friends array<string>, children map<string, int>, address struct<street:string, city:string> ) row format delimited fields terminated by ',' collection items terminated by '_' map keys terminated by ':' lines terminated by '\n'; |
字段解释:
row format delimited fields terminated by ',' -- 列分隔符
collection items terminated by '_' --MAP STRUCT 和 ARRAY 的分隔符(数据分割符号)
map keys terminated by ':' -- MAP中的key与value的分隔符
lines terminated by '\n'; -- 行分隔符
4)导入文本数据到测试表
hive (default)> load data local inpath ‘/opt/module/datas/test.txt’into table test
5)访问三种集合列里的数据,以下分别是ARRAY,MAP,STRUCT的访问方式
|
hive (default)> select friends[1],children['xiao song'],address.city from test where name="songsong"; OK _c0 _c1 city lili 18 beijing Time taken: 0.076 seconds, Fetched: 1 row(s) |
3.3 类型转化
Hive的原子数据类型是可以进行隐式转换的,类似于Java的类型转换,例如某表达式使用INT类型,TINYINT会自动转换为INT类型,但是Hive不会进行反向转化,例如,某表达式使用TINYINT类型,INT不会自动转换为TINYINT类型,它会返回错误,除非使用CAST操作。
1.隐式类型转换规则如下
(1)任何整数类型都可以隐式地转换为一个范围更广的类型,如TINYINT可以转换成INT,INT可以转换成BIGINT。
(2)所有整数类型、FLOAT和STRING类型都可以隐式地转换成DOUBLE。
(3)TINYINT、SMALLINT、INT都可以转换为FLOAT。
(4)BOOLEAN类型不可以转换为任何其它的类型。
2.可以使用CAST操作显示进行数据类型转换
例如CAST('1' AS INT)将把字符串'1' 转换成整数1;如果强制类型转换失败,如执行CAST('X' AS INT),表达式返回空值 NULL。
第4章 DDL数据定义
4.1 创建数据库
1)创建一个数据库,数据库在HDFS上的默认存储路径是/user/hive/warehouse/*.db。
hive (default)> create database db_hive;
2)避免要创建的数据库已经存在错误,增加if not exists判断。(标准写法)
|
hive (default)> create database db_hive; FAILED: Execution Error, return code 1 from org.apache.hadoop.hive.ql.exec.DDLTask. Database db_hive already exists hive (default)> create database if not exists db_hive; |
3)创建一个数据库,指定数据库在HDFS上存放的位置
hive (default)> create database db_hive2 location '/db_hive2.db';
图6-4 数据库存放位置
4.2 查询数据库
4.2.1 显示数据库
1.显示数据库
hive> show databases;
2.过滤显示查询的数据库
hive> show databases like 'db_hive*';
OK
db_hive
db_hive_1
4.2.2 查看数据库详情
1.显示数据库信息
hive> desc database db_hive;
OK
db_hive hdfs://hadoop102:9000/user/hive/warehouse/db_hive.db atguiguUSER
2.显示数据库详细信息,extended
hive> desc database extended db_hive;
OK
db_hive hdfs://hadoop102:9000/user/hive/warehouse/db_hive.db atguiguUSER
40.3.3 切换当前数据库
hive (default)> use db_hive;
4.3.3 切换当前数据库
hive (default)> use db_hive;
4.3 修改数据库
用户可以使用ALTER DATABASE命令为某个数据库的DBPROPERTIES设置键-值对属性值,来描述这个数据库的属性信息。数据库的其他元数据信息都是不可更改的,包括数据库名和数据库所在的目录位置。
hive (default)> alter database db_hive set dbproperties('createtime'='20170830');
在hive中查看修改结果
hive> desc database extended db_hive;
db_name comment location owner_name owner_type parameters
db_hive hdfs://hadoop102:8020/user/hive/warehouse/db_hive.db atguigu USER {createtime=20170830}
4.4 删除数据库
1.删除空数据库
hive>drop database db_hive2;
2.如果删除的数据库不存在,最好采用 if exists判断数据库是否存在
hive> drop database db_hive;
FAILED: SemanticException [Error 10072]: Database does not exist: db_hive
hive> drop database if exists db_hive2;
3.如果数据库不为空,可以采用cascade命令,强制删除
hive> drop database db_hive;
FAILED: Execution Error, return code 1 from org.apache.hadoop.hive.ql.exec.DDLTask. InvalidOperationException(message:Database db_hive is not empty. One or more tables exist.)
hive> drop database db_hive cascade;
4.5 创建表
1.建表语法
CREATE [EXTERNAL] TABLE [IF NOT EXISTS] table_name
[(col_name data_type [COMMENT col_comment], ...)]
[COMMENT table_comment]
[PARTITIONED BY (col_name data_type [COMMENT col_comment], ...)]
[CLUSTERED BY (col_name, col_name, ...)
[SORTED BY (col_name [ASC|DESC], ...)] INTO num_buckets BUCKETS]
[ROW FORMAT row_format]
[STORED AS file_format]
[LOCATION hdfs_path]
2.字段解释说明
(1)CREATE TABLE 创建一个指定名字的表。如果相同名字的表已经存在,则抛出异常;用户可以用 IF NOT EXISTS 选项来忽略这个异常。
(2)EXTERNAL关键字可以让用户创建一个外部表,在建表的同时指定一个指向实际数据的路径(LOCATION),Hive创建内部表时,会将数据移动到数据仓库指向的路径;若创建外部表,仅记录数据所在的路径,不对数据的位置做任何改变。在删除表的时候,内部表的元数据和数据会被一起删除,而外部表只删除元数据,不删除数据。
(3)COMMENT:为表和列添加注释。
(4)PARTITIONED BY创建分区表
(5)CLUSTERED BY创建分桶表
(6)SORTED BY不常用
(7)ROW FORMAT
DELIMITED [FIELDS TERMINATED BY char] [COLLECTION ITEMS TERMINATED BY char]
[MAP KEYS TERMINATED BY char] [LINES TERMINATED BY char]
| SERDE serde_name [WITH SERDEPROPERTIES (property_name=property_value, property_name=property_value, ...)]
用户在建表的时候可以自定义SerDe或者使用自带的SerDe。如果没有指定ROW FORMAT 或者ROW FORMAT DELIMITED,将会使用自带的SerDe。在建表的时候,用户还需要为表指定列,用户在指定表的列的同时也会指定自定义的SerDe,Hive通过SerDe确定表的具体的列的数据。
SerDe是Serialize/Deserilize的简称,目的是用于序列化和反序列化。
(8)STORED AS指定存储文件类型
常用的存储文件类型:SEQUENCEFILE(二进制序列文件)、TEXTFILE(文本)、RCFILE(列式存储格式文件)
如果文件数据是纯文本,可以使用STORED AS TEXTFILE。如果数据需要压缩,使用 STORED AS SEQUENCEFILE。
(9)LOCATION :指定表在HDFS上的存储位置。
(10)LIKE允许用户复制现有的表结构,但是不复制数据。
4.5.1 管理表
1.理论
默认创建的表都是所谓的管理表,有时也被称为内部表。因为这种表,Hive会(或多或少地)控制着数据的生命周期。Hive默认情况下会将这些表的数据存储在由配置项hive.metastore.warehouse.dir(例如,/user/hive/warehouse)所定义的目录的子目录下。 当我们删除一个管理表时,Hive也会删除这个表中数据。管理表不适合和其他工具共享数据。
2.案例实操
(1)普通创建表
|
create table if not exists student2( id int, name string ) row format delimited fields terminated by '\t' stored as textfile location '/user/hive/warehouse/student2'; |
(2)根据查询结果创建表(查询的结果会添加到新创建的表中)
|
create table if not exists student3 as select id, name from student; |
(3)根据已经存在的表结构创建表
|
create table if not exists student4 like student; |
(4)查询表的类型
hive (default)> desc formatted student2;
Table Type: MANAGED_TABLE
4.5.2 外部表
1.理论
因为表是外部表,所以Hive并非认为其完全拥有这份数据。删除该表并不会删除掉这份数据,不过描述表的元数据信息会被删除掉。
2.管理表和外部表的使用场景
每天将收集到的网站日志定期流入HDFS文本文件。在外部表(原始日志表)的基础上做大量的统计分析,用到的中间表、结果表使用内部表存储,数据通过SELECT+INSERT进入内部表。
3.案例实操
分别创建部门和员工外部表,并向表中导入数据。
(1)原始数据
(2)建表语句
创建部门表
|
create external table if not exists default.dept( deptno int, dname string, loc int ) row format delimited fields terminated by '\t'; |
创建员工表
|
create external table if not exists default.emp( empno int, ename string, job string, mgr int, hiredate string, sal double, comm double, deptno int) row format delimited fields terminated by '\t'; |
(3)查看创建的表
hive (default)> show tables;
OK
tab_name
dept
emp
(4)向外部表中导入数据
导入数据
hive (default)> load data local inpath '/opt/module/datas/dept.txt' into table default.dept;
hive (default)> load data local inpath '/opt/module/datas/emp.txt' into table default.emp;
查询结果
hive (default)> select * from emp;
hive (default)> select * from dept;
(5)查看表格式化数据
hive (default)> desc formatted dept;
Table Type: EXTERNAL_TABLE
4.5.3 管理表与外部表的互相转换
(1)查询表的类型
hive (default)> desc formatted student2;
Table Type: MANAGED_TABLE
(2)修改内部表student2为外部表
alter table student2 set tblproperties('EXTERNAL'='TRUE');
(3)查询表的类型
hive (default)> desc formatted student2;
Table Type: EXTERNAL_TABLE
(4)修改外部表student2为内部表
alter table student2 set tblproperties('EXTERNAL'='FALSE');
(5)查询表的类型
hive (default)> desc formatted student2;
Table Type: MANAGED_TABLE
注意:('EXTERNAL'='TRUE')和('EXTERNAL'='FALSE')为固定写法,区分大小写!
4.6 分区表
分区表实际上就是对应一个HDFS文件系统上的独立的文件夹,该文件夹下是该分区所有的数据文件。Hive中的分区就是分目录,把一个大的数据集根据业务需要分割成小的数据集。在查询时通过WHERE子句中的表达式选择查询所需要的指定的分区,这样的查询效率会提高很多。
4.6.1 分区表基本操作
1.引入分区表(需要根据日期对日志进行管理)
/user/hive/warehouse/log_partition/20170702/20170702.log
/user/hive/warehouse/log_partition/20170703/20170703.log
/user/hive/warehouse/log_partition/20170704/20170704.log
2.创建分区表语法
|
hive (default)> create table dept_partition( deptno int, dname string, loc string ) partitioned by (month string) row format delimited fields terminated by '\t'; |
3.加载数据到分区表中
hive (default)> load data local inpath '/opt/module/datas/dept.txt' into table default.dept_partition partition(month='201709');
hive (default)> load data local inpath '/opt/module/datas/dept.txt' into table default.dept_partition partition(month='201708');
hive (default)> load data local inpath '/opt/module/datas/dept.txt' into table default.dept_partition partition(month='201707’);
图6-5 加载数据到分区表
图6-6 分区表
4.查询分区表中数据
单分区查询
hive (default)> select * from dept_partition where month='201709';
多分区联合查询
hive (default)> select * from dept_partition where month='201709'
union
select * from dept_partition where month='201708'
union
select * from dept_partition where month='201707';
_u3.deptno _u3.dname _u3.loc _u3.month
10 ACCOUNTING NEW YORK 201707
10 ACCOUNTING NEW YORK 201708
10 ACCOUNTING NEW YORK 201709
20 RESEARCH DALLAS 201707
20 RESEARCH DALLAS 201708
20 RESEARCH DALLAS 201709
30 SALES CHICAGO 201707
30 SALES CHICAGO 201708
30 SALES CHICAGO 201709
40 OPERATIONS BOSTON 201707
40 OPERATIONS BOSTON 201708
40 OPERATIONS BOSTON 201709
5.增加分区
创建单个分区
hive (default)> alter table dept_partition add partition(month='201706') ;
同时创建多个分区
hive (default)> alter table dept_partition add partition(month='201705') partition(month='201704');
6.删除分区
删除单个分区
hive (default)> alter table dept_partition drop partition (month='201704');
同时删除多个分区
hive (default)> alter table dept_partition drop partition (month='201705'), partition (month='201706');
7.查看分区表有多少分区
hive> show partitions dept_partition;
8.查看分区表结构
hive> desc formatted dept_partition;
# Partition Information
# col_name data_type comment
month string
4.6.2 分区表注意事项
1.创建二级分区表
|
hive (default)> create table dept_partition2( deptno int, dname string, loc string ) partitioned by (month string, day string) row format delimited fields terminated by '\t'; |
2.正常的加载数据
(1)加载数据到二级分区表中
hive (default)> load data local inpath '/opt/module/datas/dept.txt' into table
default.dept_partition2 partition(month='201709', day='13');
(2)查询分区数据
hive (default)> select * from dept_partition2 where month='201709' and day='13';
3.把数据直接上传到分区目录上,让分区表和数据产生关联的三种方式
(1)方式一:上传数据后修复
上传数据
hive (default)> dfs -mkdir -p
/user/hive/warehouse/dept_partition2/month=201709/day=12;
hive (default)> dfs -put /opt/module/datas/dept.txt /user/hive/warehouse/dept_partition2/month=201709/day=12;
查询数据(查询不到刚上传的数据)
hive (default)> select * from dept_partition2 where month='201709' and day='12';
执行修复命令
hive> msck repair table dept_partition2;
再次查询数据
hive (default)> select * from dept_partition2 where month='201709' and day='12';
(2)方式二:上传数据后添加分区
上传数据
hive (default)> dfs -mkdir -p
/user/hive/warehouse/dept_partition2/month=201709/day=11;
hive (default)> dfs -put /opt/module/datas/dept.txt /user/hive/warehouse/dept_partition2/month=201709/day=11;
执行添加分区
hive (default)> alter table dept_partition2 add partition(month='201709',
day='11');
查询数据
hive (default)> select * from dept_partition2 where month='201709' and day='11';
(3)方式三:创建文件夹后load数据到分区
创建目录
hive (default)> dfs -mkdir -p
/user/hive/warehouse/dept_partition2/month=201709/day=10;
上传数据
hive (default)> load data local inpath '/opt/module/datas/dept.txt' into table
dept_partition2 partition(month='201709',day='10');
查询数据
hive (default)> select * from dept_partition2 where month='201709' and day='10';
4.7 修改表
4.7.1 重命名表
1.语法
ALTER TABLE table_name RENAME TO new_table_name
2.实操案例
hive (default)> alter table dept_partition2 rename to dept_partition3;
4.7.2 增加、修改和删除表分区
详见4.6.1分区表基本操作。
4.7.3 增加/修改/替换列信息
1.语法
更新列
ALTER TABLE table_name CHANGE [COLUMN] col_old_name col_new_name column_type [COMMENT col_comment] [FIRST|AFTER column_name]
增加和替换列
ALTER TABLE table_name ADD|REPLACE COLUMNS (col_name data_type [COMMENT col_comment], ...)
注:ADD是代表新增一字段,字段位置在所有列后面(partition列前),REPLACE则是表示替换表中所有字段。
2.实操案例
(1)查询表结构
hive> desc dept_partition;
(2)添加列
hive (default)> alter table dept_partition add columns(deptdesc string);
(3)查询表结构
hive> desc dept_partition;
(4)更新列
hive (default)> alter table dept_partition change column deptdesc desc int;
(5)查询表结构
hive> desc dept_partition;
(6)替换列
hive (default)> alter table dept_partition replace columns(deptno string, dname
string, loc string);
(7)查询表结构
hive> desc dept_partition;
4.8 删除表
hive (default)> drop table dept_partition;
第5章 DML数据操作
5.1 数据导入
5.1.1 向表中装载数据(Load)
1.语法
hive> load data [local] inpath '/opt/module/datas/student.txt' overwrite | into table student [partition (partcol1=val1,…)];
(1)load data:表示加载数据
(2)local:表示从本地加载数据到hive表;否则从HDFS加载数据到hive表
(3)inpath:表示加载数据的路径
(4)overwrite:表示覆盖表中已有数据,否则表示追加
(5)into table:表示加载到哪张表
(6)student:表示具体的表
(7)partition:表示上传到指定分区
2.实操案例
(0)创建一张表
hive (default)> create table student(id string, name string) row format delimited fields terminated by '\t';
(1)加载本地文件到hive
hive (default)> load data local inpath '/opt/module/datas/student.txt' into table default.student;
(2)加载HDFS文件到hive中
上传文件到HDFS
hive (default)> dfs -put /opt/module/datas/student.txt /user/atguigu/hive;
加载HDFS上数据
hive (default)> load data inpath '/user/atguigu/hive/student.txt' into table default.student;
(3)加载数据覆盖表中已有的数据
上传文件到HDFS
hive (default)> dfs -put /opt/module/datas/student.txt /user/atguigu/hive;
加载数据覆盖表中已有的数据
hive (default)> load data inpath '/user/atguigu/hive/student.txt' overwrite into table default.student;
5.1.2 通过查询语句向表中插入数据(Insert)
1.创建一张分区表
hive (default)> create table student(id int, name string) partitioned by (month string) row format delimited fields terminated by '\t';
2.基本插入数据
hive (default)> insert into table student partition(month='201709') values(1,'wangwu');
3.基本模式插入(根据单张表查询结果)
hive (default)> insert overwrite table student partition(month='201708')
select id, name from student where month='201709';
4.多插入模式(根据多张表查询结果)
hive (default)> from student
insert overwrite table student partition(month='201707')
select id, name where month='201709'
insert overwrite table student partition(month='201706')
select id, name where month='201709';
5.1.3 查询语句中创建表并加载数据(As Select)
详见4.5.1章创建表。
根据查询结果创建表(查询的结果会添加到新创建的表中)
create table if not exists student3
as select id, name from student;
5.1.4 创建表时通过Location指定加载数据路径
1.创建表,并指定在hdfs上的位置
hive (default)> create table if not exists student5(
id int, name string
)
row format delimited fields terminated by '\t'
location '/user/hive/warehouse/student5';
2.上传数据到hdfs上
hive (default)> dfs -put /opt/module/datas/student.txt
/user/hive/warehouse/student5;
3.查询数据
hive (default)> select * from student5;
5.1.5 Import数据到指定Hive表中
注意:先用export导出后,再将数据导入。
hive (default)> import table student2 partition(month='201709') from
'/user/hive/warehouse/export/student';
5.2 数据导出
5.2.1 Insert导出
1.将查询的结果导出到本地
hive (default)> insert overwrite local directory '/opt/module/datas/export/student'
select * from student;
2.将查询的结果格式化导出到本地
hive(default)>insert overwrite local directory '/opt/module/datas/export/student1'
ROW FORMAT DELIMITED FIELDS TERMINATED BY '\t' select * from student;
3.将查询的结果导出到HDFS上(没有local)
hive (default)> insert overwrite directory '/user/atguigu/student2'
ROW FORMAT DELIMITED FIELDS TERMINATED BY '\t'
select * from student;
5.2.2 Hadoop命令导出到本地
hive (default)> dfs -get /user/hive/warehouse/student/month=201709/000000_0
/opt/module/datas/export/student3.txt;
5.2.3 Hive Shell 命令导出
基本语法:(hive -f/-e 执行语句或者脚本 > file)
[atguigu@hadoop102 hive]$ bin/hive -e 'select * from default.student;' >
/opt/module/datas/export/student4.txt;
5.2.4 Export导出到HDFS上
(defahiveult)> export table default.student to
'/user/hive/warehouse/export/student';
5.2.5 Sqoop导出
后续课程专门讲。
5.3 清除表中数据(Truncate)
注意:Truncate只能删除管理表,不能删除外部表中数据
hive (default)> truncate table student;
第6章 查询
https://cwiki.apache.org/confluence/display/Hive/LanguageManual+Select
查询语句语法:
|
[WITH CommonTableExpression (, CommonTableExpression)*] (Note: Only available starting with Hive 0.13.0) SELECT [ALL | DISTINCT] select_expr, select_expr, ... FROM table_reference [WHERE where_condition] [GROUP BY col_list] [ORDER BY col_list] [CLUSTER BY col_list | [DISTRIBUTE BY col_list] [SORT BY col_list] ] [LIMIT number] |


