爬虫----day03(bs4介绍、遍历与搜索、css选择器、selenium基本使用、无界面浏览器、用selenium 模拟登录百度、selenium其它用法 查找标签、获取标签的属性、标签的点击、输入等、执行js代码、打开空页面等)
昨日回顾
# 1 request 高级用法
	-解析josn:发http的请求,返回的数据,可能是xml格式,json格式
    	request.get().json()
    -ssl认证
    	-http和https的区别
        	-https=http+ssl/tsl
        -http版本区别
        	-0.9:底层基于tcp,每次http请求,都是建立一个tcp连接,三次握手,请求结束需要四次挥手
            -1.1:请求头中有个参数Keep-alive,可以保证多个http请求公用一个TCP连接
            -2.x:多路复用,多个请求使用同一个数据包

    -代理:
    	-发送请求,如果使用自己的ip,可能会被封(加黑名单),需要使用代理ip,
        	-如果使用了代理ip,还能不能访问本地的django项目----》不能
            -res = requests.post('https://www.cnblogs.com',proxies={'http':'27.79.236.66:4001'})
            -高匿,透明
            -http请求头:x-forword-for,user-agent,cookie,referer,contenType
            -http:
            	-请求协议:
                	请求首行:请求头地址,请求方式,http的版本
                    请求头:key-value
                    请求体
                -响应协议:
                	响应首行:响应状态码,响应字符串描述
                    响应头:key-vaule,响应状态码,cookie
            		响应体

    -代理池:搭建免费代理池
    	-开源的---》原理
        	爬取免费代理---》验证---》存到redis中
            起了一个flask服务,监听5000,访问地址,就可以随机获取代理
    -自己的django 测试使用代理
    -超时
    -异常
    -上传文件

# 2 内网穿透
	-花生壳

# 3 爬取视频网站
	-请求头中的数据
    -请求回来的数据,不一一定能直接用

# 4 爬取新闻
	-bs4:find_all,find
.
.
.
.
.
.
.
今日内容
1 bs4介绍,遍历文档树
# 安装:pip install beautifulsoup4
# pip install lxml      # 第三方解析库 要用就下载一下


# 获取的数据如果是json格式,直接解析出来,就能拿到数据
# 获取的数据如果是html或xml格式,用re正则去解析比较麻烦
# 使用beautifulsoup4比使用re解析html或xml格式更方便


# beautifulsoup4  是从HTML或XML文件中提取数据的Python库
# 用它来解析爬取回来的xml格式的数据比较方便

-------------------------------------------------

# bs4 的主要作用就两个:
    查找标签,然后解析出标签的类容

# soup=BeautifulSoup('要解析的内容str类型','要用的解析库html.parser或lxml')

-------------------------------------------------
.
.
.
.
.
.
1.1 bs4的遍历文档树
from bs4 import BeautifulSoup

# 模拟从网站上爬取回来的xml数据,用bs4来拿想要的数据
html_doc = """
<html><head><title>The Dormouse's story</title></head>
<body>
<p class="title">
    lqz   888
    <h1> 啊啊啊 </h1>
    <b>The Dormouse's story</b>
</p>

<p class="story">Once upon a time there were three little sisters; and their names were
    <a href="http://example.com/elsie" class="sister  brother" id="link1" name='lqzsb'>Elsie</a>
    <a href="http://example.com/lacie" class="sister" id="link2">Lacie</a> and
    <a href="http://example.com/tillie" class="sister" id="link3">Tillie</a>;
    and they lived at the bottom of a well.
</p>

<p class="story">...</p>
"""


soup = BeautifulSoup(html_doc, 'lxml')


# 1 美化,不是标准xml,完成美化
print(soup.prettify())

--------------------------------------
# 2 遍历文档树----通过 .  来遍历
print(soup.html.body.p)   # 一层一层找,只找第一个
print(soup.p)   # 跨层  只找第一个

# 和soup.find(name='p')   的区别是:查到的结果没有区别,但是find是搜索找,点的方式是遍历找
# find() 效率可能会高一点

'''
都是这个结果
<p class="title">
    lqz
    888
</p>
'''

------------------------------------
# 3、获取标签的名称  a标签的名字就是a
print(soup.a.name)     # a


# 4、获取标签的属性-----属性字典
print(soup.a.attrs)     # 查找到的a标签里面的所有属性都放到字典里面
print(soup.a.attrs['href'])    # http://example.com/elsie
print(soup.a.attrs.get('class'))    # ['sister', 'brother']
# class对应的属性可能会有多个所以是个列表包裹

print(soup.a.attrs.get('name'))  # lqzsb

-------------------------------------------------
# 5、获取标签的内容

# text  获得该标签内部子子孙孙所有标签的文本内容  放到一起做成字符串
print(soup.p.text)
'''
    lqz   888
    The Dormouse's story
'''

# string  p下只有一个文本时,能取到,否则结果为None  有时候结果不准
print(soup.p.string)  # None


# 5、嵌套选择  就是可以一直点只要有
print(soup.html.body)


---------------- 了解,用的不多  ----------------

# 6、子节点、子孙节点
print(soup.body.contents)   # p下所有子节点,只取一层,子节点里的子节点不取
print(list(soup.p.children))   # 得到一个迭代器用list转一下,包含p下所有子节点  也只取一层

print(list(soup.body.descendants))  # generator  子子孙孙标签都取 这个不好用!!


# 7、父节点、祖先节点
print(soup.a.parent)  # 获取a标签的父节点  直接父亲
print(list(soup.a.parents) )  # 找到a标签所有的祖先节点,父亲的父亲,父亲的父亲的父亲...

# 8、兄弟节点
print(soup.a.next_sibling)  # 下一个兄弟
print(soup.a.previous_sibling)  # 上一个兄弟


print(list(soup.a.next_siblings))   # 下面的兄弟们=>生成器对象
print(list(soup.a.previous_siblings))   # 上面的兄弟们=>生成器对象

------------------------------------------
.
.
.
.
.
.
1.2 bs4搜索文档树
html_doc = """
<html><head><title>The Dormouse's story</title></head>
<body>
<p id="my p" class="title"><b id="bbb" class="boldest">The Dormouse's story</b>
</p>

<p class="story">Once upon a time there were three little sisters; and their names were
<a href="http://example.com/elsie" class="sister" id="link1">Elsie</a>,
<a href="http://example.com/lacie" class="sister" id="link2">Lacie</a> and
<a href="http://example.com/tillie" class="sister" id="link3">Tillie</a>;
and they lived at the bottom of a well.</p>

<p class="story">...</p>
"""

from bs4 import BeautifulSoup

soup = BeautifulSoup(html_doc, 'lxml')

--------------------------

# 共有五种过滤器: 字符串、正则表达式、列表、True、方法

# 1 查询条件是字符串

# 查询标签名是p的所有标签
res = soup.find_all(name='p')
res = soup.find_all('p')
print(res)


# 类名叫sister的所有标签
res=soup.find_all(class_='sister')
print(res)

# id 叫link1的所有标签
res = soup.find_all(id='link1')
print(res)


# 文本内容叫Elsie的父标签
res=soup.find(text='Elsie').parent
print(res)  # 所以该结果是包裹该文本内容的标签
# 该语法认为文本内容也算一个标签,所以结果是:
# <a class="sister" href="http://example.com/el" id="link1">Elsie</a>

-----------------------------------------------

# 2 查询条件是 正则表达式
import re   # 要先引入正则模块

res = soup.find_all(id=re.compile('^l'))  # id 以1开头的所有标签
res = soup.find_all(class_=re.compile('^s'))  # 类名以s 开头的所有标签
print(res)

-----------------------------------------------

# 3 查询条件是 列表
res = soup.find_all(id=['link1', 'link2'])    # 查找 id 在列表里面的所有标签
print(res)
print(soup.find_all(name=['a', 'b']))    # 查找标签名在列表里面的所有标签

-----------------------------------------------

# 4 查询条件是  True       重要!!!

res = soup.find_all(id=True)  # 查找所有,有id属性的标签
res = soup.find_all(href=True)  # 查找所有,有href属性的标签
res=soup.find_all(class_=True)   # 查找所有,有class属性的标签
print(res)

-----------------------------------------------

# 5 查询条件是 方法  用的不多
def has_class_but_no_id(tag):
    return tag.has_attr('class') and not tag.has_attr('id')

# tag代表的就是当前遍历到的标签

print(soup.find_all(name=has_class_but_no_id))
# 获取有class属性但没有id属性的所有标签

-----------------------------------------------
.
.
.
.
1.3 find的其他参数
name
class_
id
text
attrs
--------------------------------
limit:限制调试,  给find_all用的    find本质是find_all  limit=1

recursive: 查找的时候,等于False只找第一层
默认是True,子子孙孙都找

-r 就是recursive递归的意思
.
.
# limit 参数
res=soup.find_all(href=True,limit=2)
print(res)


# recursive=True  递归查找查找,子子孙孙都找
res=soup.find_all(name='b',recursive=False)  # recursive=False 只找第一层
res=soup.find_all(name='b')

-----------------------------------------------

# 建议遍历和搜索一起用,遍历很快,再搜索慢点     先通过遍历缩小范围,然后再搜索好一点
res=soup.html.body.p.find_all(name='b',recursive=False)
print(res)
.
.
.
.
.
.
.
.
.
.
.
2 bs4也支持css选择器
# 之前学过css选择器,可以很复杂

    .类名     # 类名选择器
    #id        # id选择器
    p          # 标签选择器

# 咱们只学了bs4的lxml解析器 ,以后可能见到别的解析器
# 他们都会支持css选择器,也会支持xpath  这两个东西是通用的  多数解析器都能用


# find搜索与点的遍历都是bs4模块独有的
# bs4 支持css选择器

------------------------------------------------------

html_doc = """
<html><head><title>The Dormouse's story</title></head>
<body>
<p class="title">
    <b>The Dormouse's story</b>
    Once upon a time there were three little sisters; and their names were
    <a href="http://example.com/elsie" class="sister" id="link1">
        <span>Elsie</span>
    </a>
    <a href="http://example.com/lacie" class="sister" id="link2">Lacie</a> and
    <a href="http://example.com/tillie" class="sister" id="link3">Tillie</a>;
    <div class='panel-1'>
        <ul class='list' id='list-1'>
            <li class='element'>Foo</li>
            <li class='element'>Bar</li>
            <li class='element'>Jay</li>
        </ul>
        <ul class='list list-small' id='list-2'>
            <li class='element'><h1 class='yyyy'>Foo</h1></li>
            <li class='element xxx'>Bar</li>
            <li class='element'>Jay</li>
        </ul>
    </div>
    and they lived at the bottom of a well.
</p>
<p class="story">...</p>
"""


from bs4 import BeautifulSoup
soup=BeautifulSoup(html_doc,'lxml')

# select括号内写css选择器
print(soup.select('.sister'))

print(soup.select('#link1'))   # 搜索所有 id 叫link1的标签

print(soup.select('#link1 span'))  # 搜索所有 id 叫link1的标签下的后代span标签
print(soup.select('#link1>span'))  # 搜索所有 id 叫link1的标签下的儿子span标签

------------------------------------------
------------------------------------------

# 终极大招------如果不会写css选择器,可以复制
# 直接到浏览器里面  找到对应的标签,右键,点复制,再点复制selector,就拿到该标签的ccs标签选择器了

import requests
res=requests.get('https://www.w3school.com.cn/css/css_selector_attribute.asp')
soup=BeautifulSoup(res.text,'lxml')

# print(soup.select('#intro > p:nth-child(1) > strong'))
print(soup.select('#intro > p:nth-child(1) > strong')[0].text)

# 页面中只要能爬回来的东西,一定能解析出来
.
.
.
.
.
.
.
.
.
3 selenium基本使用 重要!!!
------------------------------------------------------
# selenium
selenium最初是一个自动化测试工具
而爬虫中使用它主要是为了解决requests无法直接执行JavaScript代码的问题
并且爬虫通过使用selenium可以实现,可见即可爬的效果,因为就是让浏览器操作的
可能页面上的部分内容是ajax请求响应的数据渲染的,用requests朝当前页面网站发请求是拿不到这些数据的
selenium本质是通过驱动浏览器,完全模拟浏览器的操作,
比如跳转、输入、点击、下拉等,来拿到网页渲染之后的结果,可支持多种浏览器
# 用了selenium操作浏览器,可以直接避开好多的反扒措施!!!
# 通过python使用appnium模块可以操作手机
参见博客 https://blog.csdn.net/Makasa/article/details/121287286
参见博客 https://blog.csdn.net/weixin_42382016/article/details/122468281
------------------------------------------------------
# 使用步骤:
1 下载 pip3.8 install selenium
2 操作浏览器:分不同浏览器,需要下载不同浏览器的驱动
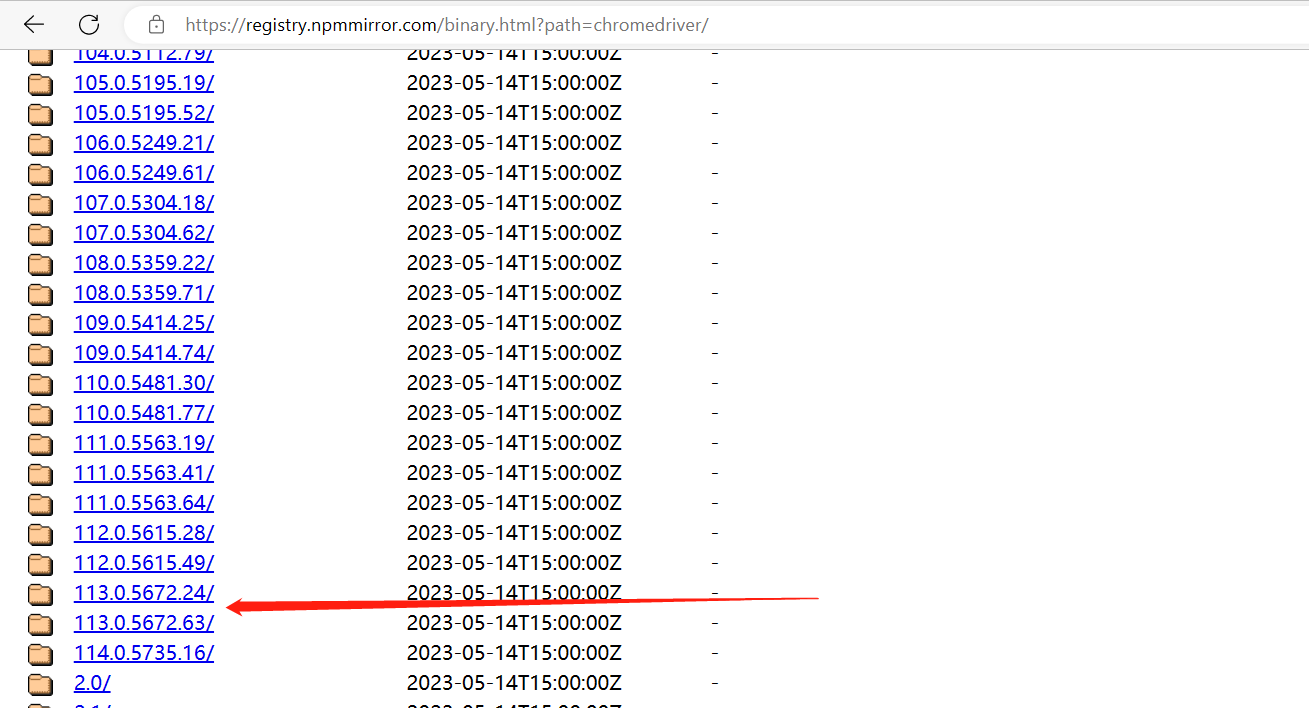
建议用谷歌---谷歌浏览器驱动:https://registry.npmmirror.com/binary.html?path=chromedriver/
跟谷歌浏览器版本要对应 113.0.5672.93 查看浏览器---帮助---关于谷歌浏览器里能查到版本
谷歌对该模块的支持最好,selenium要操作谷歌浏览器,需要用该驱动
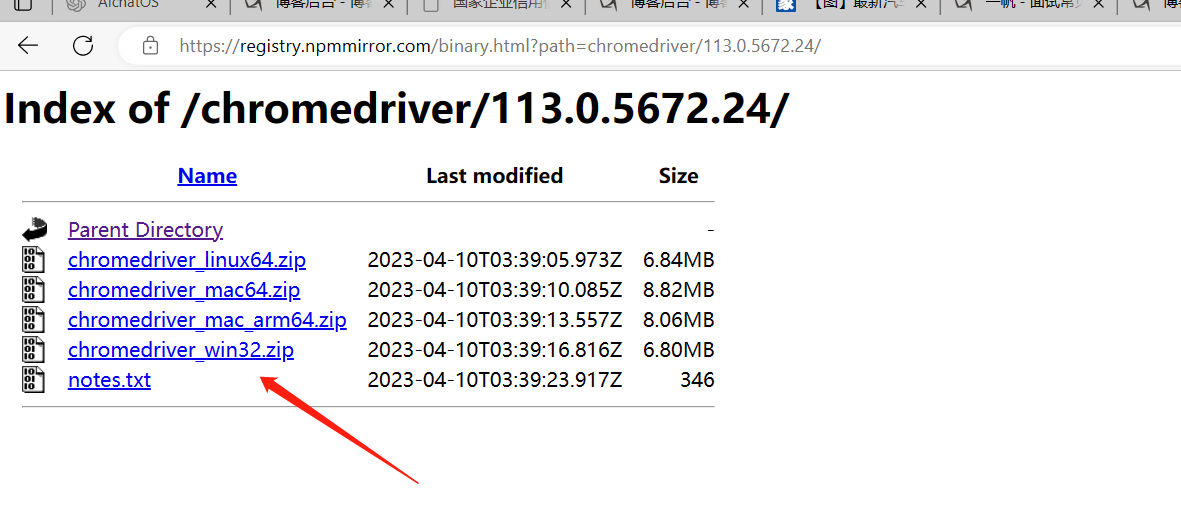
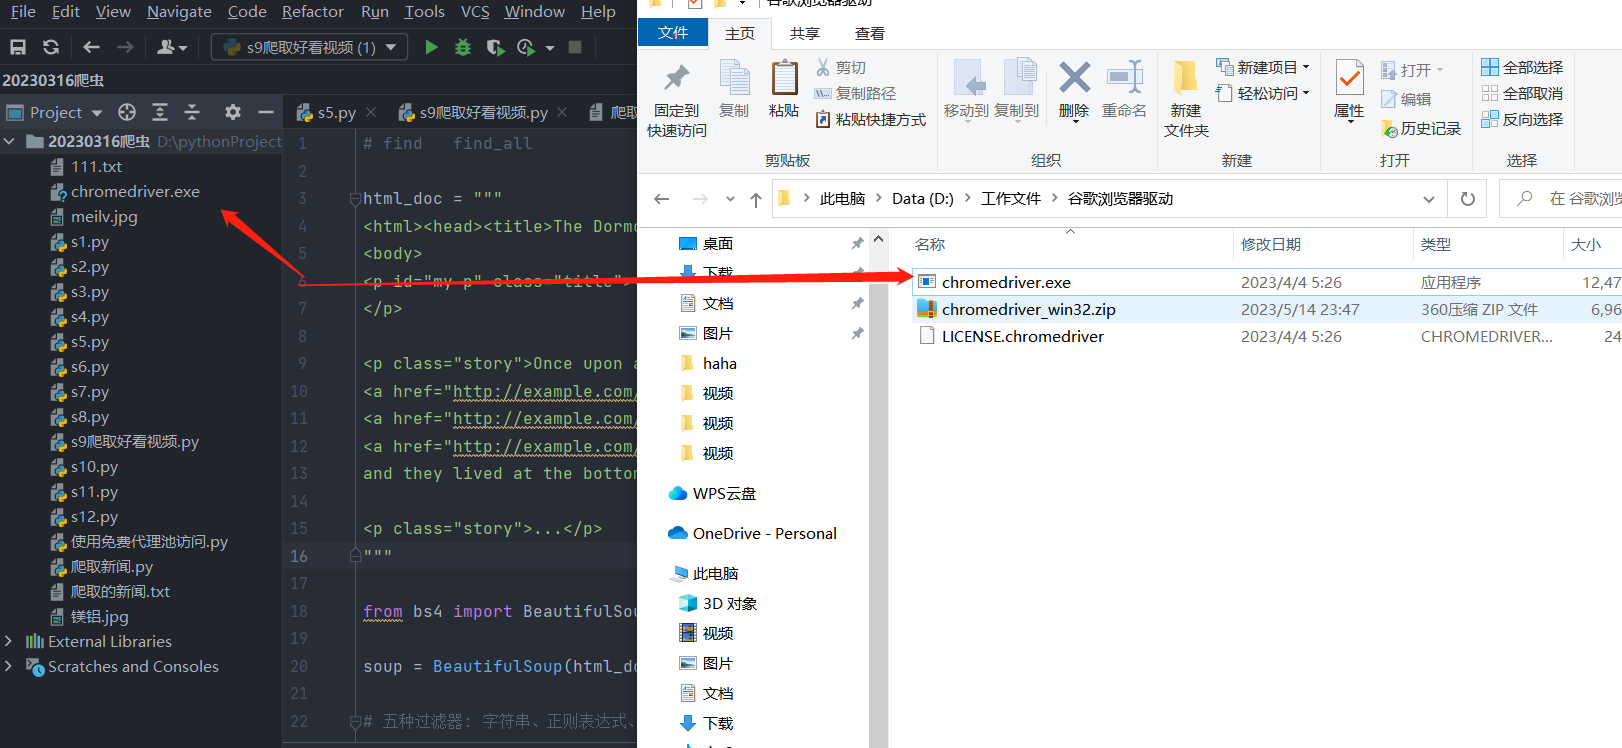
3 下载完的驱动,放在项目路径下
4 写代码,控制谷歌浏览器
from selenium import webdriver
import time
# 要先指定一个驱动,并打开一个浏览器
bro = webdriver.Chrome(executable_path='chromedriver.exe') # 自动打开一个谷歌浏览器!!!
bro.get('https://www.baidu.com/s?wd=%E7%BE%8E%E5%A5%B3') # 在浏览器地址栏中输入地址,敲回车
print(bro.page_source) # 当前页面的所有内容 (html格式!!!)
# 直接就把https://www.baidu.com/s?wd=%E7%BE%8E%E5%A5%B3 的整个页面的html标签内容都拿回来了!!!
# 用变量接收一下,就可以用bs4去解析想要的数据了!!!
with open('1.html','w',encoding='utf-8') as f:
f.write(bro.page_source)
time.sleep(5)
bro.close() # 自动关闭浏览器
-----------------------------------
# 如果直接用requests来拿该页面的数据,拿到的数据是有问题的
import requests
res = requests.get('https://www.baidu.com/s?wd=%E7%BE%8E%E5%A5%B3')
print(res.text) # 数据又少,还乱码,百度有反扒
-----------------------------------
找到对应浏览器的版本驱动,下载压缩包,解压后,把exe的驱动文件,放到项目里面去
.
.
.
.
.
.
.
.
.
.
.
4 无界面浏览器
----------------------------------------
# 就是为了隐藏浏览器的图形化界面!!!
----------------------------------------

from selenium import webdriver
import time

from selenium.webdriver.chrome.options import Options

# 隐藏浏览器的图形化界面,但是数据还正常拿到
chrome_options = Options()

chrome_options.add_argument('window-size=1920x3000')   # 指定浏览器分辨率

chrome_options.add_argument('--hide-scrollbars')   # 隐藏滚动条, 应对一些特殊页面

chrome_options.add_argument('blink-settings=imagesEnabled=false')   # 不加载图片, 提升速度

chrome_options.add_argument('--headless')
# 浏览器不提供可视化页面. linux下如果系统不支持可视化不加这条会启动失败

# chrome_options.binary_location = r"C:\Program Files (x86)\Google\Chrome\Application\chrome.exe" #手动指定使用的浏览器位置


# 打开一个谷歌浏览器
bro = webdriver.Chrome(executable_path='chromedriver.exe',chrome_options=chrome_options)


# 隐藏浏览器的图形化界面,但是数据还拿到
bro.get('https://www.cnblogs.com/')   # 在地址栏中输入地址
print(bro.page_source)   # 当前页面的内容  (html格式)
time.sleep(5)
bro.close()  # 关闭浏览器
.
.
.
.
.
.
.
.
4.1 用selenium 模拟登录百度
from selenium import webdriver
import time
from selenium.webdriver.common.by import By


bro = webdriver.Chrome(executable_path='chromedriver.exe')  # 打开一个谷歌浏览器

bro.get('https://www.baidu.com')  # 浏览器地址栏输入网站访问

# 加入等待:找标签,如果找不到,就等待 x秒,如果等了,还找不到就报错
bro.implicitly_wait(10)  # 等待


# By是要指定按什么方式去找标签或者叫定位     LINK_TEXT 表示文本内容的方式
# By.LINK_TEXT 按超链接的文本内容找标签     找文本内容有登录两个字的a标签
btn = bro.find_element(by=By.LINK_TEXT, value='登录')


# 从页面中找到登录 a标签,点击它
btn.click()


# 找到按账号登录的点击按钮,有id,优先用id,因为唯一  TANGRAM__PSP_11__changePwdCodeItem
btn_2 = bro.find_element(by=By.ID, value='TANGRAM__PSP_11__changePwdCodeItem')
btn_2.click()
time.sleep(1)

# 往输入框输东西
name = bro.find_element(by=By.ID, value='TANGRAM__PSP_11__userName')   # 用户名输入框的标签
password = bro.find_element(by=By.ID, value='TANGRAM__PSP_11__password')  # 密码输入框的标签
name.send_keys('18752386213')    # 往输入框填数据
password.send_keys('tengyifan888')
time.sleep(3)


# 再查找提交的按钮,再点击登录按钮
submit=bro.find_element(by=By.ID,value='TANGRAM__PSP_11__submit')
submit.click()
time.sleep(10)

bro.close()  # 关闭浏览器

# 整个模拟登录百度的动作链就结束了
.
.
.
.
.
.
.
.
5 selenium其它用法
5.0 查找标签
# 有时候用css选择器,查找标签可能会找不到,试试用其他的方法来找

from selenium import webdriver
import time
from selenium.webdriver.common.by import By

bro = webdriver.Chrome(executable_path='chromedriver.exe')  # 打开一个谷歌浏览器

bro.get('https://www.baidu.com')  # 浏览器地址栏输入网站访问


# 两个方法
bro.find_element   找一个
bro.find_elements  找所有

# 可以按id,标签名,name属性名,类名,a标签的文字,a标签的文字模糊匹配,css选择器,xpath【后面聊】
input_1=bro.find_element(by=By.ID,value='wd')   # 按id找
# input_1 = bro.find_element(by=By.NAME, value='wd')   # 按标签name属性名找
input_1.send_keys('性感美女')

input_2=bro.find_element(by=By.TAG_NAME,value='img')  # 按标签名找
# 可以按标签名找,一般配合查所有find_elements 来查找所有的对应标签用


input_3=bro.find_element(by=By.CLASS_NAME,value='s_ipt')  # 可以按类名
input_4=bro.find_element(by=By.LINK_TEXT,value='登录')  # 可以按a标签内容找


input_5=bro.find_element(by=By.PARTIAL_LINK_TEXT,value='录')  # 可以按a标签的模糊内容找
input_6 = bro.find_element(by=By.CSS_SELECTOR, value='#su')   # 可以按css选择器找
input_6.click()
.
.
.
.
.
.
.
5.1 获取位置属性大小,文本
# 先找到对应的标签tag ,然后再用该标签点get_attribute('属性名') ,就拿到了该标签里面的属性了

print(tag.get_attribute('src'))  # 用的最多

tag.text  # 获取标签的文本内容

----------------------------------------

# 这几个了解即可    获取标签ID,位置,名称,大小(了解)

print(tag.id)     # selenium的 id


print(tag.location)
# 返回该标签所在页面的位置,x y轴坐标位置 {'x': 782, 'y': 254}  代表的是该标签的左上角的坐标

print(tag.size)    # 标签的尺寸 {'height': 158, 'width': 158}
# 上面这两个方法可能会用到


print(tag.tag_name)    # 标签名字
----------------------------------------

from selenium import webdriver
import time
from selenium.webdriver.common.by import By
import base64

bro = webdriver.Chrome(executable_path='chromedriver.exe')  # 打开一个谷歌浏览器

bro.get('https://kyfw.12306.cn/otn/resources/login.html')  # 浏览器地址栏输入网站访问
# 加入等待:找标签,如果找不到,就等待 x秒,如果还找不到就报错
bro.implicitly_wait(10)  # 等待

btn = bro.find_element(by=By.LINK_TEXT, value='扫码登录')
btn.click()
time.sleep(2)

img = bro.find_element(by=By.ID, value='J-qrImg')  # 找到img标签
res = img.get_attribute('alt')  #
info1 = img.get_attribute('aria-label')  #
res1 = img.get_attribute('src')
# print(res)
# print(info1)
print(res1)

img_info = base64.b64decode(res1.split(',')[-1])
with open('code_img.png', 'wb') as f:
    f.write(img_info)  # 就把二维码下载下来了

time.sleep(1)
bro.close()  # 关闭浏览器

---------------------------------------------------
.
.
.
.
.
.
.
.
5.2 等待元素被加载
# 代码执行很快,有的标签没来的及加载,直接查找就会报错,   所以要设置等待


# 隐示等待:所有标签,只要去找,  找不到就遵循 等10s的规则
	bro.implicitly_wait(10)


# 显示等待:需要给每个标签绑定一个等待,比较麻烦,没必要
.
.
.
.
.
5.3 元素操作 重要!!!
# 都是要先找到该标签 tag = bro.find_element(  )

# 点击
tag.click()


# 输入内容
tag.send_keys()


# 清空内容
tag.clear()


# 浏览器对象 最大化
bro.maximize_window()


# 浏览器对象  截全屏 并以main.png文件名,保存到本地
bro.save_screenshot('main.png')
.
.
.
.
.
5.4 执行js代码
# 括号里面可以直接写js代码的
bro.execute_script('alert("美女")')  # 引号内部的相当于 用script标签包裹了


# 可以干的事
    -获取当前访问的地址  window.location
    -打开新的标签
    -滑动屏幕----bro.execute_script('scrollTo(0,document.documentElement.scrollHeight)')
    -获取cookie,获取定义的全局变量


# 滑动屏幕到当前页面的最底部
bro.execute_script('scrollTo(0,document.documentElement.scrollHeight)')

--------------------------------------
# 执行js代码
# bro.execute_script('alert("美女")')

bro.execute_script("alert(window.location)")   # 能弹出当前页面的网址

# bro.execute_script('scrollTo(0,document.documentElement.scrollHeight)')

time.sleep(2)

bro.close()  # 关闭浏览器

--------------------------------------
.
.
.
.
.
.
5.5 切换选项卡,就是再打开一个页面
import time
from selenium import webdriver

browser=webdriver.Chrome(executable_path='chromedriver.exe')
browser.get('https://www.baidu.com')

browser.execute_script('window.open()')  # 执行js代码打开一个空页面

print(browser.window_handles) # 获取所有的选项卡

# 切换到空页面
browser.switch_to.window(browser.window_handles[1])
browser.get('https://www.taobao.com')   # 地址栏输入网址回车
time.sleep(2)

# 在切回刚开始的页面
browser.switch_to.window(browser.window_handles[0])
browser.get('https://www.sina.com.cn')  # 在开始的页面地址栏,再输入新的网址,并回车执行

browser.close()
.
.
.
.
.
.
.
.
5.6 浏览器前进后退
import time
from selenium import webdriver

browser=webdriver.Chrome(executable_path='chromedriver.exe')
browser.get('https://www.baidu.com')
browser.get('https://www.taobao.com')
browser.get('http://www.sina.com.cn/')

browser.back()  # 从当前页面回退
time.sleep(2)
browser.forward()  # 从当前页面前进

browser.close()
.
.
.
.
.
5.7 异常处理
import time
from selenium import webdriver

browser=webdriver.Chrome(executable_path='chromedriver.exe')

try:
    browser.get('https://www.baidu.com')
    browser.get('https://www.taobao.com')
    browser.get('http://www.sina.com.cn/')

except Exception as e:
    print(e)

finally:
    browser.close()

# 就是把可能会出异常的代码,放到try里面去
.
.
.
.
.
.
.
作业
# 1 http的get请求和post请求有什么区别
# 2 上课讲的代码写一遍

# 期终架构


【推荐】国内首个AI IDE,深度理解中文开发场景,立即下载体验Trae
【推荐】编程新体验,更懂你的AI,立即体验豆包MarsCode编程助手
【推荐】抖音旗下AI助手豆包,你的智能百科全书,全免费不限次数
【推荐】轻量又高性能的 SSH 工具 IShell:AI 加持,快人一步
· 开源Multi-agent AI智能体框架aevatar.ai,欢迎大家贡献代码
· Manus重磅发布:全球首款通用AI代理技术深度解析与实战指南
· 被坑几百块钱后,我竟然真的恢复了删除的微信聊天记录!
· 没有Manus邀请码?试试免邀请码的MGX或者开源的OpenManus吧
· 园子的第一款AI主题卫衣上架——"HELLO! HOW CAN I ASSIST YOU TODAY