python学习笔记
本来不想看python了, 但是gcc编译环境的各种版本兼容性问题, 放弃吧.
只是想用wxWedgits... 算了, 直接用wxPython好了.
20190813 公司给了一台CentOS7.2.1511, 从原码开始安装, 下载到/tmp下
xz -d Python-3.7.4.tar.xz
tar -xvf Python-3.7.4.tar

安装一些依赖库
yum -y install bzip2-devel ncurses-devel db4-devel gdbm gdbm-devel libpcap-devel xz xz-devel libffi-devel lzma sqlite sqlite-devel tk tk-devel libuuid-devel readline-devel zlib-devel


cd Python-3.7.4
./configure --prefix=/usr/local/python3.7 --enable-optimizations

make
make install

中途有失败 make clean掉, 解决重新来.或者从头来.
https://www.code-learner.com/how-to-compile-and-install-python3-from-source-code-in-centos/
https://www.linuxidc.com/Linux/2018-01/150564.htm
https://blog.csdn.net/pengjunlee/article/details/89100730
pip 更换源

https://www.cnblogs.com/lpl521/p/6778048.html

mkdir ~/.pip
cd ~/.pip
touch pip.conf
vi pip.conf
---------------------------------
[global]
index-url = http://mirrors.xxxxxx/pypi/simple/
[install]
trusted-host = mirrors.xxxxxx


/////////////////////////////////////////////////////////////////////////////////////////////////////
可以使用内网镜像来安装
pip install -i http://mirrors.xxxxxxx/pypi/simple xxxpackage --trusted-host mirrors.xxxxxxx
windows下,配置pip.ini 文件 内容如下:
https://jingyan.baidu.com/article/3d69c55127775af0cf02d79e.html
--------------------------------------------------------------
[global]
index-url = http://mirrors.xxxxx
[install]
trusted-host=mirrors.xxxx
--------------------------------------------------------------
pip install xxxpackage
python doc, 有中文, 讲解最全
https://docs.python.org/zh-cn/3/library/python.html
https://docs.python.org/zh-cn/3/library/builtins.html
pyinstaller
https://pythonhosted.org/PyInstaller/installation.html
MysqlPython
https://pypi.org/project/MySQL-python/
wxpython
https://wiki.wxpython.org/Getting%20Started
C/C++ mysql
https://www.cnblogs.com/cy163/archive/2009/10/03/1577812.html
https://www.cnblogs.com/wunaozai/p/4528394.html
pip国内镜像, 清华大学的最快. 超过阿里云
https://www.cnblogs.com/biglittleant/p/6944180.html
//////////////////////////////////////////////////////////////////////////////////////////
opencv python 安装
官方从源头安装
https://docs.opencv.org/4.1.0/d5/de5/tutorial_py_setup_in_windows.html

没意见, 但是会碰到各种问题.

简单安装
https://qiita.com/cointoss1973/items/92d82f9accb239a276a0
日本人写的简洁明了

pip install opencv-python
pip install opencv-contrib-python
///////////////////////////////////////////////////////////////////////////////////////////////////////////////////
点滴:
python 与json
https://www.geeksforgeeks.org/json-formatting-python/
https://docs.python.org/3/library/json.html


Functions
json.dump(obj, fileObj): Serializes obj as a JSON formatted stream to fileObj.
json.dumps(obj) : Serializes obj as JSON formatted string.
json.load(JSONfile) : De-serializes JSONfile to a Python object.
json.loads(JSONfile) : De-serializes JSONfile(type: string) to a Python object.Classes

JSONEncoder: An encoder class to convert Python objects to JSON format.
JSONDecoder: A decoder class to convert JSON format file into Python obj.
The conversions are based on this conversion table.

--------------------------------------------------------------
Encoding
We will be using dump(), dumps() and JSON.Encoder class.

#Code will run in Python 3

from io import StringIO
import json

fileObj = StringIO()
json.dump(["Hello", "Geeks"], fileObj)
print("Using json.dump(): "+str(fileObj.getvalue()))

class TypeEncoder(json.JSONEncoder):
    def default(self, obj):
        if isinstance(obj, type):
            return str(obj)

print("Using json.dumps(): "+str(json.dumps(type(str), cls=TypeEncoder)))
print("Using json.JSONEncoder().encode"+
    str(TypeEncoder().encode(type(list))))
print("Using json.JSONEncoder().iterencode"+
    str(list(TypeEncoder().iterencode(type(dict)))))

Output:
////////////////////////////////////////////////////
Using json.dump(): ["Hello", "Geeks"]
Using json.dumps(): ""
Using json.JSONEncoder().encode""
Using json.JSONEncoder().iterencode['""']
////////////////////////////////////////////////////
Decoding
We will be using load(), loads() and JSON.Decoder class.

#Code will run in Python 3

from io import StringIO
import json

fileObj = StringIO('["Geeks for Geeks"]')
print("Using json.load(): "+str(json.load(fileObj)))
print("Using json.loads(): "+str(json.loads('{"Geeks": 1, "for": 2, "Geeks": 3}')))
print("Using json.JSONDecoder().decode(): " +
    str(json.JSONDecoder().decode('{"Geeks": 1, "for": 2, "Geeks": 3}')))
print("Using json.JSONDecoder().raw_decode(): " +
    str(json.JSONDecoder().raw_decode('{"Geeks": 1, "for": 2, "Geeks": 3}')))

output:
////////////////////////////////////////////////////////////////////////////////////
Using json.load(): ['Geeks for Geeks']
Using json.loads(): {'for': 2, 'Geeks': 3}
Using json.JSONDecoder().decode(): {'for': 2, 'Geeks': 3}
Using json.JSONDecoder().raw_decode(): ({'for': 2, 'Geeks': 3}, 34)
///////////////////////////////////////////////////////////////////////////////////
这个也不错! 比较全面
https://realpython.com/python-json/
Encoders and Decoders
- class
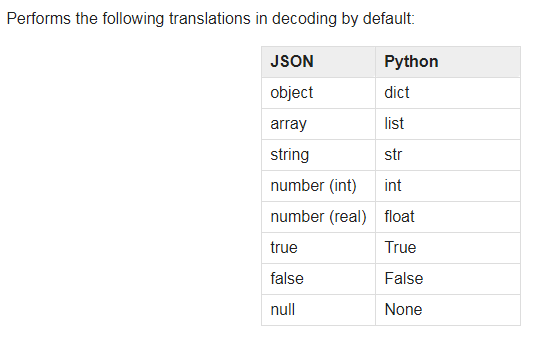
json.JSONDecoder(*, object_hook=None, parse_float=None, parse_int=None, parse_constant=None, strict=True, object_pairs_hook=None) ![]()
////////////////////////////////////////////////////////////////////////////////////////////////////////////////////////////////////////////////////////
python 与 shell 非常好.(python3以后不再支持commands)
import subprocess

p = subprocess.Popen(["echo", "hello world"], stdout=subprocess.PIPE)

print(p.communicate())

>>>('hello world', None)
https://www.pythonforbeginners.com/os/subprocess-for-system-administrators

from subprocess import Popen, PIPE
p1 = Popen(["dmesg"], stdout=PIPE)
print (p1.communicate()[0])


/////////////////////////////////////////////////////////
import subprocess
import json

cmd = '''sh ./abc.sh'''

p1 = subprocess.Popen(cmd, stdout=subprocess.PIPE)
output = p1.communicate()[0]
print(type(output))
jstr = output.decode(encoding='utf-8')
jObj = json.loads(jstr)

jstr2 = json.dumps(jObj, indent=4)
print(jstr2)
/////////////////////////////////////////////////////////////////////////////////////////////////////
python的 对象类型与序列化类型
https://realpython.com/python-json/
c = b.decode(encoding='utf-8')
type(c)
<class 'str'>
当一个print打印出来为 b'xxxxxx'的时候, 就可以decode一下, 成为string打印
////////////////////////////////////////////////////////////////////////////////////////////////////////////////////
python的判断
a==b 是值相等判断, a is b 是地址相同判断
a=None, 给a赋值None之后, a==None, a is None -->True
b=None, a==b, a is b --->True
如果直接判断 a == c , a is c就会报错
NameError: name 'c' is not defined
///////////////////////////////////////////////////////////////////////////////////////////////////////////////////////////
python中接种换行写法
第一种:
x0 = '<?xml version="1.0"?>' \
     '<ol>' \
     '  <li><a href="/python">Python</a></li>' \
     '  <li><a href="/ruby">Ruby</a></li>' \
     '</ol>'
第二种:
x1 = '<?xml version="1.0"?> \
<ol> \
    <li><a href="/python">Python</a></li> \
    <li><a href="/ruby">Ruby</a></li> \
</ol>'
第三种:
x2 = ('<?xml version="1.0"?>'
      '<ol>'
      ' <li><a href="/python">Python</a></li>'
      ' <li><a href="/ruby">Ruby</a></li>'
      '</ol>')
第四种:
x3 = '''<?xml version="1.0"?>
<ol>
    <li><a href="/python">Python</a></li>
    <li><a href="/ruby">Ruby</a></li>
</ol>'''
https://www.cnblogs.com/Jimc/p/9596482.html
////////////////////////////////////////////////////////////////////////////////////////
python执行shell脚本
抄来的
# coding=utf-8 //设置文本格式
import os //导入os方法
print('hello')
n=os.system('/home/csliyb/kjqy_xcy/bdse-tour-dp-2.1/bin/test.sh') //调用shell脚本
print '执行完毕'
下面这个有几种方式
https://www.cnblogs.com/hei-hei-hei/p/7216434.html

 浙公网安备 33010602011771号