
SpringBoot---任务管理(包括异步、定时、邮件发送)
前期准备
1、创建一个spring-web工程,在pom.xml中添加依赖
 <!--     前端模板-->
<dependency>
  <groupId>org.springframework.boot</groupId>
  <artifactId>spring-boot-starter-thymeleaf</artifactId>
</dependency>
<!--     任务调度-->
<dependency>
    <groupId>org.springframework.boot</groupId>
    <artifactId>spring-boot-starter-quartz</artifactId>
</dependency>
 <!--     邮件服务依赖启动器 -->
<dependency>
    <groupId>org.springframework.boot</groupId>
    <artifactId>spring-boot-starter-mail</artifactId>
</dependency>
<!--     生成随机数-->
<dependency>
    <groupId>net.bytebuddy</groupId>
    <artifactId>byte-buddy</artifactId>
</dependency>
2、项目结构

3、启动类中添加注解

异步任务调度
1、编写异步任务调度方法,包括有返回值和无返回值的方法(注意,类前面一定要记得写Service),本来是实现类的,这里为了简便,直接写了。
@Service
public class MyAsyncServiceImpl{

    @Async
    public void sendSMS() throws Exception{
        System.out.println("调用短信验证码业务方法。。。");
        Long startTime=System.currentTimeMillis();
        Thread.sleep(5000);
        Long endTime=System.currentTimeMillis();
        System.out.println("短信业务执行完成,耗时:"+(endTime-startTime));}

    @Async
   public Future<Integer> processA() throws Exception {
        System.out.println("开始分析统计业务A的数据。。。");
        Long startTime=System.currentTimeMillis();
        Thread.sleep(4000);
        int count=12345;
        Long endTime=System.currentTimeMillis();
        System.out.println("业务A数据统计耗时:"+(endTime-startTime));
        return new AsyncResult<>(count);}

    @Async
    public Future<Integer> processB() throws Exception {
        System.out.println("开始分析统计业务B的数据。。。");
        Long startTime=System.currentTimeMillis();
        Thread.sleep(5000);
        int count=165432;
        Long endTime=System.currentTimeMillis();
        System.out.println("业务B数据统计耗时:"+(endTime-startTime));
        return new AsyncResult<>(count);}
}
2、编写MyAsncController控制类
@RestController
public class MyAsyncController {
    @Autowired
    MyAsyncService myAsyncService;

    @GetMapping("/sendSms")
    public String sendSMS()throws Exception{
        Long startTime=System.currentTimeMillis(); //开始时间
        myAsyncService.sendSMS();
        Long endTime=System.currentTimeMillis(); //结束时间
        System.out.println("主流程耗时:"+(endTime-startTime));
        return "success"; }

    @GetMapping("/statistics")
    public String statistics() throws Exception{
        Long startTime=System.currentTimeMillis();  //开始时间
        Future<Integer> futureA=myAsyncService.processA();
        Future<Integer> futureB=myAsyncService.processB();
        int total=futureA.get()+futureB.get();
        System.out.println("异步任务数据统计汇总结果:"+total);
        Long endTime=System.currentTimeMillis();  //结束时间
        System.out.println("主流程耗时:"+(endTime-startTime));
        return "success";}
}
3、运行结果
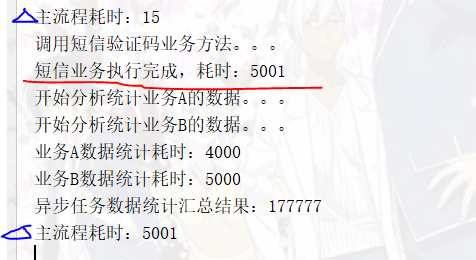
分析结果:
1、调用的短信业务无回调,主流程无需等待短信业务完成,所以主流程耗时(15秒)与短信业务耗时无关。
2、数据统计方法有回调,主流程需要等待返回值才会往下执行,还有业务A和业务B的耗时是4秒、5秒,由于他们是异步执行的(sleep),所以总耗时也就5秒左右
定时任务调度
测试fixedRate, fixedDelay, cron等三种方式的定时任务调度
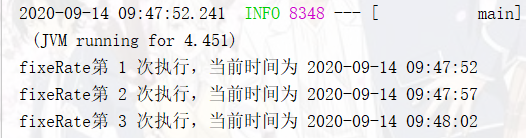
1、编写服务类,添加fixedRate的服务方法
@Service
public class ScheduledTaskServiceImpl {
    static final DateTimeFormatter dtf=DateTimeFormatter.ofPattern("yyyy-MM-dd hh:mm:ss");
    int count1=1;
    int count2=1;
    int count3=1;

    @Scheduled(fixedRate = 5000) //每5秒执行一次 ,含执行时间
    public void scheduledFixRate() {
        System.out.println(String.format("fixeRate第 %s 次执行,当前时间为 %s",count1++,dtf.format(LocalDateTime.now())));}
}
启动工程,查看控制台输出
2、添加fixedDelay的服务方法,同时将fixedRate的方法进行注释
 @Scheduled(fixedDelay = 6000)  //间隔6秒执行一次,不含执行时间
    public void scheduleTaskImmediately() throws Exception{
        System.out.println(String.format("fixeDelay第 %s 次执行,当前时间为 %s",count2++,dtf.format(LocalDateTime.now())));
        Thread.sleep(4000);
    }
启动工程,查看控制台输出

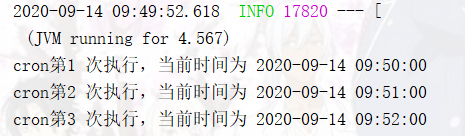
3、添加基于cron的任务调度方法,同时将fixedRate、fixedDelay的方法进行注释
@Scheduled(cron="0 * * * * *") //每分钟定时执行
    public void scheduledTaskCorn(){
        System.out.println(
                String.format("cron第%s 次执行,当前时间为 %s",count3++,dtf.format(LocalDateTime.now())) );
    }
启动工程,查看控制台输出
邮件任务
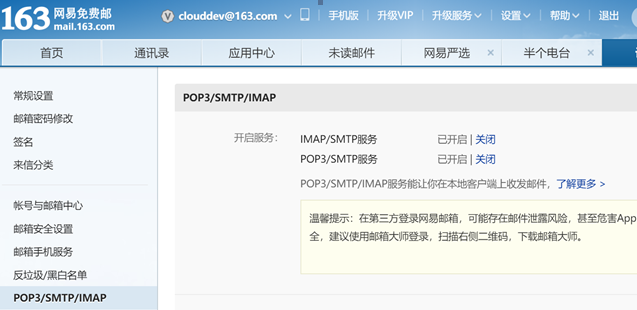
1、注册一个163或者QQ或者其他的电子邮箱账号,并开通客户端的smtp服务,同时获得注册码。
2、编写application配置文件
#邮箱服务器
spring.mail.host=smtp.163.com
#登录邮箱的账号(替换成你的邮箱账号)
spring.mail.username=*****@163.com
#这里填的是你刚才客户端授权的密码,而不是你登录邮箱的密码(替换成你的授权码)
spring.mail.password=**************
#协议
spring.mail.protocol=smtps
#邮箱服务器端口
spring.mail.port=465
#编码设置
spring.mail.default-encoding=UTF-8
spring.mail.properties.mail.smtp.auth=true
spring.mail.properties.mail.smtp.starttls.enable=true
spring.mail.properties.mail.smtp.starttls.required=true
#设置超时时间
spring.mail.properties.mail.smtp.connectiontimeout=5000
spring.mail.properties.mail.smtp.timeout=3000
spring.mail.properties.mail.smtp.writetimeout=5000
3、编写邮件发送服务类SendEmailService
@Service
public class SendEmailServiceImpl{
    @Autowired
    JavaMailSenderImpl javaMailSender;

    @Value("${spring.mail.username}")
    private String sender;

    @Async
    public void sendEmail(String receiver, String subject, String content) {
        SimpleMailMessage message=new SimpleMailMessage();
        message.setFrom(sender);
        message.setTo(receiver);
        message.setSubject(subject);
        message.setText(content);
        try{
            javaMailSender.send(message);
        }catch (MailException e){
            System.out.println("邮件发送失败");
            e.printStackTrace(); } }
}
4、编写控制器EmailController
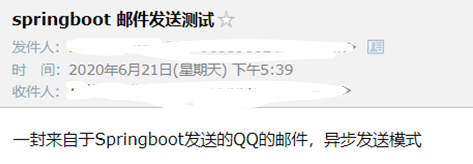
@RestController
public class EmailController {
    @Autowired
    SendEmailService sendEmailService;

    @Autowired
    TemplateEngine templateEngine;

   @GetMapping("/sendSimpleEmail")
    public String sendSimpleEmail(){
       String receiver="****@qq.com";
       String subject="springboot 邮件发送测试";
       String content="一封来自SpringBoot发送的163的邮件,异步发送模式";
       sendEmailService.sendEmail(receiver,subject,content);
       return "邮件发送成功,请检查邮箱";}
}
5、打开浏览器,访问控制器地址进行测试,并记录测试结果,同时观察控制台输出。检查目标邮箱,看是否接收到邮件。

模板的邮件发送
1、在SendEmailService中添加下面代码
   @Async
    public void sendTemplateEmail(String receiver,String subject,String content){
        MimeMessage message=javaMailSender.createMimeMessage();
        try{
            MimeMessageHelper helper=new MimeMessageHelper(message,true);
            helper.setFrom(sender);
            helper.setTo(receiver);
            helper.setSubject(subject);
            helper.setText(content,true);
            javaMailSender.send(message);
            System.out.println("邮件发送成功");
        }catch (Exception e){
            System.out.println("邮件发送失败");
            e.printStackTrace();
        }
    }
2、emailTemplate.html文件
<!DOCTYPE html>
<html lang="en" xmlns:th="http://www.thymeleaf.org">
<head>
    <meta charset="UTF-8">
    <title>用户校验码</title>
</head>
<body>
<div><span th:text="${username}">***</span> 女士/先生,您好
</div>
<p style="text-indent: 2em">你的用户验证码为:<span th:text="${code}" style="color: aqua;">
</span>请妥善保管,不要泄露给其他人. </p>
</body>
</html>
3、在EmailController中添加下面方法
@GetMapping("/sendEmail")
    public String sendEmailByTemplate(){
       String receiver="*****@qq.com";
       String subject="模板邮件的发送";
       //使用模板邮件定制邮件正文内容
        Context context=new Context();
        String code= RandomString.make(5);

        context.setVariable("username","***");
        context.setVariable("code",code);
        //使用TemplateEngine设置要处理的模板页面
        String emailContent=templateEngine.process("emailTemplate",context);
        //发送模板邮件
        sendEmailService.sendTemplateEmail(receiver,subject,emailContent);
        return "邮件发送成功,校验码为:"+code;
    }
4、打开浏览器,访问控制器地址进行测试,并记录测试结果,同时观察控制台输出。检查目标邮箱,看是否接收到邮件。

<dependency>

 浙公网安备 33010602011771号