Spring5-7
熟悉spring:
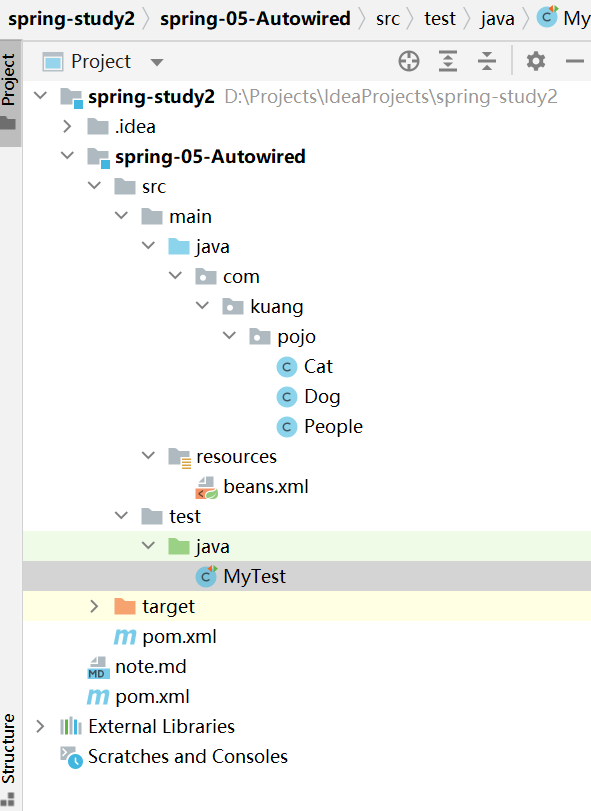
项目结构如下:
spring-study2的pom.xml文件中添加以下依赖:
<!-- https://mvnrepository.com/artifact/org.springframework/spring-webmvc -->
<dependency>
    <groupId>org.springframework</groupId>
    <artifactId>spring-webmvc</artifactId>
    <version>5.3.17</version>
</dependency>

<!-- https://mvnrepository.com/artifact/junit/junit -->
<dependency>
    <groupId>junit</groupId>
    <artifactId>junit</artifactId>
    <version>4.13.1</version>
    <scope>test</scope>
</dependency>
Cat类如下:
package com.kuang.pojo;

public class Cat {
    public void shout(){
        System.out.println("miao~");
    }
}
Dog类如下:
package com.kuang.pojo;

public class Dog {
    public void shout(){
        System.out.println("wang~");
    }
}
People类如下:
package com.kuang.pojo;

public class People {
    private Cat cat;
    private Dog dog;
    private String name;

    public Cat getCat() {
        return cat;
    }

    public Dog getDog() {
        return dog;
    }

    public String getName() {
        return name;
    }

    public void setCat(Cat cat) {
        this.cat = cat;
    }

    public void setDog(Dog dog) {
        this.dog = dog;
    }

    public void setName(String name) {
        this.name = name;
    }

    @Override
    public String toString() {
        return "People{" +
                "cat=" + cat +
                ", dog=" + dog +
                ", name='" + name + '\'' +
                '}';
    }
}
MyTest类如下:
import com.kuang.pojo.People;
import org.junit.Test;
import org.springframework.context.ApplicationContext;
import org.springframework.context.support.ClassPathXmlApplicationContext;

public class MyTest {
    @Test
    public void test1(){
        ApplicationContext context = new ClassPathXmlApplicationContext("beans.xml");

        People people = context.getBean("people",People.class);
        people.getCat().shout();
        people.getDog().shout();
    }
}
beans.xml添加如下:
<bean id="dog" class="com.kuang.pojo.Dog"/>
<bean id="cat" class="com.kuang.pojo.Cat"/>

<bean id="people" class="com.kuang.pojo.People">
    <property name="name" value="陆迁加油呀~"/>
    <property name="cat" ref="cat"/>
    <property name="dog" ref="dog"/>
</bean>
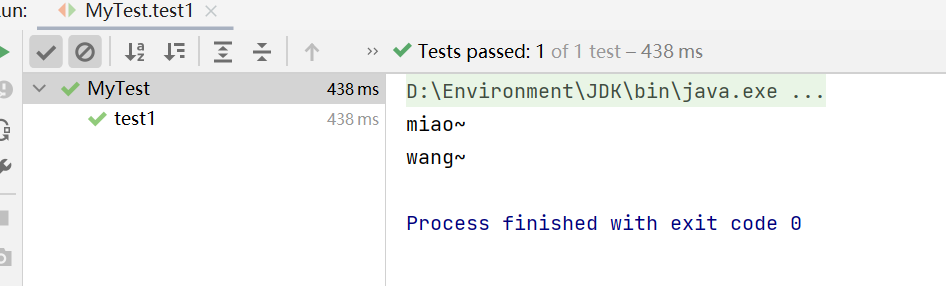
之后可以运行MyTest!
输出如下:
使用注解自动装配:
1.导入约束:context约束
2.配置注解的支持:context:annotation-config【重要!】
<?xml version="1.0" encoding="UTF-8"?>
<beans xmlns="http://www.springframework.org/schema/beans"
       xmlns:xsi="http://www.w3.org/2001/XMLSchema-instance"
       xmlns:context="http://www.springframework.org/schema/context"
       xsi:schemaLocation="http://www.springframework.org/schema/beans
            http://www.springframework.org/schema/beans/spring-beans.xsd
            http://www.springframework.org/schema/context
            http://www.springframework.org/schema/context/spring-context.xsd">

    <!--开启注解的支持-->
    <context:annotation-config/>

    <bean id="cat" class="com.kuang.pojo.Cat"/>
    <bean id="dog" class="com.kuang.pojo.Dog"/>
    <bean id="people" class="com.kuang.pojo.People"/>

</beans>
在People类做添加@Autowired,也可以删掉此类中的set方法:

@Autowired
使用Autowired我们可以不用编写set方法,前提是你这个自动装配的属性在IOC(Spring)容器中存在,且符合byType!
注解说明
- @Autowired:自动装配通过类型。名字
- 如果Autowired不能唯一自动装配上属性,则需要通过@Qualifier(value="xxx")
- @Nullable:字段标记了这个注解,说明这个字段可以为null
- @Resource:自动装配通过名字。类型

 浙公网安备 33010602011771号