logstash日志收集之json格式 & 日志参数分离
ELK日志收集分离篇
一、Logstash收集日志
1.Logstash的配置文件
[root@web01 ~]# vim /etc/logstash/logstash.yml
path.config: /etc/logstash/conf.d
2.logstash收集日志文件到文件
[root@web01 ~]# vim /etc/logstash/conf.d/file_file.conf
input {
  file {
    path => "/var/log/messages"
    start_position => "beginning"
  }
}
output {
  file {
    path => "/tmp/messages_%{+YYYY-MM-dd}.log"
  }
}
3.logstash收集日志文件到ES
[root@web01 ~]# vim /etc/logstash/conf.d/file_es.conf
input {
  file {
    path => "/var/log/messages"
    start_position => "beginning"
  }
}
output {
  elasticsearch {
    hosts => ["172.16.1.51:9200"]
    index => "messages_%{+YYYY-MM-dd}.log"
  }
}
4.Logstash收集多日志到文件
[root@web01 ~]# vim /etc/logstash/conf.d/file_file.conf
input {
  file {
    type => "messages_log"
    path => "/var/log/messages"
    start_position => "beginning"
  }
  file {
    type => "secure_log"
    path => "/var/log/secure"
    start_position => "beginn	ing"
  }
}
output {
  if [type] == "messages_log" {
    file {
      path => "/tmp/messages_%{+YYYY-MM-dd}"
    }
  }
  if [type] == "secure_log" {
    file {
      path => "/tmp/secure_%{+YYYY-MM-dd}"
    }
  }
}
5.Logstash收集多日志到ES
1)方法一:
[root@web01 ~]# vim /etc/logstash/conf.d/more_es.conf
input {
  file {
    type => "messages_log"
    path => "/var/log/messages"
    start_position => "beginning"
  }
  file {
    type => "secure_log"
    path => "/var/log/secure"
    start_position => "beginning"
  }
}
output {
  if [type] == "messages_log" {
    elasticsearch {
      hosts => ["10.0.0.51:9200"]
      index => "messages_%{+YYYY-MM-dd}"
    }
  }
  if [type] == "secure_log" {
    elasticsearch {
      hosts => ["10.0.0.51:9200"]
      index => "secure_%{+YYYY-MM-dd}"
    }
  }
}

[root@web01 ~]# /usr/share/logstash/bin/logstash -f /etc/logstash/conf.d/more_es.conf &

#启动后查看页面
2)方法二:
[root@web01 ~]# vim /etc/logstash/conf.d/more_es_2.conf
input {
  file {
    type => "messages_log"
    path => "/var/log/messages"
    start_position => "beginning"
  }
  file {
    type => "secure_log"
    path => "/var/log/secure"
    start_position => "beginning"
  }
}
output {
  elasticsearch {
    hosts => ["10.0.0.51:9200"]
    index => "%{type}_%{+YYYY-MM-dd}"
  }
}

# 这里两个同时运行,所以需要指定数据目录
[root@web01 ~]# /usr/share/logstash/bin/logstash -f /etc/logstash/conf.d/more_es_2.conf --path.data=/data/logstash/more_es_2 &
3)启动多实例
#创建不同的数据目录
[root@web01 ~]# mkdir /data/logstash/more_es_2
[root@web01 ~]# mkdir /data/logstash/more_es

#启动时使用--path.data指定数据目录
[root@web01 ~]# /usr/share/logstash/bin/logstash -f /etc/logstash/conf.d/more_es.conf --path.data=/data/logstash/more_es &
[root@web01 ~]# /usr/share/logstash/bin/logstash -f /etc/logstash/conf.d/more_es_2.conf --path.data=/data/logstash/more_es_2 &

#如果资源充足,可以使用多实例收集多日志,如果服务器资源不足,启动不了多实例,配置一个文件收集多日志启动
二、Tomcat日志收集
1.普通收集
0> 说明
# 在一般情况中,收集的日志不应该是local_access_log日志,因为这是一个访问日志,在一般架构中,
tomcat前端应该有nginx或者其他代理服务,那么对于访问日志,直接在代理服务器中收集即可,在tomcat中收集的日志应该为catalina.XXXX-XX-XX.log日志,此日志文件为服务启动文件。
1>.logstash收集Tomcat日志到文件
[root@web01 ~]# vim /etc/logstash/conf.d/tomcat_file.conf
input {
  file {
    path => "/usr/local/tomcat/logs/localhost_access_log.*.txt"
    start_position => "beginning"
  }
}
output {
  file {
    path => "/tmp/tomcat_%{+YYYY-MM-dd}.log"
  }
}
2>.logstash收集Tomcat日志到ES
[root@web01 ~]# vim /etc/logstash/conf.d/tomcat_es.conf
input {
  file {
    path => "/usr/local/tomcat/logs/localhost_access_log.*.txt"
    start_position => "beginning"
  }
}
output {
  elasticsearch {
    hosts => ["10.0.0.51:9200"]
    index => "tomcat_%{+YYYY-MM-dd}.log"
  }
}
2.收集日志并修改为json格式
0>.说明
#收集tomcat日志,当遇到报错时,一条报错会被分割成很多条数据,不方便查看,所以需要将原本格式改为json格式,
然后再使用input插件下的mutiline模块,或者直接使用mutiline模块,也就是方法二的方式。

解决方法:
1.修改tomcat日志格式为json
	1)开发修改输出日志为json
	2)修改tomcat配置,日志格式为json
2.使用logstash的input插件下的mutiline模块
3.使用filebeat模块,修改日志格式

# 这里展示1.2和2中的方式,通过修改tomcat配置文件和直接使用模块两种方式
1>.方法一:修改tomcat的日志格式
① 修改tomcat配置文件日志格式
# tomcat的主配置文件中最下面的一段就是日志格式
[root@web01 ~]# vim /usr/local/tomcat/conf/server.xml
#把原来的日志格式注释,添加我们的格式
<Valve className="org.apache.catalina.valves.AccessLogValve" directory="logs"
prefix="tomcat_access_json" suffix=".log"
pattern="{"clientip":"%h","ClientUser":"%l","authenticated":"%u","AccessTime":"%t","method":"%r","status":"%s","SendBytes":"%b","Query?string":"%q","partner":"%{Referer}i","AgentVersion":"%{User-Agent}i"}"/>
② 重启tomcat
[root@web01 ~]# /usr/local/tomcat/bin/shutdown.sh
[root@web01 ~]# /usr/local/tomcat/bin/startup.sh
③ 启动logstash
[root@web01 ~]# vim /etc/logstash/conf.d/tomcat_json_es.conf
input {
  file {
    path => "/usr/local/tomcat/logs/tomcat_access_json.*.log"
    start_position => "beginning"
  }
}
output {
  elasticsearch {
    hosts => ["10.0.0.51:9200"]
    index => "tomcat_json_%{+YYYY-MM-dd}.log"
  }
}
2> 方法二:使用mutiline模块实现错误日志收集
①说明
# 此方式可在不修改tomcat主配置文件中的日志格式下操作,直接使用模块会将输出结果以json格式输出
② 收集日志以json格式输出到屏幕
[root@web01 ~]# vim /etc/logstash/conf.d/test_mutiline.conf
input {
  stdin {
  	  # 调用匹配合并模块
    codec => multiline {
	  # 遇到以 [ 开头的开始合并
      pattern => "^\["
      #匹配到上面指定的字符进行合并,如果是false则匹配到进行合并
      negate => true
      #向上合并,向下合并是next
      what => "previous"
    }
  }
}
output {
  stdout {
    codec => json
  }
}

#测试,输入内容不会直接输出,当遇到以 [ 开头才会收集以上的日志
③ 收集日志以json格式输出到ES
# 因为在tomcat的错误日志中是以 [ 开头,所以可以根据模块的匹配规则。
[root@web01 ~]# vim /etc/logstash/conf.d/tomcat_mutiline.conf
input {
  file {
    path => "/usr/local/tomcat/logs/tomcat_access_json.*.log"
    start_position => "beginning"
    codec => multiline {
      pattern => "^\["
      negate => true
      what => "previous"
    }
  }
}

output {
  elasticsearch {
    hosts => ["10.0.0.51:9200"]
    index => "tomcat_json_%{+YYYY-MM-dd}"
    codec => "json"
  }
}
④ 模拟将错误日志写入
[root@web01 ~]# cat 1.txt >> /usr/local/tomcat/logs/tomcat_access_json.2020-08-14.log

# 最后网页查看结果,错误日志没有像以往一样分隔成多条数据,而是成块显示
三、nginx日志收集
1.普通收集
# 将日志文件输出到es中
[root@web01 ~]# vim /etc/logstash/conf.d/nginx_json.conf
input {
  file {
    path => "/var/log/nginx/access.log"
    start_position => "beginning"
  }
}
output {
  elasticsearch {
    hosts => ["10.0.0.51:9200"]
    index => "nginx_json_%{+YYYY-MM-dd}.log"
  }
}
2.日志修改json格式
1.# 将原本的日志格式删除,使用这种方式会将输出日志以json格式显示。
[root@web01 ~]# vim /etc/nginx/nginx.conf
... ...
http {
log_format json '{"@timestamp":"$time_iso8601",'
'"host":"$server_addr",'
'"clientip":"$remote_addr",'
'"size":$body_bytes_sent,'
'"responsetime":$request_time,'
'"upstreamtime":"$upstream_response_time",'
'"upstreamhost":"$upstream_addr",'
'"http_host":"$host",'
'"url":"$uri",'
'"referer":"$http_referer",'
'"agent":"$http_user_agent",'
'"status":"$status"}';
access_log /var/log/nginx/access.log json;
.............
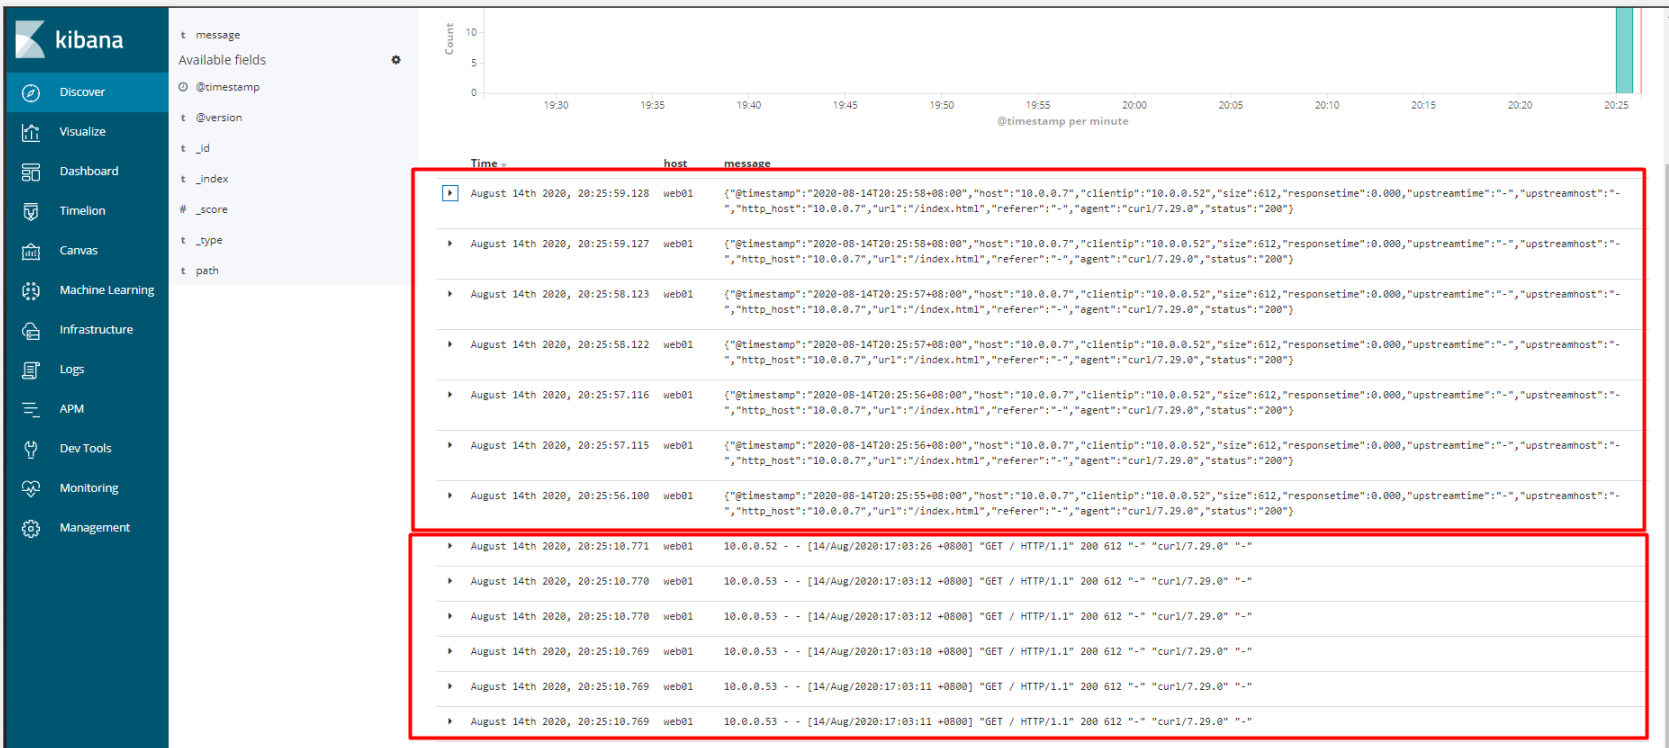
2.#实验将日志文件再次输出到es中,查看结果(图一)
- 这里发现出现两种数据格式,最上面为json键值对格式,下面为旧的默认格式
四、日志参数分离
1.说明
# 需要配合json一起使用,当数据转换成json后,message里面存放为键值对形式,然后将键值对中的每个键值进行拆分。
方法一:
1.修改tomcat日志收集配置
[root@web01 ~]# vim /etc/logstash/conf.d/tomcat_json_es.conf
input {
  file {
    path => "/usr/local/tomcat/logs/tomcat_access_json.*.log"
    start_position => "beginning"
  }
}

#把收集到的数据进行处理
filter {
  json {
    source => "message"		# 将message中的键值对进行拆分
  }
}

output {
  elasticsearch {
    hosts => ["10.0.0.51:9200"]
    index => "tomcat_json_%{+YYYY-MM-dd}.log"
  }
}
2.去掉多余数据
#message数据已经拆分,但是原本message中数据还在,去掉老的message数据,只留新拆分数据
filter {
  json {
    source => "message"
    remove_field => ["message"]
  }
}
方法二:
#nginx不需要配置修改获取日志,只需要收集同时修改格式即可(前提是这个日志文件已经是json格式了)
[root@web01 ~]# vim /etc/logstash/conf.d/nginx_json.conf
input {
file {
path => "/var/log/nginx/access.log"
start_position => "beginning"
codec => "json"
}
}
output {
elasticsearch {
hosts => ["10.0.0.51:9200"]
index => "nginx_json_%{+YYYY-MM-dd}.log"
}
}
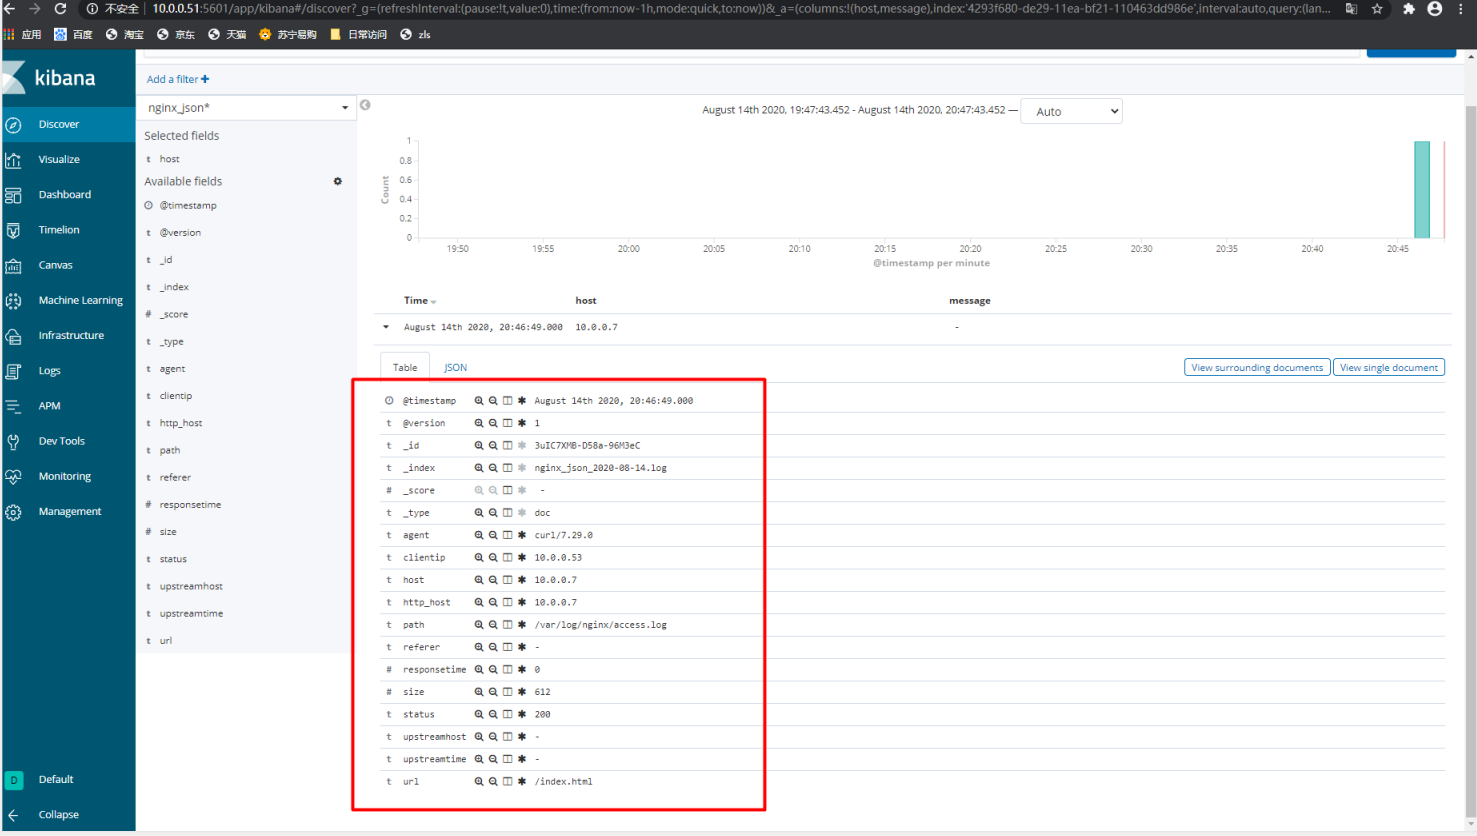
# 网页格式查看(图二)
- 图二(都进行了拆分)

 浙公网安备 33010602011771号