四层负载介绍
# 什么叫做四层负载
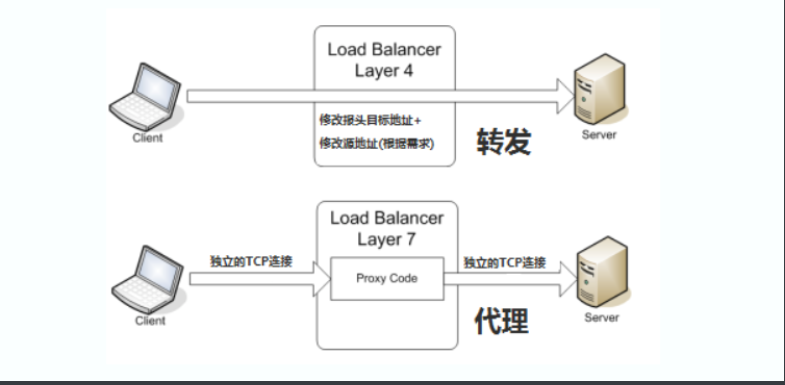
四层负载均衡是基于传输层协议包来封装的(如:TCP/IP),基于ip和端口进行转发,对外可对内部服务器端口隐藏,如用户访问可能是80端口,但服务器内部可能已经将端口做了映射。七层负载则是指的应用层,他的组装在四层的基础之上,无论四层还是七层都是指的OSI网络模型。
# 四层与七层应用场景
1、四层+七层来做负载均衡,四层可以保证七层的负载均衡的高可用性;如:nginx就无法保证自己的服务高可用,需要依赖LVS或者keepalive。
2、如:tcp协议的负载均衡,有些请求是TCP协议的(mysql、ssh),或者说这些请求只需要使用四层进行端口的转发就可以了,所以使用四层负载均衡。
# 四层负载总结
1、四层负载均衡仅能转发TCP/IP协议、UDP协议、通常用来转发端口,如:tcp/22、udp/53;
2、四层负载均衡可以用来解决七层负载均衡端口限制问题;(七层负载均衡最大使用65535个端口号)
3、四层负载均衡可以解决七层负载均衡高可用问题;(多台后端七层负载均衡能同事的使用)
4、四层的转发效率比七层的高得多,但仅支持tcp/ip协议,不支持http和https协议;
5、通常大并发场景通常会选择使用在七层负载前面增加四层负载均衡。(所以适用于大公司使用)
实验一:
实验要求
# 要求
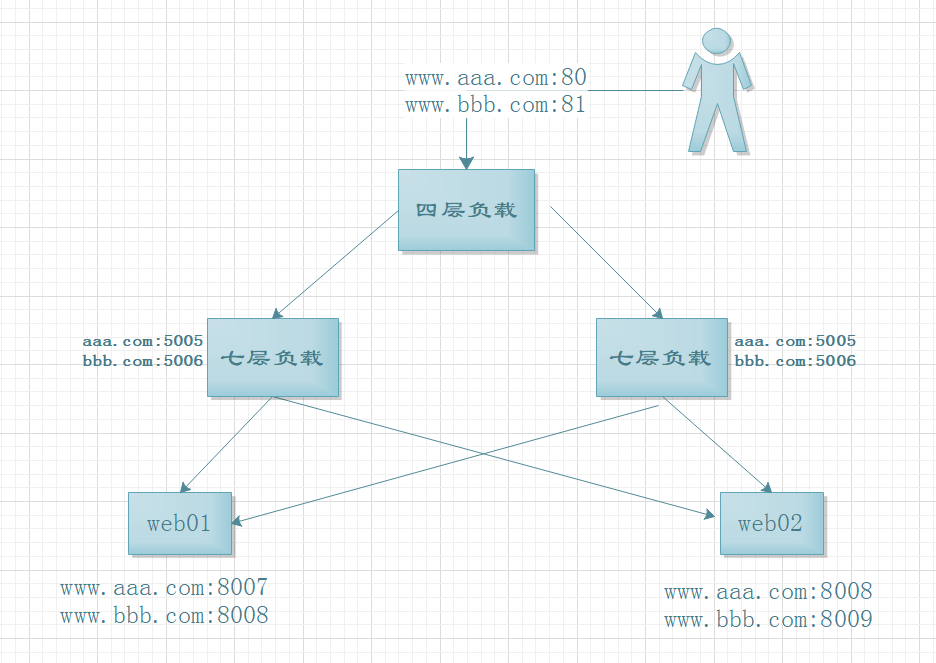
如图一,主要实现七层负载高可用,线路双选择,并且在七层和web中实现端口映射。用户访问80端口,经过四层转发更改端口,再经过七层代理映射端口,使端口做到多次映射
# 为什么要有此需求
· 端口映射保证其安全性
· 四层负载处于OSI七层模型的传输层,和七层负载处于OSI七层模型的应用层相比,速度快
环境准备
| 主机名 |
内网ip |
外网ip |
角色 |
| web01 |
10.0.0.7 |
172.16.1.7 |
web服务器 |
| web02 |
10.0.0.8 |
172.16.1.8 |
web服务器 |
| lb01 |
10.0.0.5 |
172.16.1.5 |
nginx七层负载 |
| lb02 |
10.0.0.6 |
172.16.1.6 |
nginx七层负载 |
| web03 |
10.0.0.9 |
172.16.1.9 |
nginx四层负载 |
操作流程
1.web02和web02服务安装及配置
# 1.web01和web02安装nginx
[root@web01 ~]# yum install -y nginx
[root@web02 ~]# yum install -y nginx
# 2.书写配置文件(web01)
[root@web01 conf.d]# cat www.aaa.com.conf
server {
listen 8007;
server_name www.aaa.com;
root /code/aaa;
index index.html;
}
[root@web01 conf.d]# cat www.bbb.com.conf
server {
listen 8008;
server_name www.bbb.com;
root /code/bbb;
index index.html;
}
# 3.书写web02配置文件
[root@web02 conf.d]# vim www.aaa.com.conf
server {
listen 8008;
server_name www.aaa.com;
root /code/aaa;
index index.html;
}
[root@web02 conf.d]# vim www.bbb.com.conf
server {
listen 8009;
server_name www.bbb.com;
root /code/bbb;
index index.html;
}
# 4.根据配置文件创建对应目录
[root@web01 conf.d]# mkdir /code/aaa -p
[root@web01 conf.d]# mkdir /code/bbb -p
[root@web02 conf.d]# mkdir /code/aaa -p
[root@web02 conf.d]# mkdir /code/bbb -p
# 5.添加index页面
[root@web01 bbb]# echo bbb > /code/bbb/index.html
[root@web01 bbb]# echo aaa > /code/aaa/index.html
[root@web02 bbb]# echo bbb > /code/bbb/index.html
[root@web02 bbb]# echo aaa > /code/aaa/index.html
# 6.启动服务
[root@web01 bbb]# systemctl start nginx
[root@web02 bbb]# systemctl start nginx
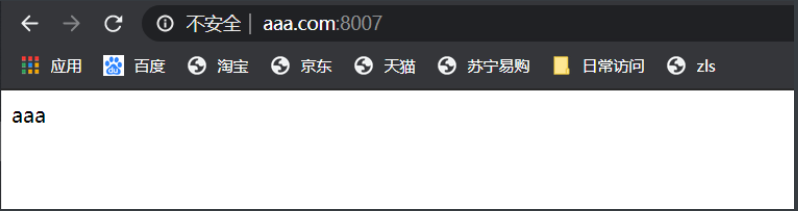
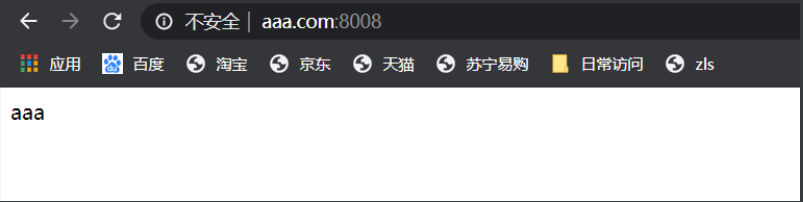
# 7.页面结果测试(图一、图二)
访问:
http://www.aaa.com:8007/
http://www.aaa.com:8008/
2.lb01和lb02负载配置
# 1.lb01和lb02安装nginx
[root@lb01 ~]# yum install -y nginx
[root@lb02 ~]# yum install -y nginx
# 2.书写负载配置文件
[root@lb01 conf.d]# cat www.aaa.com.conf # 代理到www.aaa.com的配置文件
upstream aaa {
server 172.16.1.7:8007;
server 172.16.1.8:8008;
}
server {
listen 5005;
server_name www.aaa.com;
location / {
proxy_pass http://aaa;
include proxy_params;
}
}
[root@lb01 conf.d]# cat www.bbb.com.conf # 代理到www.bbb.com的配置文件
upstream bbb {
server 172.16.1.7:8008;
server 172.16.1.8:8009;
}9
server {
listen 5006;
server_name www.bbb.com;
location / {
proxy_pass http://bbb;
include proxy_params;
}
}
# 3.书写优化文件
[root@lb01 nginx]# cat proxy_params
proxy_set_header Host $http_host;
proxy_set_header X-Forwarded-For $proxy_add_x_forwarded_for;
proxy_connect_timeout 30;
proxy_send_timeout 60;
proxy_read_timeout 60;
proxy_buffering on;
proxy_buffer_size 32k;
proxy_buffers 4 128k;
proxy_next_upstream error timeout http_500 http_502 http_503 http_504;
# 4.将配置文件和优化文件scp到lb02中
[root@lb01 nginx]# scp /etc/nginx/conf.d/www.aaa.com.conf root@10.0.0.6:/etc/nginx/conf.d/
[root@lb01 nginx]# scp /etc/nginx/conf.d/www.bbb.com.conf root@10.0.0.6:/etc/nginx/conf.d/
[root@lb01 nginx]# scp /etc/nginx/proxy_params root@10.0.0.6:/etc/nginx/
# 5.检测配置文件并启动服务
[root@lb01 nginx]# nginx -t
nginx: the configuration file /etc/nginx/nginx.conf syntax is ok
nginx: configuration file /etc/nginx/nginx.conf test is successful
[root@lb01 nginx]# systemctl start nginx
[root@lb02 nginx]# systemctl start nginx
# 6.浏览器连接负载测试是否可以连接后端web
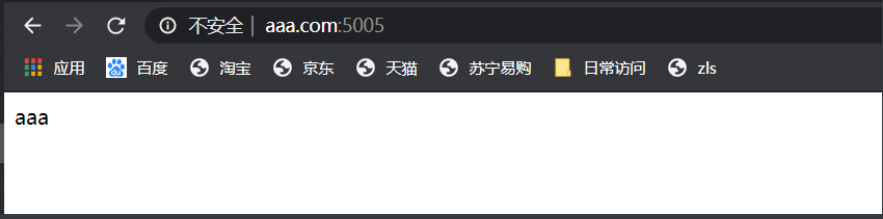
http://www.aaa.com:5005/ (如图一)
http://www.bbb.com:5006/ (如图三)

3.nginx四层负载配置
# 1.安装nginx (nginx1.9.0版本之前,没有四层负载均衡功能)
[root@web03 ~]# yum install -y nginx
# 2.检查安装模块是否带有--with-stream,否则不支持四层负载功能
[root@web03 ~]# nginx -V
nginx version: nginx/1.16.1
built by gcc 4.8.5 20150623 (Red Hat 4.8.5-39) (GCC)
built with OpenSSL 1.0.2k-fips 26 Jan 2017
TLS SNI support enabled
configure arguments: --prefix=/usr/share/nginx --sbin-path=/usr/sbin/nginx --modules-path=/usr/lib64/nginx/modules --conf-path=/etc/nginx/nginx.conf --error-log-path=/var/log/nginx/error.log --http-log-path=/var/log/nginx/access.log --http-client-body-temp-path=/var/lib/nginx/tmp/client_body --http-proxy-temp-path=/var/lib/nginx/tmp/proxy --http-fastcgi-temp-path=/var/lib/nginx/tmp/fastcgi --http-uwsgi-temp-path=/var/lib/nginx/tmp/uwsgi --http-scgi-temp-path=/var/lib/nginx/tmp/scgi --pid-path=/run/nginx.pid --lock-path=/run/lock/subsys/nginx --user=nginx --group=nginx --with-file-aio --with-ipv6 --with-http_ssl_module --with-http_v2_module --with-http_realip_module --with-stream_ssl_preread_module --with-http_addition_module --with-http_xslt_module=dynamic --with-http_image_filter_module=dynamic --with-http_sub_module --with-http_dav_module --with-http_flv_module --with-http_mp4_module --with-http_gunzip_module --with-http_gzip_static_module --with-http_random_index_module --with-http_secure_link_module --with-http_degradation_module --with-http_slice_module --with-http_stub_status_module --with-http_perl_module=dynamic --with-http_auth_request_module --with-mail=dynamic --with-mail_ssl_module --with-pcre --with-pcre-jit --with-stream=dynamic --with-stream_ssl_module --with-google_perftools_module --with-debug --with-cc-opt='-O2 -g -pipe -Wall -Wp,-D_FORTIFY_SOURCE=2 -fexceptions -fstack-protector-strong --param=ssp-buffer-size=4 -grecord-gcc-switches -specs=/usr/lib/rpm/redhat/redhat-hardened-cc1 -m64 -mtune=generic' --with-ld-opt='-Wl,-z,relro -specs=/usr/lib/rpm/redhat/redhat-hardened-ld -Wl,-E'
# 3.书写配置文件(stream模块必须在http层之上编写,所以另外在其他地方编写配置,必须将include包含写到主配置文件的http层之上)
[root@web03 nginx]# vim nginx.conf # 修改主配置文件,删除sever层内容,防止和新增文件产生冲突
user nginx;
worker_processes auto;
error_log /var/log/nginx/error.log;
pid /run/nginx.pid;
include /usr/share/nginx/modules/*.conf;
include /etc/nginx/conf.c/*.conf; # 写入此行内容,将配置文件写入此目录中,注意:http层上方写入
events {
worker_connections 1024;
}
http {
log_format main '$remote_addr - $remote_user [$time_local] "$request" '
'$status $body_bytes_sent "$http_referer" '
'"$http_user_agent" "$http_x_forwarded_for"';
access_log /var/log/nginx/access.log main;
sendfile on;
tcp_nopush on;
tcp_nodelay on;
keepalive_timeout 65;
types_hash_max_size 2048;
include /etc/nginx/mime.types;
default_type application/octet-stream;
include /etc/nginx/conf.d/*.conf;
}
# 4.编写配置文件(四层负载均衡没有access日志,因为在nginx.conf的配置文件中,access的日志格式配置在http下的,而四层负载配置在http以外的)
[root@web03 conf.c]# vim /etc/nginx/conf.c/lb_lb.conf
stream {
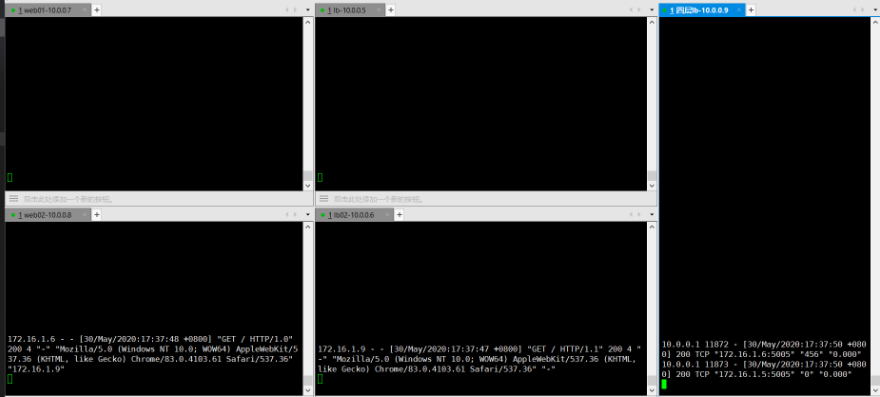
log_format proxy '$remote_addr $remote_port - [$time_local] $status $protocol '
'"$upstream_addr" "$upstream_bytes_sent" "$upstream_connect_time"' ;
access_log /var/log/nginx/proxy.log proxy;
upstream aaa { # 访问aaa即转发到后端两台web中,指定后端使用端口
server 172.16.1.5:5005 weight=5 max_fails=3 fail_timeout=30s;
server 172.16.1.6:5005 weight=5 max_fails=3 fail_timeout=30s;
}
upstream bbb { # 访问bbb即转发到后端两台web中,指定后端使用端口
server 172.16.1.6:5006 weight=5 max_fails=3 fail_timeout=30s;
server 172.16.1.5:5006 weight=5 max_fails=3 fail_timeout=30s;
}
server { # 注意:不能和七层代理一样,直接写域名,因四层不支持,所以需要写端口
listen 80;
proxy_connect_timeout 3s;
proxy_timeout 3s;
proxy_pass aaa; # 引用upstream中名为aaa组中后端web
}
server { # 注意:不能和七层代理一样,直接写域名,因四层不支持,所以需要写端口
listen 81;
proxy_connect_timeout 3s;
proxy_timeout 3s;
proxy_pass bbb; # 引用upstream中名为bbb组中后端web
}
}
# 5.检测配置文件,并启动服务
[root@web03 conf.c]# nginx -t
nginx: the configuration file /etc/nginx/nginx.conf syntax is ok
nginx: configuration file /etc/nginx/nginx.conf test is successful
[root@web03 conf.c]# systemctl start nginx
# 6.浏览器页面测试
访问:
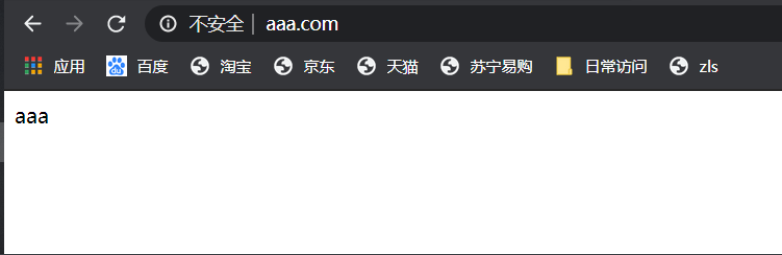
http://www.aaa.com/
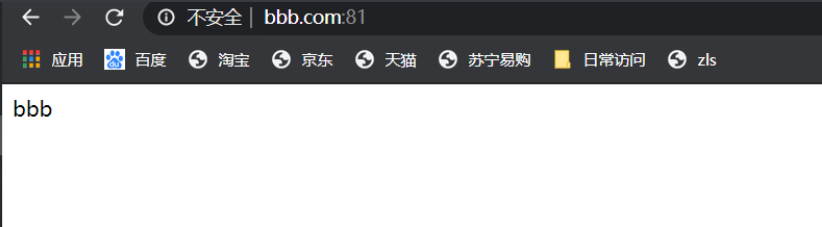
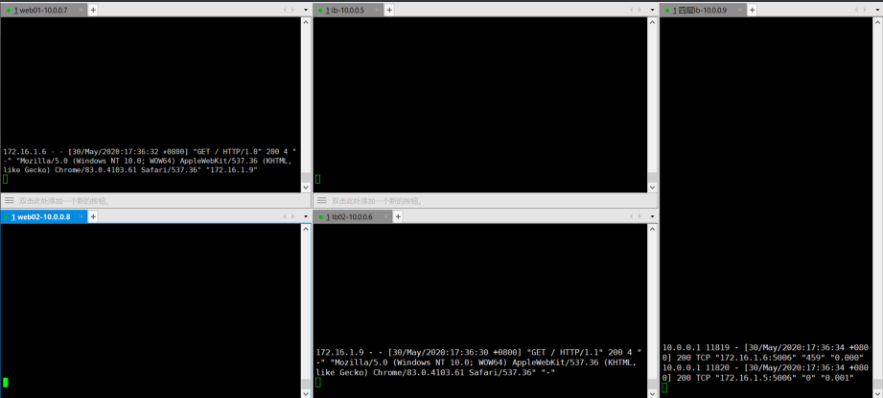
http://www.bbb.com:81/
# 7.查看日志文件