nginx相关文件及配置文件详解
目录
nginx介绍
nginx简述
Nginx是一个开源且高性能、可靠的Http Web服务、代理服务。

开源: 直接获取源代码

高性能: 支持海量并发

可靠: 服务稳定

# 动态服务器(调用动态请求,调用数据库)
tomcat
resin
php
weblogic
jboss

# 静态服务器(没有办法直接连接数据库)
nginx
apache
iis
lighttpd
tengine
openresty-nginx
nginx和Apache区别
# 1.模型不一致
- nginx采用Epool网络模型,Apache采用Select模型
Epool:当用户发起请求,epool模型会直接进行处理,效率高效,并无连接限制
Select:当用户发起一次请求,select模型就会进行一次遍历扫描,从而导致性能低下。
- select:每当用户发起一次请求,select模型就会进行一次遍历扫描,从而导致性能低下
- Epool:每当用户发起请求,epool模型会直接进行处理,效率高效,并无连接限制

# 2.nginx的优点
- 轻量级,同样起web服务,比apache占用很少的资源
- 行并发,nginx处理请求是异步非阻塞,而apache则是非阻塞型,在高并发下nginx能保持低资源低消耗高性能
- 高度模块化的设计,编写模块相对简单,功能模块少
- 社区活跃,各种高性能模块出品迅速
- 代码模块化(易读,便于二次开发,对于开发人员非常友好)
- 互联网公司选择使用nginx
- 适合主流架构趋势,微服务,云架构,中间层
- 统一技术栈,降低维护成本,降低技术跟新成本

# 3.apache相对nginx的优点
- rewrite,比nginx的rewrite强大
- 模块超多,基本想到的都可以找到
- 少bug,nginx的bug相对较多
- 超稳定

# 4. 存在理由
一般来说,需要性能的web服务,用nginx,如果不需要性能只求稳定,那就用apache,后者的各种功能模块实现得比前者强,例如ssl的模块就比前者好,可配置项多。这里需要注意一点,epoll(freebsd上都是kqueue)网络IO模型是nginx处理性能高的根本理由,但并不是所有情况下epoll大获全胜,如果本身提供静态服务的就只有几个寥寥几个文件,apache的select模型或许比epoll更高性能,当然,这只是根据网络io模型的原理作的假设,真正的应用还需要实测了再说的。
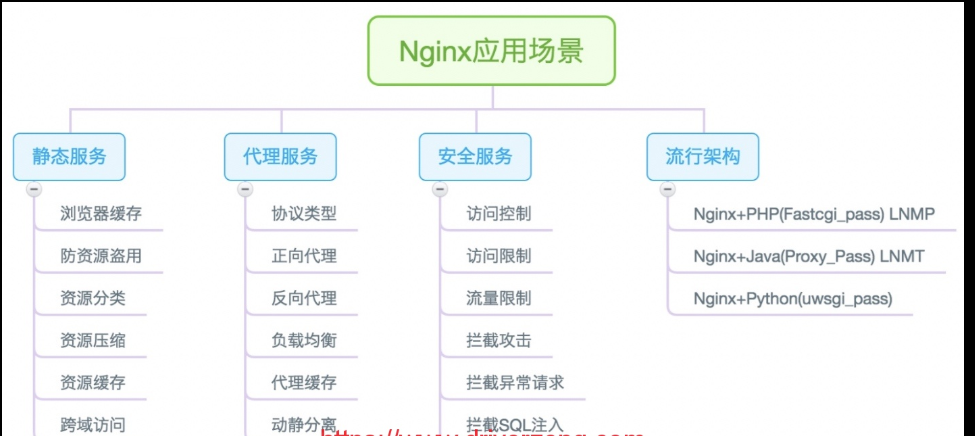
nginx典型应用场景
nginx安装及参数
# nginx的安装方式
- 编译 (1.版本随意 2.安装复杂 3.升级繁琐 4.规范 5.便于管理)
- epel仓库 (1.版本较低 2.安装简单 3.配置不易读)
- 官方仓库 (1.版本较新 2.安装简单 3.配置易读)
# 所需依赖
[root@web ~]# yum install -y gcc gcc-c++ autoconf pcre pcre-devel make automake wget httpd-tools vim tree
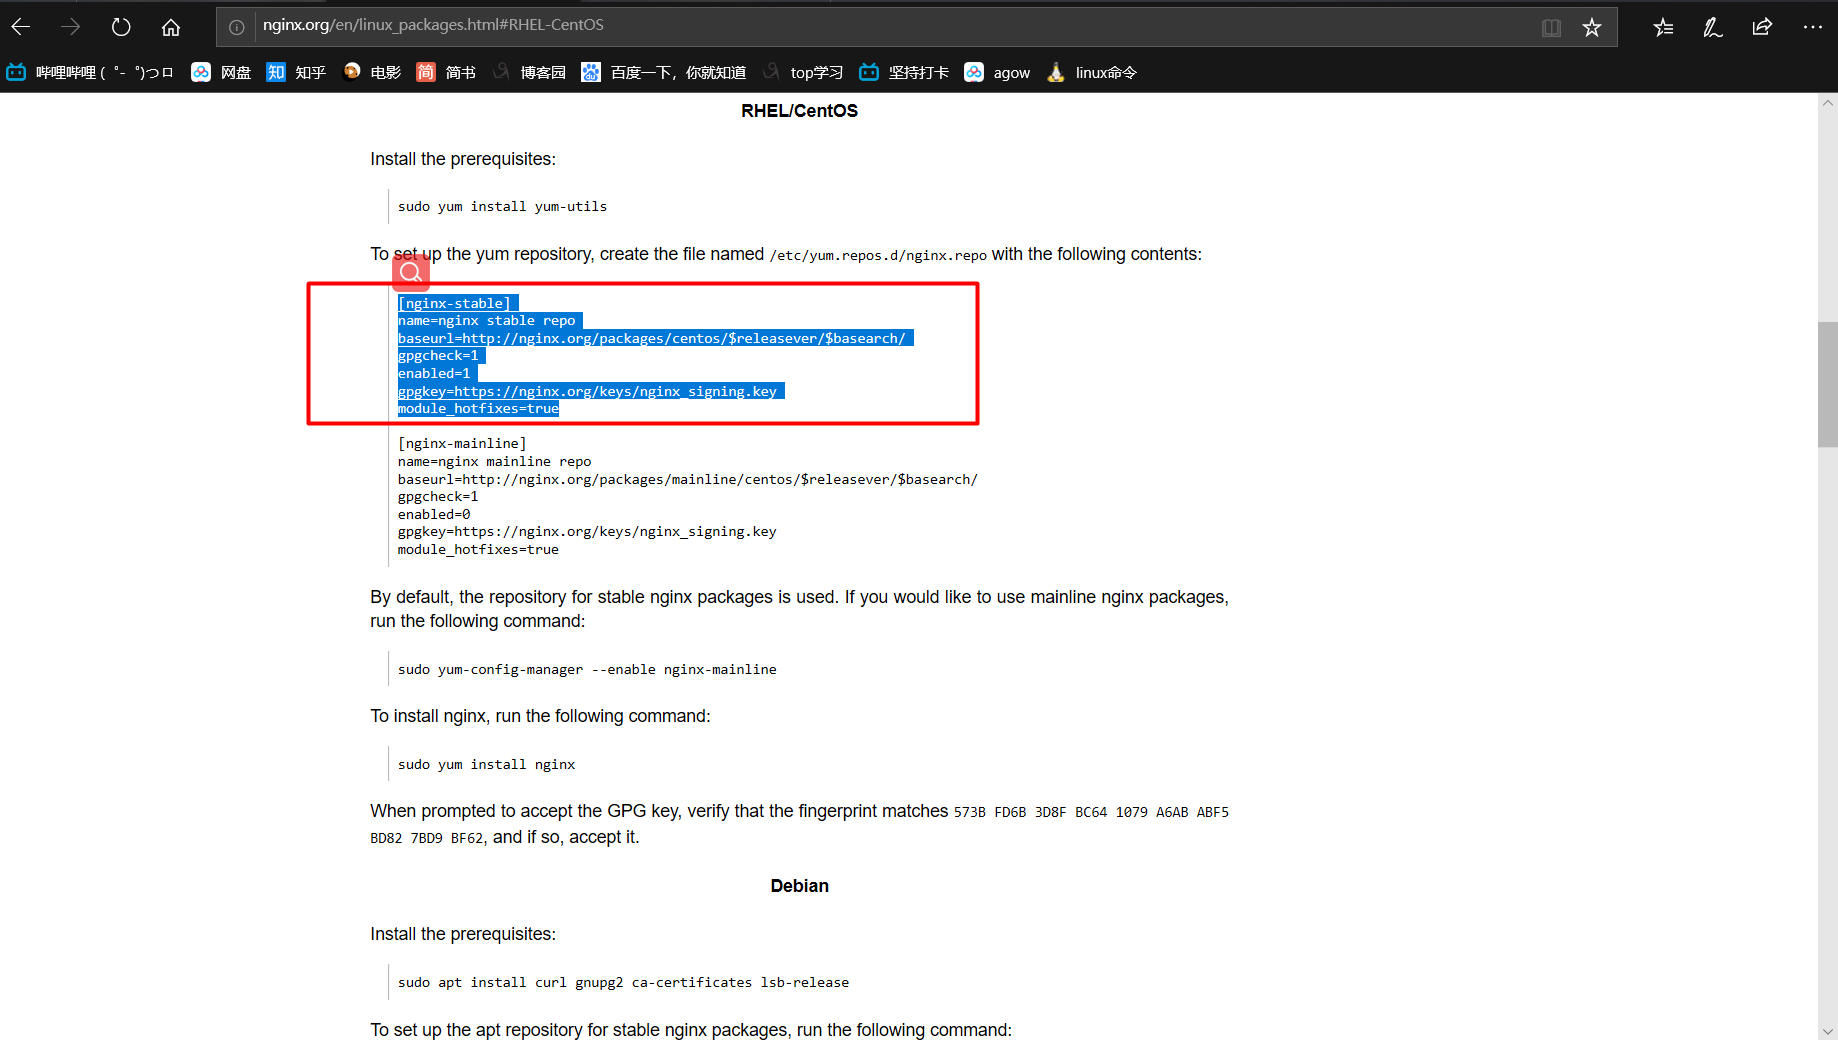
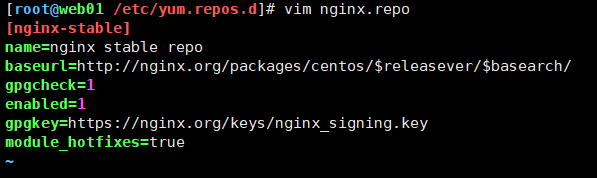
# 官方yum源
[root@web ~]# vim /etc/yum.repos.d/nginx.repo
[nginx]
name=nginx repo
baseurl=http://nginx.org/packages/centos/7/$basearch/
gpgcheck=0
enabled=1
# nginx版本检查
nginx -v
# nginx编译参数
nginx -V
# 启停方式
- 启动
[root@zls ~]# /usr/sbin/nginx
[root@zls ~]# systemctl start nginx
- 停止
[root@zls ~]# /usr/sbin/nginx -s stop
[root@zls ~]# systemctl stop nginx
- 重启
[root@zls ~]# systemctl restart nginx
- 重载
[root@zls ~]# /usr/sbin/nginx -s reload
[root@zls ~]# systemctl reload nginx
nginx安装
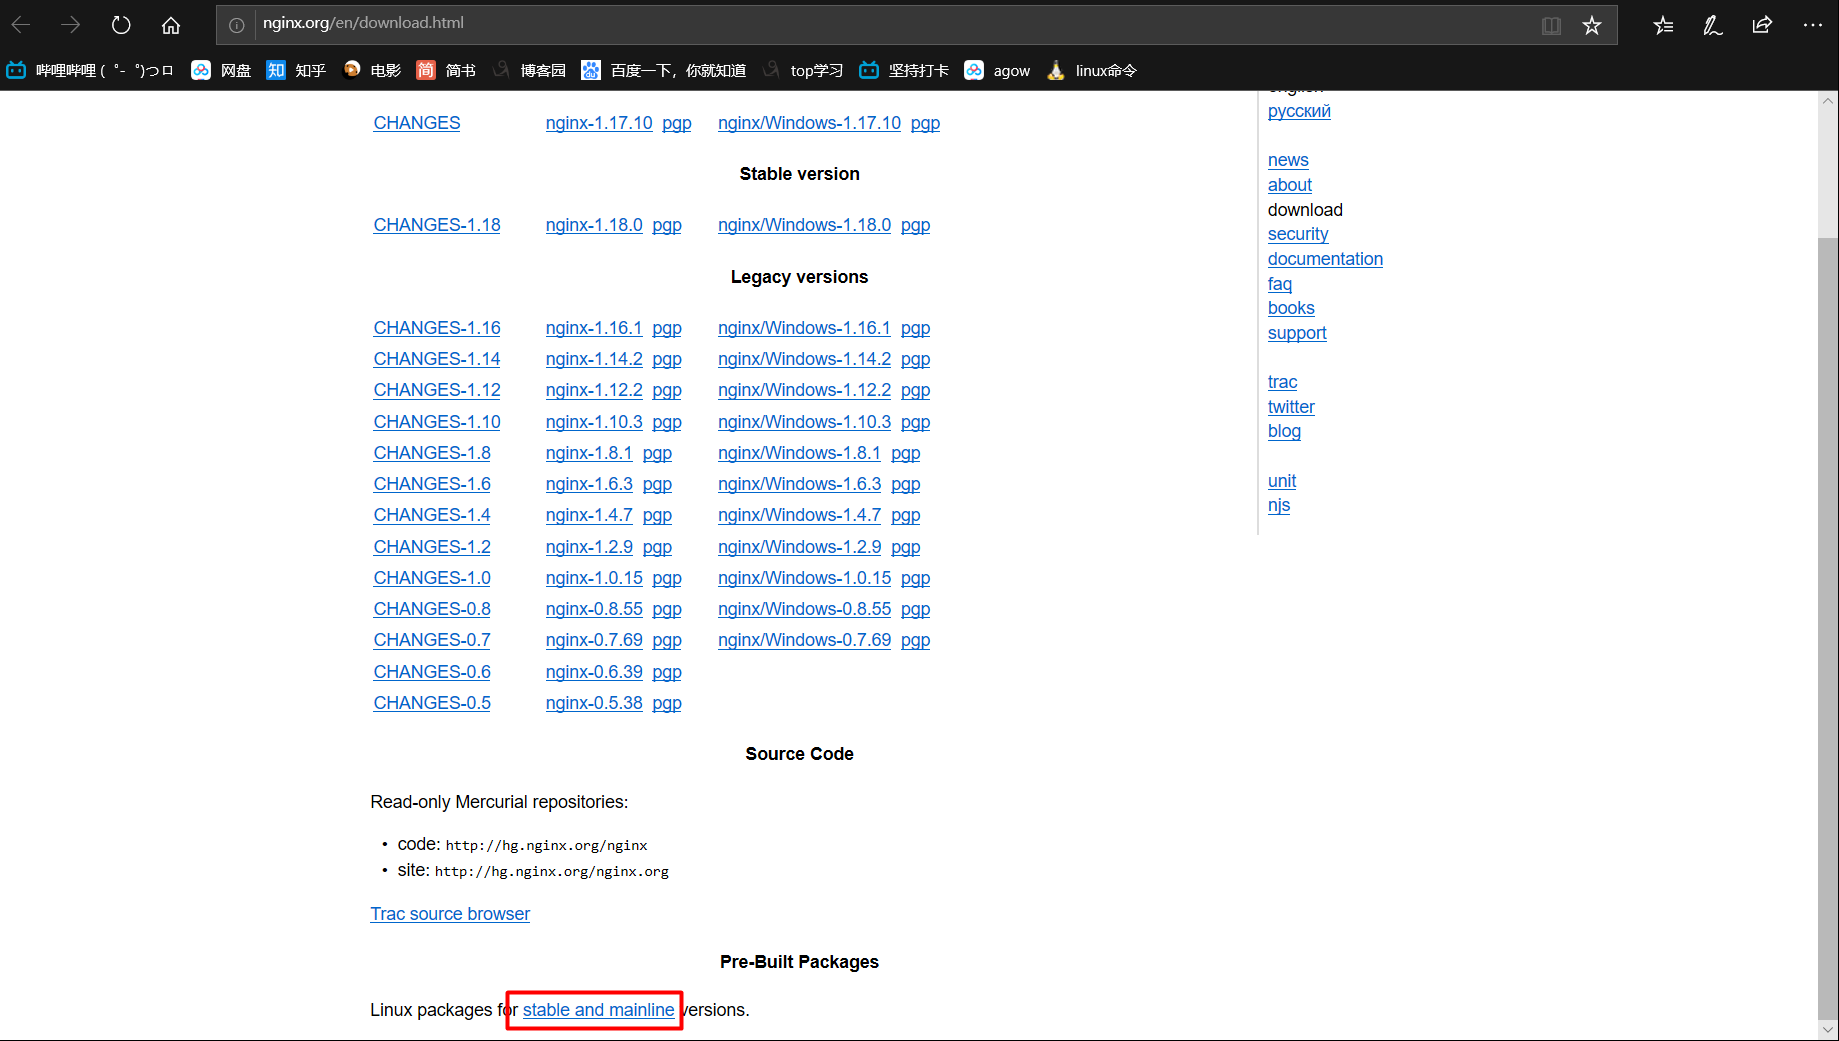
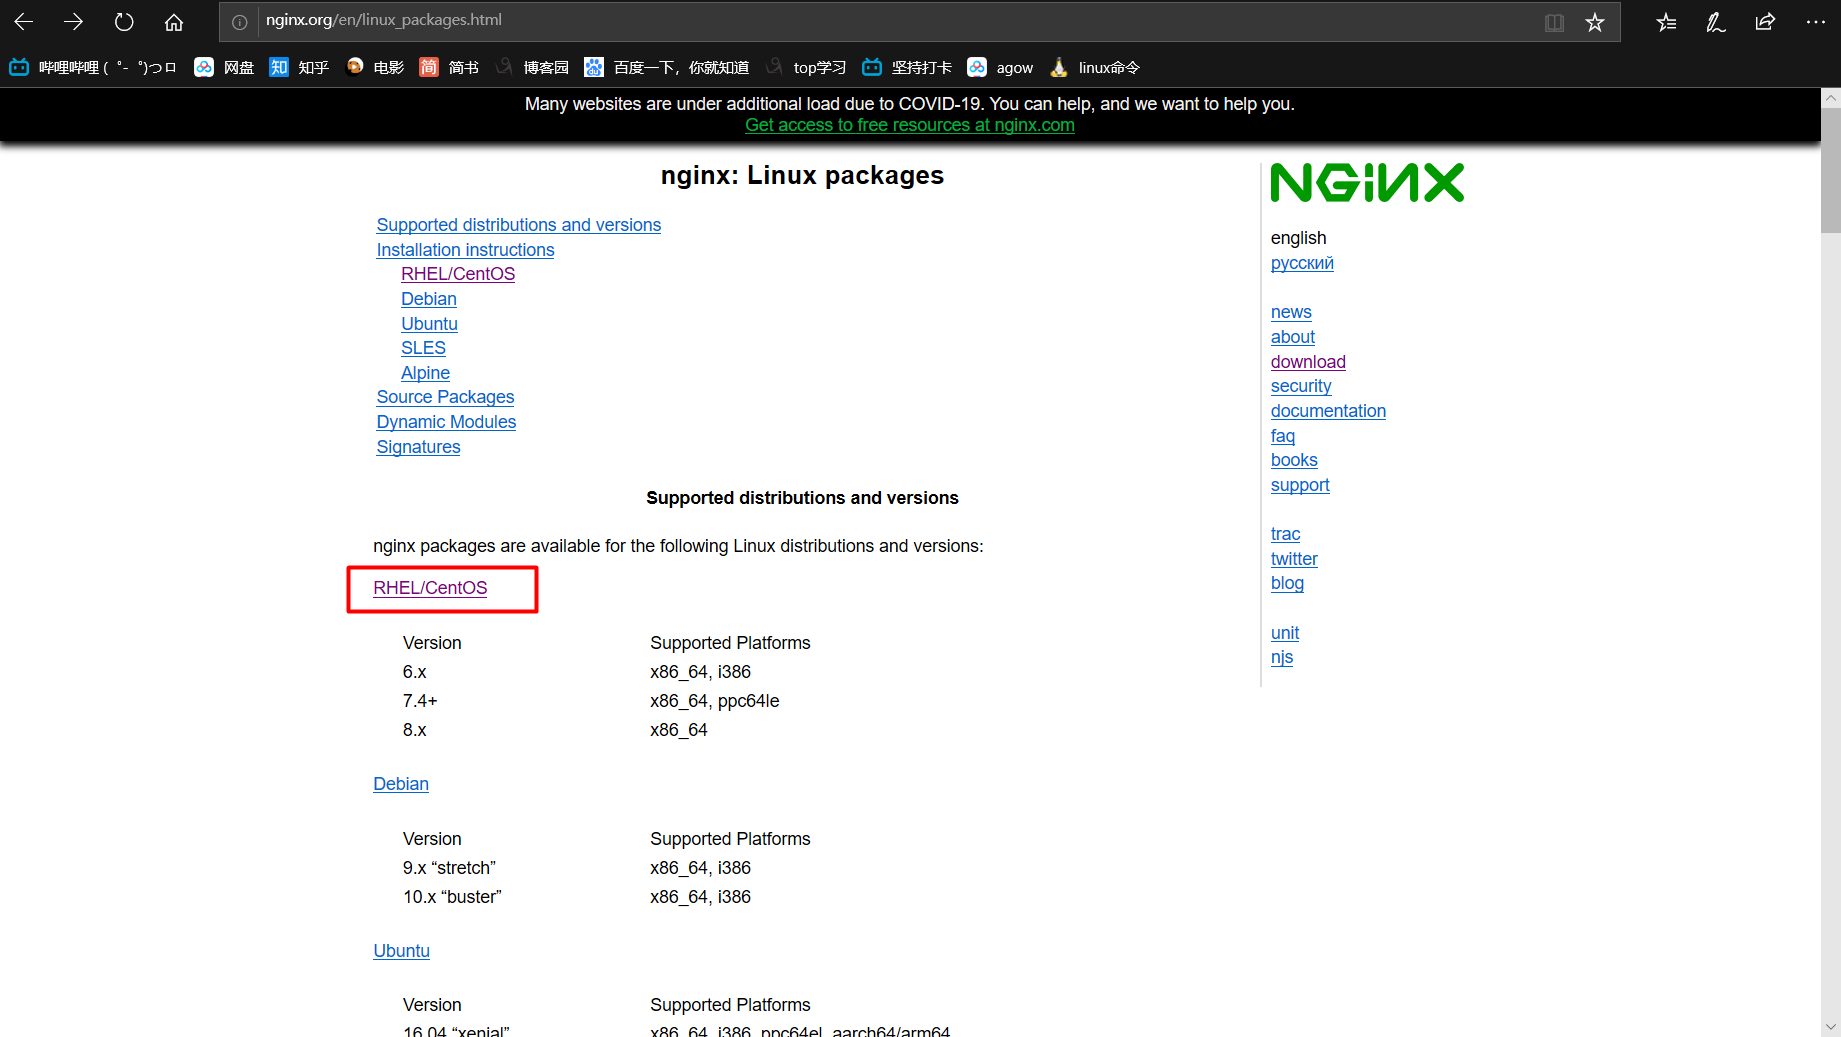
- 1 .修改默认yum源为官方源TP
- 2.安装nginx

- 3.启动服务

- 4.查看安装包为什么版本(当同时配置阿里园和nignx官方源,就算阿里园中存在nginx的rpm包,也是优先生效官网)

nginx相关文件介绍
# rpm -ql 查看整体目录结构及对应功能

###############主配置文件
/etc/nginx/nginx.conf										#主配置文件
/etc/nginx/conf.d/default.conf								        #默认网站配置文件

###############nginx代理相关参数文件
/etc/nginx/fastcgi_params									 #php代理文件
/etc/nginx/scgi_params										 #AJAX前后分离
/etc/nginx/uwsgi_params										 #Python代理文件

###############nginx编码相关参数文件
/etc/nginx/win-utf										 #Nginx编码转换映射文件
/etc/nginx/koi-utf										 #Nginx编码转换映射文件
/etc/nginx/koi-win										 #Nginx编码转换映射文件

###############浏览器支持的直接打开的文件格式
/etc/nginx/mime.types

###############nginx管理相关命令
/usr/sbin/nginx			 								 #Nginx命令行管理终端工具
/usr/sbin/nginx-debug										 #Nginx命令行与终端调试工具

###############nginx日志相关目录与文件
/var/log/nginx											 #Nginx默认存放日志目录
/etc/logrotate.d/nginx		                                                                 #Nginx默认的日志切割
nginx配置文件
# nginx配置文件模块
- 核心模块
- 事件驱动模块
- http内核模块(重点)


# 配置文件详解
[root@web02 /etc/nginx]# cat /etc/nginx/nginx.conf
################核心模块##########################
user  nginx;									      # 启动nginx服务用户
worker_processes  1;							              # worcker进程数(可设为auto自动)

error_log  /var/log/nginx/error.log warn;		                              # 错误日志路径和级别
pid        /var/run/nginx.pid;					                      # pid文件路径

################事件驱动模块##########################
events {
    worker_connections  1024;					                      # 每个worker进程允许连接数
}

################http内核模块##########################
http {
    include       /etc/nginx/mime.types;		                              # 包含指定文件内容,这里指浏览器允许访问文件类型
    default_type  application/octet-stream;		                              # 浏览器不支持打开的内容,需要下载的内容

# 日志格式
    log_format  main  '$remote_addr - $remote_user [$time_local] "$request" '
                      '$status $body_bytes_sent "$http_referer" '
                      '"$http_user_agent" "$http_x_forwarded_for"';

# 日志路径 和 指定格式
    access_log  /var/log/nginx/access.log  main;

# 高效传输文件
    sendfile        on;
    #tcp_nopush     on;

# 长连接的超时时间
    keepalive_timeout  65;

# 开启gzip压缩
    #gzip  on;

# 包含当前目录下所有以.conf结尾的文件
    include /etc/nginx/conf.d/*.conf;
}
server标签书写方法
http{}作用:标签主要用来解决用户的请求与相应
server{}作用:标签主要用来响应具体的某一个网站
location{}作用:标签主要用来匹配网站具体URL路径

# server标签可写入主配置文件或者局部配置文件中,当局部配置文件未配置,将从主配置文件进行调用。
server {												    # 虚拟主机
    listen       80;										            # 监听端口
    server_name  localhost;									            # 访问虚拟主机方式
    charset koi8-r;											    # 字符编码
    access_log  /var/log/nginx/host.access.log  main;		                                            # 定义配置文件路径及指定格式
    location / {											    # 控制网站访问路径
        root   /usr/share/nginx/html;						                            # 存放网站源代码位置
        index  index.html index.htm;						                            # 默认返回网站文件
    }

   error_page  404              /404.html;					                            # 404页面存放地址

    # redirect server error pages to the static page /50x.html
    #
    error_page   500 502 503 504  /50x.html;
    location = /50x.html {
        root   /usr/share/nginx/html;						                            # 5XX报错页面存放地址
    }
---------------------php代理配置-----------------------------------------------------
    # proxy the PHP scripts to Apache listening on 127.0.0.1:80
    #
    #location ~ \.php$ {
    #    proxy_pass   http://127.0.0.1;
    #}

    # pass the PHP scripts to FastCGI server listening on 127.0.0.1:9000
    #
    #location ~ \.php$ {
    #    root           html;
    #    fastcgi_pass   127.0.0.1:9000;
    #    fastcgi_index  index.php;
    #    fastcgi_param  SCRIPT_FILENAME  /scripts$fastcgi_script_name;
    #    include        fastcgi_params;
    #}

    # deny access to .htaccess files, if Apache's document root
    # concurs with nginx's one
    #
    #location ~ /\.ht {
    #    deny  all;
    #}
}
虚拟主机
# 什么叫做虚拟主机
1个虚拟主机相当于是一个网站,nginx中多个server标签可创建多个虚拟主机,每个虚拟主机对外可使用不同方式进行连接。如基于ip,基于端口,基于域名。
基于ip
# 基于ip实现虚拟主机
单台服务器创建多个虚拟主机,基于ip访问,有两种方式:
- 配置单台服务器多网卡
- 配置单网卡多ip(创建虚拟ip)命令:ifconfig eth0:0 10.0.0.x/24
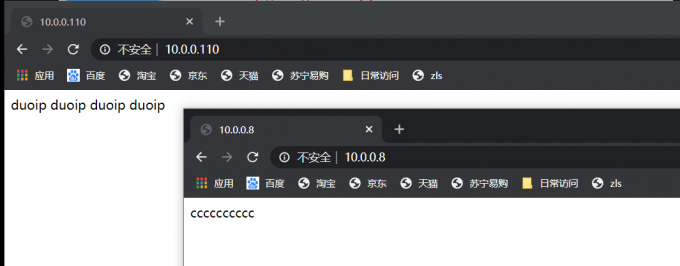
# 配置文件区别:
· 端口一致,对外ip不一致
[root@web02 /etc/nginx/conf.d]# cat ip.conf
server {
listen 80;
server_name 10.0.0.8;
location / {
root /c;
index index.html;
}
}
[root@web02 /etc/nginx/conf.d]# cat duoip.conf
server {
listen 80;
server_name 10.0.0.110;
location / {
root /d;
index index.html;
}
}
-
实现效果(两个ip访问均来自同一台服务器)
基于端口
# 基于不同端口实现虚拟主机
默认网页端口为80,为不同虚拟主机创建不同端口,可在单台服务器中,使用相同ip不同端口,访问不同网站
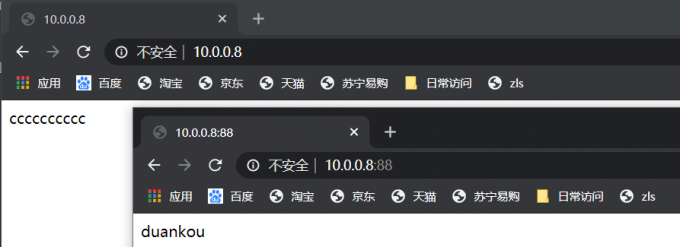
# 配置文件区别
[root@web02 /etc/nginx/conf.d]# cat ip.conf
server {
listen 80;
server_name 10.0.0.8;
location / {
root /c;
index index.html;
}
}
[root@web02 /etc/nginx/conf.d]# cat duankou.conf
server {
listen 88;
server_name 10.0.0.8;
location / {
root /yyy;
index index.html;
}
}
-
实现效果(此方式浏览器访问必须在ip后接端口)
基于域名
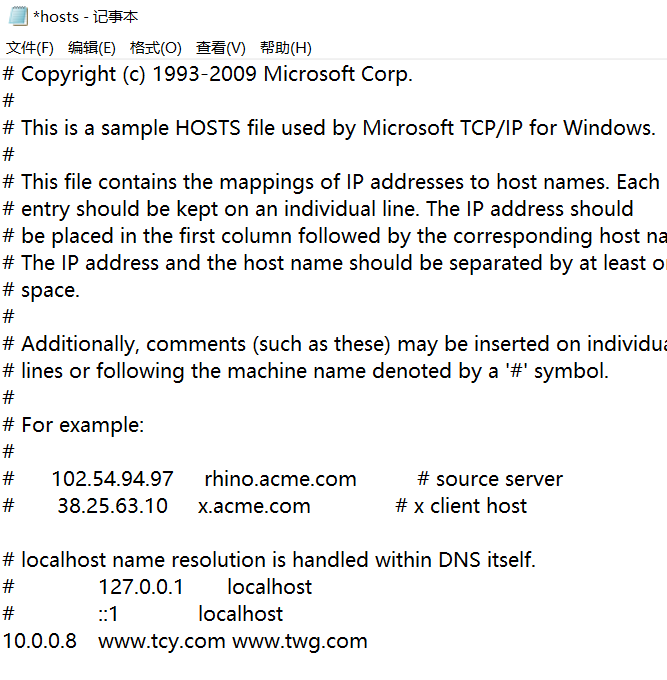
# 基于域名实现虚拟主机
单台服务器,创建多个虚拟主机,可基于域名方式。相同端口相同ip,不同域名,浏览器访问需配置DNS,一个ip绑定多个域名。

# 配置文件区别
-
实现效果
首先客户端配置DNS

nginx日志管理
日志格式
-
Nginx有非常灵活的日志记录模式,每个级别的配置可以有各自独立的访问日志。日志格式通过log_format命令定义格式。
# log_format作用
定义日志格式语法,可对产生的日志文件格式自定义

# nginx默认日志格式语法:
log_format  main  '$remote_addr - $remote_user [$time_local] "$request" '
                      '$status $body_bytes_sent "$http_referer" '
                      '"$http_user_agent" "$http_x_forwarded_for"';

# nginx日志格式允许包含的内置变量
$remote_addr        # 记录客户端IP地址
$remote_user        # 记录客户端用户名
$time_local         # 记录通用的本地时间
$time_iso8601       # 记录ISO8601标准格式下的本地时间
$request            # 记录请求的方法以及请求的http协议
$status             # 记录请求状态码(用于定位错误信息)
$body_bytes_sent    # 发送给客户端的资源字节数,不包括响应头的大小
$bytes_sent         # 发送给客户端的总字节数
$msec               # 日志写入时间。单位为秒,精度是毫秒。
$http_referer       # 记录从哪个页面链接访问过来的
$http_user_agent    # 记录客户端浏览器相关信息
$http_x_forwarded_for #记录客户端IP地址
$request_length     # 请求的长度(包括请求行, 请求头和请求正文)。
$request_time       # 请求花费的时间,单位为秒,精度毫秒
# 注:如果Nginx位于负载均衡器,nginx反向代理之后, web服务器无法直接获取到客户端真实的IP地址。
# $remote_addr获取的是反向代理的IP地址。 反向代理服务器在转发请求的http头信息中,
# 增加X-Forwarded-For信息,用来记录客户端IP地址和客户端请求的服务器地址。

# access_log日志配置语法
Syntax: access_log path [format [buffer=size] [gzip[=level]] [flush=time] [if=condition]];
access_log off;
Default: access_log logs/access.log combined;
Context: http, server, location, if in location, limit_except

# nginx	access日志配置实战
server {
    listen 80;
    server_name code.oldboy.com;

    #将当前的server网站的访问日志记录至对应的目录,使用main格式
    access_log /var/log/nginx/code.oldboy.com.log main;
    location / {
        root /code;
    }

    #当有人请求改favicon.ico时,不记录日志
    location /favicon.ico {
        access_log off;
        return 200;
    }
}
日志切割
# 默认nginx具备日志切割功能,使用logrotate切割日志,如需对mysql,tomcat,redis日志切割,也可使用相同方法,同样使用logrotate方式进行日志切割
[root@nginx conf.d]# cat /etc/logrotate.d/nginx
/var/log/nginx/*.log {
        daily                                                            # 每天切割日志
        missingok                                                        # 日志丢失忽略
        rotate 52                                                        # 日志保留52天
        compress                                                         # 日志文件压缩
        delaycompress                                                    # 延迟压缩日志
        notifempty                                                       # 不切割空文件
        create 640 nginx adm                                             # 创建日志的权限,属主和属组
        sharedscripts		                                         # 指定其他的脚本
        postrotate                                                       # 切割日志执行的命令
                if [ -f /var/run/nginx.pid ]; then
                        kill -USR1 `cat /var/run/nginx.pid`		# 查看pid号,然后对其重载
                fi
        endscript			                                # 结束脚本
}

# 日志切割效果
[root@oldboy ~]# ll /var/log/nginx/
total 4044
-rw-r----- 1 www adm  54438 Oct 12 03:28 access.log-20181012.gz
-rw-r----- 1 www adm  28657 Oct 13 03:48 access.log-20181013.gz
-rw-r----- 1 www adm  10135 Oct 12 03:28 error.log-20181130.gz
-rw-r----- 1 www adm   7452 Oct 13 03:48 error.log-20181201.gz
Linux日志切割工具Logrotate详解
Logrotate 程序是一个日志文件管理工具。用于分割日志文件,压缩转存、删除旧的日志文件,并创建新的日志文件.

1.1 Logrotate配置文件介绍
Linux系统默认安装logrotate,默认的配置文件:
/etc/logrotate.conf
/etc/logrotate.d/
logrotate.conf:为主配置文件
logrotate.d:为配置相关子系统,用于隔离每个应用配置(Nginx、PHP、Tomcat...)

Logrotate是基于CRON来运行的,其脚本是/etc/cron.daily/logrotate,日志轮转是系统自动完成的。
实际运行时,Logrotate会调用配置文件/etc/logrotate.conf。
---
[root@web01 /etc/logrotate.d]# cat /etc/cron.daily/logrotate
#!/bin/sh

/usr/sbin/logrotate -s /var/lib/logrotate/logrotate.status /etc/logrotate.conf
EXITVALUE=$?
if [ $EXITVALUE != 0 ]; then
    /usr/bin/logger -t logrotate "ALERT exited abnormally with [$EXITVALUE]"
fi
exit 0
---


Logrotate可以由自动或者手动触发日志轮转:

logrotate -f /etc/logrotate.d/nginx
logrotate -f /etc/logrotate.d/php
不过正式执行前最好通过Debug选项来验证一下(-d参数)
具体logrotate命令格式如下:

logrotate [OPTION...] <configfile>
-d, --debug :debug模式,测试配置文件是否有错误。
-f, --force :强制转储文件。
-m, --mail=command :压缩日志后,发送日志到指定邮箱。
-s, --state=statefile :使用指定的状态文件。
-v, --verbose :显示转储过程。

1.2 Logrotater日志文件切割策略
查看logrotate.conf配置:

[root@web01 /etc/logrotate.d]# cat /etc/logrotate.conf |grep -Ev '^$|#'
weekly
rotate 4
create
dateext
include /etc/logrotate.d
/var/log/wtmp {
    monthly
    create 0664 root utmp
	minsize 1M
    rotate 1
}
/var/log/btmp {
    missingok
    monthly
    create 0600 root utmp
    rotate 1
}

weekly    # 默认每一周执行一次rotate轮转工作
rotate 4  # 保留多少个日志文件(轮转几次).默认保留四个.就是指定日志文件删除之前轮转的次数,0 指没有备份
create    # 自动创建新的日志文件,新的日志文件具有和原来的文件相同的权限;因为日志被改名,因此要创建一个新的来             继续存储之前的日志
dateext   # 这个参数很重要!就是切割后的日志文件以当前日期为格式结尾,如xxx.log-20200517这样,如果注释掉,切割             出来是按数字递增,即前面说的 xxx.log-1这种格式
compress  # 是否通过gzip压缩转储以后的日志文件,如xxx.log-20200517.gz ;如果不需要压缩,注释掉就行

include /etc/logrotate.d                                                                                             # 导入/etc/logrotate.d/ 目录中的各个应用配置

/var/log/wtmp {                                                                                                      # 仅针对 /var/log/wtmp 所设定的参数
monthly                                                                                                              # 每月一次切割,取代默认的一周
create 0664 root utmp                                                                                                # 指定新建的日志文件权限以及所属用户和组
minsize 1M                                                                                                           # 文件大小超过 1M 后才会切割
rotate 1                                                                                                             # 只保留一个日志.
}

#这个 wtmp 可记录用户登录系统及系统重启的时间
#因为有 minsize 的参数,因此不见得每个月一定会执行一次.要看文件大小。


Logrotate中其他可配置参数,具体如下:

compress //通过gzip 压缩转储以后的日志
nocompress //不做gzip压缩处理
copytruncate //用于还在打开中的日志文件,把当前日志备份并截断;是先拷贝再清空的方式,拷贝和清空之间有一个时间差,可能会丢失部分日志数据。
nocopytruncate //备份日志文件不过不截断
create mode owner group //轮转时指定创建新文件的属性,如create 0777 nobody nobody
nocreate //不建立新的日志文件
delaycompress //和compress 一起使用时,转储的日志文件到下一次转储时才压缩
nodelaycompress //覆盖 delaycompress 选项,转储同时压缩。
missingok //如果日志丢失,不报错继续滚动下一个日志
errors address //专储时的错误信息发送到指定的Email 地址
ifempty //即使日志文件为空文件也做轮转,这个是logrotate的缺省选项。
notifempty //当日志文件为空时,不进行轮转
mail address //把转储的日志文件发送到指定的E-mail 地址
nomail //转储时不发送日志文件
olddir directory //转储后的日志文件放入指定的目录,必须和当前日志文件在同一个文件系统
noolddir //转储后的日志文件和当前日志文件放在同一个目录下
sharedscripts //运行postrotate脚本,作用是在所有日志都轮转后统一执行一次脚本。如果没有配置这个,那么每个日志轮转后都会执行一次脚本
prerotate //在logrotate转储之前需要执行的指令,例如修改文件的属性等动作;必须独立成行
postrotate //在logrotate转储之后需要执行的指令,例如重新启动 (kill -HUP) 某个服务!必须独立成行
daily //指定转储周期为每天
weekly //指定转储周期为每周
monthly //指定转储周期为每月
rotate count //指定日志文件删除之前转储的次数,0 指没有备份,5 指保留5 个备份
dateext //使用当期日期作为命名格式
dateformat .%s //配合dateext使用,紧跟在下一行出现,定义文件切割后的文件名,必须配合dateext使用,只支持 %Y %m %d %s 这四个参数
size(或minsize) log-size //当日志文件到达指定的大小时才转储,log-size能指定bytes(缺省)及KB (sizek)或MB(sizem).
当日志文件 >= log-size 的时候就转储。 以下为合法格式:(其他格式的单位大小写没有试过)
size = 5 或 size 5 (>= 5 个字节就转储)
size = 100k 或 size 100k
size = 100M 或 size 100M

1.3 NGINX日志的配置实例参考:
vim /etc/logrotate.d/nginx
/var/log/weblog/*.log {
    daily  //指定转储周期为每天
    compress  //通过gzip 压缩转储以后的日志
    rotate 7  //保存7天的日志
    missingok  //如果日志文件丢失,不要显示错误
    notifempty  //当日志文件为空时,不进行轮转
    dateext  //使用当期日期作为命名格式,exp: nginx_access.log-20190120
    sharedscripts  //运行postrotate脚本
    postrotate  //执行的指令
            if [ -f /run/nginx.pid ]; then
                    kill -USR1 `cat /run/nginx.pid`
            fi
    endscript  //结束指令
}


1.4 PHP-FPM日志的配置实例参考:
vim /etc/logrotate.d/nginx
/usr/local/php/var/log/*.log {
daily
compress
rotate 7
missingok
notifempty
dateext
sharedscripts
postrotate
    if [ -f /usr/local/php/var/run/php-fpm.pid ]; then
        kill -USR2 `cat /usr/local/php/var/run/php-fpm.pid`
    fi
endscript
}


1.5 Logrotater日志切割轮询
由于Logrotate是基于CRON运行的,所以这个日志轮转的时间是由CRON控制的,具体可以查询CRON的配置文件/etc/anacrontab,过往的老版本的文件为(/etc/crontab)

查看轮转文件:/etc/anacrontab

cat /etc/anacrontab
    SHELL=/bin/sh
    PATH=/sbin:/bin:/usr/sbin:/usr/bin
    MAILTO=root
    RANDOM_DELAY=45
    START_HOURS_RANGE=3-22
    1   5   cron.daily      nice run-parts /etc/cron.daily
    7   25  cron.weekly     nice run-parts /etc/cron.weekly
    @monthly 45 cron.monthly        nice run-parts /etc/cron.monthly
使用anacrontab轮转的配置文件,日志切割的生效时间是在凌晨3点到22点之间,而且随机延迟时间是45分钟,但是这样配置无法满足我们在现实中的应用

现在的需求是将切割时间调整到每天的晚上12点,即每天切割的日志是前一天的0-24点之间的内容,操作如下:

mv /etc/anacrontab /etc/anacrontab.bak          //取消日志自动轮转的设置
使用crontab来作为日志轮转的触发容器来修改Logrotate默认执行时间

vi /etc/crontab
SHELL=/bin/bash
PATH=/sbin:/bin:/usr/sbin:/usr/bin
MAILTO=root
HOME=/

# run-parts
01 * * * * root run-parts /etc/cron.hourly
59 23 * * * root run-parts /etc/cron.daily
22 4 * * 0 root run-parts /etc/cron.weekly
42 4 1 * * root run-parts /etc/cron.monthly
1.6 解决logrotate无法自动轮询日志的办法
现象说明:
使用logrotate轮询nginx日志,配置好之后,发现nginx日志连续两天没被切割,检查后确定配置文件一切正常,这是为什么呢??

强行启动记录文件维护操作,纵使logrotate指令认为没有需要,应该有可能是logroate认为nginx日志太小,不进行轮询。
故需要强制轮询,即在/etc/cron.daily/logrotate脚本中将 -t 参数替换成 -f 参数

vim /etc/cron.daily/logrotate
#!/bin/sh
/usr/sbin/logrotate /etc/logrotate.conf
EXITVALUE=$?
if [ $EXITVALUE != 0 ]; then
    /usr/bin/logger -f logrotate "ALERT exited abnormally with [$EXITVALUE]"
fi
exit 0
最后最后重启下cron服务:
# CentOS 7 (包含CentOS6)
systemctl restart crond
# CentOS 6
/etc/init.d/crond restart
Stopping crond: [ OK ]
Starting crond: [ OK ]

 浙公网安备 33010602011771号