ssh协议详解
目录
SSH协议
# ssh端口和telnet端口
[root@web02 ~]# netstat -lntup|grep 22
tcp        0      0 0.0.0.0:22              0.0.0.0:*               LISTEN      6684/sshd
tcp6       0      0 :::22                   :::*                    LISTEN      6684/sshd

[root@web02 ~]# netstat -lntup|grep 23
tcp6       0      0 :::23                   :::*                    LISTEN      1/systemd

# ssh远程连接优势
SSH是一个安全协议,在进行数据传输时,会对数据包进行加密处理,加密后在进行数据传输。确保了数据传输安全。相对telnet远程连接方式,可以使用抓包软件清楚的查看到数据传输信息,并且不对对此进行加密

# ssh相关命令
SSH有客户端与服务端,我们将这种模式称为C/S架构,ssh客户端支持Windows、Linux、Mac等平台。
在ssh客户端中包含 ssh|slogin远程登陆、scp远程拷贝、sftp文件传输、ssh-copy-id秘钥分发等应用程序。

# ssh连接原理
 1、环境介绍
    两台linux服务器
    分别安装ssh服务,并启动
2、原理以及过程
    在A上使用ssh连接B机

A向B发送连接请求
B收到请求后,将自己的公钥发给A
A收到公钥后,用公钥加密B的登陆密码,生成加密密文,发送给B
B收到加密密文后,用自己的私钥解密,得到解密信息,然后与的登陆密码做比较,正确则允许A登陆

# ssh和telnet区别
ssh 是加密的,基于 SSL 。telnet 是明码bai传输的,发送的数据被监听后不需要解密就能看到内容。
ssh 有的时候只是一个过渡传输协议,经过设置,还可以在 ssh 里面进行链接远程服务器的图形界面进行图形化操作。但这都需要安装相应的支持程序,并且进行相应的设置,还要打开相应的功能。
telnet 当然好用,不加密永远是最好用的。被人监听而劫持了你的服务器,你都不可能知道什么时候被劫持的。因为 telnet 链接就是直接白送人家用户名和密码。要知道局域网里面的集线器所有数据的发送都是广播方式向所有链接到这个集线器的网卡发送所有的数据,找个监听软件就直接能截取你的密码。
| 服务连接方式 | 服务数据传输 | 服务监听端口 | 服务登陆用户 |
|---|---|---|---|
| ssh | 加密 | 22/tcp | 默认支持root用户登陆 |
| telnet | 明文 | 23/tcp | 不支持root用户登陆 |
ssh优化
# 服务器登录优化
1. 将默认端口22进行修改
2. 禁止root用户登录
3. 禁止使用root密码直接连接,改为使用秘钥
4. 禁止ssh进行dns反向解析,影响ssh连接效率(反向解析:ip解析成域名)
5. 禁止Gss认证,减少连接时产生的延迟
6. 重要服务不使用公网ip
7. 使用防火墙限制来源ip

[root@m01 ~/.ssh]# vim /etc/ssh/sshd_config 				# ssh配置文件
-----------安全方面------------
Port 6666                       # 变更SSH服务远程连接端口 (1-65535,不能占用其它服务的常用端口)
PermitRootLogin         no      # 禁止root用户直接远程登录
PasswordAuthentication  no      # 禁止使用密码直接远程登录

------------性能方面--------------
UseDNS                  no      # 禁止ssh进行dns反向解析,影响ssh连接效率参数
GSSAPIAuthentication    no      # 禁止GSS认证,减少连接时产生的延迟
ssh远程登录服务器命令
# ssh 远程登录(知道服务器ip端口密码即可ssh远程登录)
ssh root@10.0.0.41 -p 22
ssh root@driverzeng.com -p 22

-p:指定端口
root:远程连接的用户
@:只是一个分隔符
10.0.0.41:远程连接的主机IP

# scp 远程拷贝-------------------使用ssh协议加密拷贝
-P 指定端口,默认22端口可不写
-r 表示递归拷贝目录
-p 表示在拷贝文件前后保持文件或目录属性不变
-l 限制传输使用带宽(默认kb)

推:将本地/tmp/oldboy推送至远端服务器10.0.0.61的/tmp目录,使用对端的root用户
[root@m01 ~]# scp -P22 -rp /tmp/oldboy oldboy@10.0.0.61:/tmp

拉:将远程10.0.0.61服务器/tmp/oldboy文件拉取到本地/opt/目录下
[root@m01 ~]# scp -P22 -rp root@10.0.0.61:/tmp/oldboy /opt/

限速
[root@m01 ~]# scp /opt/1.txt root@172.16.1.31:/tmp
root@172.16.1.31 password:
test                        100%  656MB  '83.9MB/s'   00:07
限速为8096kb,换算为MB,要除以 8096/8=1024KB=1MB
[root@m01 ~]# scp -rp -l 8096  /opt/1.txt root@172.16.1.31:/tmp
root@172.16.1.31s password:
test                        7%   48MB   '1.0MB/s'   09:45

# Sftp远程数据传输命令
默认可以通过sftp命令连接sftp服务
sftp root@10.0.0.61
sftp -oPort=52113 root@10.0.0.61  #sftp的特殊端口连接

sftp使用get下载文件至于本地服务器
sftp> get conf.txt /tmp/

sftp使用put上传本地服务器文件至远程服务器
sftp> put /root/t1.txt /root/
ssh密钥对登录
- 可降低密码泄露的机率和提高登录的方便性,建议使用密钥对验证方式登录
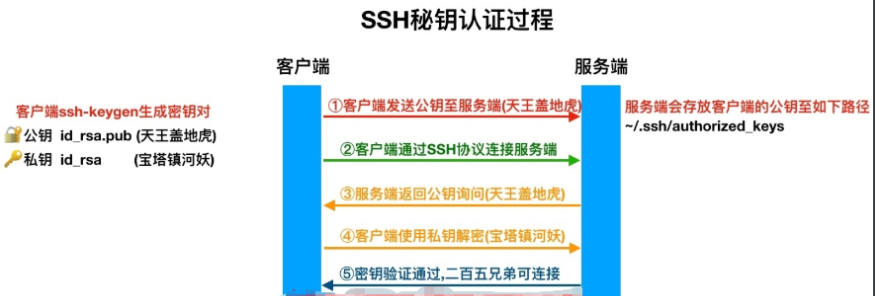
在跳板机上,创建一个秘钥对
- 公钥(锁)
- 私钥(钥匙)
- 将锁发送给免密登录服务器,本地使用私钥即可不要密码连接
## 生成非对称秘钥
-t	指定秘钥类型
-C	指定用户邮箱
例:
    [root@m01 ~]# ssh-keygen -t rsa -C 133411023@qq.com
    ...
    #默认一路回车即可
    ...

## 发送公钥(需要知道root密码)
语法: ssh-copy-id [-i [identity_file]] [user@]machine
-i	#指定下发公钥的路径
[user@]     #以什么用户身份进行公钥分发(root),如果不输入,表示以当前系统用户身份分发公钥
machine     #下发公钥至那台服务器, 填写远程主机IP地址

# 1.创建秘钥对
[root@web01 ~]# ssh-keygen
# 2.发送公钥  [将A服务器的公钥写入B服务器~/.ssh/authorized_keys文件中]
[root@web01 ~]# ssh-copy-id  -i /root/.ssh/id_rsa.pub root@172.16.1.41

# 3. 查看本地公钥和免密服务器公钥
[root@web01 .ssh]# cat /root/.ssh/id_rsa.pub
ssh-rsa AAAAB3NzaC1yc2EAAAADAQABAAABAQC3s+CqG3ViPUFtUmaYzX43qaBZ7gZOxiYYD8zIRBW5MIEDsyJ8MB5jQmq+0p9o1GTOlxDGdjrzsT9OTMVqnhBuETQ7CnlVGuFh6P0X5n+9DmsBl039Z7q43pfl6hbRJtoOF0enGKqiR5TFP/F0HmpDt/ILqX0qi80MIO6h+LrNEHPcS19t4WRb513spYz7XisEF3GW2Udpk2+4Rh4EbJaF52OdqP/ER8nGHDv1RnrFHwFZoH/PsiGFLmLFg1JPQziLYCe+Wy6OIfow96dQ5cMtW9OLtZKa3oI7qKxcJO53MV6YMCNTQ1uwpJyRIU9W8Du4tRSmWohRaLtmLfHrWVO9 root@web01

[root@lb01 ~]# vim /root/.ssh/authorized_keys
ssh-rsa AAAAB3NzaC1yc2EAAAADAQABAAABAQC3s+CqG3ViPUFtUmaYzX43qaBZ7gZOxiYYD8zIRBW5MIEDsyJ8MB5jQmq+0p9o1GTOlxDGdjrzsT9OTMVqnhBuETQ7CnlVGuFh6P0X5n+9DmsBl039Z7q43pfl6hbRJtoOF0enGKqiR5TFP/F0HmpDt/ILqX0qi80MIO6h+LrNEHPcS19t4WRb513spYz7XisEF3GW2Udpk2+4Rh4EbJaF52OdqP/ER8nGHDv1RnrFHwFZoH/PsiGFLmLFg1JPQziLYCe+Wy6OIfow96dQ5cMtW9OLtZKa3oI7qKxcJO53MV6YMCNTQ1uwpJyRIU9W8Du4tRSmWohRaLtmLfHrWVO9 root@web01
SSH生产场景案例
1.跳板机
lb02=172.16.1.6
web01=172.16.1.7
web02=172.16.1.8
web03=172.16.1.9
nfs=172.16.1.31
backup=172.16.1.41
db01=172.16.1.51
m01=172.16.1.61
zabbix=172.16.1.71

cat <<EOF
        +-------------------------+
        |     1) lb01             |
        |     2) lb02             |
        |     3) web01            |
        |     4) web02            |
        |     5) web03            |
        |     6) nfs              |
        |     7) backup           |
        |     8) db01             |
        |     9) m01              |
        |     10) zabbix          |
        |     h) help             |
        +-------------------------+
EOF
read -p 'Please Input Number: ' num

if [ $num -eq 1 ];then
  ssh root@$lb01
elif [ $num -eq 2 ];then
  ssh root@$lb02
elif [ $num -eq 3 ];then
  ssh root@$web01
elif [ $num -eq 4 ];then
  ssh root@$web02
elif [ $num -eq 5 ];then
  ssh root@$web03
fi
ssh免密连接扩展
ssh免交交互操作
## 首次连接不输出提示信息,仅提示输入密码
[root@web01 ~]# ssh -o stricthostkeychecking=no root@10.0.0.61 'df -h'

## 不进行交互生成密钥对
   ssh-keygen:密钥对创建工具
	[-P old_passphrase]  密码
    [-f output_keyfile]  输出的秘钥文件
    [-q]       不输出信息
	[-t dsa ]  指定秘钥类型。
例:[root@web01 ~]# ssh-keygen -f ~/.ssh/id_rsa -P '' -q

# 1.安装sshpass命令所需包(密码提示无需交互)
[root@m01 ~]# yum install -y sshpass

# 2. 使用格式(此命令可以将密码写入到命令中,无需交互)
[root@m01 ~]# sshpass -p 123.com ssh root@10.0.0.51

[option]
-p:指定密码
-f:从文件中取密码
-e:从环境变量中取密码
-P:设置密码提示

# ------------------------脚本书写(结合ssh -o和sshpass不输出任何信息)
 - 实现无需交互远程连接服务器
    [root@m01 ~]# cat piliang.sh
    #!/bin/bash
    p='10.0.0.'
    w=123.com

    read -p '请输入需要远程连接ip最后一位: ' num

    sshpass -p ${w} ssh -o stricthostkeychecking=no root@${p}${num}

 # ----------------------书写脚本,批量将公钥发送到需要免密登录服务器
     [root@m01 ~]# cat piliang.sh
    #!/bin/bash
    p='10.0.0.'
    w=123.com
    yyy="/root/.ssh/id_rsa"
    if [ ! -d $yyy ];then
    ssh-keygen -f ${yyy} -P '' -q
    read -p '请输入需要推送公钥ip/只需要输入ip最后一位: ' num
    sshpass -p ${w} ssh-copy-id -i /root/.ssh/id_rsa.pub -o stricthostkeychecking=no 		root@${p}${num}
    fi

  # ----------------------书写脚本,实现将公钥批量推送到免密登录服务器,并且可同时对服务器远程登录
        vim /root/js.sh

    #!/bin/bash
    if [ ! -d "/root/.ssh" ];then

            install=`yum install -y sshpass`
            pass='0000'
            ip='172.16.1.'

            ssh-keygen -t rsa -P "" -f /root/.ssh/id_rsa

            for i in  5 6 7 8 9 31 41 51 52 53 54 71 ;
            do
            sshpass -p $pass ssh-copy-id -i /root/.ssh/id_rsa.pub -o stricthostkeychecking=no root@${ip}${i}
            done
    else

    cat <<EOF
            +------------------------+
            |     1)  lb01           |
            |     2)  lb02           |
            |     3)  web01          |
            |     4)  web02          |
            |     5)  web03          |
            |     6)  nfs            |
            |     7)  backup         |
            |     8)  db01           |
            |     9)  db02           |
            |     10) db03           |
            |     11) db04           |
            |     12) zabbix         |
            +------------------------+
    EOF
            ip='172.16.1.'
            read -p "请输入连接的服务器" num
            if [ $num -eq 1 ];then
              ssh root@$ip}5
            elif [ $num -eq 2 ];then
              ssh root@${ip}6
            elif [ $num -eq 3 ];then
              ssh root@${ip}7
            elif [ $num -eq 4 ];then
              ssh root@${ip}8
            elif [ $num -eq 5 ];then
              ssh root@${ip}9
            elif [ $num -eq 6 ];then
              ssh root@${ip}31
            elif [ $num -eq 7 ];then
              ssh root@${ip}41
            elif [ $num -eq 8 ];then
              ssh root@${ip}51
            elif [ $num -eq 9 ];then
              ssh root@${ip}52
            elif [ $num -eq 10 ];then
              ssh root@${ip}53
            elif [ $num -eq 11 ];then
              ssh root@${ip}54
            elif [ $num -eq 12 ];then
              ssh root@${ip}71
            fi
    fi
ssh的备胎
- expect 也是一种语言,可以写一个脚本帮助免交互连接远程服务器并自动执行命令,然后退出连接
# 1.安装expect所需软件包
[root@m01 ~]# yum install -y expect

# 2.书写脚本
#!/usr/bin/expect
set ip 10.0.0.51
set pass 123456
set timeout 30
spawn ssh root@$ip
expect {
        "(yes/no)" {send "yes\r"; exp_continue}
        "password:" {send "$pass\r"}
}
expect "root@*"  {send "df -h\r"}
expect "root@*"  {send "exit\r"}
expect eof
案例一:
需求
1. m01  10.0.0.61 克隆m01
2.在m01上免密连接其他所有机器
3.尝试写一个跳板机的脚本
思路
1. 环境准备
2. 首先实现使用m01能免密远程连接至其他服务器
3. 书写脚本,运行脚本能自动远程至其他服务器
流程细化
1. 环境准备
| 服务器名 | 外网ip | 内网ip | 角色 |
|---|---|---|---|
| m01 | 10.0.0.61 | 172.16.1.61 | 堡垒机 |
| backup | 10.0.0.41 | 172.16.1.41 | 客户端 |
| nfs | 10.0.0.31 | 172.16.1.31 | 客户端 |
| web01 | 10.0.0.7 | 172.16.1.7 | 客户端 |
| web02 | 10.0.0.8 | 172.16.1.8 | 客户端 |
2.ssh免密登录
# 1.生成密钥对(交互提示直接回车即可)
[root@m01 ~]# ssh-keygen
Generating public/private rsa key pair.
Enter file in which to save the key (/root/.ssh/id_rsa):
Created directory '/root/.ssh'.
Enter passphrase (empty for no passphrase):
Enter same passphrase again:
Your identification has been saved in /root/.ssh/id_rsa.
Your public key has been saved in /root/.ssh/id_rsa.pub.
The key fingerprint is:
SHA256:HEKVbIRj7bupO5Lsd5aFc2raj1Oct/feqX2nXBfC4c4 root@m01
The key's randomart image is:
+---[RSA 2048]----+
|      .*o.       |
|     .+ =        |
|     ..+.    .   |
|       o..  o .  |
|        S+ . + . |
|        + * + . .|
|   . .   X . E  o|
|    + o.X.  ..o.*|
|   ..o+Ooo.  o+**|
+----[SHA256]-----+

# 2.此目录下自动生成两个文件(公钥和私钥信息)
[root@m01 /]# ll /root/.ssh/
total 8
-rw------- 1 root root 1675 May 11 22:59 id_rsa
-rw-r--r-- 1 root root  390 May 11 22:59 id_rsa.pub

# 3.将公钥信息发送到其他服务器(方法有多个)
[root@m01 /]# ssh-copy-id -i /root/.ssh/id_rsa.pub root@10.0.0.41
/usr/bin/ssh-copy-id: INFO: Source of key(s) to be installed: "/root/.ssh/id_rsa.pub"
The authenticity of host '10.0.0.41 (10.0.0.41)' can't be established.
ECDSA key fingerprint is SHA256:iMftqZMxB4iH40xvbz7lmWKhVfelqoicstFimk3plBs.
ECDSA key fingerprint is MD5:8f:38:0a:e2:22:73:21:7b:83:8f:7f:fa:8d:45:a7:d7.
Are you sure you want to continue connecting (yes/no)? yes(输入yes)
/usr/bin/ssh-copy-id: INFO: attempting to log in with the new key(s), to filter out any that are already installed
/usr/bin/ssh-copy-id: INFO: 1 key(s) remain to be installed -- if you are prompted now it is to install the new keys
root@10.0.0.41's password: (输入需要免密连接服务器的root密码)

Number of key(s) added: 1

Now try logging into the machine, with:   "ssh 'root@10.0.0.41'"
and check to make sure that only the key(s) you wanted were added.

# 4.直接可以远程至41服务器
[root@m01 /]# ssh 10.0.0.41
Last login: Mon May 11 22:49:27 2020 from 10.0.0.1
[root@backup ~]# ip add
1: lo: <LOOPBACK,UP,LOWER_UP> mtu 65536 qdisc noqueue state UNKNOWN group default qlen 1000
    link/loopback 00:00:00:00:00:00 brd 00:00:00:00:00:00
    inet 127.0.0.1/8 scope host lo
       valid_lft forever preferred_lft forever
    inet6 ::1/128 scope host
       valid_lft forever preferred_lft forever
2: eth0: <BROADCAST,MULTICAST,UP,LOWER_UP> mtu 1500 qdisc pfifo_fast state UP group default qlen 1000
    link/ether 00:0c:29:58:f3:f7 brd ff:ff:ff:ff:ff:ff
    inet 10.0.0.41/24 brd 10.0.0.255 scope global noprefixroute eth0
       valid_lft forever preferred_lft forever
    inet6 fe80::20c:29ff:fe58:f3f7/64 scope link
       valid_lft forever preferred_lft forever
3: eth1: <BROADCAST,MULTICAST,UP,LOWER_UP> mtu 1500 qdisc pfifo_fast state UP group default qlen 1000
    link/ether 00:0c:29:58:f3:01 brd ff:ff:ff:ff:ff:ff
    inet 172.16.1.41/24 brd 172.16.1.255 scope global noprefixroute eth1
       valid_lft forever preferred_lft forever
    inet6 fe80::20c:29ff:fe58:f301/64 scope link
       valid_lft forever preferred_lft forever

# 5.查看41服务器上生成文件(因公钥信息是直接复制到41root目录底下,查看公钥信息也在root下)
[root@backup /]# ll /root/.ssh/
total 4
-rw------- 1 root root 390 May 11 23:04 authorized_keys

# 6.同理,将公钥信息传送到其他服务器当中
 ssh-copy-id -i /root/.ssh/id_rsa.pub root@10.0.0.41
 ssh-copy-id -i /root/.ssh/id_rsa.pub root@10.0.0.31
 ssh-copy-id -i /root/.ssh/id_rsa.pub root@10.0.0.7
 ssh-copy-id -i /root/.ssh/id_rsa.pub root@10.0.0.8

# 7. 验证是否可以免密登录
[root@m01 /]# ssh 10.0.0.31
Last login: Mon May 11 23:13:37 2020 from 10.0.0.61
[root@nfs01 ~]#
3.脚本书写
#!/bin/bash
a='root@10.0.0.41'
b='root@10.0.0.31'
c='root@10.0.0.7'
d='root@10.0.0.8'
cat << END
        +----------------------堡垒机列表---------------------+
        +-----------------------------------------------------+
        +----------------------服务器IP对应关系---------------+
        +-----------------------------------------------------+
        +-------------------1> backup-10.0.0.41---------------+
        +-----------------------------------------------------+
        +-------------------2> nfs-10.0.0.31------------------+
        +-----------------------------------------------------+
        +-------------------3> web01-10.0.0.7-----------------+
        +-----------------------------------------------------+
        +-------------------4> web02-10.0.0.8-----------------+
        +-----------------------------------------------------+
END
read -p '请输入需要远程连接的服务器对应序号:' num
if [ $num -eq 1 ];then
        echo '正在帮您远程至backup服务器中....'
        ssh ${a}
elif [ $num -eq 2 ];then
        echo '正在帮您远程至nfs服务器中....'
        ssh ${b}
elif [ $num -eq 3 ];then
        echo '正在帮您远程至web01服务器中....'
        ssh ${c}
elif [ $num -eq 4 ];then
        echo '正在帮您远程至web02服务器中....'
        ssh ${d}
fi
案例二:
需求
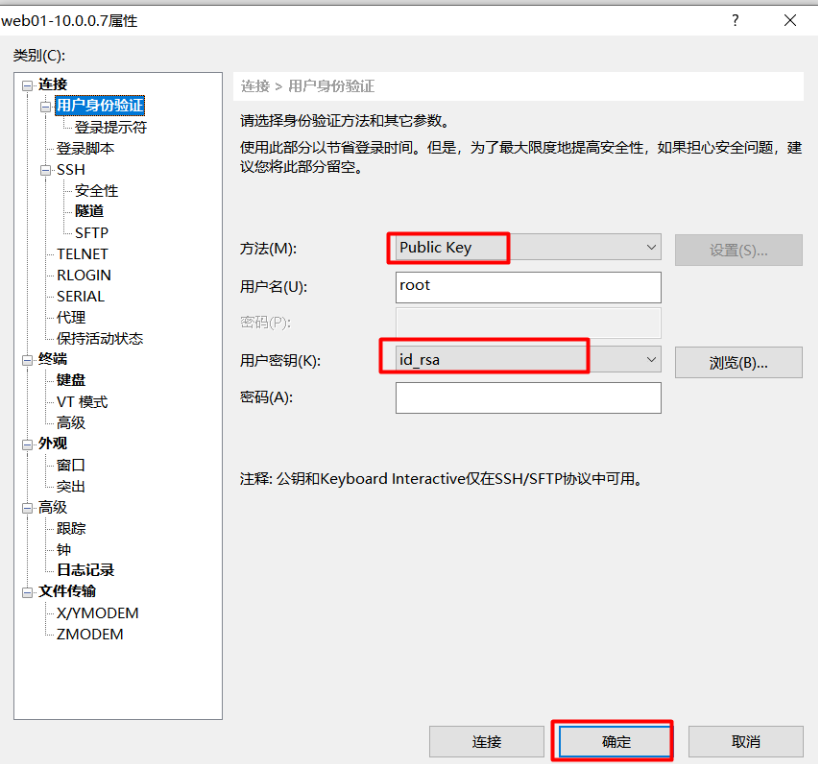
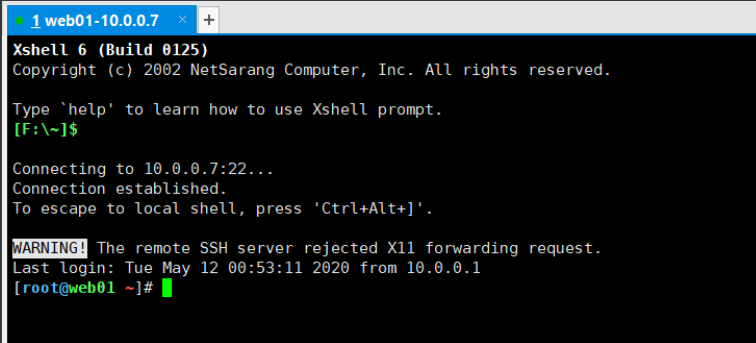
本地xhell可以直接远程连接至服务器,不需要输入密码,使用密钥对方式
思路
1. 环境准备
2. 使用cmder本地生成密钥对
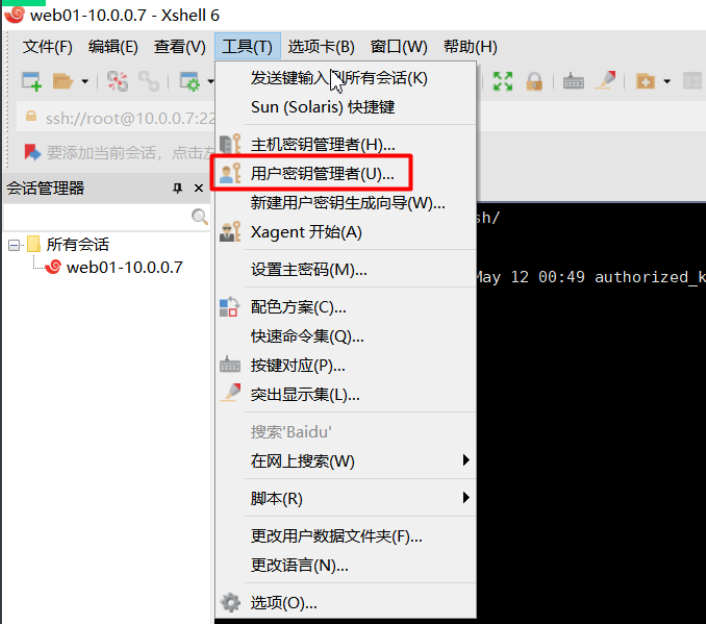
3. 手动方式将密钥对私钥导入到xhell中(只针对xshell6版本5不行)
4. 将公钥发送至需要免密服务器中,可以使用cmder进行公钥推送
流程细化
1.环境准备
| 服务器名 | ip | 角色 |
|---|---|---|
| 物理机本地 | 不管他 | 堡垒机 |
| m01 | 10.0.0.61 | 免密连接服务器 |
| web01 | 10.0.0.7 | 免密连接服务器 |
2.使用cmder生成密钥对
# 1.在windows中同样使用此方式生成密钥对
λ ssh-keygen
Generating public/private rsa key pair.
Enter file in which to save the key (/c/Users/caiyu.tang/.ssh/id_rsa):
Created directory '/c/Users/caiyu.tang/.ssh'.
Enter passphrase (empty for no passphrase):
Enter same passphrase again:
Your identification has been saved in /c/Users/caiyu.tang/.ssh/id_rsa.
Your public key has been saved in /c/Users/caiyu.tang/.ssh/id_rsa.pub.
The key fingerprint is:
SHA256:o0rTI9koKivHkSlU6IvnAkRWp+TFe/GAwfJskePJn7Q caiyu.tang@DESKTOP-9CVET67
The key's randomart image is:
+---[RSA 3072]----+
|  ooo++          |
| +oo+B o         |
|+ .o* = +        |
| +   O o .       |
|+ .o. + S        |
|+.=  = E .       |
|.=..* =          |
|+.+o + .         |
|=+  .            |
+----[SHA256]-----+

# 2.将公钥发送到免密登录服务器中
λ ssh-copy-id -i /c/Users/caiyu.tang/.ssh/id_rsa.pub root@10.0.0.61
/usr/bin/ssh-copy-id: INFO: Source of key(s) to be installed: "/c/Users/caiyu.tang/.ssh/id_rsa.pub"
The authenticity of host '10.0.0.61 (10.0.0.61)' can't be established.
ECDSA key fingerprint is SHA256:iMftqZMxB4iH40xvbz7lmWKhVfelqoicstFimk3plBs.
Are you sure you want to continue connecting (yes/no/[fingerprint])? yes
/usr/bin/ssh-copy-id: INFO: attempting to log in with the new key(s), to filter out any that are already installed
/usr/bin/ssh-copy-id: INFO: 1 key(s) remain to be installed -- if you are prompted now it is to install the new keys
root@10.0.0.61's password:

Number of key(s) added: 1

Now try logging into the machine, with:   "ssh 'root@10.0.0.61'"
and check to make sure that only the key(s) you wanted were added.

caiyu.tang@DESKTOP-9CVET67 /f/各种安装包/cmder
λ ssh-copy-id -i /c/Users/caiyu.tang/.ssh/id_rsa.pub root@10.0.0.7
/usr/bin/ssh-copy-id: INFO: Source of key(s) to be installed: "/c/Users/caiyu.tang/.ssh/id_rsa.pub"
The authenticity of host '10.0.0.7 (10.0.0.7)' can't be established.
ECDSA key fingerprint is SHA256:iMftqZMxB4iH40xvbz7lmWKhVfelqoicstFimk3plBs.
Are you sure you want to continue connecting (yes/no/[fingerprint])? yes
/usr/bin/ssh-copy-id: INFO: attempting to log in with the new key(s), to filter out any that are already installed
/usr/bin/ssh-copy-id: INFO: 1 key(s) remain to be installed -- if you are prompted now it is to install the new keys
root@10.0.0.7's password:

Number of key(s) added: 1

Now try logging into the machine, with:   "ssh 'root@10.0.0.7'"
and check to make sure that only the key(s) you wanted were added.

# 3.将私钥信息导入到xshell中
- 导入私钥到xshell
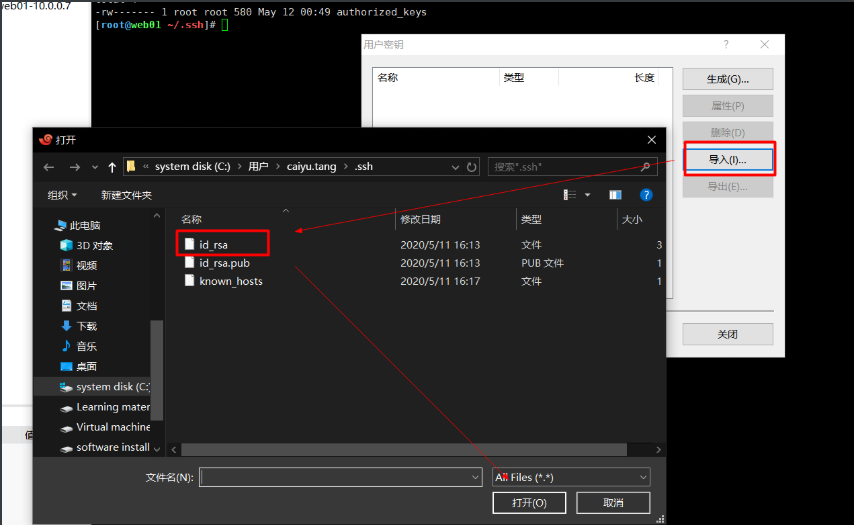
- 使用xshell验证是否可以使用密钥对方式连接服务器
