
Common Linux Commands
Linux 家族
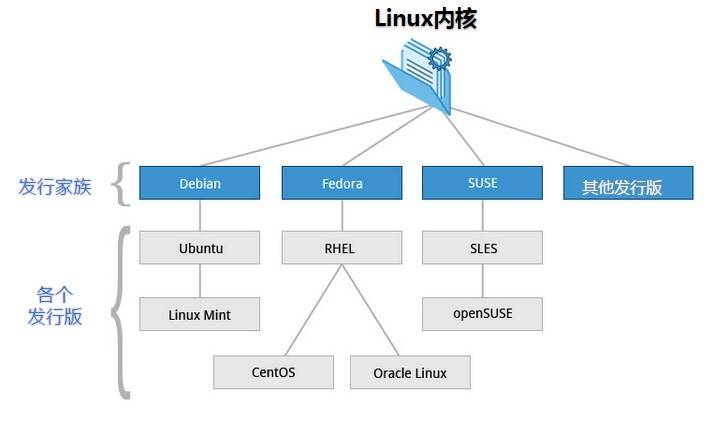
目前市面上较知名的发行版有:Ubuntu、RedHat、CentOS、Debian、Fedora、SuSE、OpenSUSE、Arch Linux、SolusOS 等。

Linux vs Windows
目前国内 Linux 更多的是应用于服务器上,而桌面操作系统更多使用的是 Windows。主要区别如下
| 比较 | Windows | Linux |
|---|---|---|
| 界面 | 界面统一,外壳程序固定所有 Windows 程序菜单几乎一致,快捷键也几乎相同 | 图形界面风格依发布版不同而不同,可能互不兼容。GNU/Linux 的终端机是从 UNIX 传承下来,基本命令和操作方法也几乎一致。 |
| 驱动程序 | 驱动程序丰富,版本更新频繁。默认安装程序里面一般包含有该版本发布时流行的硬件驱动程序,之后所出的新硬件驱动依赖于硬件厂商提供。对于一些老硬件,如果没有了原配的驱动有时很难支持。另外,有时硬件厂商未提供所需版本的 Windows 下的驱动,也会比较头痛。 | 由志愿者开发,由 Linux 核心开发小组发布,很多硬件厂商基于版权考虑并未提供驱动程序,尽管多数无需手动安装,但是涉及安装则相对复杂,使得新用户面对驱动程序问题(是否存在和安装方法)会一筹莫展。但是在开源开发模式下,许多老硬件尽管在Windows下很难支持的也容易找到驱动。HP、Intel、AMD 等硬件厂商逐步不同程度支持开源驱动,问题正在得到缓解。 |
| 使用 | 使用比较简单,容易入门。图形化界面对没有计算机背景知识的用户使用十分有利。 | 图形界面使用简单,容易入门。文字界面,需要学习才能掌握。 |
| 学习 | 系统构造复杂、变化频繁,且知识、技能淘汰快,深入学习困难。 | 系统构造简单、稳定,且知识、技能传承性好,深入学习相对容易。 |
| 软件 | 每一种特定功能可能都需要商业软件的支持,需要购买相应的授权。 | 大部分软件都可以自由获取,同样功能的软件选择较少。 |
基本概念
home 目录
Linux是一个多用户操作系统,系统在创建用户的时候可以创建一个home 目录,如果创建了home目录,那么这个用户登录系统的时候就会自动进入这个目录,系统也自动将所有权限赋给这个用户,这个就叫home目录,比如
/home/abc 代表用户abc的home目录
/home/test 代表用户test的home目录
/root 代表root用户的home目录
一般情况下,普通用户的根目录在/home目录下,但root用户的根目录在/root下,root用户是最高权限用户,现在很多Linux系统在初始化安装的时候不允许设置root用户远程登录和设置密码,一般创建普通用户,比如tben,然后给这个普通用户设置sudo权限,普通用户在执行sudo命令后可以切换为root用户,拥有root用户的权限。
根目录
根目录是/,是Linux的最顶级目录
Linux目录结构
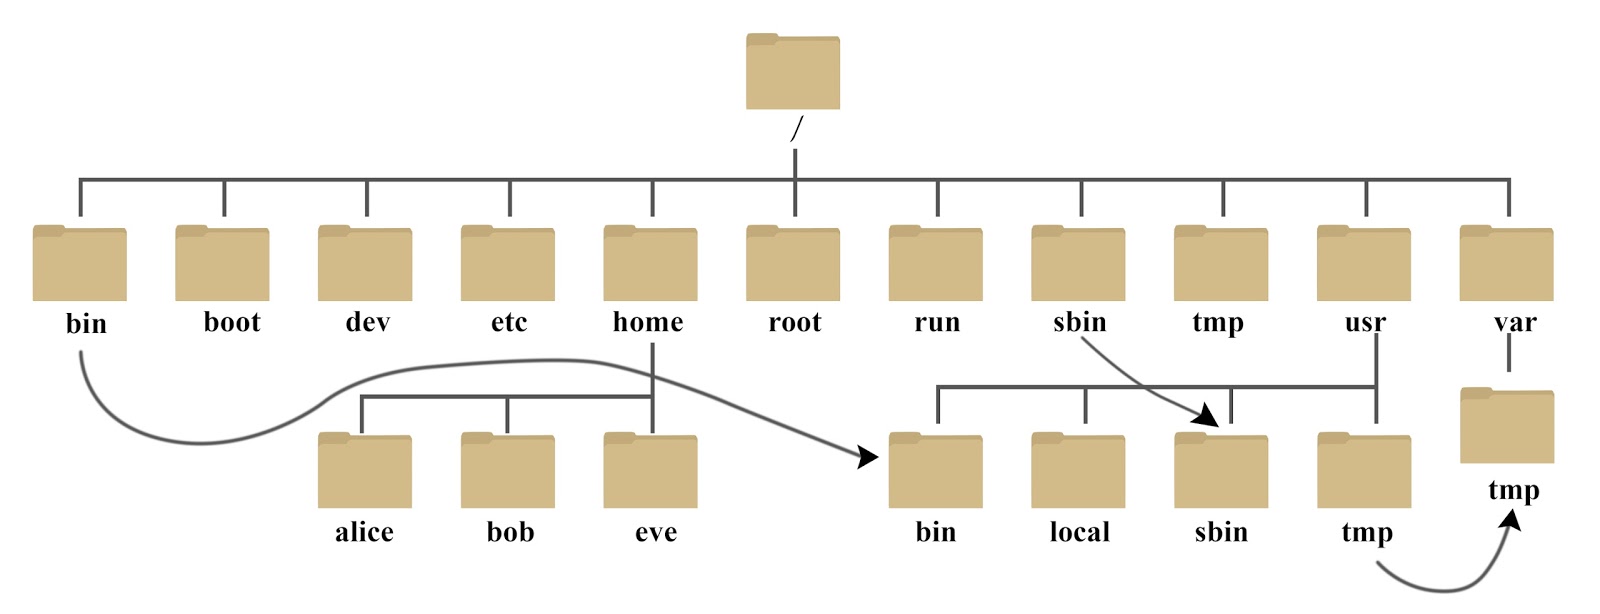
系统启动必须目录(一般不要动这些目录下的内容)
- /boot :存放的启动Linux 时使用的内核文件,包括连接文件以及镜像文件。
- /etc : 存放所有的系统需要的配置文件和子目录列表,更改目录下的文件可能会导致系统不能启动。
- /lib : 存放基本代码库(比如c++库),其作用类似于Windows里的DLL文件。几乎所有的应用程序都需要用到这些共享库。
- /sys : 这是linux2.6内核的一个很大的变化。该目录下安装了2.6内核中新出现的一个文件系统 sysfs 。sysfs文件系统集成了下面3种文件系统的信息:针对进程信息的proc文件系统、针对设备的devfs文件系统以及针对伪终端的devpts文件系统。该文件系统是内核设备树的一个直观反映。当一个内核对象被创建的时候,对应的文件和目录也在内核对象子系统中
指令集合
- /bin : 存放着最常用的程序和指令
- /sbin : 只有系统管理员能使用的程序和指令。
外部文件管理
- /dev : Device(设备)的缩写, 存放的是Linux的外部设备。注意:在Linux中访问设备和访问文件的方式是相同的。
- /media: 类windows的其他设备,例如U盘、光驱等等,识别后linux会把设备放到这个目录下。
- /mnt: 临时挂载别的文件系统的,我们可以将光驱挂载在/mnt/上,然后进入该目录就可以查看光驱里的内容了。
临时文件
- /run: 是一个临时文件系统,存储系统启动以来的信息。当系统重启时,这个目录下的文件应该被删掉或清除。如果你的系统上有 /var/run 目录,应该让它指向 run。
- /lost+found: 一般情况下为空的,系统非法关机后,这里就存放一些文件。
- /tmp : 这个目录是用来存放一些临时文件的。
账户
- /root: 系统管理员的用户主目录。
- /home: 用户的主目录,以用户的账号命名的。
- /usr: 户的很多应用程序和文件都放在这个目录下,类似于windows下的program files目录。
- /usr/bin: 系统用户使用的应用程序与指令。
- /usr/sbin:超级用户使用的比较高级的管理程序和系统守护程序。
- /usr/src:内核源代码默认的放置目录。
运行过程中要用:
- /var:存放经常修改的数据,比如程序运行的日志文件(/var/log 目录下)。
- /proc:管理内存空间!虚拟的目录,是系统内存的映射,我们可以直接访问这个目录来,获取系统信息。这个目录的内容不在硬盘上而是在内存里,我们也可以直接修改里面的某些文件来做修改。
扩展用:
- /opt:默认是空的,我们安装额外软件可以放在这个里面。
- /srv:存放服务启动后需要提取的数据(不用服务器就是空)
Linux 文件权限

权限数值对照:
| 数字 | 字符 | 说明 |
| 0 | --- | 无权限 |
| 1 | --x | 只具有执行权限 |
| 2 | -w- | 只具有写权限 |
| 3 | -wx | 具有写和执行权限 |
| 4 | r-- | 只具有读权限 |
| 5 | r-x | 具有读和执行权限 |
| 6 | rw- | 具有读和写的权限 |
| 7 | rwx | 具有读、写和执行权限 |
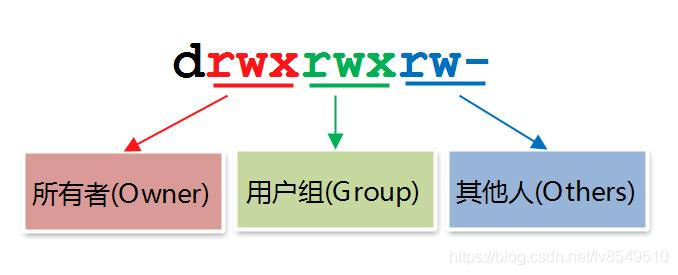
| 第一个字符 |
d 代表文件夹 - 代表文件 |
这个字符只是标识是文件或文件夹,没有权限设置 |
| 第2-4个字符(每3个一组) | Owner的权限(当前用户),缩写u |
r: Read(读)权限 w: Write(写)权限 x: Execute(执行)权限 |
| 第5-7个字符(每3个一组) | Group的权限(组权限),缩写g |
r: Read(读)权限 w: Write(写)权限 x: Execute(执行)权限 |
| 第8-10个字符(每3个一组) | Other的权限(其他),缩写o |
r: Read(读)权限 w: Write(写)权限 x: Execute(执行)权限 |
针对文件和文件夹的区别
| 类别 | r | w | x |
| 文件 | 读取文件内容 | 修改文件内容 | 执行脚本或二进制文件 |
| 文件夹 | 查看目录下文件列表 | 删除、创建目录下文件 | 可以cd目录或者进入下级目录 |
例如
xxx@test01:~/login/dev$ ls -rlht
total 12M
-rwxr-xr-x 1 aaa sw  232 Jun  5 22:14 xx_rds.sh
-rwxr-xr-x 1 aaa sw   43 Jun  5 22:14 data_es_1.sh
-rwxr-xr-x 1 aaa sw   43 Jun  5 22:14 data_es_2.sh
drwxr-xr-x 2 aaa sw 4.0K Aug 30 20:42 _dev
#第一列代表权限, 前面3个代表文件,最后一个代表文件夹
#第3列代表用户aaa
#第4列代表组sw
#第5列代表文件大小
#第6,7,8列代表文件最后修改时间
#第9列代表文件名
#以上样例对当前用户aaa具有所有权限(rwx:7),对组用户具有(r、x:5)权限,对于其他用户具有(r、x:5)权限
修改文件、文件夹用户、组的权限或所属用户、组
命令:chown 修改文件、文件夹的所属用户
修改格式:chown 用户 文件名/目录名
命令帮助:
aaa@test01:~/login/dev$ chown --help
Usage: chown [OPTION]... [OWNER][:[GROUP]] FILE...
  or:  chown [OPTION]... --reference=RFILE FILE...
Change the owner and/or group of each FILE to OWNER and/or GROUP.
With --reference, change the owner and group of each FILE to those of RFILE.

  -c, --changes          like verbose but report only when a change is made
  -f, --silent, --quiet  suppress most error messages
  -v, --verbose          output a diagnostic for every file processed
      --dereference      affect the referent of each symbolic link (this is
                         the default), rather than the symbolic link itself
  -h, --no-dereference   affect symbolic links instead of any referenced file
                         (useful only on systems that can change the
                         ownership of a symlink)
      --from=CURRENT_OWNER:CURRENT_GROUP
                         change the owner and/or group of each file only if
                         its current owner and/or group match those specified
                         here.  Either may be omitted, in which case a match
                         is not required for the omitted attribute
      --no-preserve-root  do not treat '/' specially (the default)
      --preserve-root    fail to operate recursively on '/'
      --reference=RFILE  use RFILE's owner and group rather than
                         specifying OWNER:GROUP values
  -R, --recursive        operate on files and directories recursively

The following options modify how a hierarchy is traversed when the -R
option is also specified.  If more than one is specified, only the final
one takes effect.

  -H                     if a command line argument is a symbolic link
                         to a directory, traverse it
  -L                     traverse every symbolic link to a directory
                         encountered
  -P                     do not traverse any symbolic links (default)

      --help     display this help and exit
      --version  output version information and exit

Owner is unchanged if missing.  Group is unchanged if missing, but changed
to login group if implied by a ':' following a symbolic OWNER.
OWNER and GROUP may be numeric as well as symbolic.

Examples:
  chown root /u        Change the owner of /u to "root".
  chown root:staff /u  Likewise, but also change its group to "staff".
  chown -hR root /u    Change the owner of /u and subfiles to "root".

GNU coreutils online help: <https://www.gnu.org/software/coreutils/>
Full documentation <https://www.gnu.org/software/coreutils/chown>
or available locally via: info '(coreutils) chown invocation'
样例
#样例1: 修改文件的所属用户
#将test.txt的所属用户从root更改为demo用户
[root@test03 ~]# ls -l test.txt
-rw-r--r-- 1 root root 0 Mar 9 01:36 test.txt
[root@test03 ~]# chown demo test.txt #更改
[root@test03 ~]# ls -l test.txt
-rw-r--r-- 1 demo root 0 Mar 9 01:36 test.txt

#样例2:修改文件夹的所属用户
#参数介绍:-R 参数递归的修改目录下的所有文件的所属用户
#例子 将/test目录下的所有文件和用户所属用户修改成demo
[root@test03 ~]# chown -R demo /test/
[root@test03 ~]# ls -l /test/
drwxr-xr-x 3 demo root 16 Mar 9 01:55 aa
命令:chgrp 修改文件、目录所属组
命令格式 :chgrp 用户 文件/目录名
命令帮助
aaa@test01:~/login/dev$ chgrp --help
Usage: chgrp [OPTION]... GROUP FILE...
  or:  chgrp [OPTION]... --reference=RFILE FILE...
Change the group of each FILE to GROUP.
With --reference, change the group of each FILE to that of RFILE.

  -c, --changes          like verbose but report only when a change is made
  -f, --silent, --quiet  suppress most error messages
  -v, --verbose          output a diagnostic for every file processed
      --dereference      affect the referent of each symbolic link (this is
                         the default), rather than the symbolic link itself
  -h, --no-dereference   affect symbolic links instead of any referenced file
                         (useful only on systems that can change the
                         ownership of a symlink)
      --no-preserve-root  do not treat '/' specially (the default)
      --preserve-root    fail to operate recursively on '/'
      --reference=RFILE  use RFILE's group rather than specifying a
                         GROUP value
  -R, --recursive        operate on files and directories recursively

The following options modify how a hierarchy is traversed when the -R
option is also specified.  If more than one is specified, only the final
one takes effect.

  -H                     if a command line argument is a symbolic link
                         to a directory, traverse it
  -L                     traverse every symbolic link to a directory
                         encountered
  -P                     do not traverse any symbolic links (default)

      --help     display this help and exit
      --version  output version information and exit

Examples:
  chgrp staff /u      Change the group of /u to "staff".
  chgrp -hR staff /u  Change the group of /u and subfiles to "staff".

GNU coreutils online help: <https://www.gnu.org/software/coreutils/>
Full documentation <https://www.gnu.org/software/coreutils/chgrp>
or available locally via: info '(coreutils) chgrp invocation'
样例
#例子:
[root@test03 ~]# chgrp bbb /test/
[root@test03 ~]# ls -ld /test/
drwxr-xr-x 3 demo bbb 16 Mar 9 01:55 /test/
#注意点:一般都是用chown修改用户和组的了 格式chown -R 用户.组 + 文件
使用chmod命令修改文件/目录的权限
命令格式 :chmod +模式 +文件
模式为如下格式:
- u、g、o、分别代表用户、组和其他
- a可以代指ugo
- +、-代表加入或删除对应权限
- r、w、x代表三种权限
样例
#示例
chmod u+rw test.txt #给所属用户权限位添加读写权限
chmod g+rw test.txt #给所属组权限位添加读写权限
chmod o+rw test.txt #给其他用户权限位添加读写权限
chmod u=rw test.txt #设置所属用户权限位的权限位读写
chmod a-x test.txt #所有权限为去掉执行权限

#修改权限2
#命令chmod也支持以数字方式修改权限,三个权限分别由三个数字表示:
r=4
w=2
x=1

#使用数字表示权限时,每组权限分别对应数字之和:
rw=4+2=6
rwx=4+2+1=7
r-x=4+1=5

#语法:
chmod 755 文件或文件夹名字

#例:
[root@test01 ~]# touch test.txt
[root@test01 ~]# chmod 755 test.txt
基本操作
文件操作
. 代表当前目录
.. 代表上一级目录
比如:
./test.sh   代表执行当前目录下test.sh 的文件
ls ../test.sh 代表列出上一层目录文件test.sh
cd /root/snap_tmp/snap-store/575/tmp 切换到/root/snap_tmp/snap-store/575/tmp 目录下
cd ../../../ 代表切换到/root/snap_tmp/目录下(往上切换3层目录)
~ 代表当前用户的home目录, 比如 ls ~/snap 等于ls /home/aaa/snap (当前用户为aaa)
1. 列出目录文件
1.1 命令 : ls
描述:列出当前目录文件名字
样例:
root@DEV:~# ls
a.txt  b.txt  fslinstaller.py  nat_redirect.sh  snap  xx.sh
1.2 命令:ls -l 或者 ll
描述:列出当前目录文件名字详细列表
样例:
#列出详细列表
root@DEV:~# ls -l
total 100
-rw-r--r-- 1 root root  1424  5月 22 11:21 a.txt
-rw-r--r-- 1 root root   717  5月 22 11:21 b.txt
-rw-r--r-- 1 root root 80385  5月  7  2023 fslinstaller.py
-rwxr-xr-x 1 root root   445  9月 25 15:39 nat_redirect.sh
drwx------ 5 root root  4096  5月  7  2023 snap
-rwxr-xr-x 1 root root   312  5月 22 11:09 xx.sh
#列出详细列表,包含隐藏文件 ll
root@DEV:~ # ll
total 192
drwx------  9 root root  4096 11月  7 11:25 ./
drwxr-xr-x 20 root root  4096  5月 26 13:01 ../
-rw-r--r--  1 root root  1424  5月 22 11:21 a.txt
-rw-------  1 root root 25238 11月  7 11:40 .bash_history
-rw-r--r--  1 root root  3466  5月  7  2023 .bashrc
-rw-r--r--  1 root root   717  5月 22 11:21 b.txt
drwx------  5 root root  4096  5月 17 12:21 .cache/
drwxr-xr-x  2 root root  4096  5月  7  2023 .conda/
drwxr-xr-x  6 root root  4096  5月 17 22:18 .config/
-rw-r--r--  1 root root 80385  5月  7  2023 fslinstaller.py
-rw-------  1 root root    20  9月 25 10:24 .lesshst
drwxr-xr-x  4 root root  4096  5月 17 12:21 . local /
-rwxr-xr-x  1 root root   445  9月 25 15:39 nat_redirect.sh*
-rw-r--r--  1 root root   161  7月  9  2019 .profile
drwx------  5 root root  4096  5月  7  2023 snap/
drwx------  2 root root  4096  9月  5 21:52 . ssh /
-rw-r--r--  1 root root     0  5月  7  2023 .sudo_as_admin_successful
drwxr-xr-x  2 root root  4096  5月  7  2023 .vim/
-rw-------  1 root root 14940  9月 25 15:42 .viminfo
-rwxr-xr-x  1 root root   312  5月 22 11:09 xx.sh*
1.3 命令 ls $folder
描述:列出文件夹 $folder 下的文件列表
样例:
#列出全路径(比如/tmp)下所有文件
root@DEV:~ # ls /tmp
aaa.sh
nat_redirect.sh
snap
snap-private-tmp
systemd-private-0d093240623a44fda40433f4179d4489-colord.service-gtWoSU
systemd-private-0d093240623a44fda40433f4179d4489-ModemManager.service-sBexZu
systemd-private-0d093240623a44fda40433f4179d4489-power-profiles-daemon.service-03pztx
systemd-private-0d093240623a44fda40433f4179d4489-switcheroo-control.service-eme4TO
systemd-private-0d093240623a44fda40433f4179d4489-systemd-logind.service-gXA8G5
systemd-private-0d093240623a44fda40433f4179d4489-systemd-oomd.service-s1OFpr
systemd-private-0d093240623a44fda40433f4179d4489-systemd-resolved.service-IKMnfe
systemd-private-0d093240623a44fda40433f4179d4489-systemd-timesyncd.service-ybVJR3
systemd-private-0d093240623a44fda40433f4179d4489-upower.service-ymPIou
tmp.pIinyCeOZl
tracker-extract-3-files.1000
tracker-extract-3-files.127

#列出相对路径(~/snap home目录下snap)下所有文件
root@DEV:~ # ls ~/snap
firefox  snapd-desktop-integration  snap-store
1.4 切换目录
命令: cd
1.4.1 切换到当前目录
命令 cd 或者 cd ~
描述: ~代表home目录,cd 后啥都不带就代表进入home目录
样例
#样例1,cd后不加参数,切换到home目录
root@DEV:~/snap_tmp/snap-store# pwd  --> 通过pwd确认当前目录在/root/snap_tmp/snap-store下
/root/snap_tmp/snap-store
root@DEV:~/snap_tmp/snap-store# cd  --> 执行cd命令,后面不带参数,切换到home目录
root@DEV:~# pwd -->确认切换后的目录为root的home目录/root
/root

#样例2:使用cd ~,切换到home目录
tben@DEV:~/fsl/Data_3.1/Rest_EPI.ica$ pwd --> 通过pwd确认不在home目录
/home/tben/fsl/Data_3.1/Rest_EPI.ica
tben@DEV:~/fsl/Data_3.1/Rest_EPI.ica$ cd ~ --> 通过命令cd ~ 切换到home目录
tben@DEV:~$ pwd --> 通过命令pwd确认已经切换到home目录
/home/tben
1.4.2 切换到其他目录
命令:cd $folder
描述: cd 后面加入参数$folder ,如果目录$folder 存在且当前用户拥有权限,就切换到$folder 目录下,否则切换失败
样例:
#样例1: 成功切换到其他目录
tben@DEV:~$ cd /home/tben/fsl/Data_3.1/Rest_EPI.ica  -->切换到目录/home/tben/fsl/Data_3.1/Rest_EPI.ica
tben@DEV:~/fsl/Data_3.1/Rest_EPI.ica$ pwd  -->确认目录,已经成功切换到这个目录下
/home/tben/fsl/Data_3.1/Rest_EPI.ica

#样例2: 由于目录不存在,切换失败
tben@DEV:~$  cd /home/tben/fsl/Data_3.1/Rest_EPI.ica1 -->切换到Rest_EPI.ica1但目录不存在,显示不存在的异常信息
-bash: cd: /home/tben/fsl/Data_3.1/Rest_EPI.ica1: No such file or directory
tben@DEV:~$ pwd -->确认切换失败
/home/tben

#样例3: 由于没有权限导致切换失败
test@DEV:~$ cd /home/tben/fsl/Data_3.1/Rest_EPI.ica  -->试图切换到另外一个账号下的文件夹由于没有对应权限导致切换失败
-bash: cd: /home/tben/fsl/Data_3.1/Rest_EPI.ica: Permission denied
test@DEV:~$ pwd -->确认还在当前目录
/home/test
1.4.3 使用cd - 切换到上一次切换的目录
命令:cd -
描述:切换到上一次成功切换之前的目录,比如之前在目录1,使用cd $folder成功切换到目录2,然后再执行一些非cd的命令,使用cd - 就能自动切换到目录1
样例
tben@DEV:~/fsl/Data_3.1/Rest_EPI.ica$ cd /home/tben/fsl/Data_3.1/Rest_EPI.ica   --> 使用cd命令切换到目录Rest_EPI.ica
tben@DEV:~/fsl/Data_3.1/Rest_EPI.ica$ pwd -->使用pwd确认切换成功
/home/tben/fsl/Data_3.1/Rest_EPI.ica
tben@DEV:~/fsl/Data_3.1/Rest_EPI.ica$ cd /tmp --> 使用cd切换到tmp目录
tben@DEV:/tmp$ ls  -->查看tmp目录下文件信息
aaa.sh
nat_redirect.sh
snap
snap-private-tmp
systemd-private-0d093240623a44fda40433f4179d4489-colord.service-gtWoSU
systemd-private-0d093240623a44fda40433f4179d4489-fwupd.service-MnHNWw
systemd-private-0d093240623a44fda40433f4179d4489-ModemManager.service-sBexZu
systemd-private-0d093240623a44fda40433f4179d4489-power-profiles-daemon.service-03pztx
systemd-private-0d093240623a44fda40433f4179d4489-switcheroo-control.service-eme4TO
systemd-private-0d093240623a44fda40433f4179d4489-systemd-logind.service-gXA8G5
systemd-private-0d093240623a44fda40433f4179d4489-systemd-oomd.service-s1OFpr
systemd-private-0d093240623a44fda40433f4179d4489-systemd-resolved.service-IKMnfe
systemd-private-0d093240623a44fda40433f4179d4489-systemd-timesyncd.service-ybVJR3
systemd-private-0d093240623a44fda40433f4179d4489-upower.service-ymPIou
tmp.pIinyCeOZl
tracker-extract-3-files.1000
tracker-extract-3-files.127
tben@DEV:/tmp$ cd -   -->使用命令cd - 切换到之前一次的目录
/home/tben/fsl/Data_3.1/Rest_EPI.ica
tben@DEV:~/fsl/Data_3.1/Rest_EPI.ica$ pwd -->确认已经成功却换到上一次的目录
/home/tben/fsl/Data_3.1/Rest_EPI.ica
tben@DEV:~/fsl/Data_3.1/Rest_EPI.ica$ cd -   -->再次通过cd -切换到tmp目录
/tmp
tben@DEV:/tmp$ pwd   -->确认已经成功切换到tmp目录
/tmp
1.5 查询当前目录
命令:pwd
描述:pwd可以列出当前目录,一般使用cd切换目录后,使用pwd确认下是否正确切换到正确的目录
样例
root@DEV:~/snap_tmp/snap-store# pwd
/root/snap_tmp/snap-store
2. 拷贝文件
# 拷贝单个文件到其他目录 cp
root@DEV:~# cp nat_redirect.sh /tmp
root@DEV:~# ls /tmp/nat_redirect.sh
/tmp/nat_redirect.sh

# 拷贝文件到当前目录并重命名 cp
root@DEV:~# cp xx.sh abc.sh
root@DEV:~# ls
abc.sh  a.txt  b.txt  fslinstaller.py  nat_redirect.sh  snap  xx.sh

# 拷贝文件夹到其他目录  cp -r
root@DEV:~# cp -r snap/ /tmp
root@DEV:~# ls /tmp/snap
firefox  snapd-desktop-integration  snap-store
root@DEV:~# ls /tmp/sna*
/tmp/snap:
firefox  snapd-desktop-integration  snap-store

/tmp/snap-private-tmp:
snap.firefox  snap.snapd-desktop-integration

#拷贝文件夹到当前目录  cp -r
root@DEV:~# cp -r snap/ snap_tmp
root@DEV:~# ls -l
total 108
-rwxr-xr-x 1 root root   312 11月 12 11:43 abc.sh
-rw-r--r-- 1 root root  1424  5月 22 11:21 a.txt
-rw-r--r-- 1 root root   717  5月 22 11:21 b.txt
-rw-r--r-- 1 root root 80385  5月  7  2023 fslinstaller.py
-rwxr-xr-x 1 root root   445  9月 25 15:39 nat_redirect.sh
drwx------ 5 root root  4096  5月  7  2023 snap
drwx------ 5 root root  4096 11月 12 11:45 snap_tmp
-rwxr-xr-x 1 root root   312  5月 22 11:09 xx.sh
3. 重命名文件
#重命名当前目录文件
root@DEV:~# mv abc.sh aaa.sh
root@DEV:~# ls aaa.sh
aaa.sh
root@DEV:~# ls abc.sh
ls: cannot access 'abc.sh': No such file or directory

#移动文件到其他目录
root@DEV:~# mv aaa.sh /tmp
root@DEV:~# ls /tmp/aaa.sh
/tmp/aaa.sh
root@DEV:~# ls aaa.sh
ls: cannot access 'aaa.sh': No such file or directory
参考:
https://www.runoob.com/linux/linux-intro.html
https://www.runoob.com/linux/linux-system-contents.html
https://blog.csdn.net/lv8549510/article/details/85406215

 浙公网安备 33010602011771号