WPF使用MVVMLight学习入门
参考文档
共四篇入门介绍 MvvmLight框架使用入门(一) - 楼上那个蜀黍 - 博客园 (cnblogs.com)
官方使用文档 Introduction to the MVVM Toolkit - Windows Community Toolkit | Microsoft Docs
DLL介绍
- Microsoft.Toolkit.Mvvm.ComponentModel
- ObservableObject 该类实现了INotifyPropertyChanged接口,定义了一个可通知的对象基类,供ViewModelBase继承 摘要: 一个对象的基类,其属性必须是可观察的
- ObservableRecipient 可观察对象的基类,它也充当消息的接收者 这个类是ObservableObject的扩展,它也提供了使用Microsoft.Toolkit.Mvvm.Messaging.IMessenger类型的内置支持。
- 是一个基类,实现了INotifyDataErrorInfo接口,为验证向其他应用程序模块公开的属性提供了支持。 它也继承了ObservableObject,所以它也实现了INotifyPropertyChanged和INotifyPropertyChanging。 它可以作为所有需要支持属性更改通知和属性验证的对象的起点
- Microsoft.Toolkit.Mvvm.DependencyInjection
- Ioc一种便于系统使用的类型。 IServiceProvider类型。 ioc提供了在单例、线程安全的服务提供者实例中配置服务的能力,然后可以使用该实例来解析服务实例。 使用此特性的第一步是声明一些服务
- Microsoft.Toolkit.Mvvm.Input
- RelayCommand 一种命令,其唯一目的是通过调用委托将其功能传递给其他对象;RelayCommand.CanExecute(System.Object)方法的默认返回值为true。 这种类型不允许你在.Execute(System.Object)和CanExecute(System.Object)回调方法中接受命令参数
- RelayCommand<T>
- AsyncRelayCommand
- AsyncRelayCommand<T>
- IRelayCommand
- IRelayCommand<in T>
- IAsyncRelayCommand
- IAsyncRelayCommand<in T>
- Microsoft.Toolkit.Mvvm.Messaging
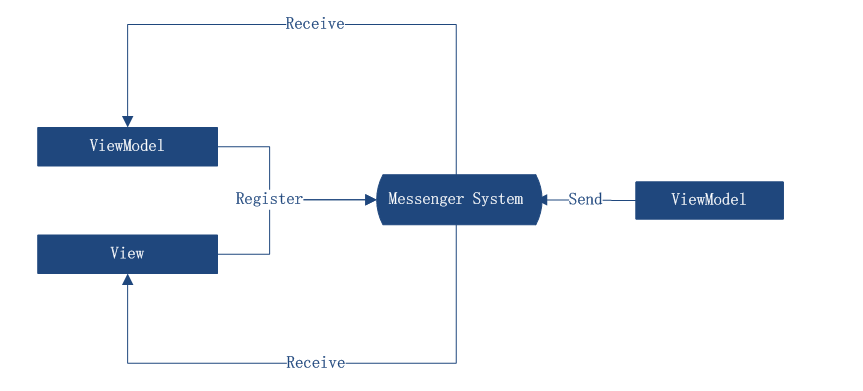
- IMessenger 提供在不同对象之间交换消息能力的类型的接口 , 还可以将消息发送到由令牌唯一标识的特定通道,并在应用程序的不同部分中使用不同的信使
- WeakReferenceMessenger
- 消息接口的实现 备注:imessenger实现使用弱引用来跟踪已注册的收件人,所以当不再需要收件人时,
- 不需要手动注销他们该类型将自动执行内部调整时完整GC调用集合,所以手动调用Cleanup没有必要确保平均内部数据结构尽可能的削减和紧凑。 注意:在。net Framework中运行时,由于应用程序域卸载问题,不支持此功能。
- StrongReferenceMessenger
- 消息接口的实现 备注:imessenger实现使用强引用来跟踪已注册的收件人,所以当他们不再需要时,必须手动注销他们。
- IRecipient<TMessage> 用于声明特定消息类型注册的接收方的接口。
- MessageHandler<TRecipient, TMessage>
- Microsoft.Toolkit.Mvvm.Messaging.Messages
- PropertyChangedMessage<T> 用于广播可观察对象属性更改的消息
- RequestMessage<T>
- AsyncRequestMessage<T>
- CollectionRequestMessage<T>
- AsyncCollectionRequestMessage<T> 用于接收多个响应的请求消息的类,这些响应可以直接使用,也可以通过派生类使用
- ValueChangedMessage<T> 一种基消息,每当特定值发生更改时发出信号;类型参数:改变的值的类型
MVVM简单使用方法
安装包

添加视图模型
    public class MainWindowViewModel : ObservableObject
    {
        private string title;

        public string Title
        {
            get { return title; }
            set { SetProperty(ref title, value); }
        }

        public ICommand ChangeTitleCommand { get; set; }


        private void ChangeTitle()
        {
            Title = "Hello MvvmLight";
        }
        public MainWindowViewModel()
        {
            Title = "Hello World";
            ChangeTitleCommand = new RelayCommand(ChangeTitle);
        }
    }
添加视图模型Locator
public class ViewModelLocator
{
    /// <summary>
    /// Gets the <see cref="IServiceProvider"/> instance to resolve application services.
    /// </summary>
    internal static  IServiceProvider Services { get; private set; }
    public ViewModelLocator()
    {
        ConfigureServices();
    }
    /// <summary>
    /// Configures the services for the application.
    /// </summary>
    private static IServiceProvider ConfigureServices()
    {

        var services = new ServiceCollection();
        services.AddSingleton<MainWindowViewModel>();
        Services = services.BuildServiceProvider();
        Ioc.Default.ConfigureServices(Services);
        return Services;
    }
    public MainWindowViewModel MainVM=> Services.GetService<MainWindowViewModel>();
}
XAML配置

主窗体xaml
    <Window.DataContext>
        <Binding Path="MainVM" Source="{StaticResource Locator}"/>
    </Window.DataContext>
    <Grid>
        <Grid.RowDefinitions>
            <RowDefinition Height="*"></RowDefinition>
            <RowDefinition Height="*"></RowDefinition>
        </Grid.RowDefinitions>
        <TextBlock Height="50" Text="{Binding Title}"></TextBlock>
        <Button Height="50" Grid.Row="1" Command="{Binding ChangeTitleCommand}"></Button>
    </Grid>
数据绑定的一个备注 利刃 MVVMLight 4:绑定和绑定的各种使用场景 - Hello-Brand - 博客园 (cnblogs.com)

值验证ObservableValidator
    //参考链接  https://www.cnblogs.com/AtTheMoment/p/15676984.html
    public class NumberAttribute : ValidationAttribute
    {
        public NumberAttribute()
        {

        }
        public override string FormatErrorMessage(string name)
        {
            return base.FormatErrorMessage(name);
        }
        protected override ValidationResult IsValid(object value, ValidationContext validationContext)
        {
            if (value == null || string.IsNullOrWhiteSpace(value.ToString()))
                return new("内容为空!");
            if (!int.TryParse(value.ToString(), out var number))
                return new("年龄非法");
            else if (number <= 0 || number > 100)
                return new($"{number}是非法年龄");

            return ValidationResult.Success;
        }
    }

    public class ValidatorVM : ObservableValidator
    {

        private string name;

        [Required(AllowEmptyStrings =false,ErrorMessage ="名字不可为空")]
        [MaxLength(6,ErrorMessage ="长度不能大于6")]
        public string Name
        {
            get { return name; }
            set { SetProperty(ref name, value, true); }
        }

        private int age;


        [Number]
        public int Age
        {
            get { return age;}
            set { SetProperty(ref age, value, true); }
        }
    }
前台代码
 <TextBox Height="50" Text="{Binding VM.Age}">
                <TextBox.Style>
                    <Style>
                        <Setter Property="Validation.ErrorTemplate">
                            <Setter.Value>
                                <ControlTemplate>
                                    <StackPanel>
                                        <AdornedElementPlaceholder/>
                                        <ItemsControl ItemsSource="{Binding}">
                                            <ItemsControl.ItemTemplate>
                                                <DataTemplate>
                                                    <TextBlock Foreground="Red" Text="{Binding ErrorContent}"/>
                                                </DataTemplate>
                                            </ItemsControl.ItemTemplate>
                                        </ItemsControl>
                                    </StackPanel>
                                </ControlTemplate>
                            </Setter.Value>
                        </Setter>
                    </Style>
                </TextBox.Style>
            </TextBox>
或者参考 https://www.cnblogs.com/wzh2010/p/6518834.html
命令绑定修改为
ChangeTitleCommand = new RelayCommand(ChangeTitle, CanExecute);
       private bool CanExecute()
        {
            return !VM.HasErrors;
        }
完整的模型代码如下
public class MainWindowViewModel : ObservableObject
    {
        private string title;

        public string Title
        {
            get { return title; }
            set { SetProperty(ref title, value); }
        }

        public ICommand ChangeTitleCommand { get; set; }

        private ValidatorVM _VM;

        public ValidatorVM VM
        {
            get { return _VM; }
            set { _VM = value; }
        }


        private void ChangeTitle()
        {
            Title = "Hello MvvmLight";
        }
        public MainWindowViewModel(IServiceProvider service)
        {
            _VM = service.GetRequiredService<ValidatorVM>();
            Title = "Hello World";
            //ChangeTitleCommand = new RelayCommand(ChangeTitle);

            ChangeTitleCommand = new RelayCommand(ChangeTitle, CanExecute);
        }

        private bool CanExecute()
        {
            return !VM.HasErrors;
        }
    }
带参数命令
RelayCommand = new RelayCommand<string>(obj => Title = "带参数的命令" + obj);
将参数包装成依赖属性,这种方式不推荐,太麻烦
    /// <summary>
    /// 一种方式就是将 UserParam类 改成 支持具有依赖属性的对象
    /// </summary>
    public class UserParam:FrameworkElement
    {
        public int Age
        {
            get { return (int)GetValue(AgeProperty); }
            set { SetValue(AgeProperty, value); }
        }

        // Using a DependencyProperty as the backing store for Age.  This enables animation, styling, binding, etc...
        public static readonly DependencyProperty AgeProperty =
            DependencyProperty.Register("Age", typeof(int), typeof(UserParam), new PropertyMetadata(0, CustomProperty, CustomValidateValueCallback));

        /// <summary>
        /// 属性值验证回调方法
        /// </summary>
        /// <param name="d"></param>
        /// <param name="e"></param>
        private static object CustomValidateValueCallback(DependencyObject d, object baseValue)
        {
            return baseValue;
        }
        /// <summary>
        /// 属性值更改回调方法
        /// </summary>
        /// <param name="d"></param>
        /// <param name="e"></param>
        private static void CustomProperty(DependencyObject d, DependencyPropertyChangedEventArgs e)
        {

        }
    }
绑定示例 https://www.cnblogs.com/wzh2010/p/6607702.html
<StackPanel DockPanel.Dock="Left" Width="240">
                            <Button Command="{Binding PassArgObjCmd}"  Content="传递多个参数" Height="23" HorizontalAlignment="Left" Width="100">
                                <Button.CommandParameter>
                                    <model:UserParam UserName="{Binding ElementName=ArgStrFrom,Path=Text}" UserPhone="88888888" UserAdd="地址" UserSex="男" ></model:UserParam>
                                </Button.CommandParameter>
                            </Button>
  </StackPanel>
转换器传递参数
模型定义如下
    /// <summary>
    /// 一种方式就是将 UserParam类 改成 支持具有依赖属性的对象
    /// </summary>
    public class UserParam
    {
        public string UserName { get; internal set; }
        public string UserSex { get; internal set; }
        public string UserPhone { get; internal set; }
        public string UserAdd { get; internal set; }
    }

    public class UserInfoConvert : IMultiValueConverter
    {
        /// <summary>
        /// 对象转换
        /// </summary>
        /// <param name="values">所绑定的源的值</param>
        /// <param name="targetType">目标的类型</param>
        /// <param name="parameter">绑定时所传递的参数</param>
        /// <param name="culture"><系统语言等信息</param>
        /// <returns></returns>
        public object Convert(object[] values, Type targetType, object parameter, System.Globalization.CultureInfo culture)
        {
            if (!values.Cast<string>().Any(text => string.IsNullOrEmpty(text)) && values.Count() == 4)
            {
                UserParam up = new UserParam() { UserName = values[0].ToString(), UserSex = values[1].ToString(), UserPhone = values[2].ToString(), UserAdd = values[3].ToString() };
                return up;
            }

            return null;
        }

        public object[] ConvertBack(object value, Type[] targetTypes, object parameter, System.Globalization.CultureInfo culture)
        {
            throw new NotImplementedException();
        }
    }
ViewModel中添加属性
        private void ExcuteParam(UserParam obj)
        {
            userParam = obj;
        }

        public IRelayCommand<UserParam> RelayCommand { get;  }

        private UserParam userParam;

        public UserParam UserParam
        {
            get { return userParam; }
            set { SetProperty(ref userParam, value); }
        }
RelayCommand = new RelayCommand<UserParam>(ExcuteParam);
前台页面代码
名称空间引入
xmlns:convert="clr-namespace:MvvmSample.Core.ViewModels"
     <StackPanel Margin="10,0,0,50">
                <TextBlock Text="动态参数传递" FontWeight="Bold" FontSize="12" Margin="0,5,0,5" ></TextBlock>
                <StackPanel Orientation="Horizontal" >
                    <StackPanel Orientation="Vertical" Margin="0,0,10,0" >
                        <StackPanel Orientation="Horizontal" Margin="0,0,0,5" >
                            <TextBlock Text="姓名" Width="80" ></TextBlock>
                            <TextBox x:Name="txtUName" Width="200" />
                        </StackPanel>
                        <StackPanel Orientation="Horizontal" Margin="0,0,0,5" >
                            <TextBlock Text="电话" Width="80" ></TextBlock>
                            <TextBox x:Name="txtUPhone" Width="200" />
                        </StackPanel>
                        <StackPanel Orientation="Horizontal" Margin="0,0,0,5" >
                            <TextBlock Text="地址" Width="80"></TextBlock>
                            <TextBox x:Name="txtUAdd" Width="200"/>
                        </StackPanel>
                        <StackPanel Orientation="Horizontal" Margin="0,0,0,5" >
                            <TextBlock Text="性别" Width="80" ></TextBlock>
                            <TextBox x:Name="txtUSex" Width="200" />
                        </StackPanel>
                    </StackPanel>

                    <StackPanel>
                        <StackPanel.Resources>
                            <convert:UserInfoConvert x:Key="uic"/>
                        </StackPanel.Resources>
                        <Button Content="点击传递" Command="{Binding RelayCommand}">
                            <Button.CommandParameter>
                                <MultiBinding Converter="{StaticResource uic}">
                                    <Binding ElementName="txtUName" Path="Text"/>
                                    <Binding ElementName="txtUSex" Path="Text"/>
                                    <Binding ElementName="txtUPhone" Path="Text"/>
                                    <Binding ElementName="txtUAdd" Path="Text"/>
                                </MultiBinding>
                            </Button.CommandParameter>
                        </Button>
                    </StackPanel>

                    <StackPanel Width="240" Orientation="Vertical" Margin="10,0,0,0" >
                        <TextBlock Text="{Binding UserParam.UserName,StringFormat='姓名:\{0\}'}" ></TextBlock>
                        <TextBlock Text="{Binding UserParam.UserPhone,StringFormat='电话:\{0\}'}" ></TextBlock>
                        <TextBlock Text="{Binding UserParam.UserAdd,StringFormat='地址:\{0\}'}" ></TextBlock>
                        <TextBlock Text="{Binding UserParam.UserSex,StringFormat='性别:\{0\}'}" ></TextBlock>
                    </StackPanel>
                </StackPanel>
            </StackPanel>
传递事件参数--拖拽上传
添加包

名称空间引用
xmlns:behav="http://schemas.microsoft.com/xaml/behaviors"
            <StackPanel Margin="10,0,0,50">
                <TextBlock Text="传递原事件参数" FontWeight="Bold" FontSize="12" Margin="0,5,0,5" ></TextBlock>
                <DockPanel x:Name="PassEventArg" >
                    <StackPanel DockPanel.Dock="Left" Width="240" Orientation="Horizontal" >
                        <Border BorderBrush="Red" BorderThickness="1" >
                            <TextBlock Width="100" Height="50"  Text="拖拽上传" TextAlignment="Center" FontSize="18" AllowDrop="True" >
                            <behav:Interaction.Triggers>
                                <behav:EventTrigger EventName="Drop">
                                    <behav:InvokeCommandAction Command="{Binding DragCommand}" PassEventArgsToCommand="True"/>
                                </behav:EventTrigger>
                            </behav:Interaction.Triggers>
                            </TextBlock>
                        </Border>
                    </StackPanel>
                    <StackPanel DockPanel.Dock="Right" Width="240" Orientation="Horizontal">
                        <TextBlock Text="{Binding FileAdd,StringFormat='获取地址:\{0\}'}" ></TextBlock>
                    </StackPanel>
                </DockPanel>
            </StackPanel>
后台代码
        public IRelayCommand<DragEventArgs> DragCommand { get; set; }
        private string _FileAdd;

        public string FileAdd
        {
            get { return _FileAdd; }
            set { SetProperty(ref _FileAdd, value); }
        }

        private void ExecuteDrop(DragEventArgs obj)
        {

            FileAdd = ((System.Array)obj.Data.GetData(System.Windows.DataFormats.FileDrop)).GetValue(0).ToString();
        }

DragCommand = new RelayCommand<DragEventArgs>(ExecuteDrop);
控件的事件转换为命令
  <StackPanel Margin="10,0,0,50">
                <TextBlock Text="事件转命令执行" FontWeight="Bold" FontSize="12" Margin="0,5,0,5" ></TextBlock>
                <DockPanel x:Name="EventToCommand" >
                    <StackPanel DockPanel.Dock="Left" Width="240" Orientation="Horizontal" >
                        <ComboBox Name="combox" Width="130" ItemsSource="{Binding UserParamList}" DisplayMemberPath="UserName" SelectedValuePath="UserSex">
                            <behav:Interaction.Triggers>
                                <behav:EventTrigger EventName="SelectionChanged">
                                    <behav:InvokeCommandAction Command="{Binding SelectCommand}"/>
                                </behav:EventTrigger>
                            </behav:Interaction.Triggers>
                        </ComboBox>
                    </StackPanel>
                    <StackPanel DockPanel.Dock="Right" Width="240" Orientation="Horizontal">
                        <TextBlock Text="{Binding ElementName=combox, Path=SelectedIndex}" ></TextBlock>
                    </StackPanel>
                </DockPanel>
            </StackPanel>
后台代码
        public ObservableCollection<UserParam> UserParamList { get; set; }
        public IRelayCommand SelectCommand { get; }
        private  void OnSelectCommand()
        {

        }
数据初始化
            UserParamList = new()
            {
                new() { UserName = "张三", UserSex = "1" },
                new() { UserName = "李四", UserSex = "2" },
                new() { UserName = "王五", UserSex = "3" },
                new() { UserName = "赵六", UserSex = "4" },
            };
            SelectCommand=new RelayCommand(OnSelectCommand);
在多线程和调度中使用
异步调用不卡UI界面
public IAsyncRelayCommand AsyncRelayCommand { get; }
AsyncRelayCommand = new AsyncRelayCommand(() => Task.Run(() => { Thread.Sleep(8000); Title = "我执行完了"; }));
Messenger

注册消息的简单模式
参数说明:
<string, string> 消息类型,令牌类型
this为消息的接收者实例,“AAA”为消息令牌,
MessageHandler:(sender,message)==>sender为接收消息的收件人,message接收到的消息
            WeakReferenceMessenger.Default.Register<string, string>(this, "AAA", (recipient, message) =>
            {
                MessageBox.Show($"MessagePage 接收到了消息: {message};\n消息的收件人类型为{recipient.GetType()};");
            });
不带令牌的消息注册
            WeakReferenceMessenger.Default.Register<string>(this, (recipient, message) =>
            {
                if (recipient is MessagePage)//如果是发送给我的
                {
                    MessageBox.Show($"MessagePage 接收到了消息: {message};\n消息的收件人类型为{recipient.GetType()};");
                }
            });
备注:同一收件人只能注册一种消息类型
发送字符串消息的两种形式
            WeakReferenceMessenger.Default.Send( DateTime.Now.ToString("HH:mm:ss")+"发送了字符串消息");
            WeakReferenceMessenger.Default.Send( DateTime.Now.ToString("HH:mm:ss") +"发送了令牌消息,标识符为AAA", "AAA");
备注:不带令牌的形式的消息不会发送给注册了令牌的接收者,带令牌的形式,不会发送给没有注册令牌的接收者
自动注册接收消息
备注:需要将isactive设置为true;以下实例将接收到所有字符串类型的消息
        public class MessagePageViewModel : ObservableRecipient, IRecipient<string>
        {
            public MessagePageViewModel()
            {
                this.IsActive = true;
            }
            public void Receive(string message)
            {
                MessageBox.Show($"MessagePage 接收到了消息: {message};消息令牌为:AAA;\n消息的收件人类型为{this.GetType()};");
            }
        }
ObservableRecipient的方法说明:发送属性改变的消息,如果想要使用自定义的令牌,可以重写该方法
protected virtual void Broadcast<T>(T oldValue, T newValue, string? propertyName)
注册接收属性改变的消息
            WeakReferenceMessenger.Default.Register<PropertyChangedMessage<string>>(this, (recipient, message) =>
            {
                if (recipient is MessagePage)
                {
                    MessageBox.Show($"发件人: {message.Sender};属性名:{message.PropertyName}");
                }

            });
请求消息
注册请求消息
            WeakReferenceMessenger.Default.Register<RequestMessage<string>>(this, (recipient, message) =>
            {
                if (recipient is MessagePage)
                {
                    message.Reply("我已经接收到了你的请求消息,这是我的答复");
                }
            });
发送请求,并接收答复
var name = WeakReferenceMessenger.Default.Send<RequestMessage<string>>();


 浙公网安备 33010602011771号