ssm框架整合
ssm框架整合流程(配置版)
1. Mybatis层
1. 创建数据库
create database `ssmbuild`;

use `ssmbuild`;

drop table if exists `books`;

create table `books`
(
    `bookID`     int(10)      not null auto_increment comment '书id',
    `bookName`   varchar(100) not null comment '书名',
    `bookCounts` int(10)      not null comment '数量',
    `detail`     varchar(200) not null comment '描述',
    key `bookID` (`bookID`)
) engine = INNODB
  default charset = utf8;

insert into books (bookID, bookName, bookCounts, detail)
values (1, 'java', 1, '从入门到放弃'),
       (2, 'MySQL', 10, '从删库到跑路'),
       (3, 'Linux', 5, '从进门到坐牢');
2. 创建一个简单的maven项目
导入依赖
<!--依赖: junit,数据库驱动,连接池,servlet,jsp,mybatis,mybatis-spring,spring-->
<dependencies>
    <!--junit-->
    <dependency>
        <groupId>junit</groupId>
        <artifactId>junit</artifactId>
        <version>4.12</version>
    </dependency>
    <!--数据库驱动-->
    <dependency>
        <groupId>mysql</groupId>
        <artifactId>mysql-connector-java</artifactId>
        <version>5.1.47</version>
    </dependency>
    <!--数据库连接池-->
    <dependency>
        <groupId>com.mchange</groupId>
        <artifactId>c3p0</artifactId>
        <version>0.9.5.2</version>
    </dependency>
    <!--Servlet,JSP-->
    <dependency>
        <groupId>javax.servlet</groupId>
        <artifactId>servlet-api</artifactId>
        <version>2.5</version>
    </dependency>
    <dependency>
        <groupId>javax.servlet.jsp</groupId>
        <artifactId>jsp-api</artifactId>
        <version>2.2</version>
    </dependency>
    <dependency>
        <groupId>javax.servlet</groupId>
        <artifactId>jstl</artifactId>
        <version>1.2</version>
    </dependency>
    <!--Mybatis-->
    <dependency>
        <groupId>org.mybatis</groupId>
        <artifactId>mybatis</artifactId>
        <version>3.5.2</version>
    </dependency>
    <dependency>
        <groupId>org.mybatis</groupId>
        <artifactId>mybatis-spring</artifactId>
        <version>2.0.5</version>
    </dependency>
    <!--Spring-->
    <dependency>
        <groupId>org.springframework</groupId>
        <artifactId>spring-webmvc</artifactId>
        <version>5.2.0.RELEASE</version>
    </dependency>
    <dependency>
        <groupId>org.springframework</groupId>
        <artifactId>spring-jdbc</artifactId>
        <version>5.2.0.RELEASE</version>
    </dependency>

    <!--Lombok:可以不导,只是为了偷懒-->
    <dependency>
        <groupId>org.projectlombok</groupId>
        <artifactId>lombok</artifactId>
        <version>1.18.12</version>
    </dependency>
</dependencies>
静态资源导出
<!--静态资源导出问题-->
<build>
    <resources>
        <resource>
            <directory>src/man/java</directory>
            <includes>
                <include>**/*.properties</include>
                <include>**/*.xml</include>
            </includes>
            <filtering>false</filtering>
        </resource>
        <resource>
            <directory>src/man/resources</directory>
            <includes>
                <include>**/*.properties</include>
                <include>**/*.xml</include>
            </includes>
            <filtering>false</filtering>
        </resource>
    </resources>
</build>
3. 在idea中连接数据库
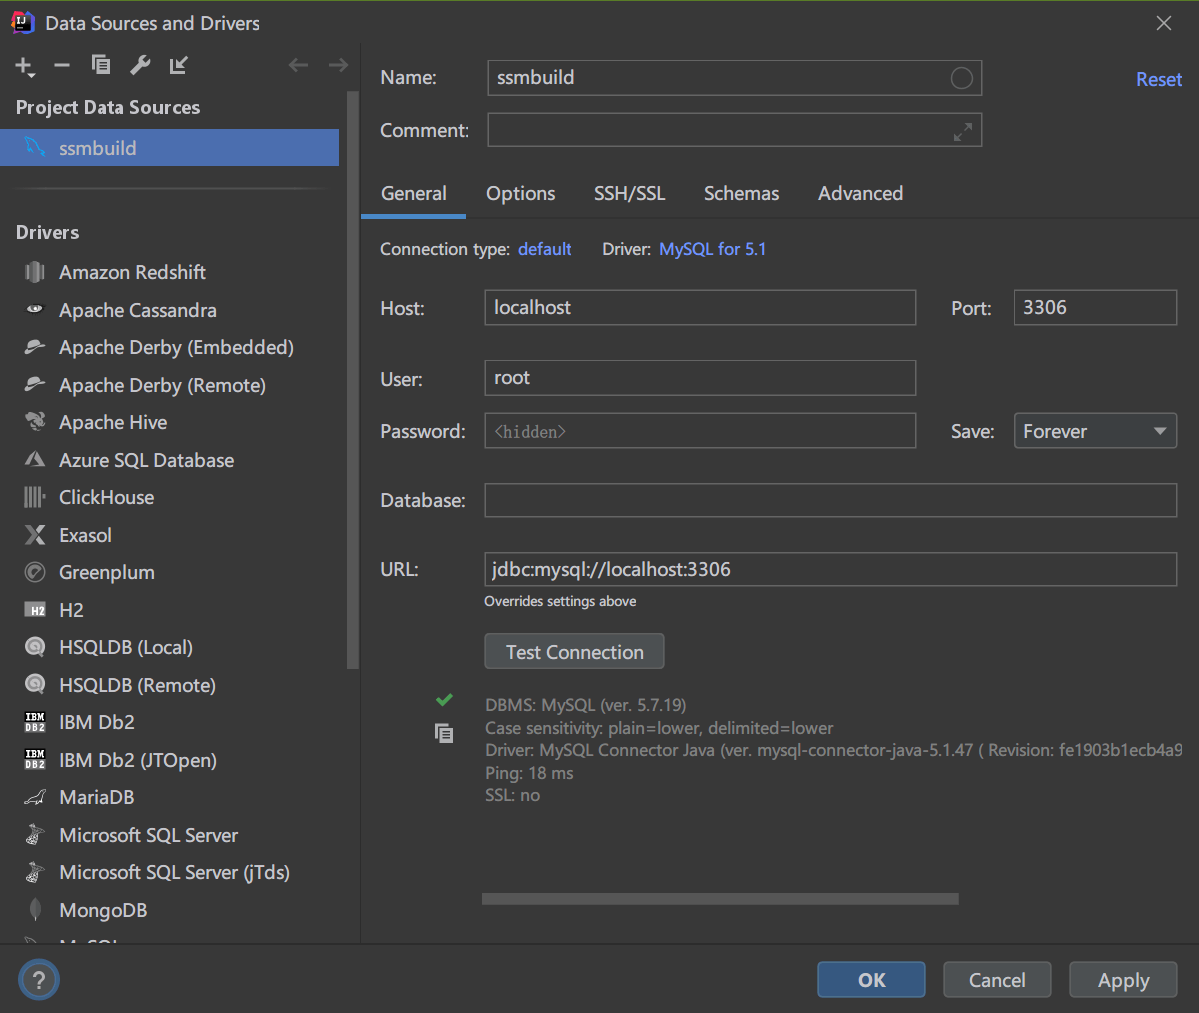
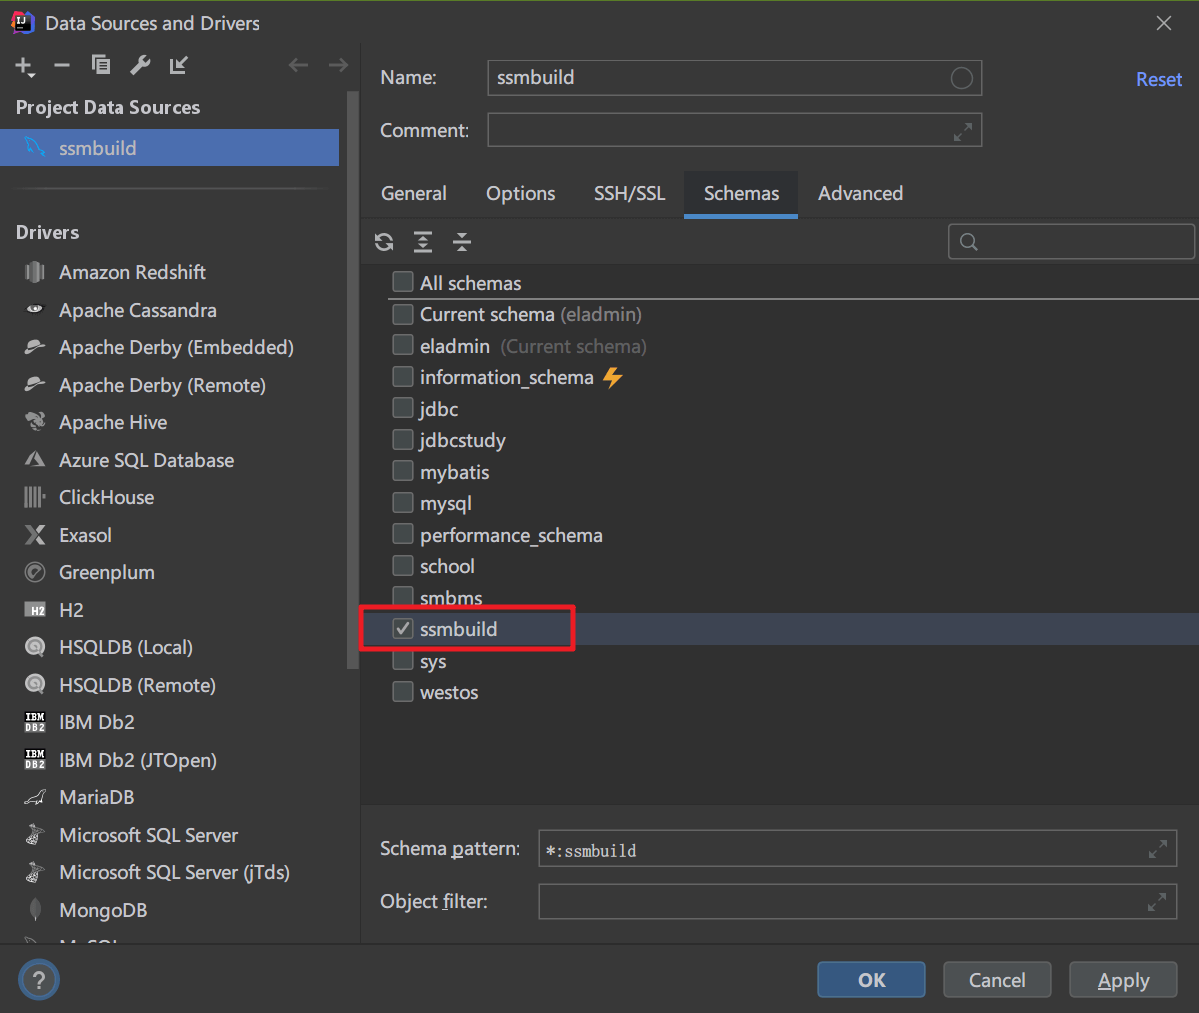
4. 建立包结构
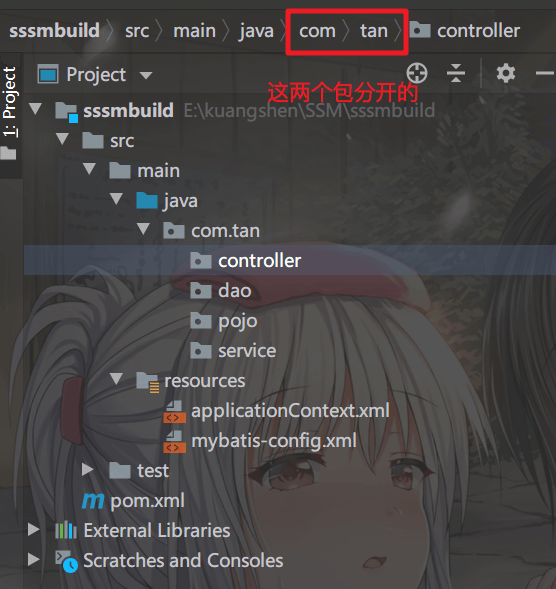
mybatis-config.xml初始化 :
<?xml version="1.0" encoding="utf-8" ?>
<!DOCTYPE configuration
        PUBLIC "-//mybatis.org//DTD Config 3.0//EN"
        "http://mybatis.org/dtd/mybatis-3-config.dtd">
<configuration>

</configuration>
applicationContext.xml初始化 :
<?xml version="1.0" encoding="utf-8" ?>
<beans xmlns="http://www.springframework.org/schema/beans"
       xmlns:xsi="http://www.w3.org/2001/XMLSchema-instance"
       xsi:schemaLocation="http://www.springframework.org/schema/beans
        http://www.springframework.org/schema/beans/spring-beans.xsd">

</beans>
在resources包下添加一个数据库配置文件database.properties :
# 如果使用MySQL 8.0+ ,增加一个时区的配置
jdbc.driver=com.mysql.jdbc.Driver
jdbc.url=jdbc:mysql://localhost:3306/ssmbuild?useSSL=true&useUnicode=true&characterEncoding=utf8
jdbc.username=root
jdbc.password=123456
5. 建立实体类
pojo包 Books类 :
@Data
@AllArgsConstructor
@NoArgsConstructor
public class Books {

    private int bookID;
    private String bookName;
    private int bookCounts;
    private String detail;
}
mybatis-config.xml中添加别名 :
<typeAliases>
    <package name="com.tan.pojo"/>
</typeAliases>
6. 编写Dao(Mapper)层
接口BookMapper :
public interface BookMapper {

    //增加一本书
    int addBook(Books books);

    //删除一本书
    int deleteBookById(@Param("bookId") int id);

    //更新一本书
    int updateBook(Books books);

    //查询一本书
    Books queryBookById(@Param("bookId") int id);

    //查询全部书
    List<Books> queryAllBook();
}
BookMapper.xml :
<?xml version="1.0" encoding="UTF-8" ?>
<!DOCTYPE mapper
        PUBLIC "-//mybatis.org//DTD Config 3.0//EN"
        "http://mybatis.org/dtd/mybatis-3-mapper.dtd">
<mapper namespace="com.tan.dao.BookMapper">

    <insert id="addBook" parameterType="Books">
        insert into ssmbuild.books(bookName, bookCounts, detail)
        values (#{bookName}, #{bookCounts}, #{detail});
    </insert>

    <delete id="deleteBookById" parameterType="int">
        delete from ssmbuild.books where bookID=#{bookId}
    </delete>

    <update id="updateBook" parameterType="Books">
        update ssmbuild.books
        set bookName = #{bookName},bookCounts=#{bookCounts},detail=#{detail}
        where bookID=#{bookId};
    </update>

    <select id="queryBookById" resultType="Books">
        select * from ssmbuild.books where bookID=#{bookId}
    </select>

    <select id="queryAllBook" resultType="Books">
        select * from ssmbuild.books
    </select>

</mapper>
mybatis配置文件中添加mapper :
<mappers>
    <mapper class="com.tan.dao.BookMapper"/>
</mappers>
7. 编写Service层
BookService接口 :
public interface BookService {
    //增加一本书
    int addBook(Books books);

    //删除一本书
    int deleteBookById(int id);

    //更新一本书
    int updateBook(Books books);

    //查询一本书
    Books queryBookById(int id);

    //查询全部书
    List<Books> queryAllBook();
}
接口实现类BookServiceImpl :
public class BookServiceImpl implements BookService{

    //service调dao层:组合Dao
    private BookMapper bookMapper;
    public void setBookMapper(BookMapper bookMapper) {
        this.bookMapper = bookMapper;
    }

    public int addBook(Books books) {
        return bookMapper.addBook(books);
    }

    public int deleteBookById(int id) {
        return bookMapper.deleteBookById(id);
    }

    public int updateBook(Books books) {
        return bookMapper.updateBook(books);
    }

    public Books queryBookById(int id) {
        return bookMapper.queryBookById(id);
    }

    public List<Books> queryAllBook() {
        return bookMapper.queryAllBook();
    }
}
2. Spring层
1. Spring整合Dao层
Dao层的配置原本在mybatis配置文件中,现在都可以整合到spring-dao.xml中.
spring-dao.xml :
<?xml version="1.0" encoding="utf-8" ?>
<beans xmlns="http://www.springframework.org/schema/beans"
       xmlns:xsi="http://www.w3.org/2001/XMLSchema-instance"
       xmlns:context="http://www.springframework.org/schema/context"
       xsi:schemaLocation="http://www.springframework.org/schema/beans
        http://www.springframework.org/schema/beans/spring-beans.xsd http://www.springframework.org/schema/context https://www.springframework.org/schema/context/spring-context.xsd">

    <!--1.关联数据库文件-->
    <context:property-placeholder location="classpath:database.properties"/>

    <!--2.连接池, 可随意配置,此处选择c3p0
        dbcp: 半自动化操作,不能自动连接
        c3p0: 自动化操作(自动化加载配置文件,并且可以自动设置到对象中!)
        druid: 阿里巴巴出品
        hikari: SpringBoot 2.x 内置默认数据库连接池
    -->
    <bean id="dataSource" class="com.mchange.v2.c3p0.ComboPooledDataSource">
        <property name="driverClass" value="${jdbc.driver}"/>
        <property name="jdbcUrl" value="${jdbc.url}"/>
        <property name="user" value="${jdbc.username}"/>
        <property name="password" value="${jdbc.password}"/>

        <!--c3p0连接池的私有属性-->
        <property name="maxPoolSize" value="30"/>
        <property name="minPoolSize" value="10"/>
        <!--关闭连接后不自动commit-->
        <property name="autoCommitOnClose" value="false"/>
        <!--获取连接超时时间-->
        <property name="checkoutTimeout" value="10000"/>
        <!--获取连接失败重试次数-->
        <property name="acquireRetryAttempts" value="2"/>
    </bean>

    <!--3.sqlSessionFactory-->
    <bean id="sqlSessionFactory" class="org.mybatis.spring.SqlSessionFactoryBean">
        <property name="dataSource" ref="dataSource"/>
        <!--绑定Mybatis的配置文件-->
        <property name="configLocation" value="classpath:mybatis-config.xml"/>
    </bean>

    <!--4.配置dao接口扫描包,动态地实现了Dao接口可以注入到Spring容器中!-->
    <bean class="org.mybatis.spring.mapper.MapperScannerConfigurer">
        <!--注入sqlSessionFactory-->
        <property name="sqlSessionFactoryBeanName" value="sqlSessionFactory"/>
        <!--扫描dao包-->
        <property name="basePackage" value="com.tan.dao"/>
    </bean>

</beans>
但是mybatis-config.xml中还是留了一点,只是为了表示一下这里还有mybatis .
mybatis-config.xml :
<?xml version="1.0" encoding="UTF-8" ?>
<!DOCTYPE configuration
        PUBLIC "-//mybatis.org//DTD Config 3.0//EN"
        "http://mybatis.org/dtd/mybatis-3-config.dtd">
<configuration>

    <!--配置数据源,交给Spring去做-->

    <typeAliases>
        <package name="com.tan.pojo"/>
    </typeAliases>

    <mappers>
        <mapper class="com.tan.dao.BookMapper"/>
    </mappers>

</configuration>
2. Spring整合Service层
spring-service.xml :
<?xml version="1.0" encoding="utf-8" ?>
<beans xmlns="http://www.springframework.org/schema/beans"
       xmlns:xsi="http://www.w3.org/2001/XMLSchema-instance"
       xmlns:context="http://www.springframework.org/schema/context"
       xsi:schemaLocation="http://www.springframework.org/schema/beans
        http://www.springframework.org/schema/beans/spring-beans.xsd http://www.springframework.org/schema/context https://www.springframework.org/schema/context/spring-context.xsd">

    <!--1.扫描service下的包-->
    <context:component-scan base-package="com.tan.service"/>

    <!--2.将我们所有业务类注入到Spring中,可以通过配置,或者注解实现-->
    <bean id="bookServiceImpl" class="com.tan.service.BookServiceImpl">
        <property name="bookMapper" ref="bookMapper"/>
    </bean>

    <!--3.声明式事务配置-->
    <bean id="transactionManager" class="org.springframework.jdbc.datasource.DataSourceTransactionManager">
        <!--注入数据源-->
        <property name="dataSource" ref="dataSource"/>
    </bean>

    <!--4.aop事务支持(需要时再加)-->

</beans>
3. SpringMVC层
1. 添加web支持
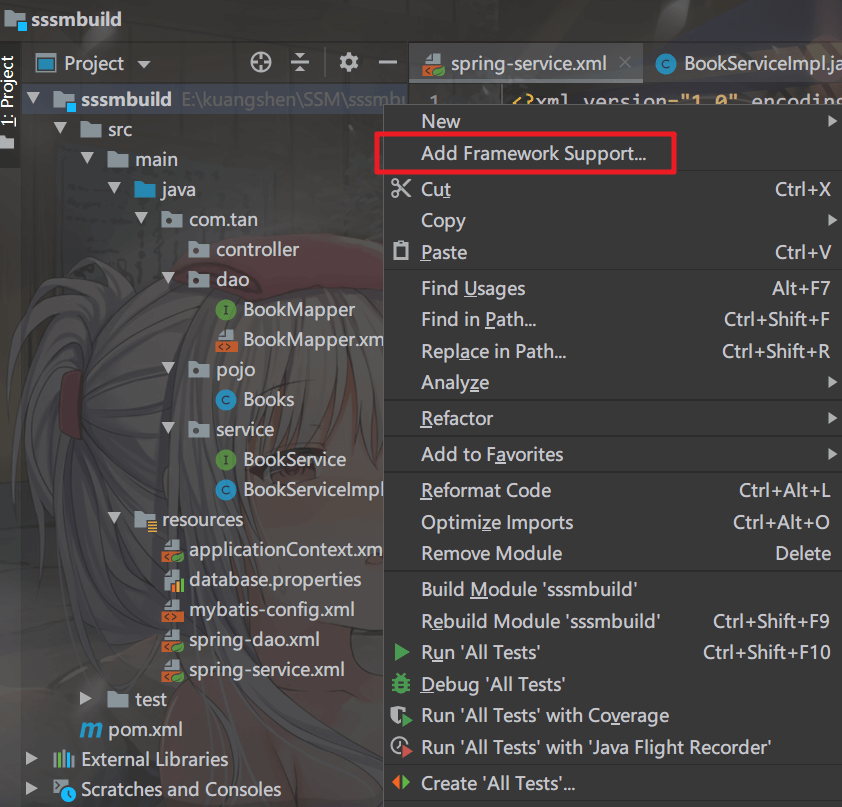
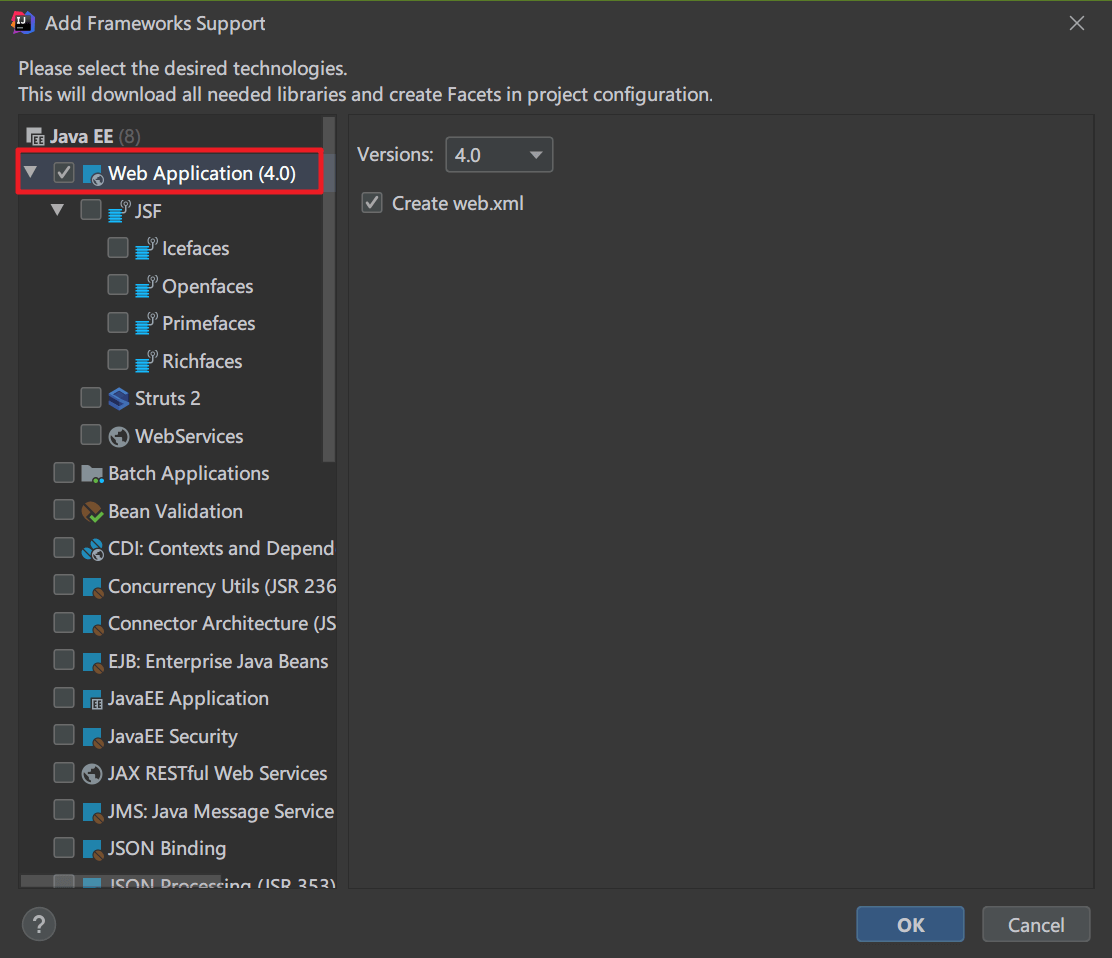

2. 配置web.xml
- 配置SpringMVC的DispatcherServlet
- 配置SpringMVC的乱码过滤
<?xml version="1.0" encoding="UTF-8"?>
<web-app xmlns="http://xmlns.jcp.org/xml/ns/javaee"
         xmlns:xsi="http://www.w3.org/2001/XMLSchema-instance"
         xsi:schemaLocation="http://xmlns.jcp.org/xml/ns/javaee http://xmlns.jcp.org/xml/ns/javaee/web-app_4_0.xsd"
         version="4.0">

    <!--DispatcherServlet-->
    <servlet>
        <servlet-name>springmvc</servlet-name>
        <servlet-class>org.springframework.web.servlet.DispatcherServlet</servlet-class>
        <init-param>
            <param-name>contextConfigLocation</param-name>
            <param-value>classpath:applicationContext.xml</param-value>
        </init-param>
        <!--启动级别1,和tomcat一起启动-->
        <load-on-startup>1</load-on-startup>
    </servlet>
    <servlet-mapping>
        <servlet-name>springmvc</servlet-name>
        <!-- /不包括.jsp , /*包括.jsp -->
        <url-pattern>/</url-pattern>
    </servlet-mapping>

    <!--乱码过滤-->
    <filter>
        <filter-name>encodingFilter</filter-name>
        <filter-class>org.springframework.web.filter.CharacterEncodingFilter</filter-class>
        <init-param>
            <param-name>encoding</param-name>
            <param-value>utf-8</param-value>
        </init-param>
    </filter>
    <filter-mapping>
        <filter-name>encodingFilter</filter-name>
        <!-- /*过滤所有页面包括.jsp -->
        <url-pattern>/*</url-pattern>
    </filter-mapping>

    <!--Session-->
    <session-config>
        <session-timeout>15</session-timeout>
    </session-config>

</web-app>
3. 配置spring-mvc.xml
- 注解驱动
- 静态资源过滤
- 扫描包:controller
- 视图解析器
<?xml version="1.0" encoding="utf-8" ?>
<beans xmlns="http://www.springframework.org/schema/beans"
       xmlns:xsi="http://www.w3.org/2001/XMLSchema-instance"
       xmlns:context="http://www.springframework.org/schema/context"
       xmlns:mvc="http://www.springframework.org/schema/mvc"
       xsi:schemaLocation="http://www.springframework.org/schema/beans
        http://www.springframework.org/schema/beans/spring-beans.xsd http://www.springframework.org/schema/context https://www.springframework.org/schema/context/spring-context.xsd http://www.springframework.org/schema/mvc https://www.springframework.org/schema/mvc/spring-mvc.xsd">

    <!--1.注解驱动-->
    <mvc:annotation-driven/>

    <!--2.静态资源过滤-->
    <mvc:default-servlet-handler/>

    <!--3.扫描包:controller-->
    <context:component-scan base-package="com.tan.controller"/>

    <!--4.视图解析器-->
    <bean class="org.springframework.web.servlet.view.InternalResourceViewResolver">
        <property name="prefix" value="/WEB-INF/jsp/"/>
        <property name="suffix" value=".jsp"/>
    </bean>
</beans>
4. 测试能否运行
1. 配置Tomcat
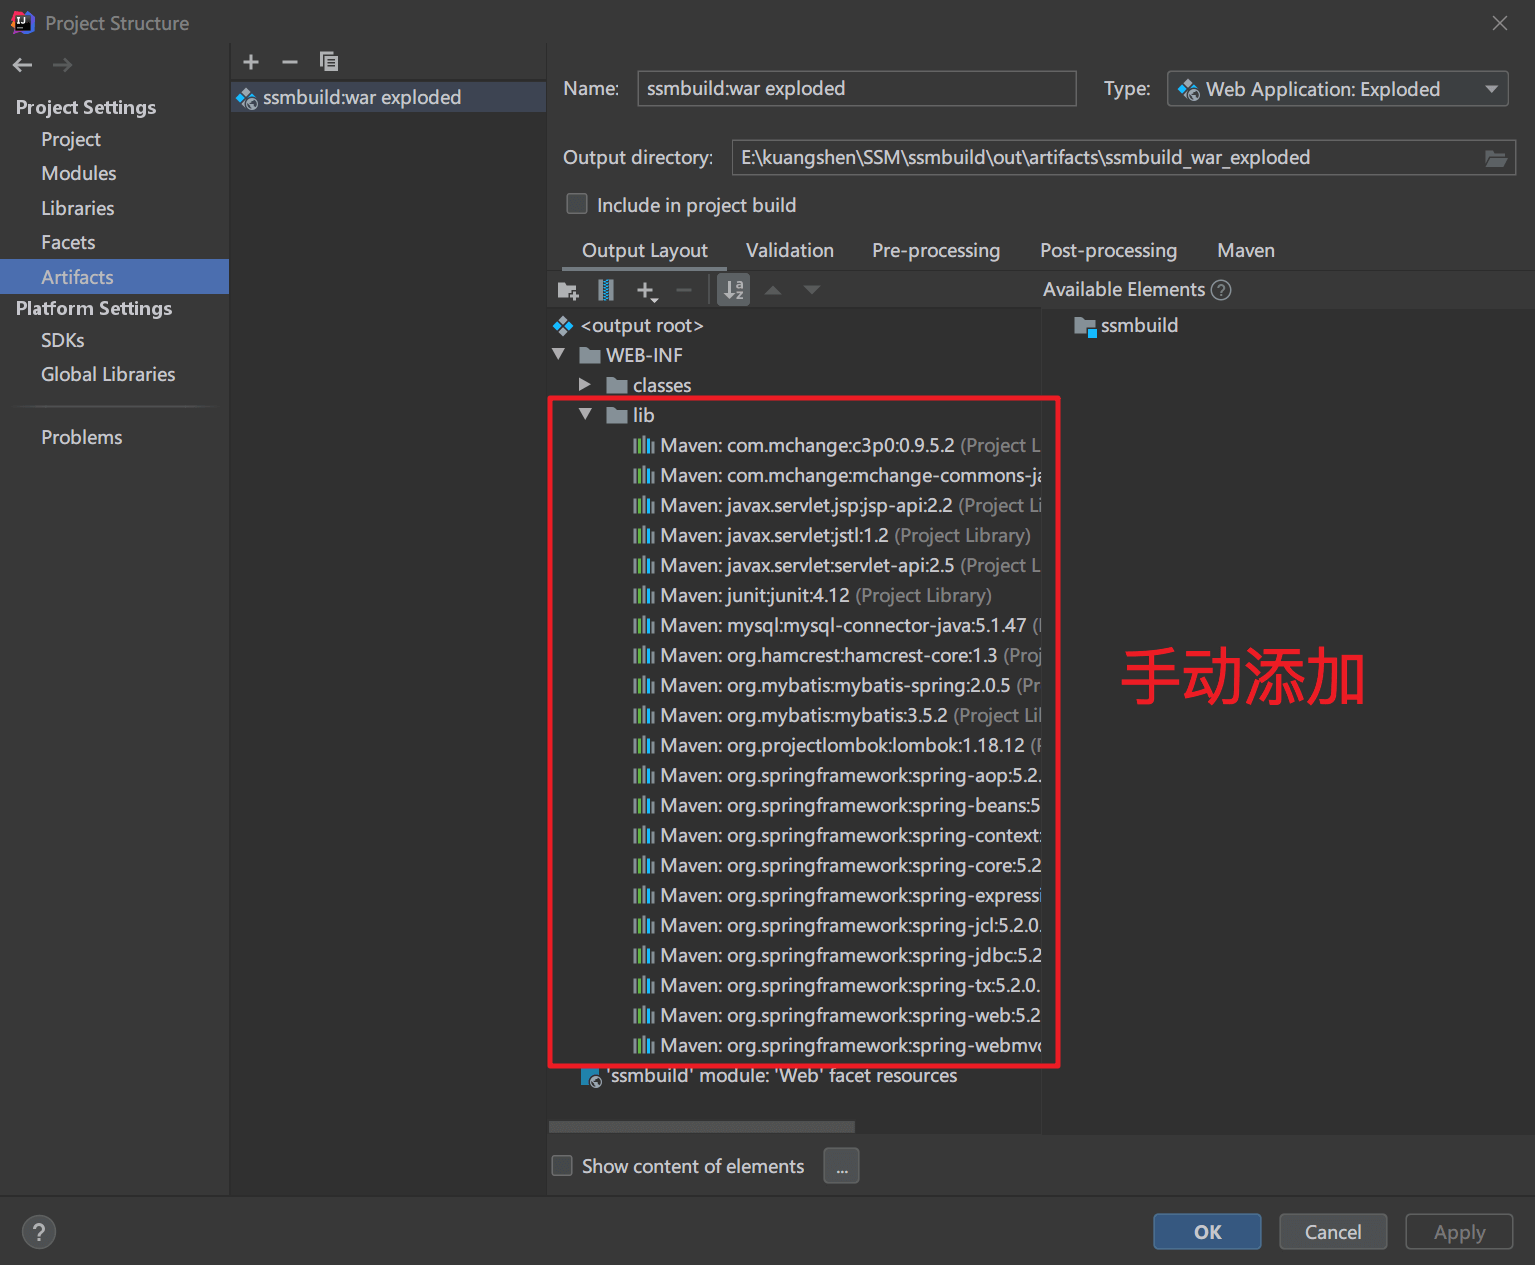
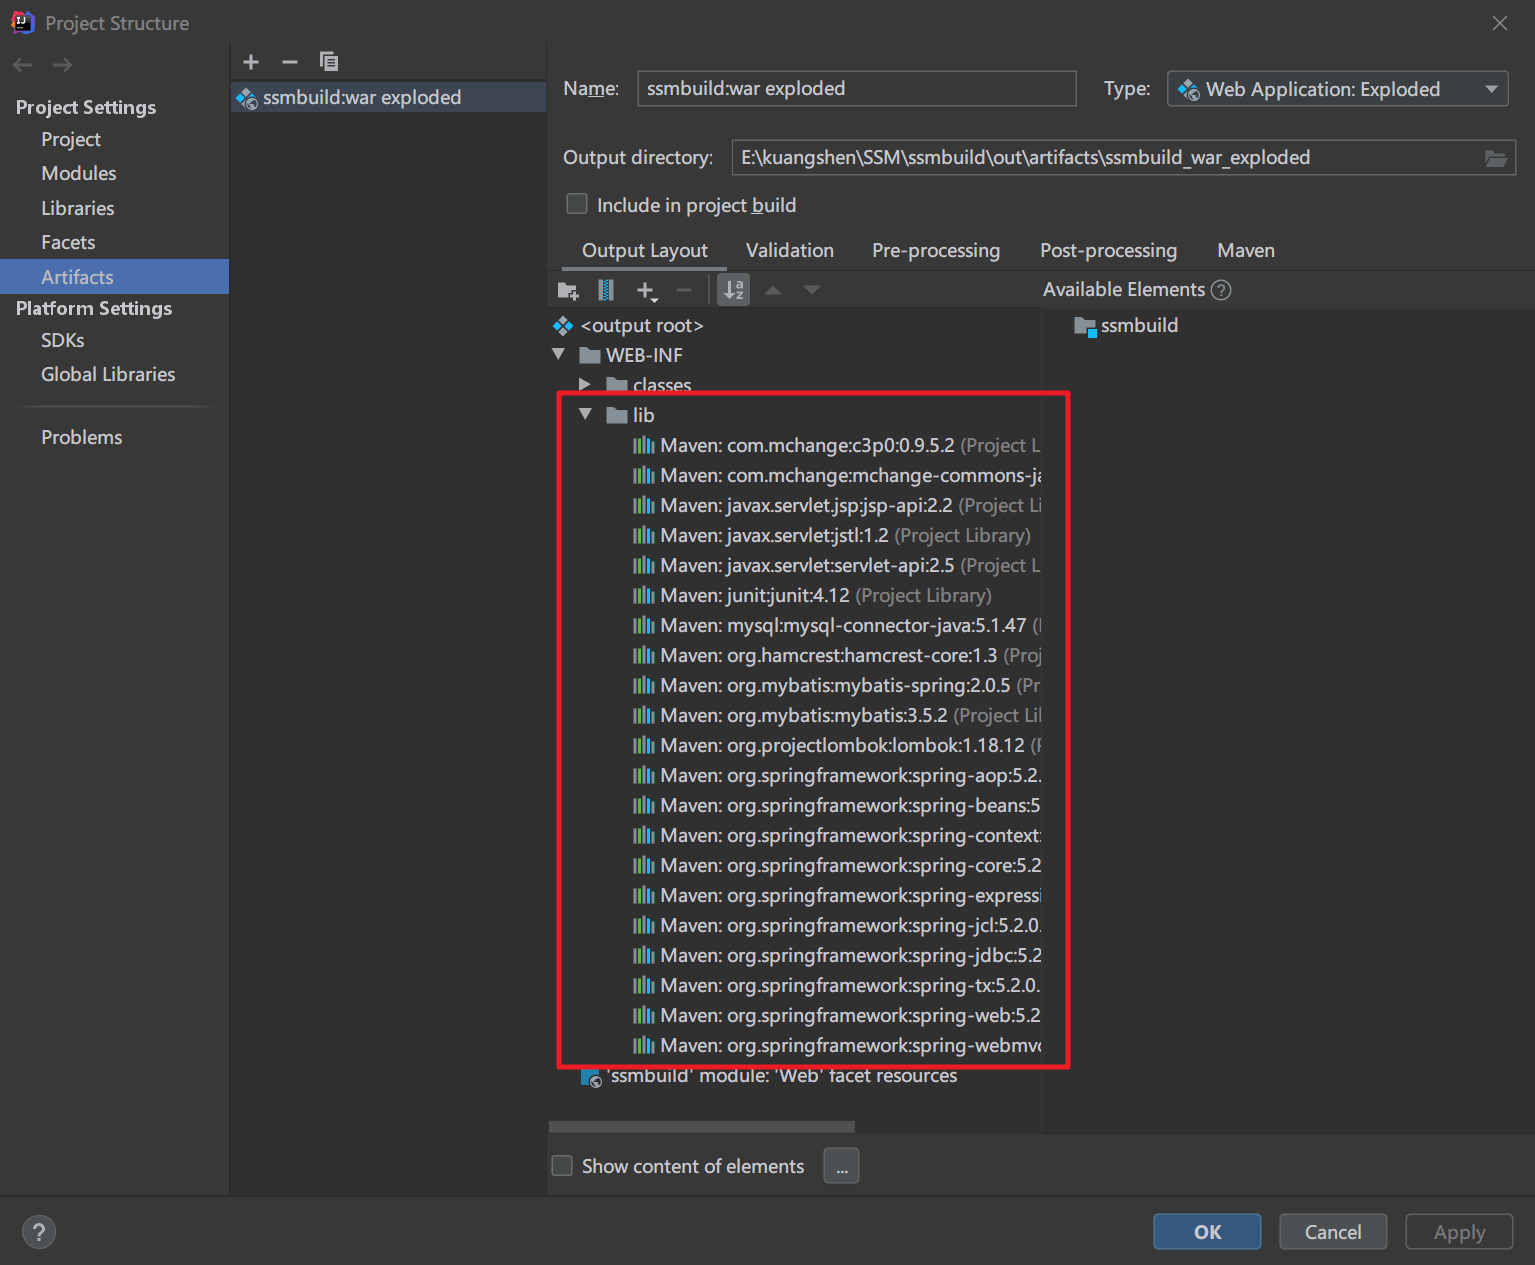
2. Artifacts手动添加lib包
不知道为什么打包的时候没有自动生成,很奇怪应该是个bug,每次添加了新的jar包之后都要在这里手动添加一下
3. 运行测试能否跳转
在controller包下新建BookController类
BookController.java :
@Controller
@RequestMapping("/book")
public class BookController {
    //controller调service层
    @Autowired
    @Qualifier("bookServiceImpl")
    private BookService bookService;

    //查询全部的书籍,并返回到一个书籍的展示页面
    @RequestMapping("/allBook")
    public String list(Model model) {
        List<Books> list = bookService.queryAllBook();
        model.addAttribute("list",list);
        return "allBook";
    }

}
由视图解析器拼接字符串后跳转的路径为\WEB-INF\jsp\allBook.jsp

index.jsp :
<html>
  <head>
    <title>书籍页面</title>
  </head>
  <body>
<h3>
  <a href="${pageContext.request.contextPath}/book/allBook">进入书籍页面</a>
</h3>
  </body>
</html>
allBook.jsp :
<html>
<head>
    <title>书籍展示</title>
</head>
<body>

<h1>书籍展示</h1>

</body>
</html>
4. 运行成功界面
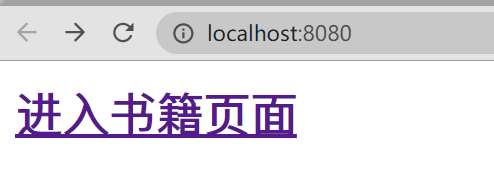
点击后 :
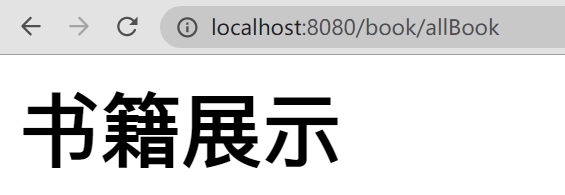
当然真实情况没这么顺利
1. 自己的踩坑与Debug
1. tomcat启动失败
错误信息给的很少,大概意思就是没有jar包,且没办法部署项目.
直接搜错误信息结果范围太大, 找不到问题.
解决方法 : 没有jar包就在Project Structure中手动添加lib包和jar包依赖
2. cvc-elt.1.a:找不到元素beans'的声明
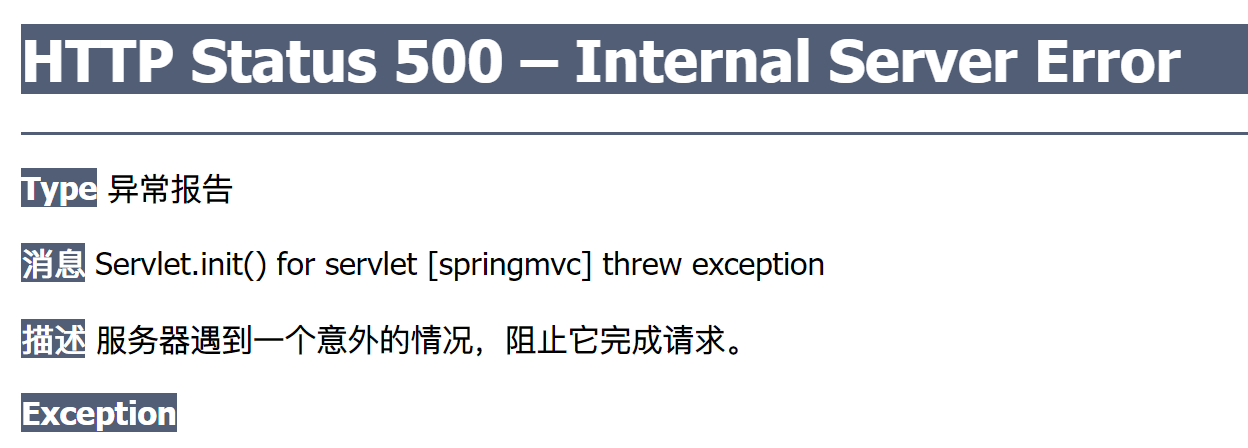

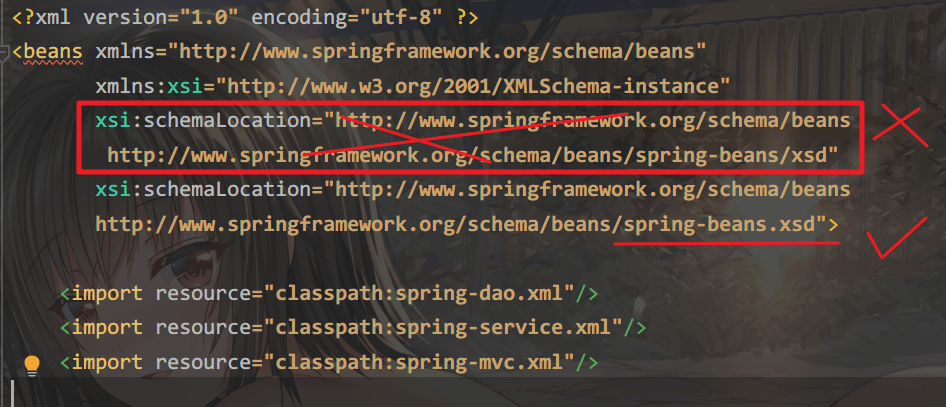
这个比较好找,错误信息中给出了具体位置,就是spring相关的配置文件的头文件出错了
3. BindingException: Invalid bound statement (not found)

绑定异常,开始以为是mapper绑定出问题,检查之后没有任何问题.
于是检查输出文件
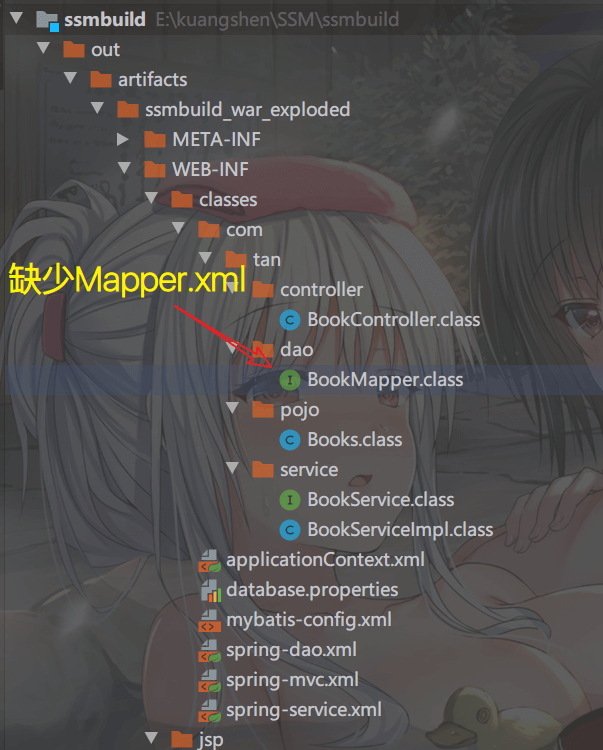
缺少BookMapper.xml八成是maven出问题
1.检查pom.xml静态资源过滤 OK
2.clean一下,在打包一下
结果打包出错,简单检查一下后发现项目名出错, 之前是sssmbuild

由于之前项目名出错,中途改了回来, 但是maven配置中的artifactId没有改, 结果打包出错
2. 老师的踩坑与Debug
由于我在视频中一眼看到就顺手改了一下, 所以自己没有遇到.😜
错误信息 :
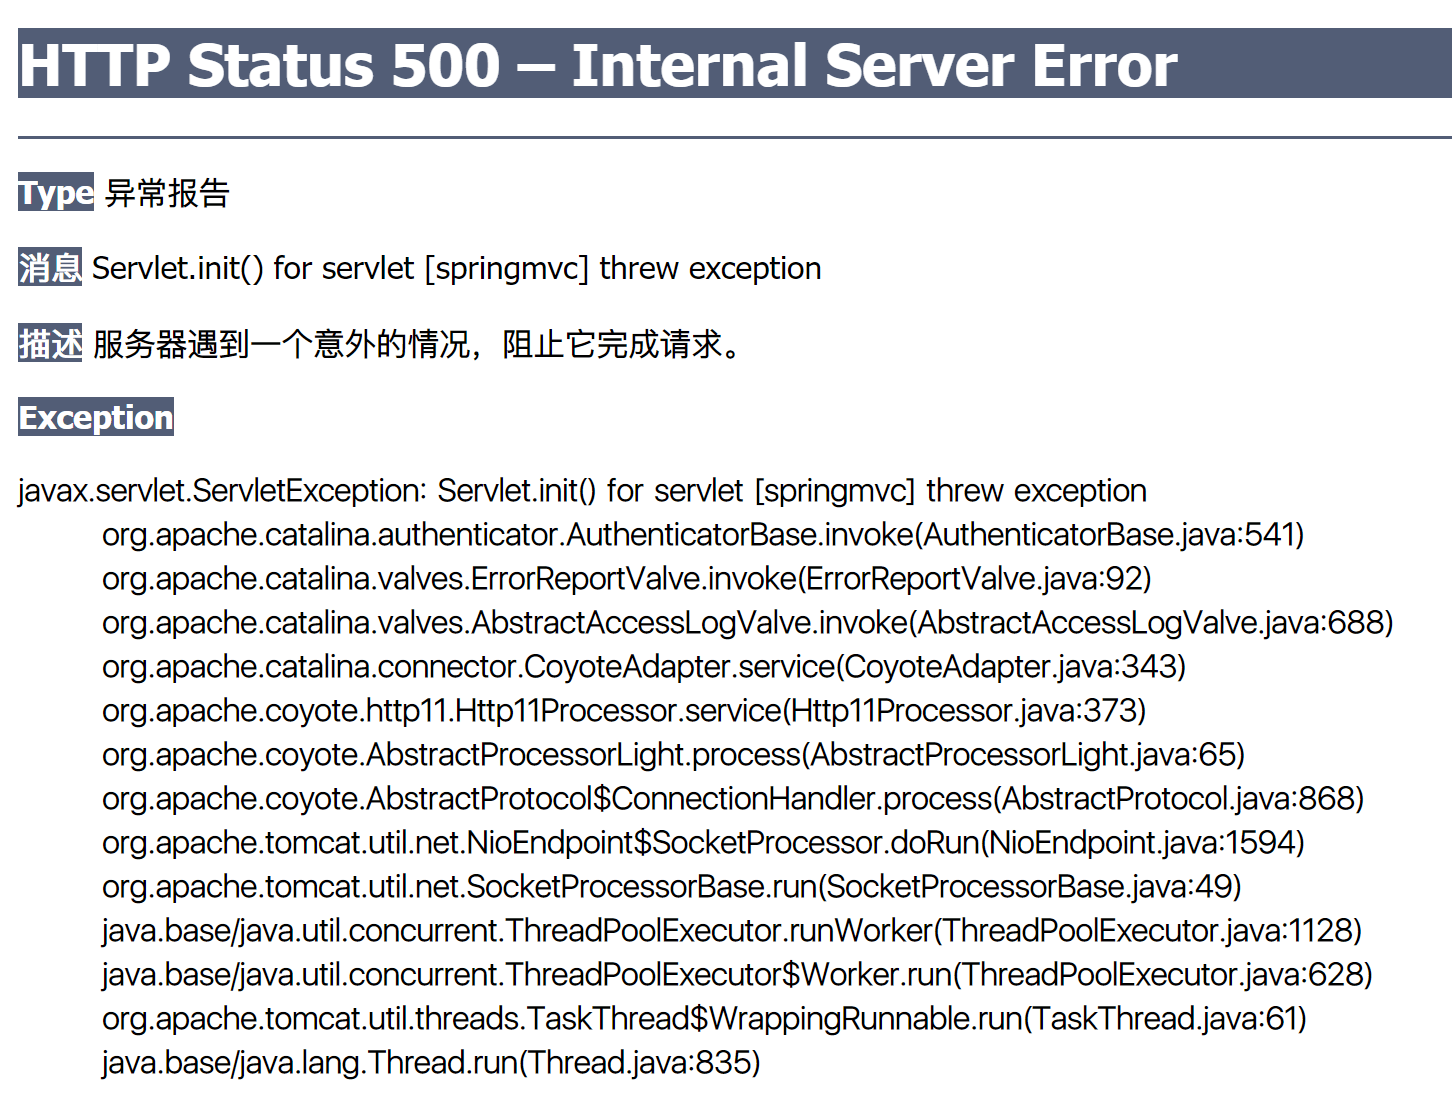
UnsatisfiedDependencyException:Error creating bean with name 'bookController': Unsatisfied dependency expressed through field 'bookService'; nested exception is org.springframework.beans.factory.NoSuchBeanDefinitionException: No qualifying bean of type 'com.tan.service.BookService' available: expected at least 1 bean which qualifies as autowire candidate. Dependency annotations: {@org.springframework.beans.factory.annotation.Autowired(required=true), @org.springframework.beans.factory.annotation.Qualifier(value="bookServiceImpl")}
NoSuchBeanDefinitionException: No qualifying bean of type 'com.tan.service.BookService' available: expected at least 1 bean which qualifies as autowire candidate. Dependency annotations: {@org.springframework.beans.factory.annotation.Autowired(required=true), @org.springframework.beans.factory.annotation.Qualifier(value="bookServiceImpl")}
大概意思就是bean不存在 ;
问题: bean不存在
步骤:
-
查看这个bean注入是否成功! ok
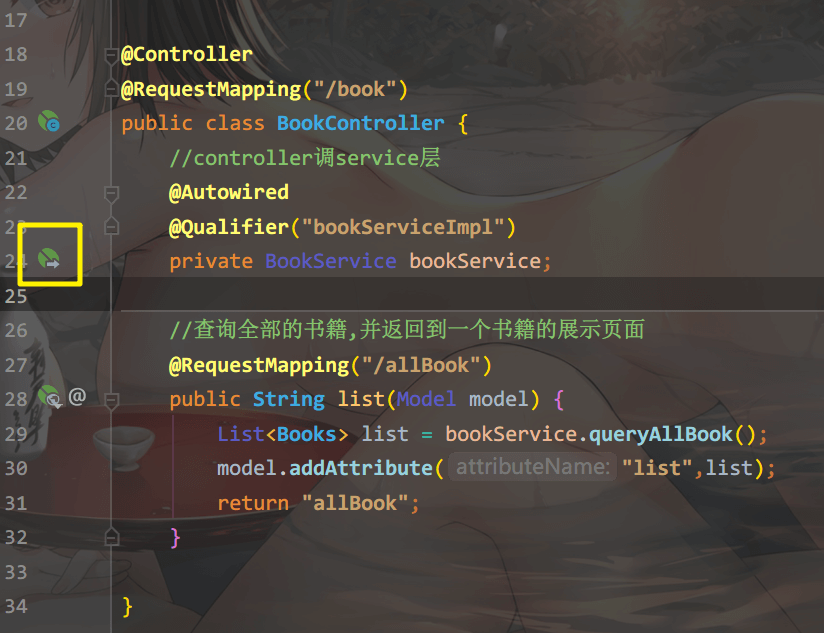
点击之后跳转到bean注入位置, bean注入没有问题

-
Junit单元测试,看我们的的代码是否能查询出来结果! ok
public class MyTest {
    @Test
    public void test() {
        ApplicationContext context = new ClassPathXmlApplicationContext("applicationContext.xml");
        BookService bookServiceImpl = (BookService) context.getBean("bookServiceImpl");
        for (Books books : bookServiceImpl.queryAllBook()) {
            System.out.println(books);
        }
    }
}
查询成功,说明代码没有问题
-
问题一定不在我们底层,是spring出了问题!
bean注入成功,底层代码没有问题,说明只剩下spring调用有问题
-
springMVC整合的时候没有调用到我们service层的bean
可能情况:
-
applicationContext.xml 没有注入bean
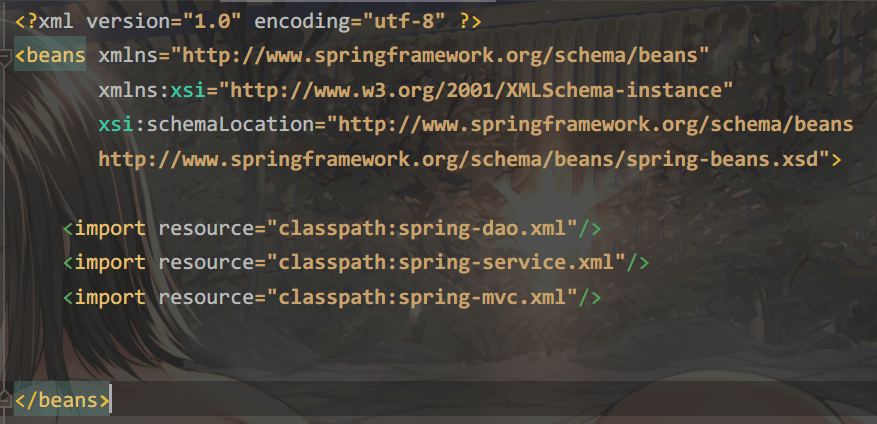
applicationContext.xml只负责整合,没有出问题
-
web.xml中, 我们也绑定过配置文件! , 发现问题,
我们配置的是Spring-MVC.xml,这里确实没有service bean
,所以报空指针.
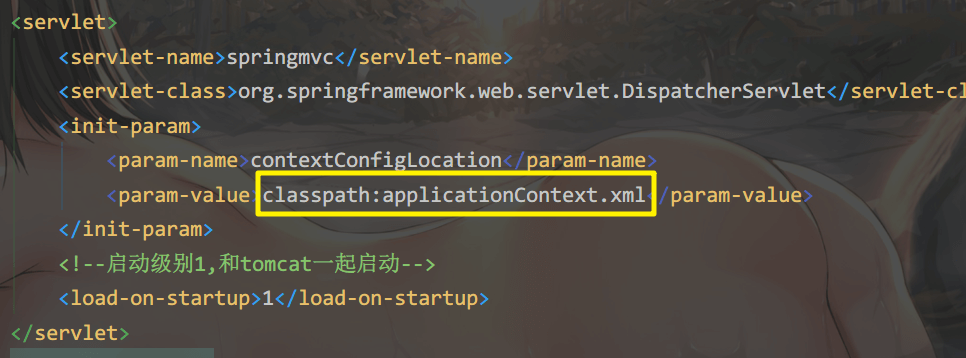
之前是classpath:spring-mvc.xml, 没办法调到spring-service.xml, 所以出现空指针异常
-
问题: bean不存在

步骤:
1. 查看这个bean注入是否成功!  ok
2. Junit单元测试,看我们的的代码是否能查询出来结果!  ok
3. 问题一定不在我们底层,是spring出了问题!
4. springMVC整合的时候没有调用到我们service层的bean
    1.applicationContext.xml 没有注入bean
    2.web.xml中, 我们也绑定过配置文件! , 发现问题,
      我们配置的是Spring-MVC.xml,这里确实没有service bean,
      所以报空指针.


