jQuery 基于verify实现验证码 "全家桶" 一次让你吃饱
这篇文章主要介绍了verify.js实现不同类型的验证码(数字字母组合、算法、滑块、图片滑块、点选图片文字)方式,需要的朋友可以参考下 。
verify.js是一款功能强大的jquery验证码插件。verify.js可以实现普通的图形验证码,数字验证码,滑动验证码和点选验证码等多种验证码功能。
1、普通验证码
就是所有英文字母和数字的组合,可以随意设置组合的位数
<div class="row">
	<div class="col-md-offset-4 col-md-4">
		<h3>普通验证码</h3>
		<div id="mpanel2" ></div>
		<button type="button" id="check-btn" class="verify-btn">确定</button>
	</div>
</div>
$('#mpanel2').codeVerify({
	type : 1,
	width : '400px',
	height : '50px',
	fontSize : '30px',
	codeLength : 6,
	btnId : 'check-btn',
    ready : function() {
	},
	success : function() {
		alert('验证匹配!');
	},
	error : function() {
		alert('验证码不匹配!');
	}
});
2、数字计算验证码
算法,支持加减乘,不填为随机,仅在type=2时生效
$('#mpanel3').codeVerify({
	type : 2,
	figure : 100,	//位数,仅在type=2时生效
	arith : 0,	//算法,支持加减乘,不填为随机,仅在type=2时生效
	width : '200px',
	height : '50px',
	fontSize : '30px',
	btnId : 'check-btn2',
	ready : function() {
	},
	success : function() {
		alert('验证匹配!');
	},
    error : function() {
		alert('验证码不匹配!');
	}
});
3、滑动滑块到最右侧完成验证
$('#mpanel1').slideVerify({
	type : 1,		//类型
	vOffset : 5,	//误差量,根据需求自行调整
	barSize : {
		width : '80%',
		height : '40px',
	},
	ready : function() {
	},
	success : function() {
		alert('验证成功,添加你自己的代码!');
		//......后续操作
	},
	error : function() {
	//alert('验证失败!');
	}

});
4、拖动方块到空白处完成验证(图片)
$('#mpanel4').slideVerify({
	type : 2,		//类型
	vOffset : 5,	//误差量,根据需求自行调整
	vSpace : 5,	//间隔
	imgName : ['1.jpg', '2.jpg','3.jpg','4.png','5.jpg'],
	imgSize : {
		width: '400px',
		height: '200px',
	},
	blockSize : {
		width: '40px',
		height: '40px',
	},
	barSize : {
		width : '400px',
		height : '40px',
	},
	ready : function() {
	},
	success : function() {
		alert('验证成功,添加你自己的代码!');
		//......后续操作
	},
	error : function() {
	//	alert('验证失败!');
	}

});
5、点选验证码(点击图片上的文字 按顺序)
$('#mpanel5').pointsVerify({
			defaultNum : 4,	//默认的文字数量
			checkNum : 2,	//校对的文字数量
			vSpace : 5,	//间隔
			imgName : ['1.jpg', '2.jpg','3.jpg','4.png','5.jpg'],
			imgSize : {
				width: '600px',
				height: '200px',
			},
			barSize : {
				width : '600px',
				height : '40px',
			},
			ready : function() {
			},
			success : function() {
				alert('验证成功,添加你自己的代码!');
				//......后续操作
			},
			error : function() {
	//		        	alert('验证失败!');
			}

		});
最好直接上完整代码文件即开即用;
<!DOCTYPE html>
<html lang="zh">
<head>
	<meta charset="UTF-8">
	<meta http-equiv="X-UA-Compatible" content="IE=edge,chrome=1">
	<meta name="viewport" content="width=device-width,initial-scale=1,minimum-scale=1,maximum-scale=1,user-scalable=no"/>
	<title>jquery验证码插件verify.js</title>
	<link href="http://cdn.bootcss.com/bootstrap/3.3.7/css/bootstrap.min.css" rel="stylesheet">
	<link rel="stylesheet" type="text/css" href="css/htmleaf-demo.css">
	<link rel="stylesheet" type="text/css" href="css/verify.css">
	<script src="http://cdn.bootcss.com/jquery/1.11.0/jquery.min.js" type="text/javascript"></script>
	<script>window.jQuery || document.write('<script src="js/jquery-1.11.0.min.js"><\/script>')</script>
	<script type="text/javascript" src="js/verify.js" ></script>
</head>
<body>
	<div class="htmleaf-container">
		<div class="container">
			<div class="row">
				<div class="col-md-offset-4 col-md-4">
					<h3>普通验证码</h3>
					<div id="mpanel2" ></div>
					<button type="button" id="check-btn" class="verify-btn">确定</button>
				</div>
			</div>
			<hr>
			<div class="row">
				<div class="col-md-offset-4 col-md-4">
					<h3>数字计算验证码</h3>
					<div id="mpanel3" style="margin-top: 20px"></div>
					<button type="button" id="check-btn2" class="verify-btn">确定</button>
				</div>
			</div>
			<hr>
			<div class="row">
				<div class="col-md-offset-4 col-md-4">
					<h3>滑动验证码</h3>
					<p>滑动滑块到最右侧完成验证</p>
					<div id="mpanel1" ></div>
					<p style="margin-top:50px;">拖动方块到空白处完成验证</p>
					<div id="mpanel4" ></div>
				</div>
			</div>
			<hr>
			<div class="row">
				<div class="col-md-offset-4 col-md-4">
					<h3>点选验证码</h3>
					<div id="mpanel5" style="margin-top:50px;"></div>
					<div id="mpanel6" style="margin-top:50px;"></div>
				</div>
			</div>

		</div>
	</div>

	<script type="text/javascript">
		$('#mpanel2').codeVerify({
			type : 1,
			width : '400px',
			height : '50px',
			fontSize : '30px',
			codeLength : 6,
			btnId : 'check-btn',
			ready : function() {
			},
			success : function() {
				alert('验证匹配!');
			},
			error : function() {
				alert('验证码不匹配!');
			}
		});


		$('#mpanel3').codeVerify({
			type : 2,
			figure : 100,	//位数,仅在type=2时生效
			arith : 0,	//算法,支持加减乘,不填为随机,仅在type=2时生效
			width : '200px',
			height : '50px',
			fontSize : '30px',
			btnId : 'check-btn2',
			ready : function() {
			},
			success : function() {
				alert('验证匹配!');
			},
			error : function() {
				alert('验证码不匹配!');
			}
		});


		$('#mpanel1').slideVerify({
			type : 1,		//类型
			vOffset : 5,	//误差量,根据需求自行调整
			barSize : {
				width : '80%',
				height : '40px',
			},
			ready : function() {
			},
			success : function() {
				alert('验证成功,添加你自己的代码!');
				//......后续操作
			},
			error : function() {
	//		        	alert('验证失败!');
			}

		});


		$('#mpanel4').slideVerify({
			type : 2,		//类型
			vOffset : 5,	//误差量,根据需求自行调整
			vSpace : 5,	//间隔
			imgName : ['1.jpg', '2.jpg','3.jpg','4.png','5.jpg'],
			imgSize : {
				width: '400px',
				height: '200px',
			},
			blockSize : {
				width: '40px',
				height: '40px',
			},
			barSize : {
				width : '400px',
				height : '40px',
			},
			ready : function() {
			},
			success : function() {
				alert('验证成功,添加你自己的代码!');
				//......后续操作
			},
			error : function() {
	//		        	alert('验证失败!');
			}

		});


		$('#mpanel5').pointsVerify({
			defaultNum : 4,	//默认的文字数量
			checkNum : 2,	//校对的文字数量
			vSpace : 5,	//间隔
			imgName : ['1.jpg', '2.jpg','3.jpg','4.png','5.jpg'],
			imgSize : {
				width: '600px',
				height: '200px',
			},
			barSize : {
				width : '600px',
				height : '40px',
			},
			ready : function() {
			},
			success : function() {
				alert('验证成功,添加你自己的代码!');
				//......后续操作
			},
			error : function() {
	//		        	alert('验证失败!');
			}

		});

		$('#mpanel6').pointsVerify({
			defaultNum : 4,	//默认的文字数量
			checkNum : 2,	//校对的文字数量
			vSpace : 5,	//间隔
			imgName : ['1.jpg', '2.jpg','3.jpg','4.png','5.jpg'],
			imgSize : {
				width: '600px',
				height: '200px',
			},
			barSize : {
				width : '600px',
				height : '40px',
			},
			ready : function() {
			},
			success : function() {
				alert('验证成功,添加你自己的代码!');
				//......后续操作
			},
			error : function() {
	//		        	alert('验证失败!');
			}

		});


	</script>
</body>
</html>
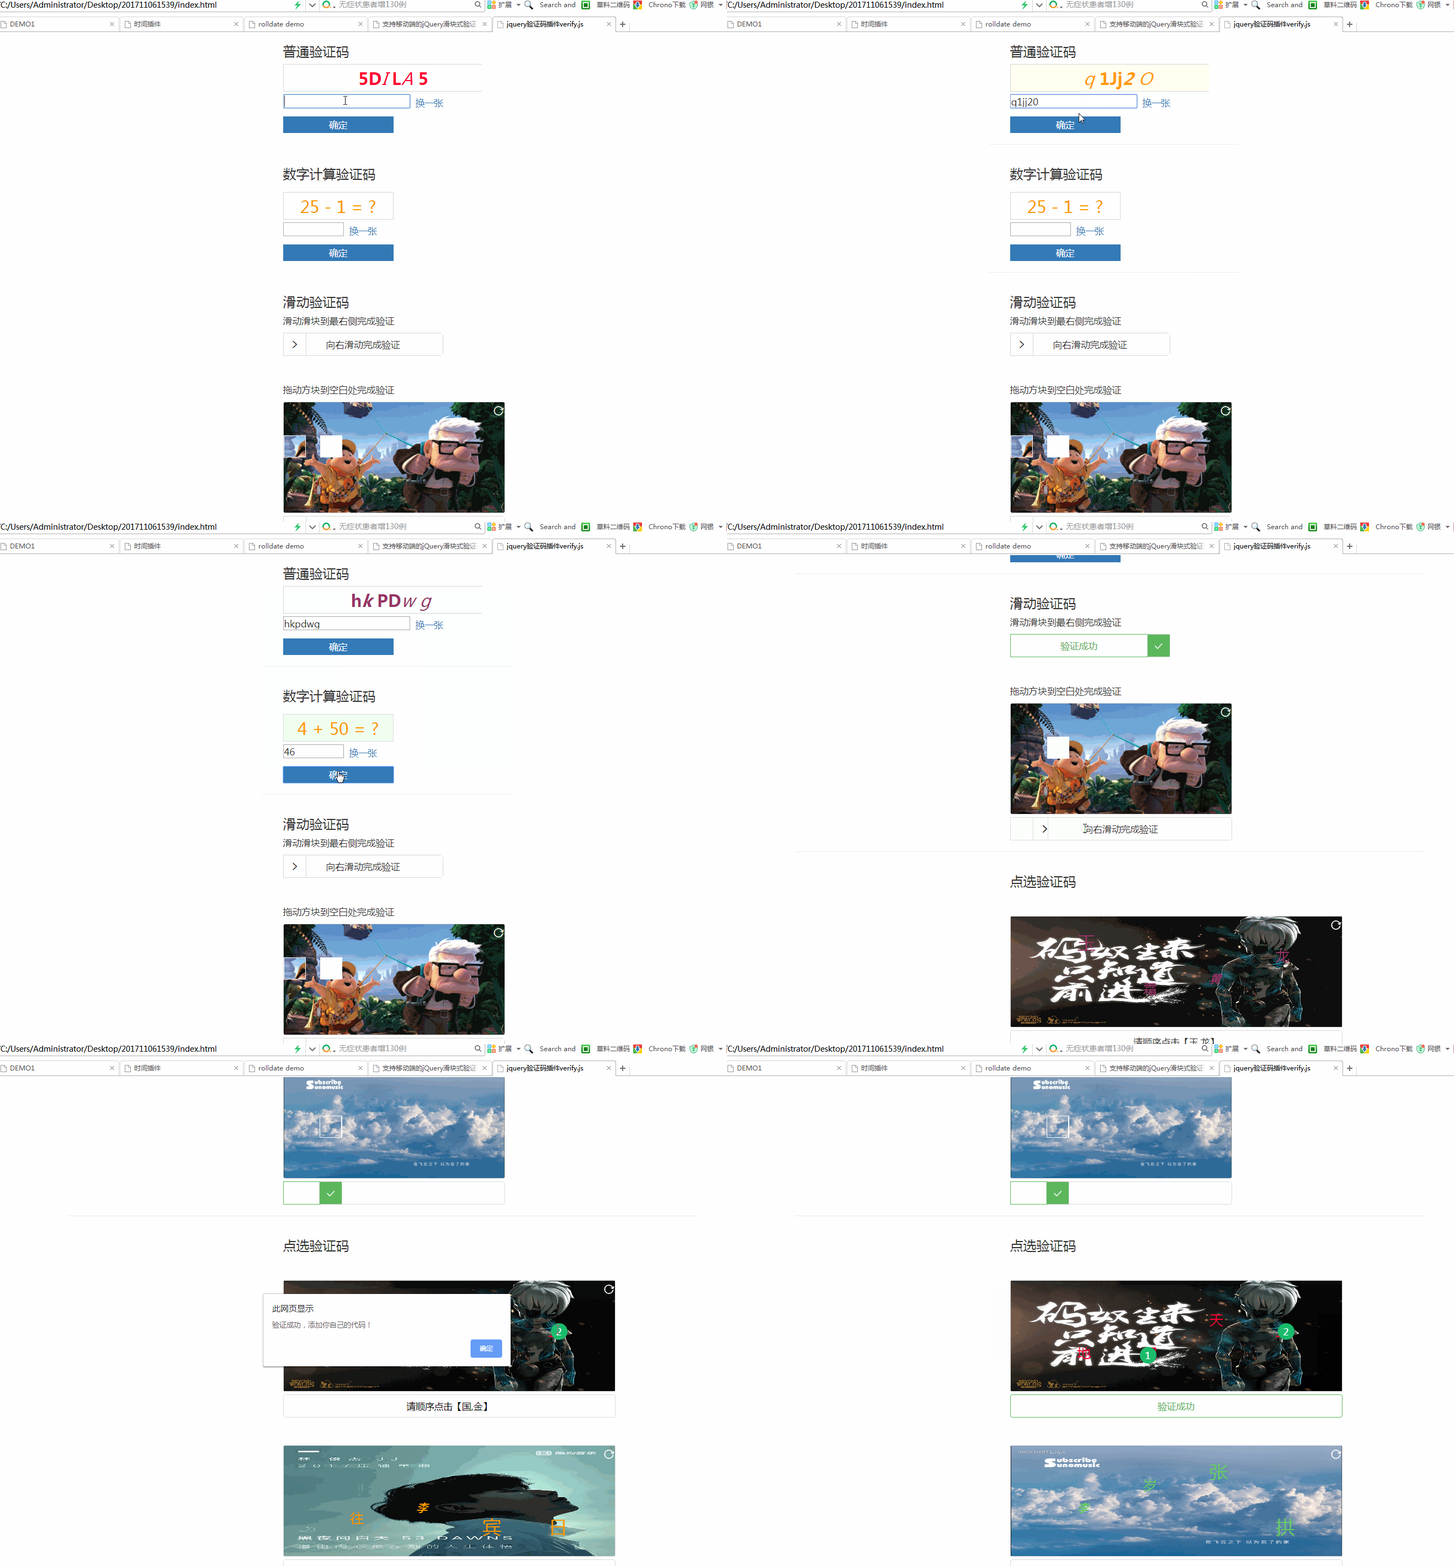
下面是实际的演示效果

提示:如果不需要在验证之后自动刷新验证码之后就可以注释掉verify.js文件的这个方法 this.setCode();
好了以上写的verify.js实现不同类型的验证码方式方法,希望本文的内容对大家的学习或者工作能带来一定的帮助,如果对你有用 点赞评论收藏 加关注^_^


